Page 156 of 460

2-43
New Vehicle ªBreak-Inº
NOTICE:
Your vehicle doesn't need an elaborate
ªbreak
-in.º But it will perform better in the long
run if you follow these guidelines:
�Don't drive at any one speed -- fast or
slow
-- for the first 500 miles (805 km).
Don't make full
-throttle starts.
�Avoid making hard stops for the first
200 miles (322 km) or so. During this time
your new brake linings aren't yet broken
in. Hard stops with new linings can mean
premature wear and earlier replacement.
Follow this breaking
-in guideline every
time you get new brake linings.
�Don't tow a trailer during break
-in.
See ªTowing a Trailerº in the Index for
more information.
Ignition Positions
With the key in the ignition, you can turn the switch to
five positions.
ACCESSORY (A): This is the position in which you can
operate your electrical power accessories. Press in the
ignition switch as you turn the top of the key toward you.
LOCK (B): This is the only position in which you can
remove the key. This position locks your steering wheel,
ignition and transaxle.
Page 157 of 460

2-44
NOTICE:
If your key seems stuck in LOCK and you can't
turn it, be sure you are using the correct key; if
so, is it all the way in? If it is, then turn the
steering wheel left and right while you turn the
key hard. But turn the key only with your hand.
Using a tool to force it could break the key or the
ignition switch. If none of this works, then your
vehicle needs service.
OFF (C): This position unlocks the steering wheel,
ignition and transaxle, but does not send electrical
power to any accessories. Use this position if your
vehicle must be pushed or towed, but never try to
push
-start your vehicle. A warning chime will sound if
you open the driver's door when the ignition is off and
the key is in the ignition.RUN (D): This is the position to which the switch
returns after you start your engine and release the
switch. The switch stays in RUN when the engine is
running. But even when the engine is not running,
you can use RUN to operate your electrical power
accessories, and to display some instrument panel
warning lights.
START (E): This position starts the engine. When the
engine starts, release the key. The ignition switch will
return to RUN for normal driving.
If the engine is not running, ACCESSORY and RUN are
positions that allow you to operate your electrical
accessories, such as the radio.
Retained Accessory Power (RAP)
With RAP, the power windows (option), the power rear
quarter windows (if equipped), audio system and the
optional electronic level control (ELC) will continue to
work up to 10 minutes after the ignition key is turned to
OFF and none of the doors are opened.
Page 171 of 460
 with the
parking brake firmly set. Your vehicle can roll.
Dont leave your vehicle when the eng")
2-58
CAUTION:
It can be dangerous to get out of your vehicle if
the shift lever is not fully in PARK (P) with the
parking brake firmly set. Your vehicle can roll.
Don't leave your vehicle when the engine is
running unless you have to. If you've left the
engine running, the vehicle can move suddenly.
You or others could be injured. To be sure your
vehicle won't move, even when you're on fairly
level ground, always set your parking brake and
move the shift lever to PARK (P).
Follow the proper steps to be sure your vehicle won't
move. See ªShifting Into PARK (P)º in the Index.
If you're pulling a trailer, see ªTowing a Trailerº in
the Index.
Horn
You can sound the horn by pressing the horn symbols on
your steering wheel.
Tilt Wheel
A tilt steering wheel allows you to adjust the steering
wheel before you drive. You can also raise it to the
highest level to give your legs more room when you exit
and enter the vehicle.
To tilt the wheel, hold the
steering wheel and pull the
lever located on the left side
of the steering wheel console.
Move the steering wheel to a comfortable level, then
release the lever to lock the wheel in place.
Page 172 of 460

2-59
Turn Signal/Multifunction Lever
The lever on the left side of the steering column
includes the following:
�Turn Signal and Lane
-Change Indicator
�Headlamp High/Low
-Beam Changer
�Flash
-to-Pass
�Windshield Wiper and Washer Control
�Cruise Control (Option)
Turn Signal and Lane-Change Indicator
The turn signal has two upward (for right) and two
downward (for left) positions. These positions allow you
to signal a turn or a lane change.
To signal a turn, move the lever all the way up or down.
When the turn is finished, the lever will return automatically.
An arrow on the instrument
panel cluster will flash in
the direction of the turn or
lane change.
To signal a lane change, just raise or lower the lever
until the arrow starts to flash. Hold it there until you
complete your lane change. The lever will return by
itself when you release it.
As you signal a turn or a lane change, if the arrow
flashes faster than normal, a signal bulb may be burned
out and other drivers won't see your turn signal.
Page 179 of 460
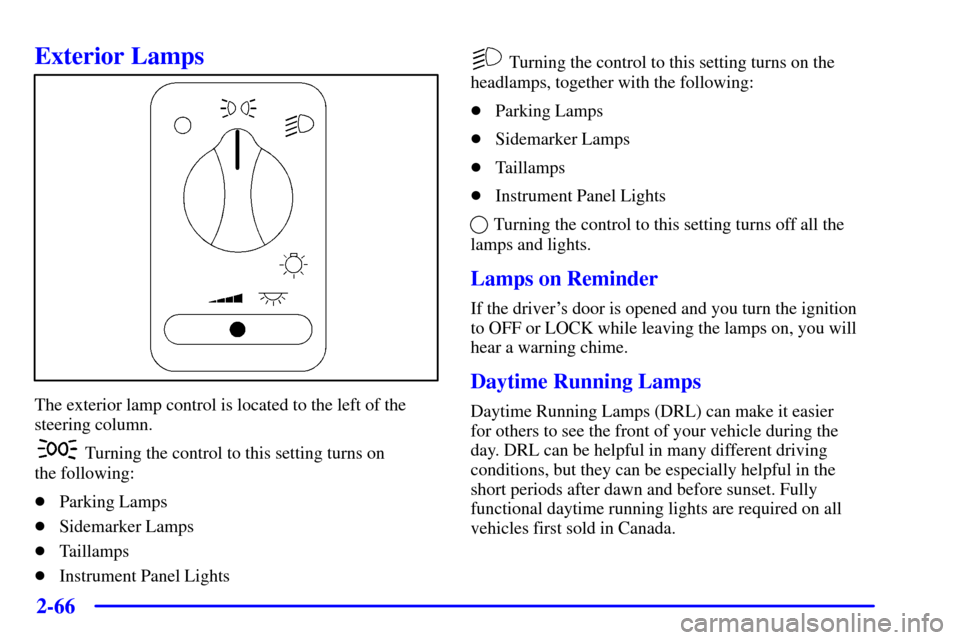
2-66
Exterior Lamps
The exterior lamp control is located to the left of the
steering column.
Turning the control to this setting turns on
the following:
�Parking Lamps
�Sidemarker Lamps
�Taillamps
�Instrument Panel Lights
Turning the control to this setting turns on the
headlamps, together with the following:
�Parking Lamps
�Sidemarker Lamps
�Taillamps
�Instrument Panel Lights
Turning the control to this setting turns off all the
lamps and lights.
Lamps on Reminder
If the driver's door is opened and you turn the ignition
to OFF or LOCK while leaving the lamps on, you will
hear a warning chime.
Daytime Running Lamps
Daytime Running Lamps (DRL) can make it easier
for others to see the front of your vehicle during the
day. DRL can be helpful in many different driving
conditions, but they can be especially helpful in the
short periods after dawn and before sunset. Fully
functional daytime running lights are required on all
vehicles first sold in Canada.
Page 201 of 460

2-88
Emergency Button: In an emergency situation,
press the emergency service button. Upon receiving the
call, an advisor at the center will locate your vehicle and
assess the situation. If necessary, the advisor will alert
the nearest emergency service provider.
Call ANSWER/END Button: Use this button
to answer a call. (If you are receiving a call, the audio
system will mute, and the ring will be heard). Press this
button at the end of a call to disconnect and return the
audio system to its previous settings. This button will
also cancel a call if one of the buttons is accidentally
pressed or if the automatic redial function is activated.
Volume Control: You can control the volume of the OnStar
System using either the volume control knob on the radio or,
if equipped, the steering wheel volume control.
Telltale Light: This light will indicate the status of
the system. A solid green light will come on when you
start the vehicle to let you know that the system is on
and is ready to make or receive calls.
If the light blinks green it means that an incoming or
outgoing call is in progress. Press the Call ANSWER/END
button if you notice the light blinking and you are not
on a call.The light will be red in the event of an OnStar system
malfunction. If this occurs press the OnStar button to
attempt to contact an advisor. If the connection is made,
the advisor will assist you with steps to take to make
sure that the system is functioning properly. If you
cannot contact the advisor, take your vehicle to your
dealership as soon as possible for assistance.
Safety and Security Services
�Automatic Notification of Air Bag
Deployment
-- If an air bag deploys, a priority
emergency signal is automatically sent to the center.
An advisor will locate your vehicle's position, try to
contact you and assist you in the situation. If the
center is unable to contact you, an emergency service
provider will be contacted.
�Stolen Vehicle Tracking
-- Call the center at
1
-888-4-ONSTAR (1-888-466-7827) to report your
vehicle stolen. The system can then locate and track
your vehicle and the advisor will be able to notify
the proper authorities.
�Roadside Assistance with Location
-- For vehicle
breakdowns, press the OnStar button. An advisor
will contact the appropriate help.
Page 279 of 460
4-
4-1
Section 4 Your Driving and the Road
Here you'll find information about driving on different kinds of roads and in varying weather conditions. We've also
included many other useful tips on driving.
4
-2 Defensive Driving
4
-3 Drunken Driving
4
-6 Control of a Vehicle
4
-6 Braking
4
-9 Traction Control System (Option)
4
-11 Steering
4
-13 Off-Road Recovery
4
-13 Passing
4
-15 Loss of Control
4
-16 Driving at Night4
-17 Driving in Rain and on Wet Roads
4
-20 City Driving
4
-21 Freeway Driving
4
-22 Before Leaving on a Long Trip
4
-23 Highway Hypnosis
4
-23 Hill and Mountain Roads
4
-25 Winter Driving
4
-29 Recreational Vehicle Towing
4
-30 Loading Your Vehicle
4
-32 Towing a Trailer
Page 284 of 460

4-6
Control of a Vehicle
You have three systems that make your vehicle go where
you want it to go. They are the brakes, the steering and
the accelerator. All three systems have to do their work
at the places where the tires meet the road.
Sometimes, as when you're driving on snow or ice, it's
easy to ask more of those control systems than the tires
and road can provide. That means you can lose control
of your vehicle. Also see ªTraction Control Systemº in
the Index.
Braking
Braking action involves perception time and
reaction time.
First, you have to decide to push on the brake pedal.
That's perception time. Then you have to bring up
your foot and do it. That's reaction time.
Average reaction time is about 3/4 of a second.
But that's only an average. It might be less with one
driver and as long as two or three seconds or more with
another. Age, physical condition, alertness, coordination
and eyesight all play a part. So do alcohol, drugs
and frustration. But even in 3/4 of a second, a vehicle
moving at 60 mph (100 km/h) travels 66 feet (20 m).
That could be a lot of distance in an emergency, so
keeping enough space between your vehicle and others
is important.
And, of course, actual stopping distances vary greatly
with the surface of the road (whether it's pavement or
gravel); the condition of the road (wet, dry, icy); tire
tread; the condition of your brakes; the weight of the
vehicle and the amount of brake force applied.