Page 267 of 468

4-45
Recreational Vehicle Towing
There may be times when you want to tow your vehicle
behind another vehicle for use at your destination.
Be sure to use the proper towing equipment designed
for recreational vehicle towing. Follow the instructions
for the towing equipment.
When towing your vehicle, turn the ignition to OFF. To
prevent your battery from draining while towing, remove
the IGN 0 fuse from the instrument panel fuse block.
Be sure to replace the fuse when you reach your destination.
See ªFuses and Circuit Breakersº in the Index.
Two-Wheel-Drive Vehicles
Tw o-wheel-drive vehicles, should not be towed
with all four wheels on the ground. Two
-wheel-drive
transmissions have no provisions for internal lubrication
while being towed. To properly tow these vehicles,
they should be placed on a platform trailer with all
four wheels off the ground.
In rare cases when it's unavoidable that a
two
-wheel-drive vehicle is to be towed with all four
wheels on the ground, the propeller shaft to axle yoke
orientation should be marked and the propeller shaft
removed following the applicable service manual
removal/installation procedure.
Dust or dirt can enter the back of the transmission
through the opening created by removing the propeller
shaft if proper protection is not provided. Also, check
the transmission fluid level before driving the truck.
Page 268 of 468

4-46 Four-Wheel-Drive Vehicles
CAUTION:
Shifting the transfer case into NEUTRAL can
cause your vehicle to roll even if the transmission
is in PARK (P), for an automatic transmission,
or if your vehicle is in gear, for a manual
transmission. You or others could be injured.
Make sure the parking brake is firmly set before
you shift the transfer case into NEUTRAL.
Use the following procedure to correctly tow your
vehicle on all four wheels:
1. Firmly set the parking brake.
2. Shift an automatic transmission to PARK (P),
or a manual transmission to FIRST (1).
3. Securely attach the vehicle being towed to the
tow vehicle.
4. Shift the transfer case to NEUTRAL (N).
See ªFour
-Wheel Driveº in the Index for the
proper procedure to select the neutral position for
your vehicle.
5. Release the parking brake only after the vehicle
being towed is firmly attached to the towing vehicle.
6. Turn the ignition to OFF. The OFF position unlocks
the steering column and reduces battery drain as long
as the IGN 0 fuse is removed. Unlocking the steering
column will allow the proper movement of the front
wheels and tires during towing.
Page 298 of 468

4-76 Parking on Hills
CAUTION:
You really should not park your vehicle, with a
trailer attached, on a hill. If something goes
wrong, your rig could start to move. People can
be injured, and both your vehicle and the trailer
can be damaged.
But if you ever have to park your rig on a hill, here's
how to do it:
1. Apply your regular brakes, but don't shift into
PARK (P) yet for an automatic transmission,
or into gear for a manual transmission.
2. Have someone place chocks under the trailer wheels.
3. When the wheel chocks are in place, release the
regular brakes until the chocks absorb the load.
4. Reapply the regular brakes. Then apply your
parking brake and shift into PARK (P) for an
automatic transmission, or REVERSE (R) for a
manual transmission.5. If you have a four
-wheel-drive vehicle, be sure
the transfer case is in a drive gear and not in
NEUTRAL (N).
6. Release the regular brakes.
CAUTION:
It can be dangerous to get out of your vehicle if
the shift lever is not fully in PARK (P) with the
parking brake firmly set. Your vehicle can roll.
If you have left the engine running, the vehicle
can move suddenly. You or others could be
injured. To be sure your vehicle won't move,
even when you're on fairly level ground, use the
steps that follow.
Always put the shift lever fully in PARK (P) with
the parking brake firmly set.
If the transfer case on four-wheel drive vehicles
is in NEUTRAL, your vehicle will be free to roll,
even if your shift lever is in PARK (P). So, be
sure the transfer case is in a drive gear
-- not
in NEUTRAL.
Page 301 of 468

4-79
The eight-wire harness contains the following
trailer circuits:
�Yellow: Left Stop/Turn Signal
�Dark Green: Right Stop/Turn Signal
�Brown: Taillamps
�White: Ground
�Light Green: Back
-up Lamps
�Light Blue: CHMSL
�Red: Battery Feed
�Dark Blue: Trailer Brake
A jumper harness for an electric trailer brake controller
and a trailer battery feed fuse are included with this
trailering package. (See ªInstrument Panel Jumper
Wiring Harnessº later in this section.)
If you need to tow a light
-duty trailer with a standard
four
-way round pin connector, an adapter connector is
available from your dealer.Camper/Fifth
-Wheel Trailer Wiring Package
(If Equipped)
The eight
-wire camper harness is located under the
front edge of the pickup box on the driver's side of the
vehicle, attached to the frame bracket. A connector will
have to be added to the wiring harness which connects
to the camper.
The eight
-wire harness contains the following
camper/trailer circuits:
�Yellow: Left Stop/Turn Signal
�Dark Green: Right Stop/Turn Signal
�Brown: Taillamps
�White: Ground
�Light Green: Back
-up Lamps
�Light Blue: Center High
-Mounted
Stoplamp (CHMSL)
�Red: Battery Feed
�Dark Blue: Trailer Brake
A jumper harness for an electric trailer brake controller
and a trailer battery feed fuse are included with this
trailering package. (See ªInstrument Panel Jumper
Wiring Harnessº later in this section.)
Page 310 of 468
5-4
2. Get the vehicles close enough so the jumper cables
can reach, but be sure the vehicles aren't touching
each other. If they are, it could cause a ground
connection you don't want. You wouldn't be able
to start your vehicle, and the bad grounding could
damage the electrical systems.
To avoid the possibility of the vehicles rolling, set the
parking brake firmly on both vehicles involved in the
jump start procedure. Put an automatic transmission in
PARK (P) or a manual transmission in NEUTRAL (N).
If you have a four
-wheel-drive vehicle, be sure the
transfer case is not in NEUTRAL (N).
3. Turn off the ignition on both vehicles. Unplug
unnecessary accessories plugged into the cigarette
lighter or accessory power outlets. Turn off all lamps
that aren't needed as well as radios. This will avoid
sparks and help save both batteries. In addition,
it could save your radio!
NOTICE:
If you leave your radio on, it could be badly
damaged. The repairs wouldn't be covered by
your warranty.
4. Open the hoods and locate the positive (+) and
negative (
-) terminal locations on the other vehicle.
Your vehicle has a remote positive (+) jump starting
terminal and a remote negative (
-) jump starting
terminal. The remote positive (+) terminal is located
behind a red plastic cover near the engine accessory
drive bracket. To uncover the remote positive (+)
terminal, open the red plastic cover.
On all V8 gasoline and diesel engines, the remote
negative (
-) terminal is located on the engine
accessory drive bracket. This is marked ªGNDº on
V8 engines. On V6 engines, the remote negative (
-)
terminal is located on a tab attached to the engine
accessory drive bracket where it is marked ªGNDº.
You should always use the remote positive (+)
and the remote negative (
-) terminals instead of
the positive (+) and negative (
-) terminals on
your battery.
Page 325 of 468
5-19
Changing a Flat Tire
If a tire goes flat, avoid further tire and wheel damage
by driving slowly to a level place. Turn on your hazard
warning flashers.
CAUTION:
Changing a tire can cause an injury. The vehicle
can slip off the jack and roll over you or other
people. You and they could be badly injured.
Find a level place to change your tire. To help
prevent the vehicle from moving:
1. Set the parking brake firmly.
2. Put an automatic transmission shift lever in
PARK (P) or shift a manual transmission
to FIRST (1) or REVERSE (R).
3. If you have a four
-wheel-drive vehicle,
be sure the transfer case is in a drive
gear
-- not in NEUTRAL.
CAUTION: (Continued)
CAUTION: (Continued)
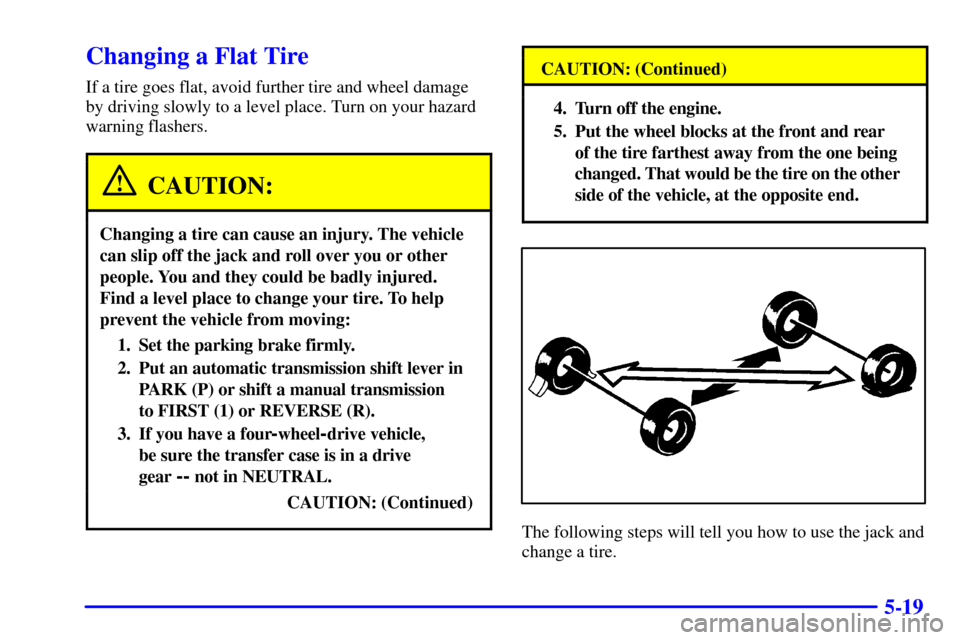
4. Turn off the engine.
5. Put the wheel blocks at the front and rear
of the tire farthest away from the one being
changed. That would be the tire on the other
side of the vehicle, at the opposite end.
The following steps will tell you how to use the jack and
change a tire.
Page 341 of 468
5-35 Rocking Your Vehicle To Get It Out
First, turn your steering wheel left and right. That will
clear the area around your front wheels. If you have a
four
-wheel drive vehicle, shift into 4HI. If your vehicle
has the Traction Assist System, you should turn it off
by pressing the TAS on/off button. Then shift back
and forth between REVERSE (R) and a forward gear
(or with a manual transmission, between FIRST (1) or
SECOND (2) and REVERSE (R)), spinning the wheels
as little as possible. Release the accelerator pedal while
you shift, and press lightly on the accelerator pedal
when the transmission is in gear. By slowly spinning
your wheels in the forward and reverse directions, you
will cause a rocking motion that may free your vehicle.
If that doesn't get you out after a few tries, you may
need to be towed out. Or, you can use your recovery
hooks if your vehicle has them. If you do need to be
towed out, see ªTowing Your Vehicleº in the Index.
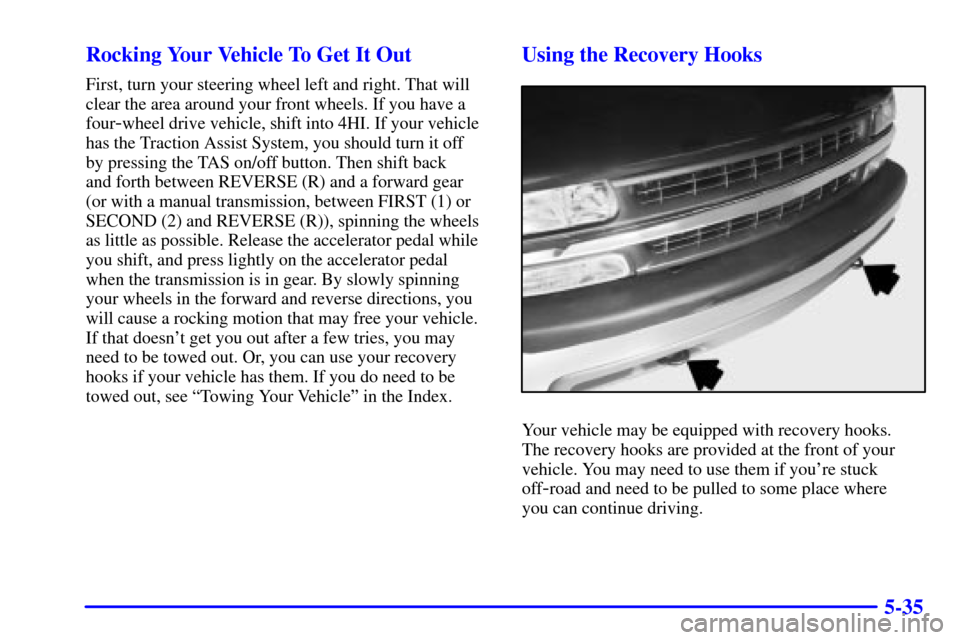
Using the Recovery Hooks
Your vehicle may be equipped with recovery hooks.
The recovery hooks are provided at the front of your
vehicle. You may need to use them if you're stuck
off
-road and need to be pulled to some place where
you can continue driving.
Page 343 of 468
6-
6-1
Section 6 Service and Appearance Care
Here you will find information about the care of your vehicle. This section begins with service and fuel information,
and then it shows how to check important fluid and lubricant levels. There is also technical information about your
vehicle, and a part devoted to its appearance care.
6
-2 Service
6
-3 Fuel
6
-5 Fuels in Foreign Countries
6
-6 Filling Your Tank
6
-8 Checking Things Under the Hood
6
-13 Noise Control System
6
-14 Engine Oil
6
-18 Engine Air Cleaner/Filter
6
-20 Passenger Compartment Air Filter
(If Equipped)
6
-21 Automatic Transmission Fluid
(Except Allison Transmission)
6
-25 Automatic Transmission Fluid
(Allison� Only)
6
-28 Manual Transmission Fluid
6
-30 Hydraulic Clutch
6
-30 Rear Axle
6
-31 Four-Wheel Drive6
-33 Engine Coolant
6
-36 Coolant Surge Tank Pressure Cap
6
-36 Power Steering Fluid
6
-38 Windshield Washer Fluid
6
-39 Brakes
6
-43 Battery
6
-43 Bulb Replacement
6
-51 Windshield Wiper Blade Replacement
6
-52 Tires
6
-62 Appearance Care
6
-62 Cleaning the Inside of Your Vehicle
6
-65 Cleaning the Outside of Your Vehicle
6
-69 GM Vehicle Care/Appearance Materials
6
-70 Vehicle Identification Number (VIN)
6
-71 Electrical System
6
-79 Replacement Bulbs
6
-80 Capacities and Specifications