Page 363 of 468

6-21
3. Remove the air filter by pulling downward on the
element. Remove the second portion of the air filter
by sliding it towards the rear of the vehicle and then
pulling downward.
4. Install the new filter by reversing the steps listed
previously. Be sure to follow any instructions that
may be included in the replacement filter package.
Because this procedure can be a little difficult,
you may choose to have it done at your dealer's
service department.
Refer to the Maintenance Schedule to determine
when to replace the passenger compartment air filter.
See ªScheduled Maintenanceº in the Index.Automatic Transmission Fluid
(Except Allison Transmission)
When to Check and Change
A good time to check your automatic transmission fluid
level is when the engine oil is changed.
Change both the fluid and filter every 50,000 miles
(83 000 km) if the vehicle's GVWR is over 8,600 or
if the vehicle is mainly driven under one or more of
these conditions:
�In heavy city traffic where the outside temperature
regularly reaches 90�F (32�C) or higher.
�In hilly or mountainous terrain.
�When doing frequent trailer towing.
�Uses such as found in taxi, police or delivery service.
If you do not use your vehicle under any of
these conditions, change the fluid and filter every
100,000 miles (166 000 km).
See ªScheduled Maintenance Servicesº in the Index.
Page 365 of 468
6-23
Checking the Fluid Level
Prepare your vehicle as follows:
�Park your vehicle on a level place. Keep the
engine running.
�With the parking brake applied, place the shift lever
in PARK (P).
�With your foot on the brake pedal, move the shift
lever through each gear range, pausing for about
three seconds in each range. Then, position the
shift lever in PARK (P).
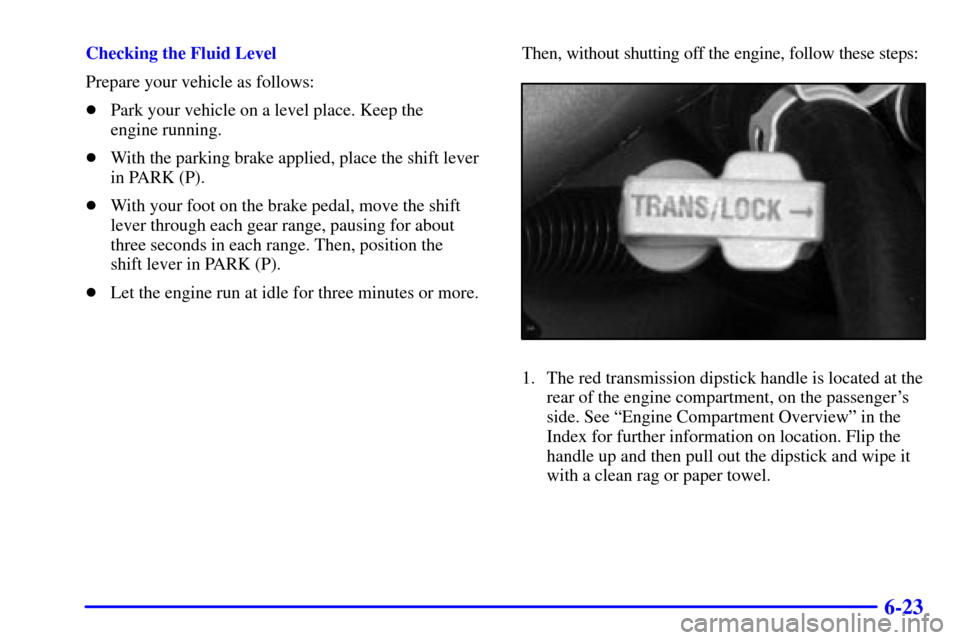
�Let the engine run at idle for three minutes or more.Then, without shutting off the engine, follow these steps:
1. The red transmission dipstick handle is located at the
rear of the engine compartment, on the passenger's
side. See ªEngine Compartment Overviewº in the
Index for further information on location. Flip the
handle up and then pull out the dipstick and wipe it
with a clean rag or paper towel.
Page 366 of 468

6-24
2. Push it back in all the way, wait three seconds and
then pull it back out again.
3. Check both sides of the dipstick, and read the lower
level. The fluid level must be in the COLD area,
below the cross
-hatched area, for a cold check or in
the HOT area or cross
-hatched area for a hot check.
4. If the fluid level is in the acceptable range, push the
dipstick back in all the way; then flip the handle
down to lock the dipstick in place.
How to Add Fluid
Refer to the Maintenance Schedule to determine what
kind of transmission fluid to use. See ªRecommended
Fluids and Lubricantsº in the Index.
Add fluid only after checking the transmission fluid while
it is hot. (A cold check is used only as a reference.)
If the fluid level is low, add only enough of the proper
fluid to bring the level up to the HOT area for a hot
check. It doesn't take much fluid, generally less than
one pint (0.5 L). Don't overfill.
NOTICE:
We recommend you use only fluid labeled
DEXRON�-III, because fluid with that label is
made especially for your automatic transmission.
Damage caused by fluid other than DEXRON
�-III
is not covered by your new vehicle warranty.
�After adding fluid, recheck the fluid level as
described under ªHow to Check.º
�When the correct fluid level is obtained, push the
dipstick back in all the way; then flip the handle
down to lock the dipstick in place.
Page 367 of 468

When to Check and Change
A good time to check your automatic transmission fluid
level is when the engine oil is changed.
Change both the fluid and fil")
6-25
Automatic Transmission Fluid
(Allison� Only)
When to Check and Change
A good time to check your automatic transmission fluid
level is when the engine oil is changed.
Change both the fluid and filter every 25,000 miles
(41 500 km) if the vehicle is mainly driven under one
or more of these conditions:
�In heavy city traffic where the outside temperature
regularly reaches 90�F (32�C) or higher.
�In hilly or mountainous terrain.
�When doing frequent trailer towing.
�Uses such as found in taxi, police or delivery service.
If you do not use your vehicle under any of these conditions,
change the fluid and filter every 50,000 miles (83 000 km).
See ªScheduled Maintenance Servicesº in the Index.
How to Check
Because this operation can be a little difficult, you
may choose to have this done at the dealership
service department.
If you do it yourself, be sure to follow all the instructions
here, or you could get a false reading on the dipstick.
NOTICE:
Too much or too little fluid can damage your
transmission. Too much can mean that some of
the fluid could come out and fall on hot engine
parts or exhaust system parts, starting a fire.
Be sure to get an accurate reading if you check
your transmission fluid.
Wait at least 30 minutes before checking the
transmission fluid level if you have been driving:
�When outside temperatures are above 90�F (32�C).
�At high speed for quite a while.
�In heavy traffic
-- especially in hot weather.
�While pulling a trailer.
Page 370 of 468

6-28 How to Add Fluid
Refer to the Maintenance Schedule to determine what
kind of transmission fluid to use. See ªRecommended
Fluids and Lubricantsº in the Index.
Add fluid only after checking the transmission fluid while
it is hot. (A cold check is used only as a reference.)
If the fluid level is low, add only enough of the proper
fluid to bring the level up to the HOT area for a hot
check. It doesn't take much fluid, generally less than
one pint (0.5 L). Don't overfill.
NOTICE:
We recommend you use only fluid labeled
DEXRON�-III, because fluid with that label is
made especially for your automatic transmission.
Damage caused by fluid other than DEXRON
�-III
is not covered by your new vehicle warranty.
�After adding fluid, recheck the fluid level as
described under ªHow to Check.º
�When the correct fluid level is obtained,
push the dipstick back in all the way.
Manual Transmission Fluid
When to Check
A good time to have it checked is when the engine oil
is changed. See your maintenance schedule to find out
when to change your transmission fluid.
How to Check
Because this operation can be a little difficult, you
may choose to have this done at your GM dealership
service department.
If you do it yourself, be sure to follow all the
instructions here, or you could get a false reading.
NOTICE:
Too much or too little fluid can damage your
transmission. Too much can mean that some of
the fluid could come out and fall on hot engine
parts or exhaust system parts, starting a fire.
Be sure to get an accurate reading if you check
your transmission fluid.
Page 371 of 468
6-29
Check the fluid level only when your engine is off, the
vehicle is parked on a level place and the transmission is
cool enough for you to rest your fingers on the
transmission case.
Then, follow these steps:
5-Speed for VORTEC 4300 V6 and 4800 V8 engines
shown, other manual transmissions similar1. Remove the filler plug.
2. Check that the lubricant level is up to the bottom
of the filler plug hole.
3. If the fluid level is good, install the plug and be sure
it is fully seated. If the fluid level is low, add more
fluid as described in the next steps.
How to Add Fluid
Here's how to add fluid. Refer to the Maintenance
Schedule to determine what kind of fluid to use. See
ªRecommended Fluids and Lubricantsº in the Index.
1. Remove the filler plug.
2. Add fluid at the filler plug hole. Add only enough
fluid to bring the fluid level up to the bottom of the
filler plug hole.
3. Install the filler plug. Be sure the plug is fully seated.
Page 372 of 468

6-30
Hydraulic Clutch
The hydraulic clutch linkage in your vehicle is
self
-adjusting. The clutch master cylinder reservoir is
filled with hydraulic clutch fluid.
It is not necessary to regularly check clutch fluid unless
you suspect there is a leak in the system. Adding fluid
won't correct a leak.
A fluid loss in this system could indicate a problem.
Have the system inspected and repaired.
When to Check and What to Use
Refer to the Maintenance
Schedule to determine how
often you should check the
fluid level in your clutch
master cylinder reservoir
and for the proper fluid.
See ªOwner Checks
and Servicesº and
ªRecommended Fluids and
Lubricantsº in the Index.
How to Check and Add Fluid
The proper fluid should be added if the level does not
reach the bottom of the diaphragm when it's in place in
the reservoir. See the instructions on the reservoir cap.
Rear Axle
When to Check Lubricant
Refer to the Maintenance Schedule to determine
how often to check the lubricant. Additional rear axle
scheduled maintenance is required when trailer towing.
See ªScheduled Maintenance Servicesº in the Index for
more information.
Page 373 of 468
6-31 How to Check Lubricant
1500 Series shown, 2500 LD Series similar.
2500 HD and 3500 Series located on rear axle cover.
The proper level for the 1500 Series is from 5/8 inch to
1 5/8 inch (15 mm to 40 mm) below the filler plug.
The proper level for the 2500/3500 Series is from
0 to 3/8 inch (0 to 10 mm) below the filler plug.
Add only enough fluid to reach the proper level.
What to Use
Refer to the Maintenance Schedule to determine what
kind of lubricant to use. See ªRecommended Fluids and
Lubricantsº in the Index.
Four-Wheel Drive
Most lubricant checks in this section also apply to
four
-wheel-drive vehicles. However, they have two
additional systems that need lubrication.
Transfer Case
When to Check Lubricant
Refer to the Maintenance Schedule to determine how
often to check the lubricant. See ªPeriodic Maintenance
Inspectionsº in the Index.
How to Check Lubricant
Manual Transfer Case