Page 259 of 383
5-16
1. You can remove the coolant surge tank pressure cap
when the cooling system, including the coolant surge
tank pressure cap and upper radiator hose, is no
longer hot. Turn the pressure cap slowly
counterclockwise (left) about one
-quarter turn and
then stop.
If you hear a hiss, wait for that to stop. A hiss means
there is still some pressure left.
2. Then keep turning the pressure cap slowly, and
remove it.
3. Then fill the coolant surge tank with the proper
mixture, to the FULL COLD mark on the coolant
surge tank.
Page 266 of 383
 tire pressure cannot be
reached after")
5-23
NOTICE:
Do not allow the air compressor to operate
continuously for more than 6 minutes to help
prevent damage from overheating.
NOTICE:
If 26 psi (179 kPa) tire pressure cannot be
reached after 6 minutes, the vehicle should not be
driven further. Damage to the tire is severe and
the sealant will not be effective. Remove the air
compressor plug from the accessory power outlet
and unscrew the inflating hose from the tire
valve. See ªRoadside Assistanceº in the Index.
If 26 psi (179 kPa) tire pressure is reached in 6 minutes
or less, disconnect the air compressor and attach the
enclosed maximum speed label to the inside upper
lefthand corner of the windshield or to the face of
the radio/clock.
The maximum speed
label reminds you to
drive cautiously and
not to exceed 55 mph
(90 km/h) until you
have the damaged tire
inspected and repaired.
Place the air compressor pump and accessories into the
inflator kit case and store in the hatch/trunk
compartment area of your vehicle.
Page 276 of 383
6-7
If your fuel filler door release won't operate, there is a
manual release tab. The tab is located against the upper
trim on the driver's side in the rear compartment. Pull
the tab to manually release the fuel filler door.While refueling, rest the tether across the tab on the fuel
filler door to prevent damage to your vehicle's finish.
To remove the cap, turn it slowly to the left
(counterclockwise). The cap has a spring in it; if you let
go of the cap too soon, it will spring back to the right.
Page 277 of 383

6-8
CAUTION:
If you get gasoline on yourself and then
something ignites it, you could be badly burned.
Gasoline can spray out on you if you open the
fuel filler cap too quickly. This spray can happen
if your tank is nearly full, and is more likely in
hot weather. Open the fuel filler cap slowly and
wait for any ªhissº noise to stop. Then unscrew
the cap all the way.
Be careful not to spill gasoline. Clean gasoline from
painted surfaces as soon as possible. See ªCleaning the
Outside of Your Vehicleº in the Index.When you put the cap back on, turn it to the
right (clockwise) until you hear a clicking sound. Make
sure you fully install the cap. The diagnostic system can
determine if the fuel cap has been left off or improperly
installed. This would allow fuel to evaporate into the
atmosphere. See ªMalfunction Indicator Lampº in
the Index.
NOTICE:
If you need a new cap, be sure to get the right
type. Your dealer can get one for you. If you get
the wrong type, it may not fit properly. This may
cause your malfunction indicator lamp to light
and your fuel tank and emissions system may be
damaged. See ªMalfunction Indicator Lampº in
the Index.
Page 303 of 383
6-34 Headlamps
1. The headlamp doors need to be halfway open. Turn
the headlamps on, then quickly back to the parking
lamps setting. You may have to do this a few times
to get the half
-open position.
You can also open the headlamp doors manually by
turning the adjuster counterclockwise.
2. Remove the screws using a screwdriver on each side
of the headlamp bezel.
3. Open the hood.
4. To remove the bezel, pull the sides slightly outward
and tilt the bezel forward. Pull the clip centered
above the lens outward. Be careful not to scratch
the paint.
Page 304 of 383
6-35
5. Reach behind the lamp and turn the bulb
counterclockwise to remove it. Don't touch the
halogen bulbs. The inner bulb is the high beam and
the outer bulb is the low beam.
6. Disconnect the desired bulb from the wiring harness.
7. Reverse the steps listed previously with a new bulb.
Rear Turn Signal and Taillamps
A. Back-up Lamp
B. Inboard Taillamp
C. Outboard Taillamp
Page 305 of 383
6-36
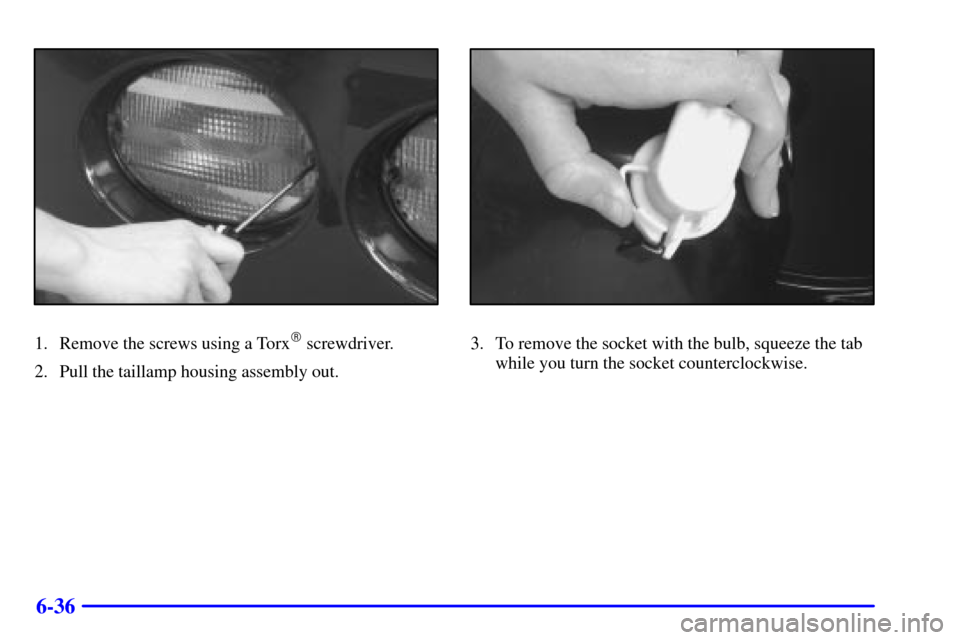
1. Remove the screws using a Torx� screwdriver.
2. Pull the taillamp housing assembly out.3. To remove the socket with the bulb, squeeze the tab
while you turn the socket counterclockwise.
Page 306 of 383
6-37
4. Remove the bulb from the socket.
5. Reverse the steps listed previously with a new bulb.
Back-Up Lamps
You can access the back-up lamps through the inboard
taillamp opening. See ªRear Turn Signal and Taillampsº
in the Index.
1. Squeeze the tab on the socket while turning it
counterclockwise to remove it from the assembly.
2. Remove the bulb from the socket.
3. Reverse the steps listed previously with a new bulb.