Page 247 of 388
5-29
12. Lower the vehicle by turning the ratchet
counterclockwise. Lower the jack completely.
13. Tighten the wheel
nuts firmly in a
crisscross sequence
as shown. Turn the
ratchet clockwise
with the UP mark
facing you.
Page 248 of 388
5-30
CAUTION:
Incorrect wheel nuts or improperly tightened
wheel nuts can cause the wheel to become loose
and even come off. This could lead to an accident.
Be sure to use the correct wheel nuts. If you have
to replace them, be sure to get new GM original
equipment wheel nuts.
Stop somewhere as soon as you can and
have the nuts tightened with a torque wrench
to 100 lb
-ft (140 N´m).
NOTICE:
Improperly tightened wheel nuts can lead to
brake pulsation and rotor damage. To avoid
expensive brake repairs, evenly tighten the wheel
nuts in the proper sequence and to the proper
torque specification.
14. Remove the wheel blocks.
NOTICE:
Wheel covers won't fit on your compact spare.
If you try to put a wheel cover on your compact
spare, you could damage the cover or the spare.
Page 258 of 388
6-6
To remove the cap, turn it slowly to the left
(counterclockwise). The cap has a spring in it; if you let
go of the cap too soon, it will spring back to the right.
CAUTION:
If you get gasoline on yourself and then
something ignites it, you could be badly burned.
Gasoline can spray out on you if you open the
fuel filler cap too quickly. This spray can happen
if your tank is nearly full, and is more likely in
hot weather. Open the fuel filler cap slowly and
wait for any ªhissº noise to stop. Then unscrew
the cap all the way.
Be careful not to spill gasoline. Clean gasoline from
painted surfaces as soon as possible. See ªCleaning the
Outside of Your Vehicleº in the Index.
Page 259 of 388

6-7
When you put the cap back on, turn it to the right
(clockwise) until you hear a clicking sound. Make sure
you fully install the cap. The diagnostic system can
determine if the fuel cap has been left off or improperly
installed. This would allow fuel to evaporate into the
atmosphere. See ªMalfunction Indicator Lampº in
the Index.
NOTICE:
If you need a new cap, be sure to get the right
type. Your dealer can get one for you. If you get
the wrong type, it may not fit properly. This may
cause your malfunction indicator lamp to light
and your fuel tank and emissions system may be
damaged. See ªMalfunction Indicator Lampº in
the Index.
Filling a Portable Fuel Container
CAUTION:
Never fill a portable fuel container while it is in
your vehicle. Static electricity discharge from the
container can ignite the gasoline vapor. You can
be badly burned and your vehicle damaged if this
occurs. To help avoid injury to you and others:
�Dispense gasoline only into
approved containers.
�Do not fill a container while it is inside a
vehicle, in a vehicle's trunk, pickup bed or
on any surface other than the ground.
�Bring the fill nozzle in contact with the
inside of the fill opening before operating
the nozzle. Contact should be maintained
until the filling is complete.
�Don't smoke while pumping gasoline.
Page 275 of 388

6-23
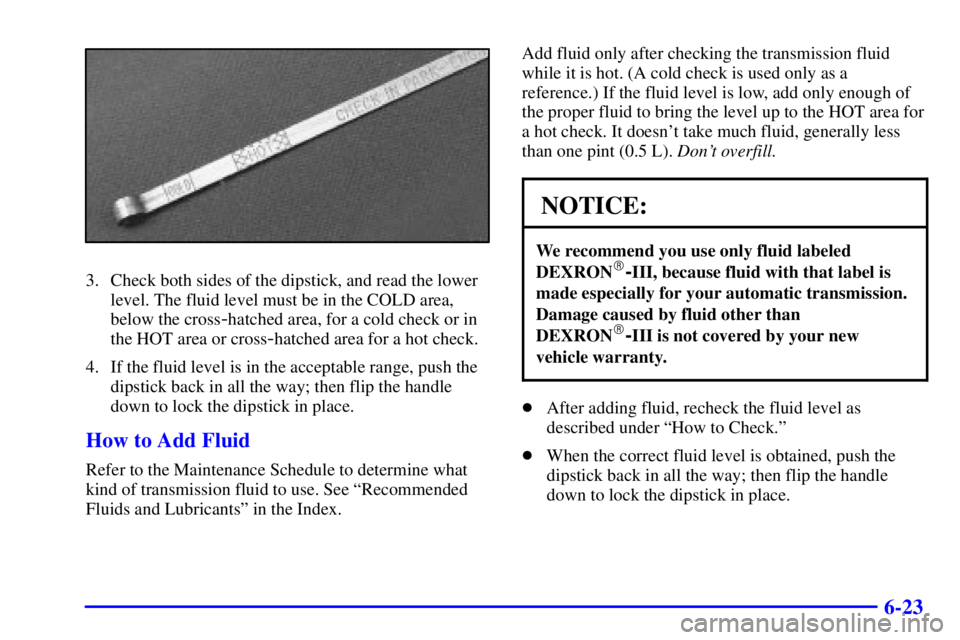
3. Check both sides of the dipstick, and read the lower
level. The fluid level must be in the COLD area,
below the cross
-hatched area, for a cold check or in
the HOT area or cross
-hatched area for a hot check.
4. If the fluid level is in the acceptable range, push the
dipstick back in all the way; then flip the handle
down to lock the dipstick in place.
How to Add Fluid
Refer to the Maintenance Schedule to determine what
kind of transmission fluid to use. See ªRecommended
Fluids and Lubricantsº in the Index.Add fluid only after checking the transmission fluid
while it is hot. (A cold check is used only as a
reference.) If the fluid level is low, add only enough of
the proper fluid to bring the level up to the HOT area for
a hot check. It doesn't take much fluid, generally less
than one pint (0.5 L). Don't overfill.
NOTICE:
We recommend you use only fluid labeled
DEXRON�-III, because fluid with that label is
made especially for your automatic transmission.
Damage caused by fluid other than
DEXRON
�-III is not covered by your new
vehicle warranty.
�After adding fluid, recheck the fluid level as
described under ªHow to Check.º
�When the correct fluid level is obtained, push the
dipstick back in all the way; then flip the handle
down to lock the dipstick in place.
Page 292 of 388
6-40
7. Turn the halogen
bulb counterclockwise
to remove it from
the assembly.
8. Install the new bulb into the composite assembly by
turning it clockwise until it is completely tightened.
9. Reinstall the composite assembly by installing and
tightening all of the screws previously removed.Front Turn Signal Lamps
1. Remove the two screws at the inside edge of the
parking/turn signal lamp assembly.
2. Remove the lamp assembly.
3. Squeeze the tab on
the side of the lamp
socket while turning the
socket counterclockwise.
4. Pull the socket out of the lamp assembly.
5. Pull the bulb from the socket.
6. Gently push the new bulb into the socket.
7. Put the socket back into the lamp assembly and turn
it clockwise until it locks.
8. Put the parking/turn signal lamp assembly back into
the vehicle and tighten the screws.
Page 294 of 388
6-42
4. Press the tab and
turn the socket
counterclockwise
to remove the socket
from the bezel.
If the socket does not
have a tab, turn the
socket counterclockwise
to remove the socket
from the bezel.
5. Remove the old bulb from the socket and replace it
with a new one.
6. Reverse Steps 1 through 4 to reinstall the taillamp.Windshield Wiper
Blade Replacement
Windshield wiper blades should be inspected at least
twice a year for wear and cracking. See ªWiper Blade
Checkº in the Index for more information.
To replace your windshield
wiper blade inserts, lift
the wiper arm away from
the windshield.
Pinch the two tabs on the wiper arm and slide the insert
out of the blade. Slide the new one in place. Make sure
the tabs are locked into position. See ªNormal
Maintenance Replacement Partsº in the Index for the
proper type of replacement blade.
Page 313 of 388

6-61 Fuses and Circuit Breakers
The wiring circuits in your vehicle are protected from
short circuits by a combination of fuses, circuit breakers
and fusible thermal links. This greatly reduces the
chance of fires caused by electrical problems.
Look at the silver
-colored band inside the fuse. If the
band is broken or melted, replace the fuse. Be sure you
replace a bad fuse with a new one of the identical size
and rating.
Spare fuses and a fuse puller are located in the
underhood electrical center. You can remove fuses with
the fuse puller. Remember to replace any of the spare
fuses you use, so you will have some if you ever need
them again.If you ever have a problem on the road and don't have a
spare fuse, you can borrow one that has the same
amperage. Just pick some feature of your vehicle that
you can get along without
-- like the radio or cigarette
lighter
-- and use its fuse, if it is the correct amperage.
Replace it as soon as you can.
There are two fuse blocks in your vehicle: one is inside
the vehicle and one is in the engine compartment.