Page 6 of 371
iv
Fuel
Checking Fluids and Lubricants
GM Oil Life System™
Engine Air Cleaner/Filter
Brakes
Bulb ReplacementWindshield Wiper Blade Replacement
Tires and Wheels
Appearance Care
Electrical System/Fuses and Circuit Breakers
Capacities and Specifications
Normal Maintenance Replacement Parts
Table of Contents (cont'd)
Maintenance Schedule Service and Appearance Care
Section
6
Scheduled Maintenance
Owner Checks and Services
Periodic Maintenance InspectionsRecommended Fluids and Lubricants
Maintenance Records
See separate Maintenance Schedule Booklet
Page 158 of 371

2-91
LF-RF-LR-RR TIRE (If Equipped): On vehicles
equipped with the Tire Pressure Monitor, this message
shows the tire pressure for each tire (left front, right
front, left rear and right rear). Pressing the INFO button
will scroll through the tire pressure for each of the
four tires, such as the following:
�34 PSI LF TIRE OK or
�234 kPa LF TIRE OK
If a tire pressure is below 24 PSI (165 kPa) or above
36 PSI (248 kPa), the message will appear as shown
above except it will show TIRE LOW or TIRE HIGH as
appropriate. If desired, the tire pressure information can
be programmed not to appear when using the INFO
button to scroll through the DIC displays. See ªVehicle
Programming and Personalization Featuresº in
the Index.
If a low or high tire pressure is detected by the system
while driving, a CHECK TIRE PRESSURE message
will appear in the display. If this occurs, press the INFO
button to scroll to the tire(s) with a low or high pressure
condition. See ªDriver Information Center (DIC)
Messagesº in the Index for more information.ENGINE OIL LIFE (Reset): Press the INFO button to
display ENGINE OIL LIFE, then press and hold the
INFO RESET button until 100% ENGINE OIL LIFE is
displayed. (This only needs to be reset after you have
had the oil changed.)
TRANSMISSION FLUID LIFE MONITOR: Under
normal conditions, the rate of deterioration of the
transmission fluid is slow. See the Maintenance
Schedule booklet for proper fluid and change intervals.
To reset the transmission fluid life, press the INFO
button to display TRANS FLUID LIFE, then press and
hold the INFO RESET button until 100% TRANS
FLUID LIFE is displayed. (This only needs to be reset
after you have had the fluid changed.)
ENG/MET: Press this button to display information in
the English (miles) or metric (kilometers) system.
Page 160 of 371

2-93
BATTERY VOLTAGE LOW - 6: This message will
appear when the electrical system is charging less than
10.5 volts or if the battery has been drained. If this
message appears immediately after starting, it is possible
that the generator can still recharge the battery. The
battery should recharge while driving but may take a
few hours to do so. Consider using an auxiliary charger
(be sure to follow the manufacturer's instructions) to
boost the battery after returning home or to a final
destination. If this message appears while driving or
after starting your vehicle and stays on, have it checked
immediately to determine the cause of this problem.
To help the generator recharge the battery quickly, you
can reduce the load on the electrical system by turning
off the accessories. You can monitor battery voltage on
the DIC by pressing the INFO button. The normal
range is 11.5 to 15.5 volts.
CHANGE BRAKE PADS
- 125: This message is used
to notify you that the brake pads may have worn down.
A sensor is connected to the brake pads and is triggered
when they wear to a certain point. Have the front and
rear brakes serviced by your dealer as soon as possible.CHANGE ENGINE OIL
- 82: This means that the
life of the engine oil has expired and it should be
changed within 200 miles. See ªEngine Oilº and ªFilter
Recommendationsº in the Maintenance Schedule
booklet. After an oil change, the Oil Life Indicator must
be reset. See ªOil Life Indicator, How to Resetº in
the Index.
CHANGE TRANS FLUID
- 47: This message will
appear when it is time to replace the transaxle fluid.
See the Maintenance Schedule booklet for the proper
fluid and change intervals.
CHECK BRAKE FLUID
- 37: This message will
display if the ignition is in ON to inform the driver that
the brake fluid level is low. Have the brake system
serviced by a technician as soon as possible. See ªBrake
System Warning Lightº in the Index.
CHECK COOLANT LEVEL
- 2: This message
will appear when there is a low level of engine coolant.
Have the cooling system serviced by a technician as
soon as possible.
Page 174 of 371
2-107
Oil Life Indicator
This feature lets you know when to change the engine
oil. It's based on the engine oil temperatures and your
driving patterns. To see the display, press the INFO
button several times until ENGINE OIL LIFE appears.
If you see 99% ENGINE OIL LIFE, 99 percent of your
current oil life remains.The DIC may display a CHANGE ENGINE OIL
message. Always keep a written record of the mileage
and date when you changed your oil. For more
information, see the Maintenance Schedule booklet.
If you see CHANGE ENGINE OIL, it means the
oil life is gone and you should change the oil right away.
The system doesn't check how much oil you have,
so you'll still have to check for that. To see how, see
ªEngine Oilº in the Index.
When the oil is changed, you'll need to reset the system.
See ªOil Life Indicator, How to Resetº in the Index.
Page 188 of 371

3-9
Ventilation Tips
�Keep the hood and front air inlet free of ice, snow or
any other obstruction (such as leaves). The heater
and defroster will work far better, reducing the
chance of fogging the inside of the windows.
�Keep the air path under the front seats clear
of objects. This helps circulate air throughout
your vehicle.
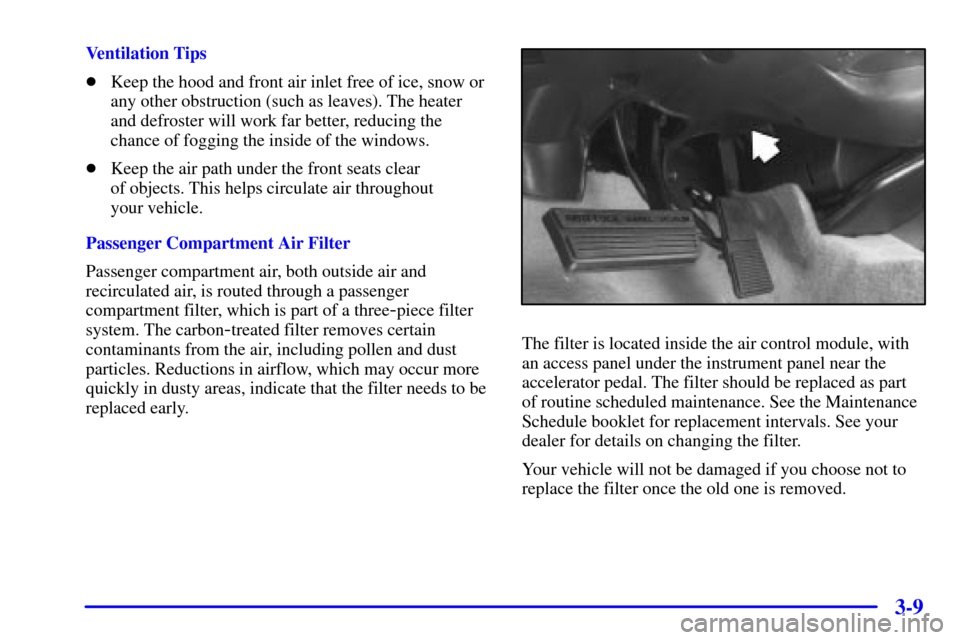
Passenger Compartment Air Filter
Passenger compartment air, both outside air and
recirculated air, is routed through a passenger
compartment filter, which is part of a three
-piece filter
system. The carbon
-treated filter removes certain
contaminants from the air, including pollen and dust
particles. Reductions in airflow, which may occur more
quickly in dusty areas, indicate that the filter needs to be
replaced early.The filter is located inside the air control module, with
an access panel under the instrument panel near the
accelerator pedal. The filter should be replaced as part
of routine scheduled maintenance. See the Maintenance
Schedule booklet for replacement intervals. See your
dealer for details on changing the filter.
Your vehicle will not be damaged if you choose not to
replace the filter once the old one is removed.
Page 253 of 371

4-39 When You Are Ready to Leave After
Parking on a Hill
1. Apply your regular brakes and hold the pedal down
while you:
�Start your engine;
�Shift into a gear; and
�Be sure the parking brake has released.
2. Let up on the brake pedal.
3. Drive slowly until the trailer is clear of the chocks.
4. Stop and have someone pick up and store the chocks.
Maintenance When Trailer Towing
Your vehicle will need service more often when you're
pulling a trailer. See the Maintenance Schedule booklet
for more on this. Things that are especially important
in trailer operation are automatic transaxle fluid
(don't overfill), engine oil, drive belt, cooling system
and brake system. If you're trailering, it's a good idea
to review this information before you start your trip.
Check periodically to see that all hitch nuts and bolts
are tight.
Engine Cooling When Trailer Towing
Your cooling system may temporarily overheat during
severe operating conditions. See ªEngine Overheatingº
in the Index.
Page 284 of 371
6-2
Service
Your dealer knows your vehicle best and wants you to
be happy with it. We hope you'll go to your dealer for
all your service needs. You'll get genuine GM parts and
GM
-trained and supported service people.
We hope you'll want to keep your GM vehicle all GM.
Genuine GM parts have one of these marks:
Doing Your Own Service Work
If you want to do some of your own service work, you'll
want to use the proper service manual. It tells you much
more about how to service your vehicle than this manual
can. To order the proper service manual, see ªService
and Owner Publicationsº in the Index.
Your vehicle has an air bag system. Before attempting
to do your own service work, see ªServicing Your Air
Bag
-Equipped Vehicleº in the Index.
You should keep a record with all parts receipts and
list the mileage and the date of any service work you
perform. See ªMaintenance Recordº in the Maintenance
Schedule booklet.
Page 301 of 371

6-19
Follow these steps to reinstall the air cleaner assembly:
1. Slide the air cleaner lid into the slots in the bottom of
the air cleaner base.
2. Close the cover and make sure that both latches are
secure and fully engaged.
3. Reinstall the clean air duct over the mass airflow
sensor. Make sure that the duct is secure around
the entire outer edge of the sensor.
4. Tighten the air duct clamp.
Refer to the Maintenance Schedule to determine when to
replace the air filter.
See ªScheduled Maintenance Servicesº in the
Maintenance Schedule booklet.
CAUTION:
Operating the engine with the air cleaner/filter
off can cause you or others to be burned. The air
cleaner not only cleans the air, it stops flame if
the engine backfires. If it isn't there, and the
engine backfires, you could be burned. Don't
drive with it off, and be careful working on the
engine with the air cleaner/filter off.
NOTICE:
If the air cleaner/filter is off, a backfire can
cause a damaging engine fire. And, dirt can
easily get into your engine, which will damage it.
Always have the air cleaner/filter in place when
you're driving.