Page 79 of 371

2-12
Operation
When you press
this button to unlock the
driver's door, the parking
lamps on your vehicle will
flash twice.
Pressing this button again within one to five seconds
will unlock the other doors. Pressing this button will
also disarm the theft
-deterrent system and turn on the
interior lamps at night. (You can program your vehicle
so the parking lamps will not flash. For more
information, see ªVehicle Programming and
Personalization Featuresº in the Index.)
When you press this button to lock the doors, the
parking lamps will flash once and the horn will sound
once. This also arms the theft
-deterrent system when the
ignition is turned off. (You can program your vehicle so
the parking lamps will not flash and/or the horn will not
sound. For more information, see ªVehicle
Programming and Personalization Featuresº in
the Index.)
Press this button to open the trunk. (The valet
lockout switch must be in the OFF position.)
Press this button to open the fuel door. (The valet
lockout switch must be in the OFF position.)
The numbers on the back of the RKE transmitter
correspond to Driver 1 and Driver 2. See ªVehicle
Programming and Personalization Features º in the
Index. Remote confirmation is not operational if any
door is open.
The RKE transmitter can also be used to recall the
memory seats for up to two drivers. For more
information, see ªMemory Seat, Mirrors and Steering
Wheelº in the Index.
Page 84 of 371

2-17
Theft
Vehicle theft is big business, especially in some cities.
Although your vehicle has a number of theft
-deterrent
features, we know that nothing we put on it can make
it impossible to steal. However, there are ways you
can help.
Key in the Ignition
If you leave your vehicle with the keys inside, it's an
easy target for joy riders or professional thieves
-- so
don't do it.
When you park your vehicle and open the driver's door,
you'll hear a chime reminding you to remove your key
from the ignition and take it with you. Always do this.
Your steering wheel will be locked, and so will your
ignition and transaxle. And remember to lock the doors.
Parking at Night
Park in a lighted spot, close all windows and lock your
vehicle. Remember to keep your valuables out of sight.
Put them in a storage area, or take them with you.
Parking Lots
Even if you park in a lot where someone will be
watching your vehicle, it's still best to lock it up and
take your keys. But what if you have to leave your
ignition key?
�If possible, park in a busy, well
-lit area.
�Put your valuables in a storage area, like your
trunk or glove box. Be sure to close and lock the
storage area.
�Close all windows.
�Move the valet lockout switch to ON.
�Lock all doors except the driver's.
�Give the valet key to the valet. Then take the master
key with you.
Page 89 of 371
2-22
New Vehicle ªBreak-Inº
NOTICE:
Your vehicle doesn't need an elaborate
ªbreak
-in.º But it will perform better in the long
run if you follow these guidelines:
�Don't drive at any one speed -- fast or
slow
-- for the first 500 miles (805 km).
Don't make full
-throttle starts.
�Avoid making hard stops for the first
200 miles (322 km) or so. During this time
your new brake linings aren't yet broken
in. Hard stops with new linings can mean
premature wear and earlier replacement.
Follow this breaking
-in guideline every
time you get new brake linings.
�Don't tow a trailer during break
-in.
See ªTowing a Trailerº in the Index for
more information.
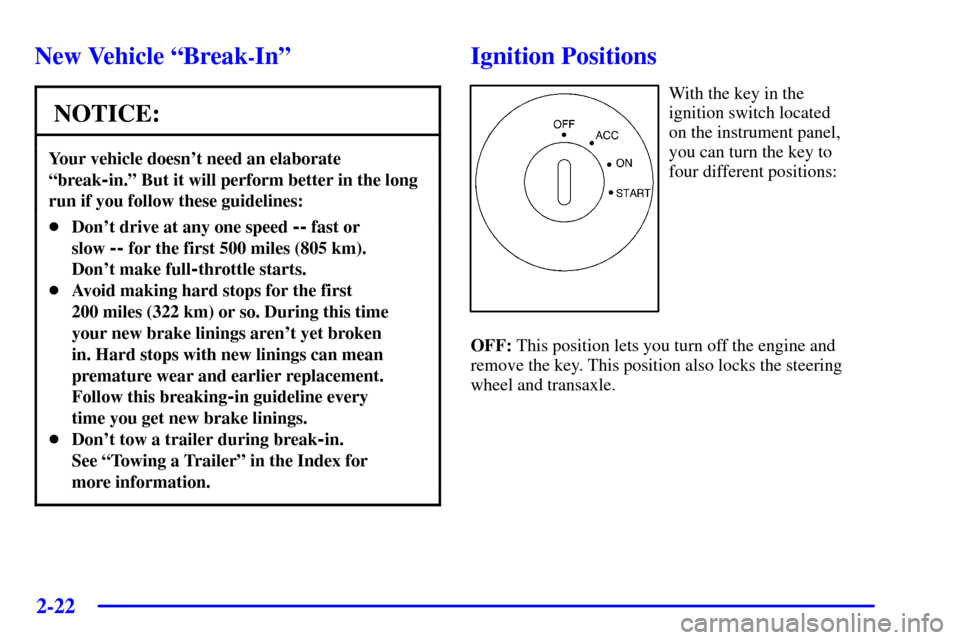
Ignition Positions
With the key in the
ignition switch located
on the instrument panel,
you can turn the key to
four different positions:
OFF: This position lets you turn off the engine and
remove the key. This position also locks the steering
wheel and transaxle.
Page 90 of 371

2-23
NOTICE:
If your key seems stuck in OFF and you can't
turn it, be sure you are using the correct key; if
so, is it all the way in? Turn the key only with
your hand. Using a tool to force it could break
the key or the ignition switch. If none of this
works, then your vehicle needs service.
ACC: This position lets you use things like the radio,
windshield wipers, power windows and sunroof (option)
when the engine is off. Use ACC if you must have your
vehicle in motion while the engine is off (for example, if
your vehicle is being pushed or towed).
ON: This is the position for driving.
START: This position starts the engine.
Retained Accessory Power (RAP)
The following accessories on your vehicle may be used
for up to 10 minutes after the ignition key is turned from
ON to OFF:
�Cellular Phone (If Equipped)
�Radio
�Power Windows
�Audio Steering Wheel Controls
�Sunroof (Option)
Power to these accessories stops after 10 minutes or if
any door is opened. If you want power for another
10 minutes, close all the doors and turn the ignition key
to ON and then back to OFF. If the cellular phone is
being used while retained accessory power is active, the
timer is suspended (to avoid interruption of the call).
The timer resets to 10 minutes at the end of the call.
Page 104 of 371
 with the
parking brake firmly set. Your vehicle can roll.
Dont leave your vehicle when the eng")
2-37
CAUTION:
It can be dangerous to get out of your vehicle if
the shift lever is not fully in PARK (P) with the
parking brake firmly set. Your vehicle can roll.
Don't leave your vehicle when the engine is
running unless you have to. If you've left the
engine running, the vehicle can move suddenly.
You or others could be injured. To be sure your
vehicle won't move, even when you're on fairly
level ground, always set your parking brake after
you move the shift lever to PARK (P).
Follow the proper steps to be sure your vehicle won't
move. See ªShifting Into PARK (P)º in the Index.
If you are parking on a hill and if you're pulling a
trailer, also see ªTowing a Trailerº in the Index.
Horn
The horn can be sounded by pressing on the center of
the steering wheel pad.
Tilt Wheel
The tilt wheel control is located on the outboard side of
the steering column.
Tilt steering allows you to adjust the steering wheel
before you drive. Raising the steering wheel to the
highest level gives your legs more room when you enter
and exit the vehicle.
Hold the steering wheel and pull the lever toward you to
bring the steering wheel close to you. Adjust the steering
wheel to a comfortable position and then release the
lever to lock it into place.
Page 105 of 371

The power tilt wheel control
is located on the outboard
side of the steering column.
To operate the power tilt feature, push the control up and
the")
2-38
Power Tilt and Telescopic Wheel
(If Equipped)
The power tilt wheel control
is located on the outboard
side of the steering column.
To operate the power tilt feature, push the control up and
the steering wheel will tilt up. Push the control down
and the steering wheel will go down.If the power tilt control is pressed up or down and held
in that position, there will be a slight movement and a
slight pause followed by a continuous movement in the
direction the control is being pressed. This allows very
fine control of the steering wheel position. If the control
is bumped, the steering wheel moves approximately
one degree in the direction commanded.
Push the control forward and the steering wheel moves
toward the front of the vehicle. Push the control
rearward and the steering wheel moves toward the rear
of the vehicle. To set the memory position, see ªVehicle
Programming and Personalization Featuresº and
ªMemory Seat, Mirrors and Steering Wheelº in
the Index.
Turn Signal/Multifunction Lever
The lever on the left side of the steering column
includes the following:
�Turn and Lane Change Signals
�Headlamp High/Low
-Beam Changer
�Flash
-To-Pass
Page 106 of 371

2-39
Turn and Lane Change Signals
To signal a turn, move the lever on the left side of the
steering wheel all the way up or down. The lever returns
automatically when the turn is complete.
An arrow located on the
instrument panel cluster will
flash in the direction of the
turn or lane change.
Raise or lower the lever until the arrow starts to flash to
signal a lane change. Hold it there until the lane change
is complete. The lever returns when it is released.
If the turn signal is left on, a warning chime will sound
and the Driver Information Center (DIC) will display
TURN SIGNAL ON (after driving about a mile) to
remind you to turn it off.Arrows that flash rapidly when signaling for a turn or
lane change may be caused by a burned
-out signal bulb.
Other drivers won't see the turn signal.
Replace burned
-out bulbs to help avoid possible
accidents. Check the fuse (see ªFuses and Circuit
Breakersº in the Index) and check for burned
-out bulbs
if the arrow fails to work when signaling a turn.
Headlamp High/Low-Beam Changer
When the low-beam headlamps are on, push the turn
signal lever away from you to change the headlamps to
high beam.
This light on the instrument
panel cluster will be on,
indicating high
-beam usage.
Pull the turn signal lever toward you to return to
low
-beam headlamps.
Page 107 of 371
2-40
Flash-To-Pass
This feature lets you use the high-beam headlamps to
signal the driver in front of you that you want to pass.
Pull the turn signal lever toward you briefly to
flash
-to-pass. When you do, the following will occur:
�If the headlamps are either off or in the Daytime
Running Lamps (DRL) mode, the high
-beam
headlamps will turn on. They'll stay on as long as
you hold the lever there. Release the lever to turn
them off.
�If the headlamps are on low beam, they will remain
active and the high beam will also illuminate until
you release the lever.
Windshield Wipers
You can control the windshield wipers by moving the
lever with the wiper symbol on it. This lever is located
on the right side of your steering column. For
information on wiper
-activated headlamp operation,
refer to ªWiper
-Activated Headlampsº in the Index.