Page 283 of 335
6-29
Open the cap labeled WASHER FLUID. Add washer
fluid until the tank is full.
NOTICE:
�When using concentrated washer fluid,
follow the manufacturer's instructions for
adding water.
�Don't mix water with ready
-to-use washer
fluid. Water can cause the solution to freeze
and damage your washer fluid tank and
other parts of the washer system. Also,
water doesn't clean as well as washer fluid.
�Fill your washer fluid tank only
three
-quarters full when it's very cold.
This allows for expansion if freezing occurs,
which could damage the tank if it is
completely full.
�Don't use engine coolant (antifreeze) in
your windshield washer. It can damage
your washer system and paint.
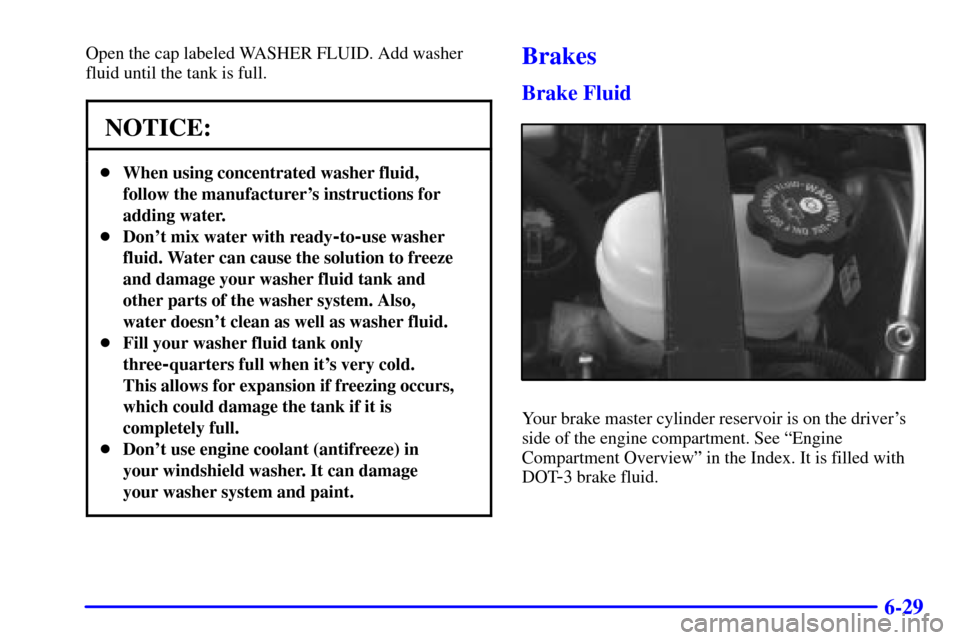
Brakes
Brake Fluid
Your brake master cylinder reservoir is on the driver's
side of the engine compartment. See ªEngine
Compartment Overviewº in the Index. It is filled with
DOT
-3 brake fluid.
Page 284 of 335

6-30
There are only two reasons why the brake fluid level in the
reservoir might go down. The first is that the brake fluid
goes down to an acceptable level during normal brake
lining wear. When new linings are put in, the fluid level
goes back up. The other reason is that fluid is leaking out
of the brake system. If it is, you should have your brake
system fixed, since a leak means that sooner or later your
brakes won't work well, or won't work at all.
So, it isn't a good idea to ªtop offº your brake fluid.
Adding brake fluid won't correct a leak. If you add fluid
when your linings are worn, then you'll have too much
fluid when you get new brake linings. You should add
(or remove) brake fluid, as necessary, only when work is
done on the brake hydraulic system.
CAUTION:
If you have too much brake fluid, it can spill on the
engine. The fluid will burn if the engine is hot
enough. You or others could be burned, and your
vehicle could be damaged. Add brake fluid only
when work is done on the brake hydraulic system.
When your brake fluid falls to a low level, your brake
warning light will come on. See ªBrake System Warning
Lightº in the Index.
What to Add
When you do need brake fluid, use only DOT
-3 brake
fluid. Use new brake fluid from a sealed container only.
Refer to ªRecommended Fluids and Lubricantsº in the
Maintenance Schedule booklet.
Always clean the brake fluid reservoir cap and the area
around the cap before removing it. This will help keep
dirt from entering the reservoir.
CAUTION:
With the wrong kind of fluid in your brake
system, your brakes may not work well, or they
may not even work at all. This could cause a
crash. Always use the proper brake fluid.
Page 285 of 335

6-31
NOTICE:
�Using the wrong fluid can badly damage
brake system parts. For example, just a few
drops of mineral
-based oil, such as engine
oil, in your brake system can damage brake
system parts so badly that they'll have to be
replaced. Don't let someone put in the
wrong kind of fluid.
�If you spill brake fluid on your vehicle's
painted surfaces, the paint finish can be
damaged. Be careful not to spill brake fluid
on your vehicle. If you do, wash it off
immediately. See ªAppearance Careº in
the Index.
Brake Wear
Your vehicle has four-wheel disc brakes.
Disc brake pads have built
-in wear indicators that make a
high
-pitched warning sound when the brake pads are worn
and new pads are needed. The sound may come and go or
be heard all the time your vehicle is moving (except when
you are pushing on the brake pedal firmly).
CAUTION:
The brake wear warning sound means that soon
your brakes won't work well. That could lead to
an accident. When you hear the brake wear
warning sound, have your vehicle serviced.
NOTICE:
Continuing to drive with worn-out brake pads
could result in costly brake repair.
Page 286 of 335

6-32
Some driving conditions or climates may cause a brake
squeal when the brakes are first applied or lightly applied.
This does not mean something is wrong with your brakes.
Properly torqued wheel nuts are necessary to help
prevent brake pulsation. When tires are rotated, inspect
brake pads for wear and evenly tighten wheel nuts in the
proper sequence to GM torque specifications.
Brake linings should always be replaced as complete
axle sets.
See ªBrake System Inspectionº in the
Maintenance Schedule booklet under Part C
ªPeriodic Maintenance Inspections.º
Brake Pedal Travel
See your dealer if the brake pedal does not return to
normal height, or if there is a rapid increase in pedal
travel. This could be a sign of brake trouble.
Brake Adjustment
Every time you apply the brakes, with or without the
vehicle moving, your brakes adjust for wear.
Replacing Brake System Parts
The braking system on a vehicle is complex. Its many
parts have to be of top quality and work well together if
the vehicle is to have really good braking. Your vehicle
was designed and tested with top
-quality GM brake parts.
When you replace parts of your braking system
-- for
example, when your brake linings wear down and you
have to have new ones put in
-- be sure you get new
approved GM replacement parts. If you don't, your brakes
may no longer work properly. For example, if someone
puts in brake linings that are wrong for your vehicle,
the balance between your front and rear brakes can
change
-- for the worse. The braking performance you've
come to expect can change in many other ways if someone
puts in the wrong replacement brake parts.
Battery
Your new vehicle comes with a maintenance free ACDelco�
battery. When it's time for a new battery, get one that has the
replacement number shown on the original battery's label.
We recommend an ACDelco battery. See ªEngine
Compartment Overviewº in the Index for battery location.
WARNING: Battery posts, terminals and related
accessories contain lead and lead compounds, chemicals
known to the State of California to cause cancer and
reproductive harm. Wash hands after handling.
Page 311 of 335
6-57
Vehicle Identification Number (VIN)
This is the legal identifier for your vehicle. It appears on
a plate in the front corner of the instrument panel, on the
driver's side. You can see it if you look through the
windshield from outside your vehicle. The VIN also
appears on the Vehicle Certification and Service Parts
labels and the certificates of title and registration.
Engine Identification
The 8th character in your VIN is the engine code. This
code will help you identify your engine, specifications
and replacement parts.
Service Parts Identification Label
You'll find this label on the rear wall of the trunk on the
passenger's side. It's very helpful if you ever need to
order parts. On this label is:
�your VIN,
�the model designation,
�paint information and
�a list of all production options and
special equipment.
Be sure that this label is not removed from the vehicle.
Page 313 of 335
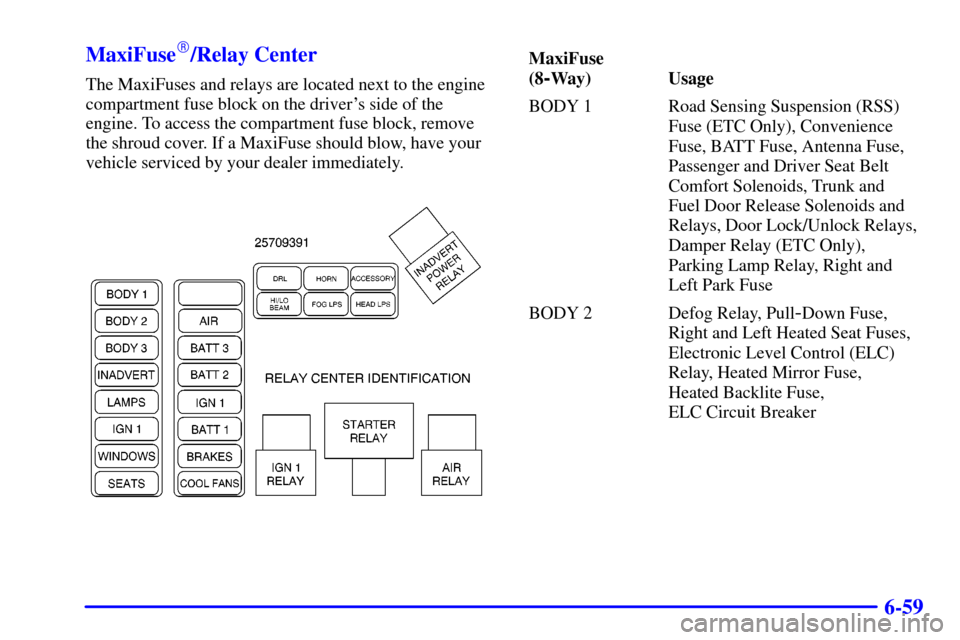
6-59 MaxiFuse
�/Relay Center
The MaxiFuses and relays are located next to the engine
compartment fuse block on the driver's side of the
engine. To access the compartment fuse block, remove
the shroud cover. If a MaxiFuse should blow, have your
vehicle serviced by your dealer immediately.
MaxiFuse
(8
-Way) Usage
BODY 1 Road Sensing Suspension (RSS)
Fuse (ETC Only), Convenience
Fuse, BATT Fuse, Antenna Fuse,
Passenger and Driver Seat Belt
Comfort Solenoids, Trunk and
Fuel Door Release Solenoids and
Relays, Door Lock/Unlock Relays,
Damper Relay (ETC Only),
Parking Lamp Relay, Right and
Left Park Fuse
BODY 2 Defog Relay, Pull
-Down Fuse,
Right and Left Heated Seat Fuses,
Electronic Level Control (ELC)
Relay, Heated Mirror Fuse,
Heated Backlite Fuse,
ELC Circuit Breaker
Page 316 of 335
6-62 Fuses and Circuit Breakers
The wiring circuits in your vehicle are protected from
short circuits by a combination of fuses and circuit
breakers. This greatly reduces the chance of fires caused
by electrical problems.
Look at the silver
-colored band inside the fuse. If the
band is broken or melted, replace the fuse. Be sure you
replace a bad fuse with a new one of the identical size
and rating.
If you ever have a problem on the road and don't have a
spare fuse, you can ªborrowº one that has the same
amperage. Pick some feature of your vehicle that you
can get along without
-- like the radio or cigarette
lighter
-- and use its fuse, if it is the correct amperage.
Replace it as soon as you can.
There are two fuse blocks in your vehicle: the
underhood fuse block and the rear compartment
fuse block.Underhood Fuse Block
The underhood fuse block is located next to the air
cleaner on the driver's side of the engine. Lift the cover
to gain access.
Page 321 of 335

6-67
Replacement Bulbs
Application Number
Headlamps Composite
Inner High Beam 9005. . . . . . . . . . . . . . . . . . . . . . .
Outer Low Beam 9006. . . . . . . . . . . . . . . . . . . . . . .
Front Turn Signal 3157 NA. . . . . . . . . . . . . . . . . . . . .
Center High
-Mounted Stoplamp (CHMSL) 1156. . .
Rear Turn Signal and Taillamp 2057. . . . . . . . . . . . .
Capacities and Specifications
The following approximate capacities are given in
English and metric conversions. Please refer to
ªRecommended Fluids and Lubricantsº in the
Maintenance Schedule booklet for more information.
Engine Specifications
Displacement 279 cubic inches (4 565 cc). . . . . . . . .
Type 4.6 L DOHC V8. . . . . . . . . . . . . . . . . . . . . . . . .
VIN Engine Code
Eldorado Y. . . . . . . . . . . . . . . . . . . . . . . . . . . . . . . .
ETC 9. . . . . . . . . . . . . . . . . . . . . . . . . . . . . . . . . . . .
Horsepower
Eldorado 275 (bhp) @ 5600 rpm. . . . . . . . . . . . . . .
205 (kW) @ 5600 rpm
ETC 300 (bhp) @ 6000 rpm. . . . . . . . . . . . . . . . . . .
224 (kW) @ 6000 rpm
Torque
Eldorado 300 (lb
-ft) @ 4000 rpm . . . . . . . . . . . . . .
407 (N´m) @ 4000 rpm
ETC 295 (lb
-ft) @ 4400 rpm . . . . . . . . . . . . . . . . . .
400 (N´m) @ 4400 rpm
Firing Order 1
-2-7-3-4-5-6-8 . . . . . . . . . . . . . . . . . . .
Thermostat Starts To Open 177
-184�F (81-85�C) . .

This is the legal identifier for your vehicle. It appears on
a plate in the front corner of the instrument panel, on the
drivers side. You can see it if you l")