Page 153 of 328

3-
3-1
Section 3 Comfort Controls and Audio Systems
In this section, you'll find out how to operate the comfort control and audio systems offered with your vehicle.
Be sure to read about the particular systems supplied with your vehicle.
3
-2 Comfort Controls
3
-2 Electronic Climate Control (ECC)
3
-3 Automatic Operation
3
-4 Manual Operation
3
-6 Air Conditioning
3
-6 Heating
3
-6 Defrosting
3
-7 Rear Window Defogger
3
-7 Ventilation System
3
-8 Audio Systems
3
-8 Setting the Clock
3
-9AM-FM Stereo with Cassette Tape Player
3
-13 AM-FM Stereo with Cassette Tape and
Compact Disc Player with Radio Data
Systems (RDS) (If Equipped)3
-21 Radio Data Systems (RDS) Program
Type (PTY) Selections
3
-22 CD Adapter Kits
3
-22 Trunk-Mounted CD Changer (Option)
3
-26 Theft-Deterrent Feature
3
-27 Audio Steering Wheel Controls
3
-27 Understanding Radio Reception
3
-28 Tips About Your Audio System
3
-29 Care of Your Cassette Tape Player
3
-30 Care of Your Compact Discs
3
-30 Care of Your Compact Disc Player
3
-31 Heated Backlite Antenna
Page 165 of 328

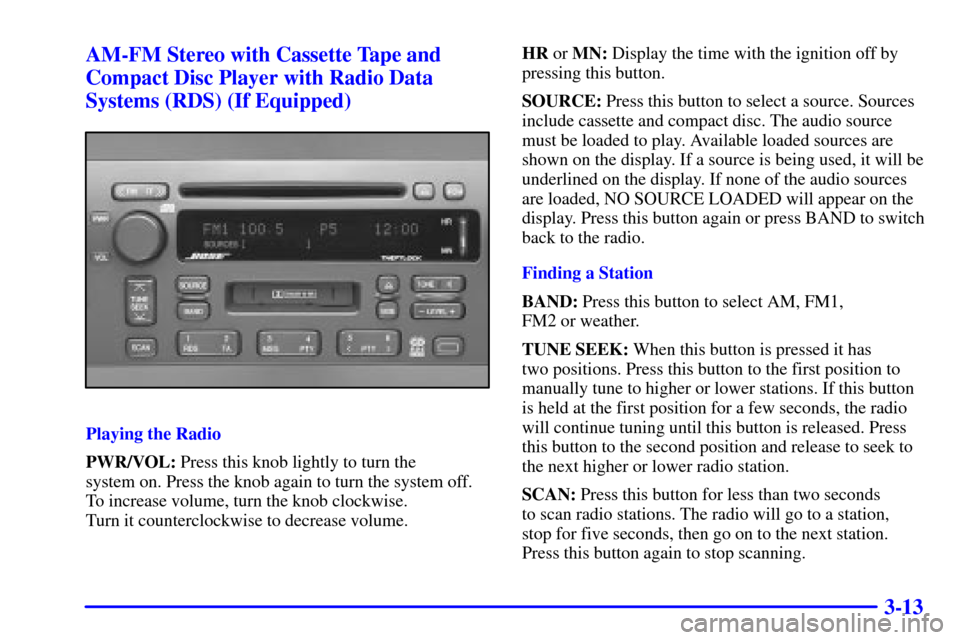
3-13 AM-FM Stereo with Cassette Tape and
Compact Disc Player with Radio Data
Systems (RDS) (If Equipped)
Playing the Radio
PWR/VOL: Press this knob lightly to turn the
system on. Press the knob again to turn the system off.
To increase volume, turn the knob clockwise.
Turn it counterclockwise to decrease volume.HR or MN: Display the time with the ignition off by
pressing this button.
SOURCE: Press this button to select a source. Sources
include cassette and compact disc. The audio source
must be loaded to play. Available loaded sources are
shown on the display. If a source is being used, it will be
underlined on the display. If none of the audio sources
are loaded, NO SOURCE LOADED will appear on the
display. Press this button again or press BAND to switch
back to the radio.
Finding a Station
BAND: Press this button to select AM, FM1,
FM2 or weather.
TUNE SEEK: When this button is pressed it has
two positions. Press this button to the first position to
manually tune to higher or lower stations. If this button
is held at the first position for a few seconds, the radio
will continue tuning until this button is released. Press
this button to the second position and release to seek to
the next higher or lower radio station.
SCAN: Press this button for less than two seconds
to scan radio stations. The radio will go to a station,
stop for five seconds, then go on to the next station.
Press this button again to stop scanning.
Page 225 of 328

5-4
1. Check the other vehicle. It must have a 12-volt
battery with a negative ground system.
NOTICE:
If the other system isn't a 12-volt system with a
negative ground, both vehicles can be damaged.
Get the vehicles close enough so the jumper cables
can reach, but be sure the vehicles aren't touching
each other. If they are, it could cause a ground
connection you don't want. You wouldn't be able
to start your vehicle and the bad grounding could
damage the electrical systems.
To avoid the possibility of the vehicles rolling, set
the parking brake firmly on both vehicles involved.
Put an automatic transaxle in PARK (P) and a
manual transaxle in NEUTRAL before setting the
parking brake.2. Turn off the ignition on both vehicles. Unplug
unnecessary accessories plugged into the cigarette
lighter. Turn off all lamps that aren't needed as well
as the radios. This will avoid sparks and help save
both batteries. In addition, it could save the radio!
NOTICE:
If you leave your radio on, it could be badly
damaged. The repairs wouldn't be covered by
your warranty.