Page 285 of 392
6-22
Checking the Fluid Level
Prepare your vehicle as follows:
�Park your vehicle on a level place.
Keep the engine running.
�With the parking brake applied, place the shift lever
in PARK (P).
�With your foot on the brake pedal, move the shift
lever through each gear range, pausing for about
three seconds in each range. Then, position the shift
lever in PARK (P).
�Let the engine run at idle for three to five minutes.Then, without shutting off the engine, follow these steps:
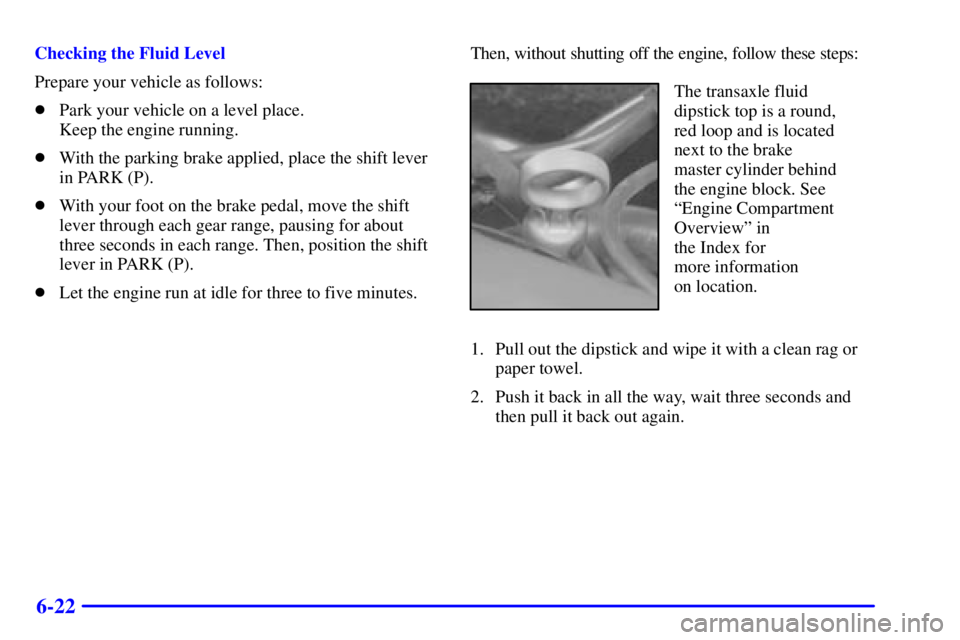
The transaxle fluid
dipstick top is a round,
red loop and is located
next to the brake
master cylinder behind
the engine block. See
ªEngine Compartment
Overviewº in
the Index for
more information
on location.
1. Pull out the dipstick and wipe it with a clean rag or
paper towel.
2. Push it back in all the way, wait three seconds and
then pull it back out again.
Page 288 of 392

6-25 What to Use
Use a mixture of one-half clean, drinkable water and
one
-half DEX-COOL� coolant which won't damage
aluminum parts. If you use this coolant mixture, you
don't need to add anything else.
CAUTION:
Adding only plain water to your cooling system
can be dangerous. Plain water, or some other
liquid like alcohol, can boil before the proper
coolant mixture will. Your vehicle's coolant
warning system is set for the proper coolant
mixture. With plain water or the wrong mixture,
your engine could get too hot but you wouldn't
get the overheat warning. Your engine could
catch fire and you or others could be burned.
Use a 50/50 mixture of clean, drinkable water
and DEX
-COOL� coolant.
NOTICE:
If you use an improper coolant mixture, your
engine could overheat and be badly damaged.
The repair cost wouldn't be covered by your
warranty. Too much water in the mixture can
freeze and crack the engine, radiator, heater core
and other parts.
If you have to add coolant more than four times a year,
have your dealer check your cooling system.
NOTICE:
If you use the proper coolant, you don't have to
add extra inhibitors or additives which claim to
improve the system. These can be harmful.
Page 289 of 392
6-26 Checking Coolant
The coolant recovery tank is located on the driver's side of
the engine compartment. See ªEngine Compartment
Overviewº in the Index for more information on location.
The vehicle must be on a level surface. When your
engine is cold, the coolant level should be at FULL
COLD or a little higher. When your engine is warm, the
level should be up to FULL HOT or a little higher.Adding Coolant
If you need more coolant, add the proper DEX
-COOL�
coolant mixture at the coolant recovery tank, but be
careful not to spill it.
CAUTION:
Turning the radiator pressure cap when the
engine and radiator are hot can allow steam and
scalding liquids to blow out and burn you badly.
With the coolant recovery tank, you will almost
never have to add coolant at the radiator.
Never turn the radiator pressure cap
-- even a
little
-- when the engine and radiator are hot.
Page 290 of 392

6-27
CAUTION:
You can be burned if you spill coolant on hot
engine parts. Coolant contains ethylene glycol,
and it will burn if the engine parts are hot
enough. Don't spill coolant on a hot engine.
Occasionally check the coolant level in the radiator. For
information on how to add coolant to the radiator, see
ªCooling Systemº in the Index.
Radiator Pressure Cap
NOTICE:
Your radiator pressure cap is a 15 psi (105 kPa)
pressure
-type cap and must be tightly installed to
prevent coolant loss and possible engine damage
from overheating. Be sure the arrows on the cap
line up with the overflow tube on the radiator
filler neck.
Power Steering Fluid
When to Check Power Steering Fluid
It is not necessary to regularly check power steering fluid
unless you suspect there is a leak in the system or you hear
an unusual noise. A fluid loss in this system could indicate
a problem. Have the system inspected and repaired.
The power steering fluid reservoir on the L36 and
L67 engine is located below the generator and behind
the accessory drive belt on the passenger's side toward
the rear of the engine.
Page 291 of 392

6-28 How to Check Power Steering Fluid
Turn the key off, let the engine compartment cool down,
wipe the cap and the top of the reservoir clean, then
unscrew the cap and wipe the dipstick with a clean rag.
Replace the cap and completely tighten it. Then remove
the cap again and look at the fluid level on the dipstick.
The level should be at the FULL COLD mark.
If necessary, add only enough fluid to bring the level up
to the mark.
What to Use
To determine what kind of fluid to use, see
ªRecommended Fluids and Lubricantsº in the Index.
Always use the proper fluid. Failure to use the proper
fluid can cause leaks and damage hoses and seals.
Windshield Washer Fluid
What to Use
When you need windshield washer fluid, be sure to read
the manufacturer's instructions before use. If you will be
operating your vehicle in an area where the temperature
may fall below freezing, use a fluid that has sufficient
protection against freezing.
Adding Washer Fluid
When the windshield washer fluid reservoir is low,
WINDSHIELD WASHER FLUID LOW will be
displayed on the DIC (if equipped).
Page 329 of 392

6-66
Electrical System
Add-On Electrical Equipment
NOTICE:
Don't add anything electrical to your vehicle
unless you check with your dealer first. Some
electrical equipment can damage your vehicle
and the damage wouldn't be covered by your
warranty. Some add
-on electrical equipment can
keep other components from working as
they should.
Your vehicle has an air bag system. Before attempting to
add anything electrical to your vehicle, see ªServicing
Your Air Bag
-Equipped Vehicleº in the Index.
Fuses and Circuit Breakers
The wiring circuits in your vehicle are protected from
short circuits by a combination of fuses and circuit
breakers. This greatly reduces the chance of damage
caused by electrical problems.
Look at the silver
-colored band inside the fuse. If the
band is broken or melted, replace the fuse. Be sure you
replace a bad fuse with a new one of the identical size
and rating.
There are three fuse blocks in your vehicle: the
instrument panel fuse block located under the instrument
panel, the underhood fuse block located on the
passenger's side engine compartment and the rear fuse
block, located under the rear seat.
Page 332 of 392
6-69
Instrument Panel Bussed Electrical Center (BEC)
Fuse Usage
PERIM LP Perimeter Lamps
ACCY Accessory
IGN 3 Ignition 3Underhood Fuse Block
There are additional fuses located on the passenger's
side of the engine compartment.
To check the fuses in this underhood fuse center, turn
the knob counterclockwise and remove the cover. There
is a chart inside the cover that explains the features and
controls governed by each fuse and relay.
Page 345 of 392

Scheduled Maintenance
7-5
Short Trip/City Definition
Follow the Short Trip/City Scheduled Maintenance if
any one of these conditions is true for your vehicle:
�Most trips are less than 5 to 10 miles (8 to 16 km).
This is particularly important when outside
temperatures are below freezing.
�Most trips include extensive idling (such as frequent
driving in stop
-and-go traffic).
�Most trips are through dusty areas.
�You frequently tow a trailer or use a carrier on top of
your vehicle.
�If the vehicle is used for delivery service, police, taxi
or other commercial application.
One of the reasons you should follow this schedule
if you operate your vehicle under any of these conditions
is that these conditions cause engine oil to break
down sooner.
Short Trip/City Intervals
Every 3,000 Miles (5 000 km): Engine Oil and Filter
Change (or 3 months, whichever occurs first).
Every 6,000 Miles (10 000 km): Tire Rotation.
Every 12,000 Miles (20 000 km): Passenger
Compartment Air Filter Replacement.
Every 15,000 Miles (25 000 km): Engine Air Cleaner
Filter Inspection, if driving in dusty conditions.
Every 30,000 Miles (50 000 km): Engine Air
Cleaner Filter Replacement. Supercharger Oil Check
(or every 36 months, whichever occurs first)
(3800 Code 1 V6 engine only).
Every 50,000 Miles (83 000 km): Automatic Transaxle
Service (severe conditions only).
(Continued)


Fuse Usage
PERIM LP Perimeter Lamps
ACCY Accessory
IGN 3 Ignition 3Underhood Fuse Block
There are additional fuses located on the passengers
side")