2001 BMW X5 3.0I change wheel
[x] Cancel search: change wheelPage 56 of 223

56nPersonalized memory*Car Memory, Key Memory
Your BMW center can adjust your
vehicle's systems in such a
manner that your personalized settings
are automatically called up for the seat,
mirror and steering wheel positions
when you unlock the vehicle with your
personal remote control key. <
If
you make use of the Key Memory,
be sure that the footwell behind
the driver's seat is unobstructed before
unlocking the vehicle. If you fail to do
so, persons or objects could be injured
or damaged if the seat should move
backward. <
How the system functions
You have probably frequently wished
that you could configure individual
functions of your vehicles to reflect your
own personal requirements. In engi-
neering your vehicle, BMW has
included several user-defined func-
tions in the vehicle's design. Your BMW
center can make these settings for you.
There are settings related to the vehicle
("Car Memory") and settings related to
individuals ("Key Memory"). You can
configure up to four different basic
positions for four different persons. The
only requirement is that each person
uses his or her own remote control key.
463de029
When your vehicle is unlocked with the
remote control, the vehicle recognizes
the individual user by means of a data
exchange with the key, and makes
adjustments accordingly.
In order for you to distinguish between
different keys, colored decals are
supplied together with the keys.
What the system can do
Your BMW center can provide you with
details on the capabilities of the "Car
Memory" and "Key Memory" systems.
Memory functions are possible for the
> driver's seat
> steering wheel
> exterior mirrors
> automatic climate control.
You will see this symbol
throughout the Owner's Manual. It
is to remind you at appropriate places
of the settings that are available to
you. <
An example of Key Memory is the auto-
matic adjustment of the driver's power
seat with settings stored in the memory
for the individual person when the
vehicle is unlocked.
Page 69 of 223

Index
Data
Technology
Repairs
Car care
Controls
Overview
69nAutomatic transmission with Steptronic*
Do not leave the vehicle unattended
with the engine running. An unattended
vehicle with a running engine repre-
sents a potential safety hazard. <
P — Park
Select "Park" only when the vehicle is
completely stopped. The transmission
locks to prevent the rear wheels from
turning.
R — Reverse
Select "Reverse" only when the vehicle
is completely stopped.
N — Neutral
Select "Neutral" only if your journey is
interrupted for a longer period.
D — Drive
(automatic shift program)
This position is designed for driving
under all normal operating conditions.
All forward gears are available.
"Kickdown"
In the "Kickdown" mode, you achieve
maximum performance.
Depress the accelerator pedal past the
increased resistance point at the full-
throttle position.
M/S Manual mode and
Sport Program
When you change from D to M/S, the
Sport Program is activated. This is indi-
cated by "D S" in the gear selection
display. The Sport Program is designed
for performance-oriented driving.
With the first brief touch, the automatic
transmission shifts from the Sport
Program to the manual mode. When
you move the selector lever forward in
the "+" direction, the transmission shifts
up. When the lever is moved back in the
"–" direction, the transmission shifts
down. Depending on the equipment
version, 1 to 5 or M1 to M5 is indicated
in the transmission range display.
Upshifts or downshifts will only be
carried out by the ATC at appropriate
engine speeds and road speeds. If the
530us042
engine speed is too high, for instance,
the downshift will not be executed. The
gear selected will appear briefly in the
instrument cluster followed by the
current gear.
If you are driving in the manual
mode and wish to accelerate
rapidly – to pass another vehicle, for
example – shift down manually or with
the kickdown function. <
You can only change from M/S to
selector lever positions "P," "R" and "N"
via the "D" position.
In the following situations, the Step-
tronic "thinks" for you in the manual
mode:
> In order to prevent engine over-
speeding, the transmission shifts
automatically to the next higher gear
shortly before the RPM cutoff point.
> At low speeds, the transmission
shifts down automatically – you do
not have to act.
> In the "Kickdown" mode, the trans-
mission shifts down to the lowest
possible gear based on the engine
speed.
> Depending on the situation – when
driving in adverse winter conditions,
for example – you may also start out
in 2nd or 3rd gear.
Page 103 of 223

IndexDataTechnologyRepairsCar careControlsOverview
103n
Air conditionerRecirculated air mode
You can respond to
unpleasant odors outside the
vehicle by temporarily switching off the
outside air. The system then recircu-
lates the air currently within the vehicle.
If you have a multifunction steering
wheel with the button for recirculated
air, you can also use this button to
switch to the recirculated air mode
(refer to page 26).
If the windows fog over in the
recirculated air mode, switch the
recirculated air off and increase the air
supply as required.<
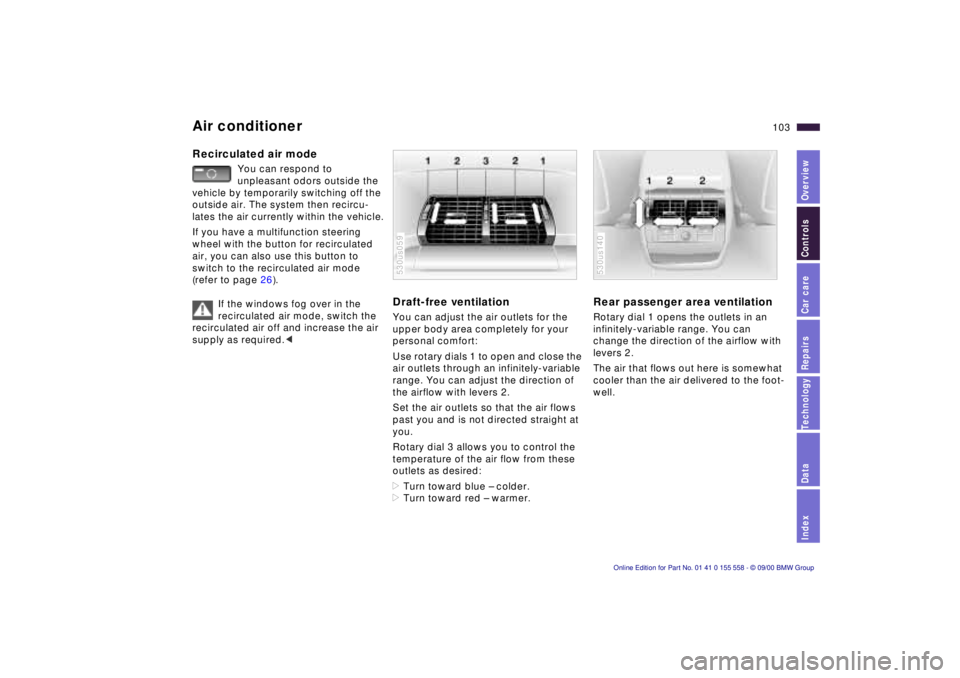
Draft-free ventilation You can adjust the air outlets for the
upper body area completely for your
personal comfort:
Use rotary dials 1 to open and close the
air outlets through an infinitely-variable
range. You can adjust the direction of
the airflow with levers 2.
Set the air outlets so that the air flows
past you and is not directed straight at
you.
Rotary dial 3 allows you to control the
temperature of the air flow from these
outlets as desired:
>Turn toward blue – colder.
>Turn toward red – warmer.530us059
Rear passenger area ventilationRotary dial 1 opens the outlets in an
infinitely-variable range. You can
change the direction of the airflow with
levers 2.
The air that flows out here is somewhat
cooler than the air delivered to the foot-
well.530us140
Page 138 of 223

138n
Antilock Brake System (ABS)should adapt road speed to the road
conditions.
On road surfaces that have a loose
surface layer on a firm base with good
traction (on gravel, deep sand or snow,
for example), braking distances may be
longer than with locked wheels.This is
also true if snow chains are mounted.
However, ABS continues to provide
enhanced vehicle stability and steering
response under these conditions. Information for your safety Not even ABS can suspend the laws of
physics. ABS alone cannot prevent
accidents when the brakes are applied
without an adequate safety distance
between vehicles, if the vehicle is
driven with excessive speed, or if aqua-
planing occurs. Responsibility for these
types of situations remains in the hands
(and at the feet) of the driver. You
should never allow the added safety of
ABS to lull you into a false sense of
security, or mislead you into taking
increased risks that could affect your
own safety and that of others.
Do not make any modifications to
the ABS system.
Service procedures on ABS are to be
performed by authorized technicians
only.<
Cornering Brake Control (CBC) CBC is an advanced engineering
design of the ABS. When braking
during cornering with high lateral accel-
eration, or when braking during a lane
change, vehicle stability is further
improved and the steering response is
enhanced. Electronic Brake Force
Distribution (EBV) EBV governs brake application pres-
sure at the rear wheels to achieve
stable brake response.
If the EBV fails (refer to the next
page), avoid full or "panic" brake
applications. Full or panic brake appli-
cations can result in overbraking at the
rear axle, and braking stability is no
longer ensured.<
Dynamic Brake Control (DBC)
If you apply the brakes rapidly, this
system automatically produces the
maximum braking force boost and thus
helps to achieve the shortest possible
braking distance during "panic stops."
All of the benefits of the ABS system
are exploited under these circum-
stances.
Do not reduce the pressure on the
brake pedal for the duration of the
brake application. When the brake
pedal is released, the DBC is deacti-
vated.
In the event of a malfunction,
the yellow warning lamp comes
on. Have the system checked
and repaired at your BMW
center as soon as possible.
Refer to the "Information for your
safety" covering the ABS system.
This information also applies in general
for DBC.<
Page 149 of 223

IndexDataTechnologyRepairsCar careControlsOverview
149n
Special features of winter tires Snow chains
*
Choosing the right tireBMW recommends winter tires (M+S
radial tires) for operation under inclem-
ent winter driving conditions. While
so-called all-season tires (M+S desig-
nation) provide better winter traction
than summer tires with the load ratings
H, V, W, Y and ZR, they generally do
not achieve the performance of winter
tires.
In the interests of safe tracking and
steering response, install radial tires
made by the same manufacturer and
with the same tread configuration on all
four wheels if you elect to mount winter
tires.
Do not exceed specified
maximum speeds
Never exceed the maximum speed
for which the tires are rated.
Unprofessional attempts by laymen to
service tires can lead to damage and
accidents.
Have this work performed by skilled
professionals only. Your BMW center
will be glad to assist you with both their
expertise and the proper equipment for
your vehicle.<
Tire condition, tire pressureWinter tires display a perceptible loss in
their ability to cope with winter driving
conditions once the tread wears to
below 0.16 in (4 mm), and should thus
be replaced.
Comply with the specified tire inflation
pressures — and be sure to have the
wheel and tire assemblies balanced
every time you change the tires.
The use of narrow-link BMW snow
chains is approved only in pairs on the
rear wheels and only with tire size
235/65 R 17. Comply with all manufac-
turer's safety precautions when
mounting the chains.
Page 180 of 223

180n
Changing a wheel
Safety measures in the event of a
flat tire or wheel change: stop the
vehicle as far as possible from passing
traffic. Park on a firm, flat, surface.
Switch on the hazard warning flashers.
Turn the steering wheel to the straight-
ahead position, remove the key and
engage the steering lock. Shift into 1st or
reverse (selector lever in "Park" with
automatic transmission) and engage the
parking brake. All passengers should be
outside the vehicle and well away from
your immediate working area (behind a
guardrail, for instance). If a warning
triangle or portable hazard warning lamp
is required, set it up on the roadside at
an appropriate distance from the rear of
the vehicle. Comply with all safety guide-
lines and regulations. Change the wheel
only on a level, firm surface which is not
slippery. Avoid jacking the vehicle up on
a soft or slippery surface (snow, ice, very
smooth surfaces, etc.), since it could
slide sideways. Position the jack on a
firm support surface. Do not place
wooden blocks or similar objects under
the jack. If this is done, the jack might not
be able to reach its full support capacity
because of the limited height. Do not lie
under the vehicle or start the engine
when the vehicle is supported by the
jack. Failure to comply with this creates a
risk of fatal injury.<
What you will need In order to avoid rattling noises later,
note the position of the tools when you
remove them and return them to their
original position when you are through
using them.
>Two wedges (wheel chocks)
Open the liftgate and tailgate.
In the cargo area, fold up the floor
cover or pull-out cargo floor (refer to
page 127 or 128).
Take out the wedges (arrow) next to
the spare wheel. 530us117
>Lug wrench
Is located next to the spare wheel. 530us120
Page 183 of 223

IndexDataTechnologyRepairsCar careControlsOverview
183n
Changing a wheel5 Press the tailgate down and hold it
there. The spare wheel is now pulled
by means of the removal aid onto the
tailgate.
Hold the tailgate in the opened
position and do not allow it to
retract sharply upward. If you do so,
there is a risk of personal injury and
vehicle damage.< 530us158
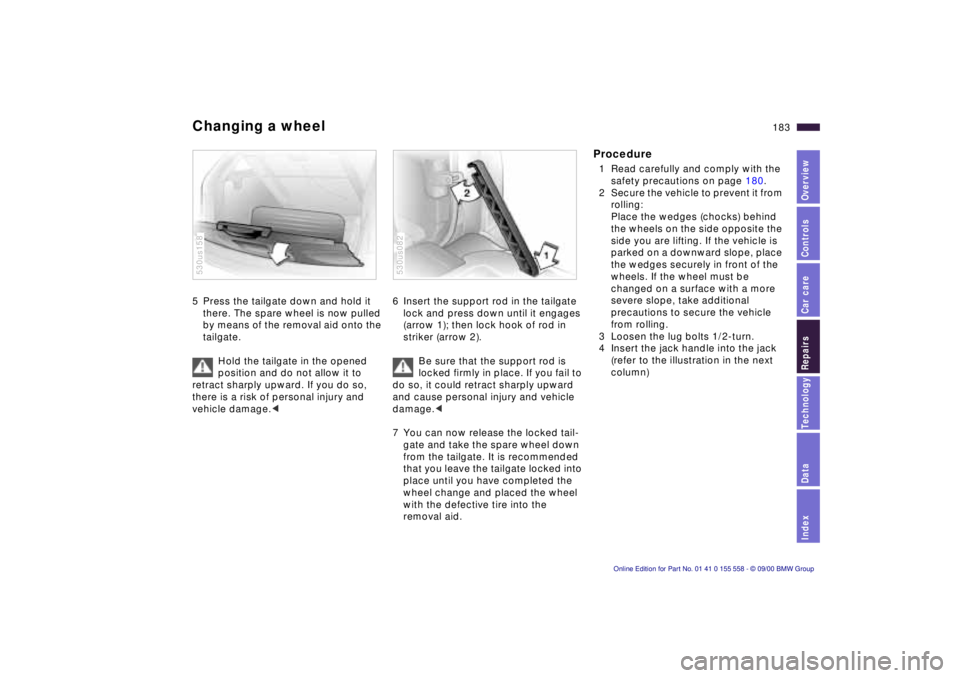
6 Insert the support rod in the tailgate
lock and press down until it engages
(arrow 1); then lock hook of rod in
striker (arrow 2).
Be sure that the support rod is
locked firmly in place. If you fail to
do so, it could retract sharply upward
and cause personal injury and vehicle
damage.<
7 You can now release the locked tail-
gate and take the spare wheel down
from the tailgate. It is recommended
that you leave the tailgate locked into
place until you have completed the
wheel change and placed the wheel
with the defective tire into the
removal aid.530us082
Procedure1 Read carefully and comply with the
safety precautions on page 180.
2 Secure the vehicle to prevent it from
rolling:
Place the wedges (chocks) behind
the wheels on the side opposite the
side you are lifting. If the vehicle is
parked on a downward slope, place
the wedges securely in front of the
wheels. If the wheel must be
changed on a surface with a more
severe slope, take additional
precautions to secure the vehicle
from rolling.
3 Loosen the lug bolts 1/2-turn.
4 Insert the jack handle into the jack
(refer to the illustration in the next
column)
Page 217 of 223

Everything from A to Z217n
Index
Data
Technology
Repairs
Car care
Controls
Overview
I
Ice warning 76
Identification number 161
Identification, tires 148
Ignition key 34
Ignition lock 64
Independent ventilation 87
Independent ventilation system 114
Indicator lamps 22
Inflation pressure 31, 145
INSPECTION 78
Instrument cluster 18, 20
Instrument lighting 97
Instrument panel 18, 20
Integrated rear suspension 201
Intensive cleaning system 72
Interference indicators 79
Interference, cellular phone 144
Interior lamps 98
bulb replacement 178t
remote control 38
Interior mirror 54
Interior motion sensor 44
Interior rearview mirror, automatic dimming
feature 199
Interlock 64
Intermittent wipe 71
J
Jack181, 183
Jump-starting 190t
K
Key Memory 56
Keys 34
Keys with radio remote control 34
Kickdown 69
L
Lamps and bulbs 175
Lashing eyes 129
LATCH attachment of the child seat 63
Leather care 167
Length 207
Level control system 24, 201
inactive 143t
License plate lamps, bulb replacement 178t
Liftgate 41, 42
release following an
electrical
malfunction 188t
Light switch 97
Light-alloy wheel 150
Lighter 120
LIGHTS ON warning 97LIMIT
88
Load-securing devices 129
Louvers 100, 106
Low beams 97
bulb replacement 175t
Low-fuel warning lamp 77
Lug bolts 183
Lug wrench 180t
Luggage compartment, refer to cargo area 124
Luggage net 42
Luggage straps 42
Lumbar support 50
M
M+S radial tires149
Maintenance 78t , 162 t
Malfunction displays 79t
Manual operation doors 36t
liftgate 188t
sliding/tilt sunroof 188t
tailgate 189t
Manual transmission 67
Master key 34
Maximum cooling 109
Mechanical seat 49
Memo 86
Memory 55
Microfilter 104, 112
MID (Multi-Information Display) 84 Mirror defrosting
53
Mirror memory 55
Mirrors 53
Mobile phone 144
Modifications, technical 6, 169
Moonroof 46
Motion sensor, interior 44
Multifunction steering wheel 26
Multi-Information Display (MID) 84
N
Navigation system, refer to
the separate Owner's
Manual
O
OBD interface socket 170
Odometer 76
Oil additives 157
consumption 157t
dipstick 157t
grades 158
Oil change interval, refer to
the Service and Warranty
Information Booklet (US
models) or to the Warranty
and Service Guide Booklet
(Canadian models)