2001 BMW 330Ci COUPE Wheel
[x] Cancel search: WheelPage 30 of 203

30n
Opening and closing:
Keys32
Electronic vehicle
immobilizer33
Central locking system34
Opening and closing Ð from the
outside34
Opening and closing Ð from the
inside38
Luggage compartment lid39
Luggage compartment41
Alarm system42
Electric power windows44
Sliding/Tilt sunroof45
Adjusting:
Seats47
Seat and mirror memory51
Steering wheel52
Mirrors52
Car Memory, Key Memory54
Passenger safety systems:
Safety belts55
Airbags57
Transporting children safely60
Controls
Page 42 of 203

42n
Alarm system
*
The conceptThe vehicle alarm system responds:
>When a door, the hood or the
luggage compartment lid is opened.
>To movement inside the vehicle
(interior motion sensor).
>To a change of the vehicle's tilt Ð if
someone attempts to steal the
wheels or tow the vehicle without
authorization, for example.
>If there is an interruption in battery
voltage.
The system responds to unauthorized
vehicle entry and attempted theft by
simultaneously activating the following:
>Sounding an alarm for 30 seconds.
>The hazard warning flashers are acti-
vated for approx. five minutes.
>The high beams flash on and off in
sync with the hazard warning flashers.
To activate and deactivate the
alarm systemWhen the vehicle is locked or unlocked
by using a key or with the remote
control, the alarm system is also simul-
taneously armed or disarmed.
The interior motion sensor and the tilt
alarm sensor are activated approx.
30 seconds after you have finished
locking the vehicle.
If the alarm system has been armed
correctly, the hazard warning flashers
flash once.
You can have a signal set as
acknowledgment for both arming
and disarming the alarm system.<
You can also open the luggage
compartment lid when the system is
armed by pressing button 3 of the
remote control (refer to page 37). When
it is closed, the lid is once again
secured.
Indicator lamp displaysThe indicator lamp is located under the
interior rearview mirror.
>When the indicator lamp flashes
continuously: the system is armed.
>If the indicator lamp flashes during
arming of the system: the door(s), the
hood or luggage compartment lid are
not properly closed. Even if you do
not close the indicated area, the
system begins to monitor the
remaining areas, and the indicator
lamp flashes continuously after
>10 seconds. However, the interior
motion sensor is not activated.
>If the indicator lamp goes out when
the system is disarmed: no manipula-
tion or attempted intrusions have
been detected in the period since the
system was armed.463us010
Page 47 of 203

47n
IndexDataTechnologyRepairsCar careControlsOverview
For your personal safety when adjusting
the seat position, please follow the
instructions below carefully:
Never try to adjust your seat while
driving the vehicle. The seat could
respond with an unexpected move-
ment, and the ensuing loss of vehicle
control could lead to an accident.
Be sure that the safety belt remains
firmly against your body at all times. In
the event of a frontal impact, a loose lap
belt could slide over the hips, leading to
abdominal injury. In addition, the safety
belt's restraint effectiveness is reduced
if the belt is worn loosely.
Never ride with the backrest reclined to
an extreme angle (especially important
for the front passenger to remember),
otherwise, you run the risk that you will
slide under the safety belt during an
accident, thus negating the protection
the safety belt provides.<
Correct sitting postureTo reduce strain on the spinal column,
sit all the way back in the seat and rest
your back fully against the backrest.
The ideal sitting posture is achieved
with your head extending from your
spine in a straight line.
For long-distance driving, you may wish
to increase the backrest angle slightly
to reduce muscular tension. You should
be able to grasp the steering wheel at
its highest point with your arms slightly
bent.
After a seat adjustment, adjust the
height of the safety belt also. Refer to
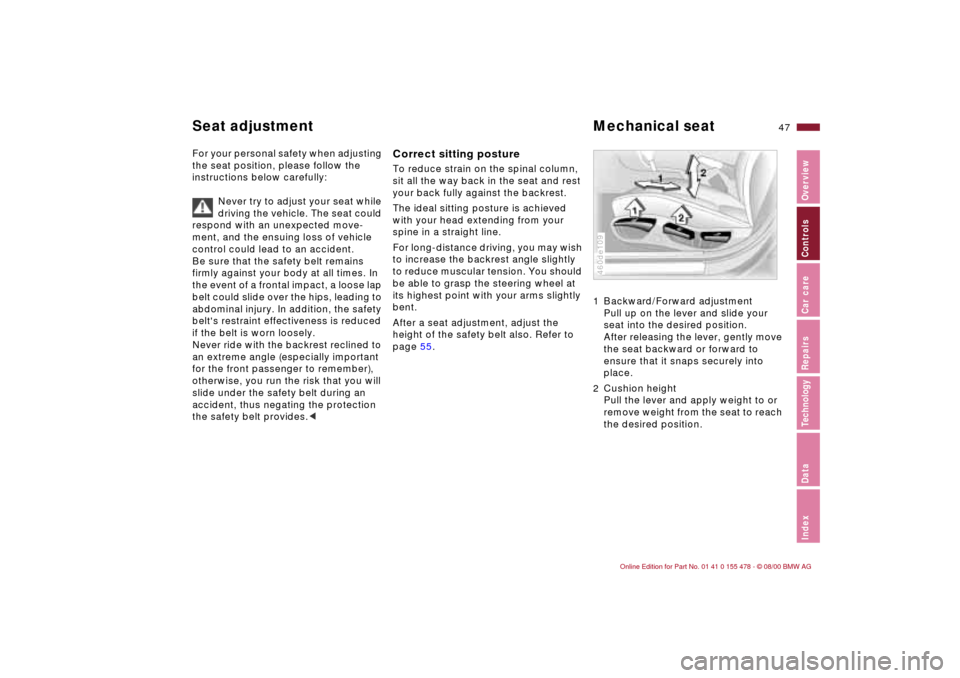
page 55.1 Backward/Forward adjustment
Pull up on the lever and slide your
seat into the desired position.
After releasing the lever, gently move
the seat backward or forward to
ensure that it snaps securely into
place.
2 Cushion height
Pull the lever and apply weight to or
remove weight from the seat to reach
the desired position.
460de109
Seat adjustment Mechanical seat
Page 52 of 203

52n
Seat and mirror memory* Adjusting steering wheel Mirrors Passenger side exterior mirror tilt
function(automatic curb monitor
*)
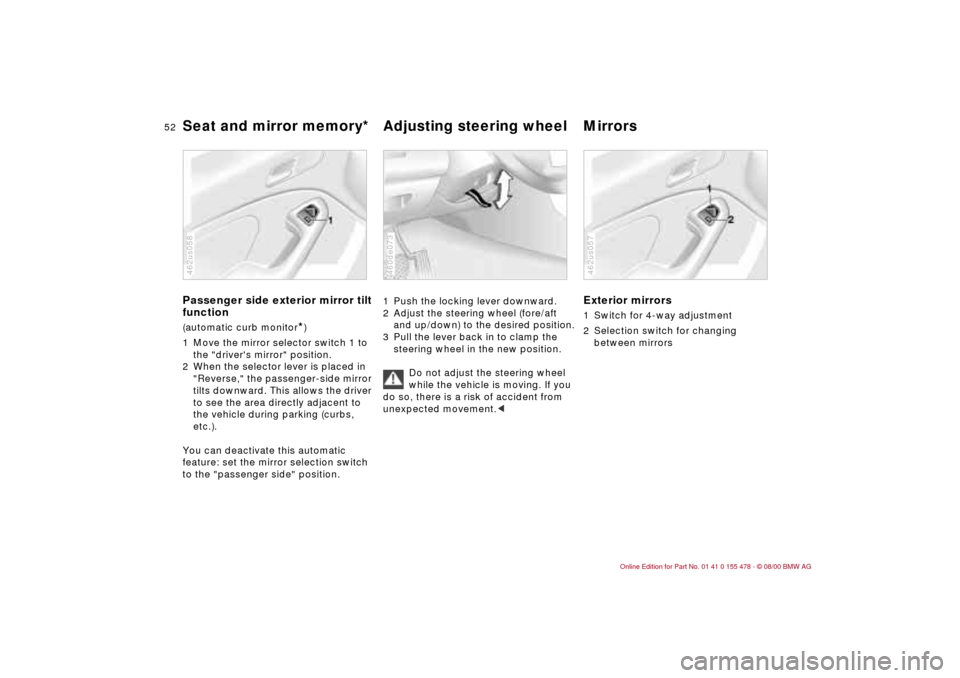
1 Move the mirror selector switch 1 to
the "driver's mirror" position.
2 When the selector lever is placed in
"Reverse," the passenger-side mirror
tilts downward. This allows the driver
to see the area directly adjacent to
the vehicle during parking (curbs,
etc.).
You can deactivate this automatic
feature: set the mirror selection switch
to the "passenger side" position.
462us058
1 Push the locking lever downward.
2 Adjust the steering wheel (fore/aft
and up/down) to the desired position.
3 Pull the lever back in to clamp the
steering wheel in the new position.
Do not adjust the steering wheel
while the vehicle is moving. If you
do so, there is a risk of accident from
unexpected movement.<460de073
Exterior mirrors1 Switch for 4-way adjustment
2 Selection switch for changing
between mirrors462us057
Page 58 of 203

58n
AirbagsSitting correctly with airbags
For your safety, comply with the
following instructions for the
airbags. If you do not, the airbags may
not be able to provide their maximum
protection. All passengers in the vehicle
should be aware of and comply with
this information:
The airbags are supplemental restraint
devices designed to provide extra
protection; they are not a substitute for
safety belts. Wear your safety belt at all
times. The airbags will not be triggered
in the event of a minor accident, a
vehicle roll-over, or collisions from the
rear. In these instances, the safety belt
provides optimal protection.
Airbags are located under cover panels
in the steering wheel, in the instrument
panel, in the side trim panels in the
front and rear
*, in the roof panels, and
in the sides of the inside roof lining.
Adjust your seat to a position that
provides maximum distance between
you and the steering wheel, the instru-
ment panel and the door while still
allowing comfortable and safe access
to all vehicle controls.
To avoid sustaining hand and arm inju-
ries, always grasp the steering wheel
on the rim with the hands at the 9 and
3 o'clock positions. Do not place your
hands on the center pad.
Never allow any objects to obstruct the
area between the airbag and an occu-
pant.
Do not use the cover panel above the
passenger-side airbag as a storage
area.
Do not apply adhesive materials to the
cover panels of the airbags, cover them
or modify them in any other way.
Do not install a rear-facing child
restraint system in the front passenger
seat of this vehicle.
Children under 13 years of age and
children less than 5 feet (150 cm) tall
should ride only in the rear seat.
Infants or small children should never
be held on the lap of a passenger.
If your vehicle is equipped with side
airbags in the rear passenger area
*, be
sure that child restraints are mounted
correctly and provided with the
greatest-possible distance between the
airbags in the side trim panels. Do not
allow children to lean out of the child's
seat in the direction of the side trim
panels. If they do so, serious injuries
can occur if the airbag is triggered.
(infants and small children in appro-
priate child restraint systems; larger
children and adults using the safety
belts). Never let an occupant's head
rest near or on a side airbag because
the inflating airbag could cause a
serious or fatal injury. Please note that
the word "Airbag" imprinted on the door
trim panel indicates the airbag's loca-
tion.
Accident research shows that the
safest place for children in an automo-
bile is in the rear seat. However, a child
sitting in the rear seat and not properly
restrained may place his or her head on
or near the airbag, if so equipped. For
example, a child Ñ even though belted
Ñ may fall asleep with his or her head
against the side airbag. It may be diffi-
cult for a driver to ensure that children
in the rear seat will remain properly
positioned at all times and not place
their heads on or near the side airbag.
Therefore, we recommend that the rear
seat side airbags, if so equipped, be
deactivated if children will travel in the
rear seat.
The rear seat side airbags may already
have been deactivated, either at the
time of manufacture or by a BMW
Page 63 of 203

63n
IndexDataTechnologyRepairsCar careControlsOverview
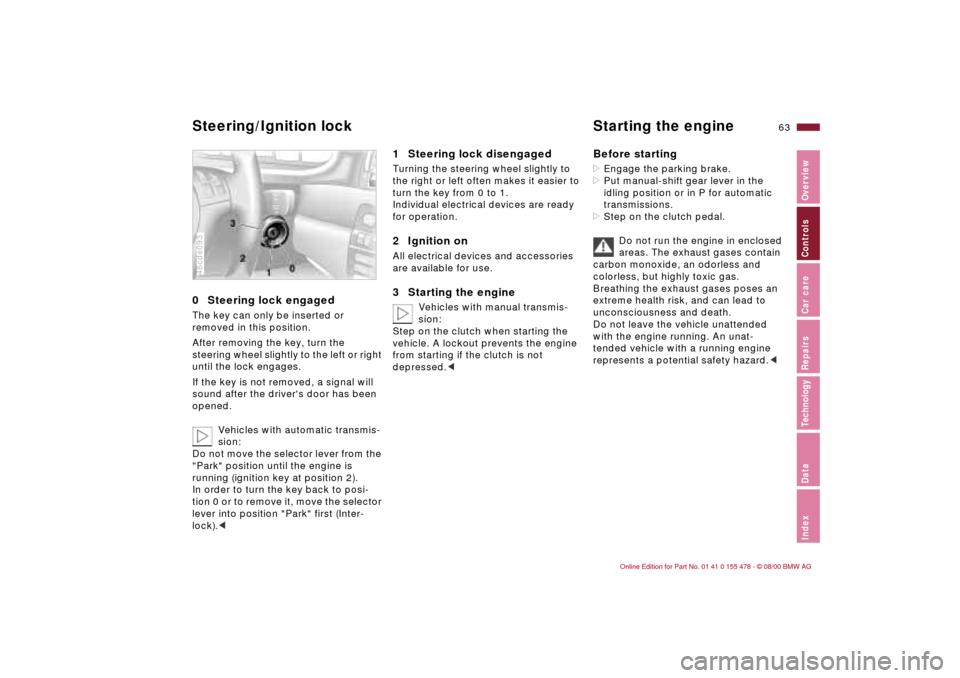
0 Steering lock engaged The key can only be inserted or
removed in this position.
After removing the key, turn the
steering wheel slightly to the left or right
until the lock engages.
If the key is not removed, a signal will
sound after the driver's door has been
opened.
Vehicles with automatic transmis-
sion:
Do not move the selector lever from the
"Park" position until the engine is
running (ignition key at position 2).
In order to turn the key back to posi-
tion 0 or to remove it, move the selector
lever into position "Park" first (Inter-
lock).<46cde093
1 Steering lock disengaged Turning the steering wheel slightly to
the right or left often makes it easier to
turn the key from 0 to 1.
Individual electrical devices are ready
for operation.2 Ignition onAll electrical devices and accessories
are available for use.3 Starting the engine
Vehicles with manual transmis-
sion:
Step on the clutch when starting the
vehicle. A lockout prevents the engine
from starting if the clutch is not
depressed.<
Before starting>Engage the parking brake.
>Put manual-shift gear lever in the
idling position or in P for automatic
transmissions.
>Step on the clutch pedal.
Do not run the engine in enclosed
areas. The exhaust gases contain
carbon monoxide, an odorless and
colorless, but highly toxic gas.
Breathing the exhaust gases poses an
extreme health risk, and can lead to
unconsciousness and death.
Do not leave the vehicle unattended
with the engine running. An unat-
tended vehicle with a running engine
represents a potential safety hazard.<
Steering/Ignition lock Starting the engine
Page 64 of 203

64n
Starting the engine Switching off the engine Do not press the accelerator pedal
while starting the engine.
Do not actuate the starter for too
short a time, but do not actuate it
for more than approx. 20 seconds.
Release the ignition key immediately
when the engine starts.
Do not allow the engine to warm up by
leaving it running while the vehicle
remains stationary. Instead, begin
driving immediately at a moderate
engine speed.<
If the engine does not start on the first
attempt (if it is very cold or hot, for
instance):
>Press the accelerator pedal halfway
down while engaging the starter.
Cold starts at very low temperatures,
starting at about +57 (Ð156) and
at high altitudes above 3,300 ft
(1,000 meters):
>On the first start attempt, engage the
starter for a longer period (approx.
10 seconds).
>Press the accelerator pedal halfway
down while engaging the starter.
Engine idle speed is controlled by the
engine computer system. Increased
speeds at start-up are normal and
should decrease as the engine warms
up. If engine speed does not decrease,
service is required.
To prevent the battery from
discharging, always deactivate
electrical devices that are not in
use. Switch the ignition off when the
vehicle is not being driven.Turn the ignition key to position 1 or 0.
Do not remove the ignition key
while the vehicle is still moving.
If you did so, the steering lock would
engage when the steering wheel is
turned.
Whenever you leave the vehicle, always
remove the ignition key and lock the
steering wheel.
Vehicles with manual transmission:
Always apply the parking brake when
parking on slopes and inclined
surfaces, since placing the shift lever in
1st gear or reverse may not provide
adequate resistance to rolling.
Vehicles with automatic transmission:
Place the selector lever in "Park."<
Page 65 of 203

65n
IndexDataTechnologyRepairsCar careControlsOverview
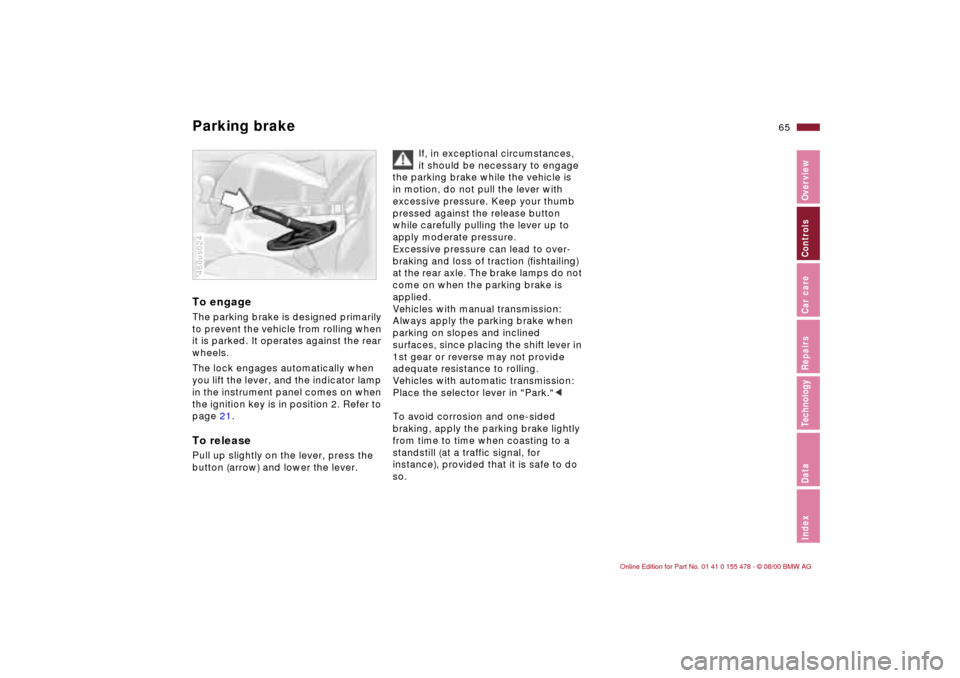
Parking brake To engageThe parking brake is designed primarily
to prevent the vehicle from rolling when
it is parked. It operates against the rear
wheels.
The lock engages automatically when
you lift the lever, and the indicator lamp
in the instrument panel comes on when
the ignition key is in position 2. Refer to
page 21.To releasePull up slightly on the lever, press the
button (arrow) and lower the lever.460us024
If, in exceptional circumstances,
it should be necessary to engage
the parking brake while the vehicle is
in motion, do not pull the lever with
excessive pressure. Keep your thumb
pressed against the release button
while carefully pulling the lever up to
apply moderate pressure.
Excessive pressure can lead to over-
braking and loss of traction (fishtailing)
at the rear axle. The brake lamps do not
come on when the parking brake is
applied.
Vehicles with manual transmission:
Always apply the parking brake when
parking on slopes and inclined
surfaces, since placing the shift lever in
1st gear or reverse may not provide
adequate resistance to rolling.
Vehicles with automatic transmission:
Place the selector lever in "Park."<
To avoid corrosion and one-sided
braking, apply the parking brake lightly
from time to time when coasting to a
standstill (at a traffic signal, for
instance), provided that it is safe to do
so.