2001 BMW 325i SEDAN Automatic transmission
[x] Cancel search: Automatic transmissionPage 10 of 211

Contents
Overview
Controls and features
Cockpit16
Instrument cluster18
Indicator and warning lamps20
Multifunction steering wheel
(MFL)24
Sports steering wheel with
multifunction buttons25
Hazard warning flashers26
Warning triangle26
First-aid kit26
Refueling27
Fuel specifications28
Tire inflation pressure28
Locks and security systems:
Keys32
Electronic vehicle
immobilizer33
Central locking system34
Opening and closing Ð from the
outside34
Opening and closing Ð from the
inside38
Luggage compartment lid39
Luggage compartment41
Alarm system42
Electric power windows44
Sliding/tilt sunroof45
Adjustments:
Seats47
Seat and mirror memory50
Steering wheel51
Mirrors52
Car Memory, Key Memory53
Passenger safety systems:
Safety belts54
Airbags55
Transporting children safely59
Driving:
Steering/Ignition lock62
Starting the engine62
Switching off the engine63
Parking brake64
Manual transmission65
Automatic transmission with
Steptronic66
Turn signal indicator/Headlamp
flasher69
Wiper/Washer system69
Rear window defroster71
Cruise control72
Everything under control:
Odometer74
Tachometer74
Energy Control74
Fuel gauge75
Temperature gauge75
Service Interval Display75
Check Control76
Clock76
Computer77
Technology for safety and
convenience:
Park Distance Control (PDC)79
Automatic Stability Control plus
Traction (ASC+T)80
Dynamic Stability Control
(DSC)82
Tire Pressure Control (RDC)86
Contents
Page 12 of 211

Contents
Owner service procedures
Advanced technology
Technical data
Replacement procedures:
Onboard tool kit158
Windshield wiper blades158
Lamps and bulbs158
Changing a wheel165
Battery168
Fuses170
Microfilter/Activated-charcoal
filter171
In case of electrical
malfunction:
Fuel filler door172
Sliding/Tilt sunroof172
Assistance, giving and
receiving:
Jump-starting173
Towing the vehicle174Adaptive Transmission Control
(ATC)178
Airbags179
Automatic Stability Control plus
traction (ASC+T)/Dynamic
Stability Control (DSC)180
Radio reception181
Four-wheel drive182
Safety belt tensioner183
Interior rearview mirror with
automatic dimming
feature184
Rain sensor185
Tire Pressure Control (RDC)186
Self-diagnostics187
Xenon lamps188Engine data192
Dimensions193
Weights194
Capacities195
Electrical system196
V-belts196
Page 19 of 211

19n
IndexDataTechnologyRepairsCar careControlsOverview
Instrument cluster
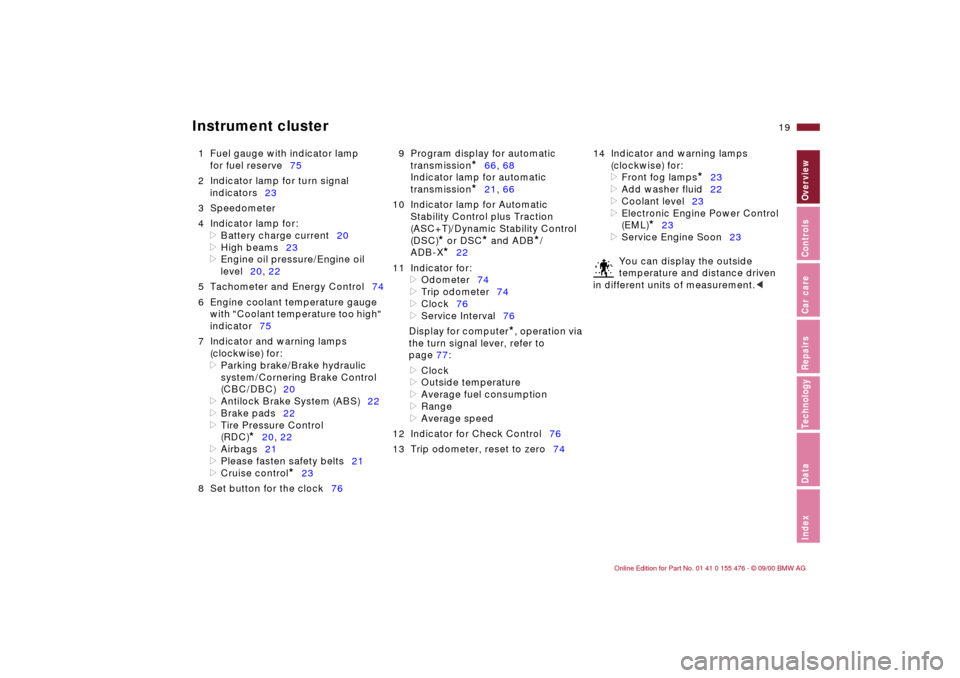
1 Fuel gauge with indicator lamp
for fuel reserve75
2 Indicator lamp for turn signal
indicators23
3 Speedometer
4 Indicator lamp for:
>
Battery charge current20
>
High beams23
>
Engine oil pressure/Engine oil
level20, 22
5 Tachometer and Energy Control74
6 Engine coolant temperature gauge
with "Coolant temperature too high"
indicator75
7 Indicator and warning lamps
(clockwise) for:
>
Parking brake/Brake hydraulic
system/Cornering Brake Control
(CBC/DBC)20
>
Antilock Brake System (ABS)22
>
Brake pads22
>
Tire Pressure Control
(RDC)
*
20, 22
>
Airbags21
>
Please fasten safety belts21
>
Cruise control
*
23
8 Set button for the clock769 Program display for automatic
transmission
*
66, 68
Indicator lamp for automatic
transmission
*
21, 66
10 Indicator lamp for Automatic
Stability Control plus Traction
(ASC+T)/Dynamic Stability Control
(DSC)
*
or DSC
*
and ADB
*
/
ADB-X
*
22
11 Indicator for:
>
Odometer74
>
Trip odometer74
>
Clock76
>
Service Interval76
Display for computer
*
, operation via
the turn signal lever, refer to
page 77:
>
Clock
>
Outside temperature
>
Average fuel consumption
>
Range
>
Average speed
12 Indicator for Check Control76
13 Trip odometer, reset to zero7414 Indicator and warning lamps
(clockwise) for:
>
Front fog lamps
*
23
>
Add washer fluid22
>
Coolant level23
>
Electronic Engine Power Control
(EML)
*
23
>
Service Engine Soon23
You can display the outside
temperature and distance driven
in different units of measurement.
<
Page 21 of 211

21n
IndexDataTechnologyRepairsCar careControlsOverview
Indicator and warning lampsRed and yellow: continue driving
cautiously
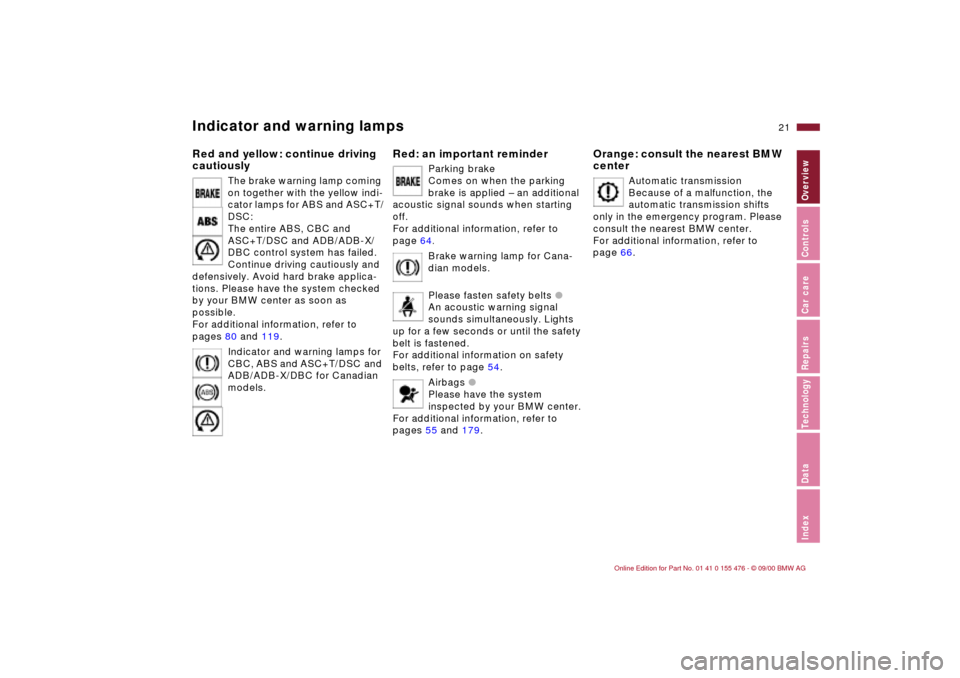
The brake warning lamp coming
on together with the yellow indi-
cator lamps for ABS and ASC+T/
DSC:
The entire ABS, CBC and
ASC+T/DSC and ADB/ADB-X/
DBC control system has failed.
Continue driving cautiously and
defensively. Avoid hard brake applica-
tions. Please have the system checked
by your BMW center as soon as
possible.
For additional information, refer to
pages 80 and 119.
Indicator and warning lamps for
CBC, ABS and ASC+T/DSC
and
ADB/ADB-X/DBC for Canadian
models.
Red: an important reminder
Parking brake
Comes on when the parking
brake is applied Ð an additional
acoustic signal sounds when starting
off.
For additional information, refer to
page 64.Brake warning lamp for Cana-
dian models.
Please fasten safety belts l
An acoustic warning signal
sounds simultaneously. Lights
up for a few seconds or until the safety
belt is fastened.
For additional information on safety
belts, refer to page 54.
Airbags l
Please have the system
inspected by your BMW center.
For additional information, refer to
pages 55 and 179.
Orange: consult the nearest BMW
center
Automatic transmission
Because of a malfunction, the
automatic transmission shifts
only in the emergency program. Please
consult the nearest BMW center.
For additional information, refer to
page 66.
Page 31 of 211

Overview
Controls and features
Operation, care
and maintenance
Owner service procedures
Technical data
Index Advanced technology
31n
IndexDataTechnologyRepairsCar careControlsOverview
Driving:
Steering/Ignition lock62
Starting the engine62
Switching off the engine63
Parking brake64
Manual transmission65
Automatic transmission with
Steptronic66
Turn signal indicator/Headlamp
flasher69
Wiper/Washer system69
Rear window defroster71
Cruise control72
Everything under control:
Odometer74
Tachometer74
Energy Control74
Fuel gauge75
Temperature gauge75
Service Interval Display75
Check Control76
Clock76
Computer77
Technology for safety and
convenience:
Park Distance Control (PDC)79
Automatic Stability Control plus
Traction (ASC+T)80
Dynamic Stability Control
(DSC)82
Tire Pressure Control (RDC)86Lamps:
Side lamps/Low beams88
Instrument lightning88
High beams/Parking lamps89
Fog lamps89
Interior lamps89
Controlling the climate for
pleasant driving:
Air conditioner92
Automatic climate control98
Seat heating103
Roller sun blind103
Interior conveniences:
HiFi system104
Glove compartment104
Storage compartments105
Cellular phones107
Ashtray, front107
Cigarette lighter108
Ashtray, rear108
Loading and transporting:
Through-loading system109
Ski bag110
Cargo loading112
Roof-mounted luggage rack113
Page 63 of 211

63n
IndexDataTechnologyRepairsCar careControlsOverview
Starting the engine Switching off the engine Do not press the accelerator pedal
while starting the engine.
Do not actuate the starter for too
short a time, but do not turn it for
more than approx. 20 seconds. Release
the ignition key immediately when the
engine starts.
Do not allow the engine to warm up by
leaving it running while the vehicle
remains stationary. Instead, begin
driving immediately at a moderate
engine speed.<
If the engine does not start on the first
attempt (if it is very hot or cold, for
instance):
>Press the accelerator pedal halfway
down while engaging the starter.
Cold start at extremely low tempera-
tures, from approx. +5 7 (-15 6)
and at elevations above 3,300 feet
(above 1,000 meters):
>On the first start attempt, engage the
starter for a longer period (approx.
10 seconds).
>Press the accelerator pedal halfway
down while engaging the starter.
Engine idle speed is controlled by the
engine computer system. Increased
speeds at startup are normal and
should decrease as the engine warms
up. If engine speed does not decrease,
service is required.
To prevent the battery from
discharging, always deactivate elec-
trical devices that are not in use. Switch
the ignition off when the vehicle is not
being driven.Turn the ignition key to position 1 or 0.
Do not remove the ignition key
while the vehicle is still moving.
If you did so, the steering lock would
engage when the steering wheel is
turned.
When you leave the vehicle, always
remove the ignition key and engage the
steering lock.
Vehicles with manual transmission:
Always engage the parking brake when
parking on slopes and inclined
surfaces. Placing the lever in 1st gear
or reverse may not provide adequate
resistance to rolling.
Vehicles with automatic transmission:
Place the selector lever in "Park."<
Page 64 of 211

64n
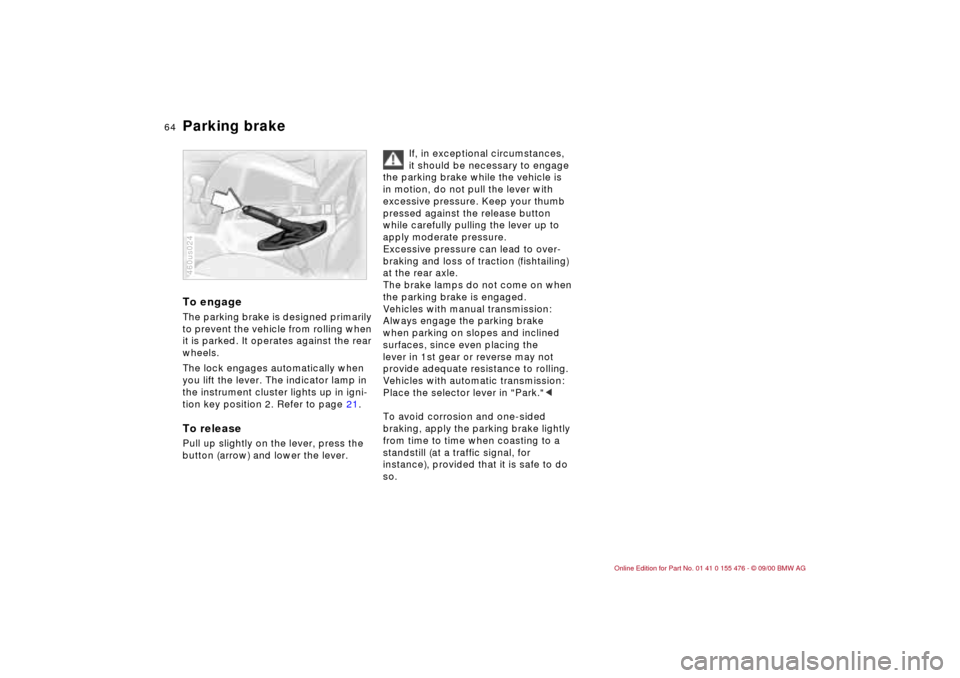
Parking brake To engageThe parking brake is designed primarily
to prevent the vehicle from rolling when
it is parked. It operates against the rear
wheels.
The lock engages automatically when
you lift the lever. The indicator lamp in
the instrument cluster lights up in igni-
tion key position 2. Refer to page 21.To releasePull up slightly on the lever, press the
button (arrow) and lower the lever.460us024
If, in exceptional circumstances,
it should be necessary to engage
the parking brake while the vehicle is
in motion, do not pull the lever with
excessive pressure. Keep your thumb
pressed against the release button
while carefully pulling the lever up to
apply moderate pressure.
Excessive pressure can lead to over-
braking and loss of traction (fishtailing)
at the rear axle.
The brake lamps do not come on when
the parking brake is engaged.
Vehicles with manual transmission:
Always engage the parking brake
when parking on slopes and inclined
surfaces, since even placing the
lever in 1st gear or reverse may not
provide adequate resistance to rolling.
Vehicles with automatic transmission:
Place the selector lever in "Park."<
To avoid corrosion and one-sided
braking, apply the parking brake lightly
from time to time when coasting to a
standstill (at a traffic signal, for
instance), provided that it is safe to do
so.
Page 65 of 211

65n
IndexDataTechnologyRepairsCar careControlsOverview
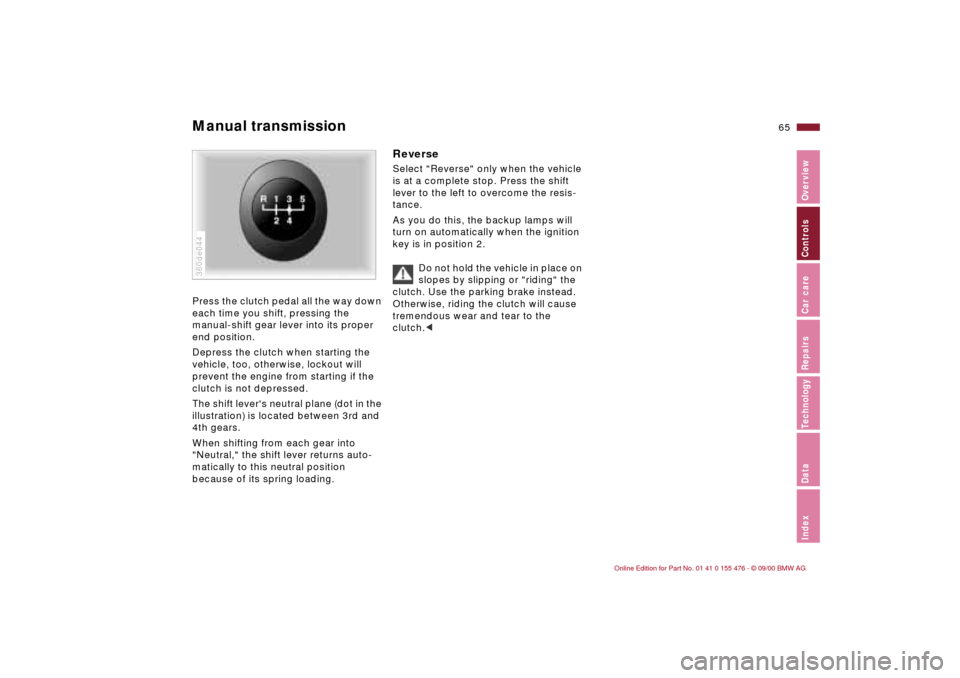
Manual transmission Press the clutch pedal all the way down
each time you shift, pressing the
manual-shift gear lever into its proper
end position.
Depress the clutch when starting the
vehicle, too, otherwise, lockout will
prevent the engine from starting if the
clutch is not depressed.
The shift lever's neutral plane (dot in the
illustration) is located between 3rd and
4th gears.
When shifting from each gear into
"Neutral," the shift lever returns auto-
matically to this neutral position
because of its spring loading.360de044
Reverse Select "Reverse" only when the vehicle
is at a complete stop. Press the shift
lever to the left to overcome the resis-
tance.
As you do this, the backup lamps will
turn on automatically when the ignition
key is in position 2.
Do not hold the vehicle in place on
slopes by slipping or "riding" the
clutch. Use the parking brake instead.
Otherwise, riding the clutch will cause
tremendous wear and tear to the
clutch.<