2001 BMW 325Ci CONVERTIBLE open top
[x] Cancel search: open topPage 116 of 215

116n
Roof-mounted luggage rack for the hardtop
*
AnchorsAccess to the anchors:
To open the cover (arrow), please use
the tool included with the roof-rack
system.
A special roof-rack system is available
for your BMW as an optional extra.
Please comply with the precautions
included with the installation instruc-
tions.
Because roof racks raise the center of
gravity of the vehicle when loaded, they
exercise a major effect on its handling
and steering response. You should
therefore always remember not to
exceed the approved roof weight, the
approved gross vehicle weight or the 46cde097
axle loads when loading the rack. Perti-
nent specifications are listed under
"Technical Data," page 198.
Make sure that the load is not too
heavy, and distribute it evenly.
Always load the heaviest pieces first (on
the bottom). Be sure that objects do not
project into the opening path of the
luggage compartment lid.
Secure the roof luggage correctly and
securely to prevent it from shifting or
being lost during driving (danger to
following traffic).
Drive smoothly and avoid sudden
acceleration or braking. Do not corner
at high speeds.
The roof load increases aerodynamic
resistance, which in turn increases fuel
consumption and places additional
stress on the vehicle itself.
Page 130 of 215
130n
Hardtop
*
It is not necessary to remove the fabric
top even in the winter, when the
hardtop is generally in constant use.
But you can remove it at any time
without difficulty. Before the fabric top
is stored in the convertible top well, it
must be absolutely dry in order to avoid
water spots and mildew from forming.
The hardtop offers reading lamps and
clothing hooks that can be used by
pressing lightly. In addition, a roof-rack
assembly is possible. In this regard,
please contact your BMW center.
When hanging clothing from the
hooks, be sure that they do not
obstruct the driver's vision. Do not hang
heavy objects on the hooks. If you do
so, they could cause personal injury
during braking or evasive maneuvers.<
Two persons are required for installa-
tion or removal. Work with extreme
caution in order to avoid paint damage
and damage to the body or hardtop.
To facilitate hardtop installation or
removal, you can obtain a specially
designed hardtop lift
* or hardtop cart
*
at your BMW center.
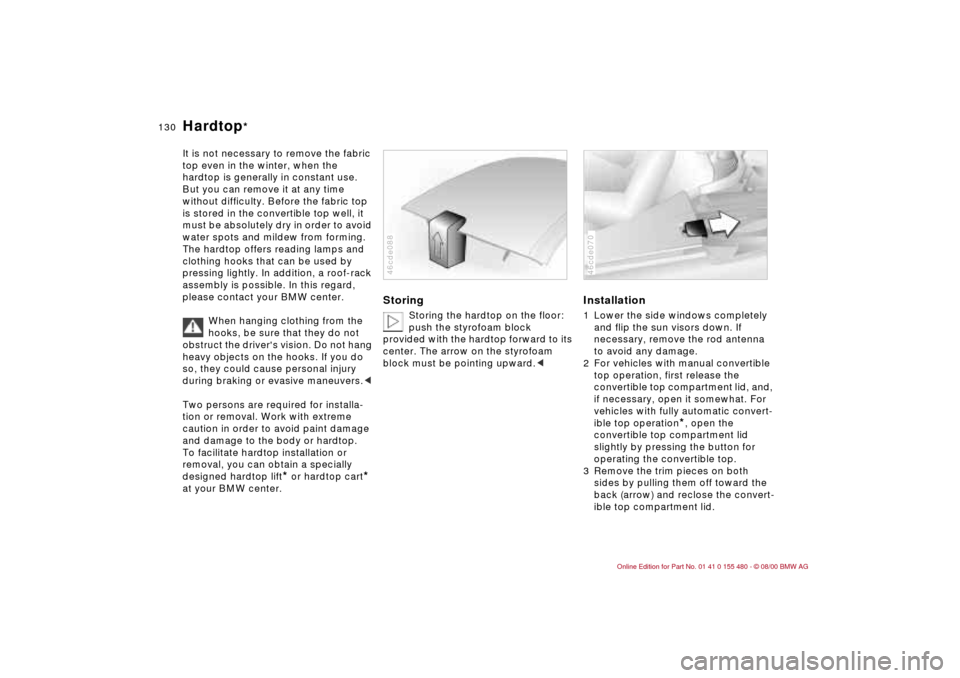
Storing
Storing the hardtop on the floor:
push the styrofoam block
provided with the hardtop forward to its
center. The arrow on the styrofoam
block must be pointing upward.<
46cde088
Installation1 Lower the side windows completely
and flip the sun visors down. If
necessary, remove the rod antenna
to avoid any damage.
2 For vehicles with manual convertible
top operation, first release the
convertible top compartment lid, and,
if necessary, open it somewhat. For
vehicles with fully automatic convert-
ible top operation
*, open the
convertible top compartment lid
slightly by pressing the button for
operating the convertible top.
3 Remove the trim pieces on both
sides by pulling them off toward the
back (arrow) and reclose the convert-
ible top compartment lid.
46cde070
Page 131 of 215
131n
IndexDataTechnologyRepairsCar careControlsOverview
Hardtop
*
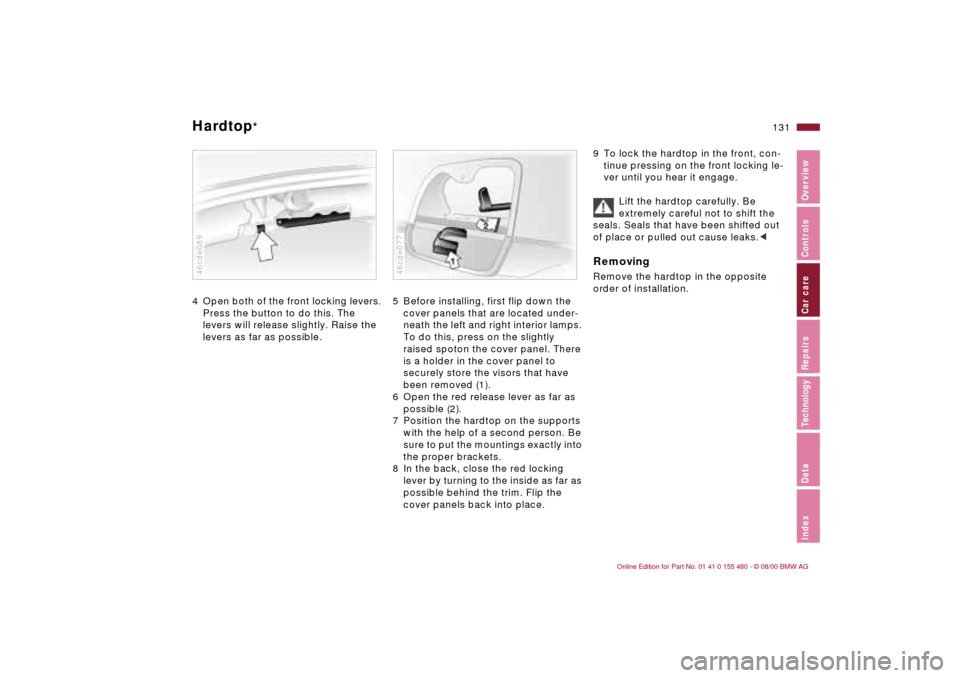
4 Open both of the front locking levers.
Press the button to do this. The
levers will release slightly. Raise the
levers as far as possible.46cde089
5 Before installing, first flip down the
cover panels that are located under-
neath the left and right interior lamps.
To do this, press on the slightly
raised spoton the cover panel. There
is a holder in the cover panel to
securely store the visors that have
been removed (1).
6 Open the red release lever as far as
possible (2).
7 Position the hardtop on the supports
with the help of a second person. Be
sure to put the mountings exactly into
the proper brackets.
8 In the back, close the red locking
lever by turning to the inside as far as
possible behind the trim. Flip the
cover panels back into place.46cde077
9 To lock the hardtop in the front, con-
tinue pressing on the front locking le-
ver until you hear it engage.
Lift the hardtop carefully. Be
extremely careful not to shift the
seals. Seals that have been shifted out
of place or pulled out cause leaks.cRemovingRemove the hardtop in the opposite
order of installation.
Page 148 of 215

148n
Coolant Brake fluidAdding coolant Wait until the engine cools before
removing the cap from the expansion
tank. The needle of the coolant temper-
ature gauge in the instrument cluster
must be located in the blue zone. If it
is not, there is a danger of scalding.
1 Turn the cap slightly counterclock-
wise in order to allow accumulated
pressure to escape. Then open.
2 If the coolant is low, slowly add
coolant until the correct level is
reached Ð do not overfill.
The coolant is a mixture of water and
extended-duty antifreeze with corrosion
inhibitor. Always maintain the
prescribed all-season 50:50 mixture
ratio for year-round protection against
internal corrosion. No other additives
are required.
Replace the coolant every four years.The brake warning lamp comes on
when the parking brake has been
released:
Check the brake fluid level and if
necessary, top up to the "MAX" mark.
For adding brake fluid or for deter-
mining and correcting the cause of
brake fluid loss, consult your BMW
center. Your BMW center is familiar
with the specifications for factory-
approved brake fluids (DOT 4).
Brake fluid loss can result in extended
pedal travel. Comply with the informa-
tion provided on page 126.
460de128
Brake fluid is hygroscopic, that is,
it absorbs moisture from the air
over time.
In order to ensure the safety and reli-
ability of the brake system, have the
brake fluid changed every two years by
an authorized BMW center. Refer also
to the Service and Warranty Information
Booklet (US models) or the Warranty
and Service Guide Booklet (Canadian
models). Brake fluid is hazardous to
health and damages the vehicle's paint.
You should always store it in its original
container and in a location that is
inaccessible to children.
Do not spill the fluid and do not fill the
brake fluid reservoir beyond the "MAX"
mark. The brake fluid could ignite upon
contact with hot engine parts and
cause serious burns.<
Comply with the applicable
environmental laws regulating
the disposal of brake fluid.<
Page 158 of 215
158n
Cleaning and care of the convertible topDo not use spot removers, paint thin-
ners, solvents, gasoline or similar
substances for removing spots from the
convertible top or from the rear
window. These materials destroy the
rubber seals, which will lead to leaks.
Use only BMW-approved cleaners.
Cleaning agents can contain
substances that are dangerous or
pose health risks. Therefore, always
comply with the warnings and danger
notices on the package.
Open the doors or windows on your
vehicle whenever cleaning the interior.
Never clean your vehicle with solvents
or other materials not specifically
intended for this purpose.c
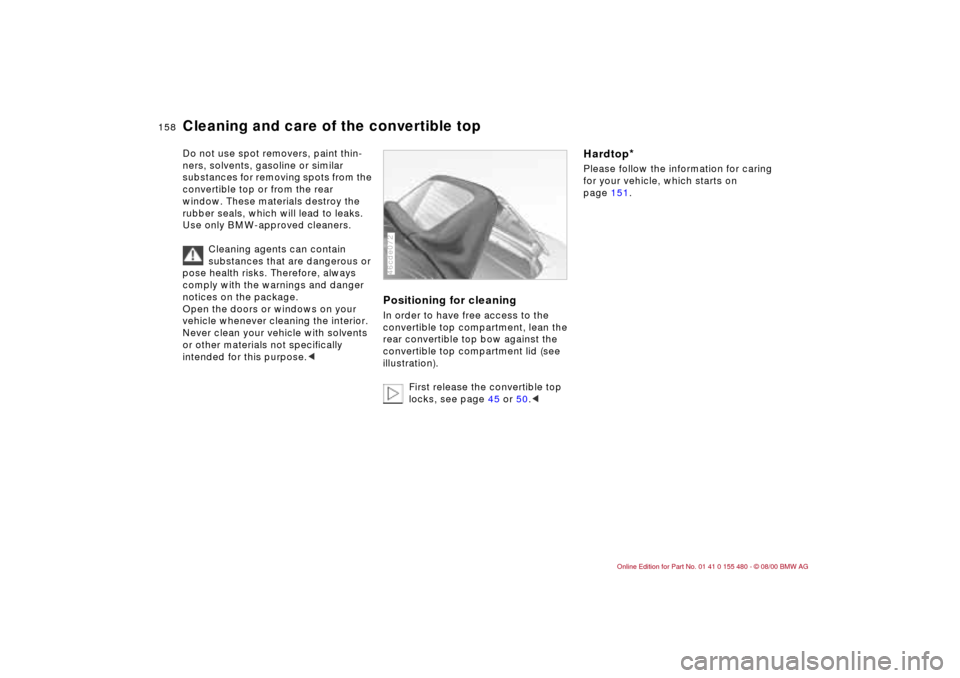
Positioning for cleaningIn order to have free access to the
convertible top compartment, lean the
rear convertible top bow against the
convertible top compartment lid (see
illustration).
First release the convertible top
locks, see page 45 or 50.<46cde072
Hardtop
*
Please follow the information for caring
for your vehicle, which starts on
page 151.
Page 166 of 215

166n
The onboard tool kit is located in the
luggage compartment lid.
Loosen the wingnut to open.
46cde042
1 Rotate the wiper arm completely out
from the windshield.
2 Position the wiper blade at an angle
and pull the release spring (arrow).
3 Fold the wiper blade down and
unhook it toward the windshield.
4 Pull the wiper blade past the wiper
arm toward the top.
5 Insert a new wiper blade and apply
pressure until you hear it engage.
Use only wiper blades approved
by BMW.<460de056
The lamps and bulbs are essential
factors contributing to the safety of
your vehicle. For this reason, follow the
instructions below carefully when
replacing a bulb. If you are not familiar
with any of the procedures, consult
your BMW center.
Do not touch the glass portion of
a new bulb with your bare hands
since even small amounts of impurities
burn into the surface and reduce the
service life of the bulb. Use a clean
cloth, paper napkin, or a similar material,
or hold the bulb by its metallic base.<
A replacement bulb set is available from
your BMW center.
Whenever working on the
electrical system, switch off the
electrical accessory you are working on
or disconnect the cable from the
negative terminal of the battery. Failure
to do this could result in short circuits.
To prevent injuries and damage, comply
with any instructions provided by the
bulb manufacturer.<
Onboard tool kit Windshield wiper blades Lamps and bulbs
Page 179 of 215
179n
IndexDataTechnologyRepairsCar careControlsOverview
FusesIf an electrical accessory should fail,
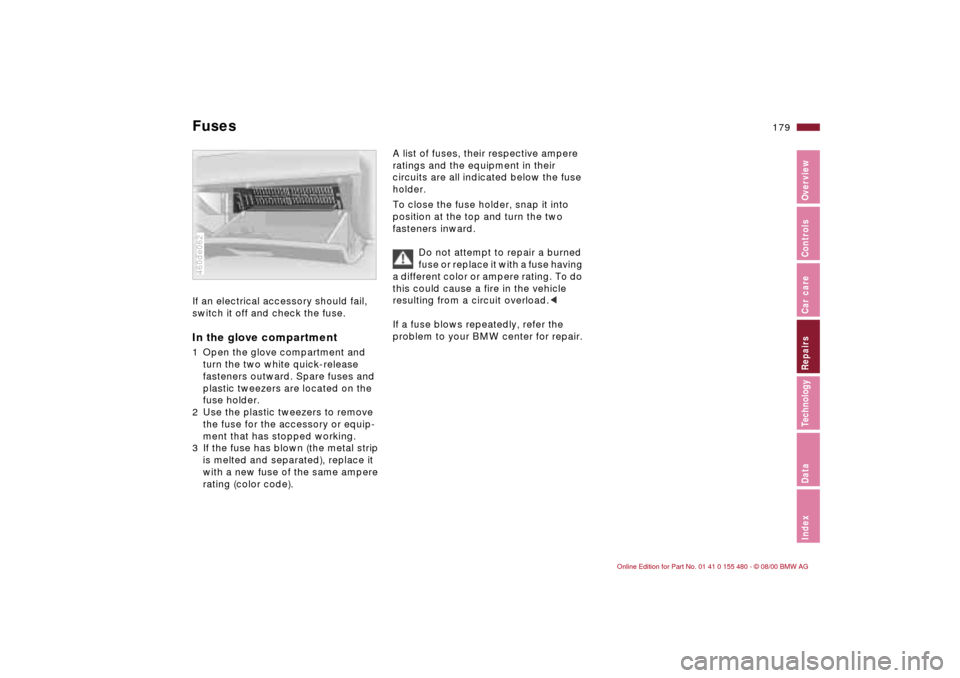
switch it off and check the fuse. In the glove compartment1 Open the glove compartment and
turn the two white quick-release
fasteners outward. Spare fuses and
plastic tweezers are located on the
fuse holder.
2 Use the plastic tweezers to remove
the fuse for the accessory or equip-
ment that has stopped working.
3 If the fuse has blown (the metal strip
is melted and separated), replace it
with a new fuse of the same ampere
rating (color code).460de062
A list of fuses, their respective ampere
ratings and the equipment in their
circuits are all indicated below the fuse
holder.
To close the fuse holder, snap it into
position at the top and turn the two
fasteners inward.
Do not attempt to repair a burned
fuse or replace it with a fuse having
a different color or ampere rating. To do
this could cause a fire in the vehicle
resulting from a circuit overload.<
If a fuse blows repeatedly, refer the
problem to your BMW center for repair.
Page 181 of 215
181n
IndexDataTechnologyRepairsCar careControlsOverview
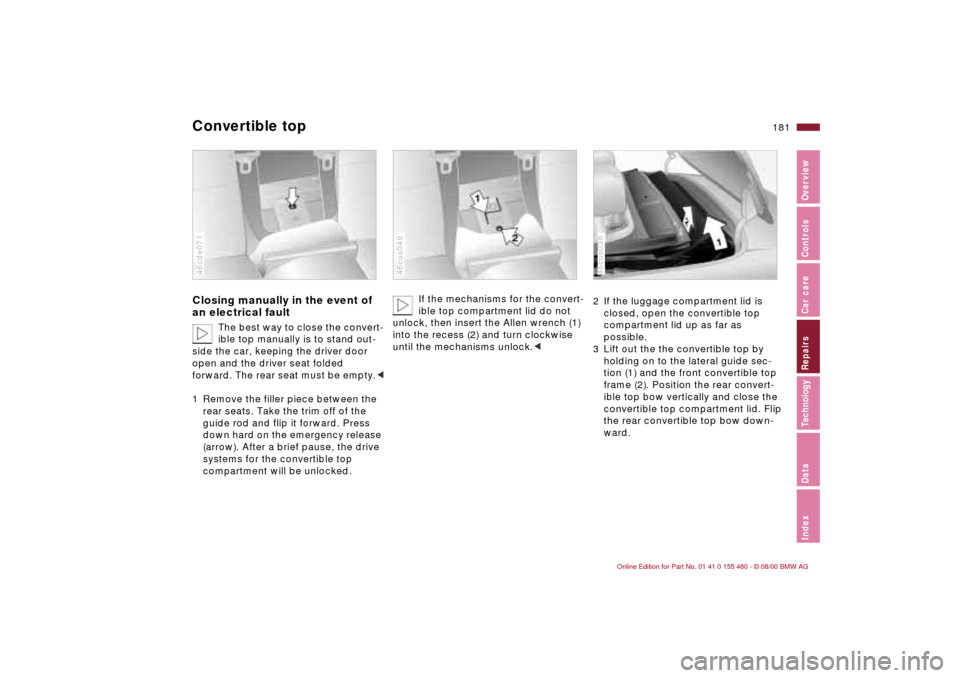
Convertible topClosing manually in the event of
an electrical fault
The best way to close the convert-
ible top manually is to stand out-
side the car, keeping the driver door
open and the driver seat folded
forward. The rear seat must be empty.c
1 Remove the filler piece between the
rear seats. Take the trim off of the
guide rod and flip it forward. Press
down hard on the emergency release
(arrow). After a brief pause, the drive
systems for the convertible top
compartment will be unlocked.
46cde071
If the mechanisms for the convert-
ible top compartment lid do not
unlock, then insert the Allen wrench (1)
into the recess (2) and turn clockwise
until the mechanisms unlock.c
46cus040
2 If the luggage compartment lid is
closed, open the convertible top
compartment lid up as far as
possible.
3 Lift out the the convertible top by
holding on to the lateral guide sec-
tion (1) and the front convertible top
frame (2). Position the rear convert-
ible top bow vertically and close the
convertible top compartment lid. Flip
the rear convertible top bow down-
ward.46cus038