Page 25 of 37
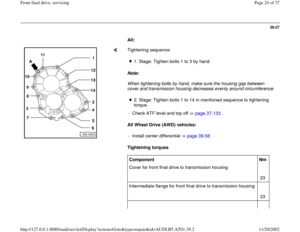
Center differential to transmission housing 23
Pa
ge 25 of 37 Front final drive, servicin
g
11/20/2002 htt
p://127.0.0.1:8080/audi/servlet/Dis
play?action=Goto&t
yp
e=re
pair&id=AUDI.B5.AT01.39.2
Page 26 of 37
39-28
Final drive to transmission housing seal,
replacing
Special Tools and equipment
VW681 extractor lever
3383 double seal installer
VAG1306 drip tray
VAG1358A - oil siphoning unit
Pa
ge 26 of 37 Front final drive, servicin
g
11/20/2002 htt
p://127.0.0.1:8080/audi/servlet/Dis
play?action=Goto&t
yp
e=re
pair&id=AUDI.B5.AT01.39.2
Page 27 of 37
39-29
Notes:
A faulty seal lets ATF or gear oil escape into the
converter housing via the center vent of the
shaft seal (between the two sealing lips).
In addition, a faulty seal can let ATF escape
into the center differential. It over-fills and oil
escapes at the differential vent.
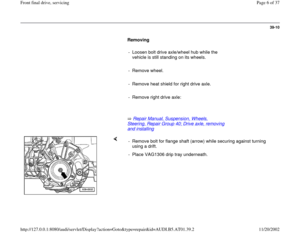
Removing
- Loosen bolt drive axle/wheel hub while the
vehicle is still standing on its wheels.
- Remove front wheels.
- Remove heat shield for right drive axle.
- Remove drive axles:
Repair Manual, Suspension, Wheels,
Steering, Repair Group 40; Drive axle, removing and installing
Pa
ge 27 of 37 Front final drive, servicin
g
11/20/2002 htt
p://127.0.0.1:8080/audi/servlet/Dis
play?action=Goto&t
yp
e=re
pair&id=AUDI.B5.AT01.39.2
Page 28 of 37
39-30
- Remove bolt for flange shaft (arrow) while securing against turning
using a drift.
- Using VAG1358A oil siphoning unit, siphon gear oil from the final drive.
- Place VAG1306 drip tray underneath.
- Remove right drive flange.
- Remove right transmission support page 37
-125
.
- Remove bolts for final drive cover opposite of shown tightening
sequence and remove cover.
- Pull out differential and remove.
Pa
ge 28 of 37 Front final drive, servicin
g
11/20/2002 htt
p://127.0.0.1:8080/audi/servlet/Dis
play?action=Goto&t
yp
e=re
pair&id=AUDI.B5.AT01.39.2
Page 29 of 37
39-31
Note:
Shim is pre-determined and must not be exchanged for a shim with
another thickness. - Remove tapered roller bearing outer race of differential -1- and shim -
2- which is behind it from transmission housing by hand.
- Remove left drive flange page 39
-13
.
Note:
Extractor lever must be positioned behind both sealing lips of the seal. Do
not position at outer circumference of seal, otherwise the contact surface
in transmission housing will be damaged. When levering out, carefully
guide extractor lever. - Pull out seal.
Pa
ge 29 of 37 Front final drive, servicin
g
11/20/2002 htt
p://127.0.0.1:8080/audi/servlet/Dis
play?action=Goto&t
yp
e=re
pair&id=AUDI.B5.AT01.39.2
Page 30 of 37
39-32
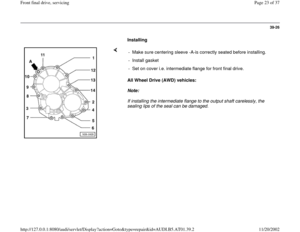
Installing
- Check seal seat in transmission housing for
damage; rework if necessary.
- Coat outer circumference and sealing lip of seal
with ATF.
- Slide seal onto 3383 double seal installer so that the projecting sealing
lip (arrow) of seal faces tool.
- Drive in new seal to stop.
Pa
ge 30 of 37 Front final drive, servicin
g
11/20/2002 htt
p://127.0.0.1:8080/audi/servlet/Dis
play?action=Goto&t
yp
e=re
pair&id=AUDI.B5.AT01.39.2
Page 31 of 37
39-33
- Install left drive flange page 39
-22
.
- Insert adjustment shim -2- and tapered roller bearing outer race for
differential -1- into transmission housing up to stop by hand.
- Replace O-ring (arrow).
- Insert differential into transmission housing.
Pa
ge 31 of 37 Front final drive, servicin
g
11/20/2002 htt
p://127.0.0.1:8080/audi/servlet/Dis
play?action=Goto&t
yp
e=re
pair&id=AUDI.B5.AT01.39.2
Page 32 of 37
39-34
Tightening sequence:
Repair Manual, Suspension, Wheels, Steering, Repair Group 40; Drive axle, removing and installing
- Install cover for final drive.
1. Stage: Tighten bolts 1 to 3 by hand2. Stage: Tighten bolts 1 to 12 in mentioned sequence to tightening
torque.
- Install right drive flange.
- Install right transmission support page 37
-125
.
- Installing drive axles: - Top-up and check gear oil in front final drive page 39
-1 .
Pa
ge 32 of 37 Front final drive, servicin
g
11/20/2002 htt
p://127.0.0.1:8080/audi/servlet/Dis
play?action=Goto&t
yp
e=re
pair&id=AUDI.B5.AT01.39.2


.
In addition, a faulty sea")
 while securing against turning
using a drift.
- Using VAG1358A oil siphoning unit, siphon gear oil from the final drive.
- Place VAG1306 drip t")


