Page 88 of 123

YOUR 206 CC IN DETAIL
88
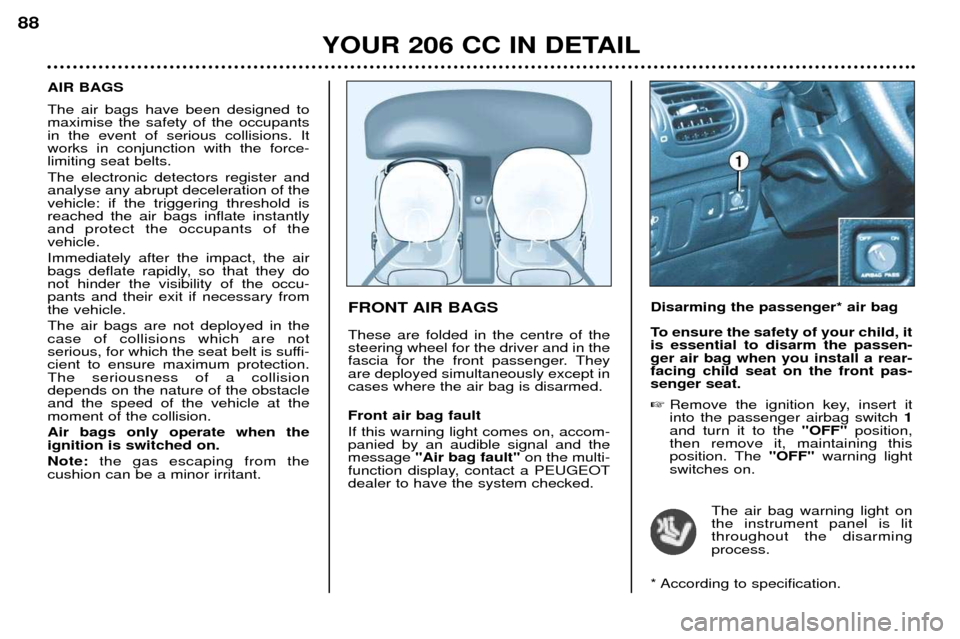
FRONT AIR BAGS These are folded in the centre of the steering wheel for the driver and in the
fascia for the front passenger. Theyare deployed simultaneously except incases where the air bag is disarmed. Front air bag fault If this warning light comes on, accom- panied by an audible signal and themessage
"Air bag fault" on the multi-
function display, contact a PEUGEOTdealer to have the system checked.
AIR BAGS The air bags have been designed to maximise the safety of the occupantsin the event of serious collisions. Itworks in conjunction with the force-limiting seat belts. The electronic detectors register and analyse any abrupt deceleration of thevehicle: if the triggering threshold isreached the air bags inflate instantlyand protect the occupants of thevehicle. Immediately after the impact, the air
bags deflate rapidly, so that they donot hinder the visibility of the occu-pants and their exit if necessary fromthe vehicle. The air bags are not deployed in the case of collisions which are not
serious, for which the seat belt is suffi-cient to ensure maximum protection.The seriousness of a collisiondepends on the nature of the obstacleand the speed of the vehicle at themoment of the collision. Air bags only operate when the ignition is switched on. Note:
the gas escaping from the
cushion can be a minor irritant. Disarming the passenger* air bag
To ensure the safety of your child, it is essential to disarm the passen-ger air bag when you install a rear-facing child seat on the front pas-senger seat. �
Remove the ignition key, insert it into the passenger airbag switch 1
and turn it to the "OFF"position,
then remove it, maintaining thisposition. The ''OFF''warning light
switches on.
The air bag warning light onthe instrument panel is litthroughout the disarmingprocess.
* According to specification.
Page 90 of 123

YOUR 206 CC IN DETAIL
90
For the front and side air bags* to be fully effective, observe the following safety rules:
¥ Wear a correctly adjusted seat belt.
¥ Sit in a normal upright position (passengers must not place their feet on the fascia).
¥ Do not leave an accessory, any other object or a small pet between the occupants of the front seats and the air bags. It could hamper the operation of the air bags or injure the occupants.
¥ All work on the air bag systems is strictly forbidden unless it is carried out by qualified personnel of the PEUGEOT network.
¥ After an accident or if the vehicle has been stolen or broken into, have the air bag systems checked.
¥ The air bag systems have been designed to be fully operational for 10 years after the vehicle has been registered. Have them replaced by a PEUGEOT dealer after this period.
Front air bags
¥ Do not drive holding the steering wheel by its spokes or resting your hands on the centre part of the wheel.
¥ Never remove or pierce the steering wheel or hit it violently.
¥ Smoke as little as possible; deployment of the air bags can cause burns or the risk of injury from a cigarette or pipe. Side air bags*
¥ Do not fix or glue anything to the front seat backs. This could cause injury to the chest or arms when the side air bag inflates.
¥ Do not sit with the upper part of the body any nearer to the door than necessary.
¥ Never put covers on the front seats. Contact your PEUGEOT dealer.
*According to specification
Page 92 of 123

YOUR 206 CC IN DETAIL
90
For the front and side air bags* to be fully effective, observe the following safety rules:
¥ Wear a correctly adjusted seat belt.
¥ Sit in a normal upright position (passengers must not place their feet on the fascia).
¥ Do not leave an accessory, any other object or a small pet between the occupants of the front seats and the air bags. It could hamper the operation of the air bags or injure the occupants.
¥ All work on the air bag systems is strictly forbidden unless it is carried out by qualified personnel of the PEUGEOT network.
¥ After an accident or if the vehicle has been stolen or broken into, have the air bag systems checked.
¥ The air bag systems have been designed to be fully operational for 10 years after the vehicle has been registered. Have them replaced by a PEUGEOT dealer after this period.
Front air bags
¥ Do not drive holding the steering wheel by its spokes or resting your hands on the centre part of the wheel.
¥ Never remove or pierce the steering wheel or hit it violently.
¥ Smoke as little as possible; deployment of the air bags can cause burns or the risk of injury from a cigarette or pipe. Side air bags*
¥ Do not fix or glue anything to the front seat backs. This could cause injury to the chest or arms when the side air bag inflates.
¥ Do not sit with the upper part of the body any nearer to the door than necessary.
¥ Never put covers on the front seats. Contact your PEUGEOT dealer.
*According to specification
Page 93 of 123
PRACTICAL ASPECTS OF YOUR VEHICLE91
1 -
Power steering reservoir
2 - Windscreen and headlamp wash reservoir*
3 - Coolant reservoir 4 -
Brake fluid reservoir
5 - Battery
6 - Air filter 7 -
Dipstick
8 - Engine oil reservoir
* According to specification.
1.6 LITRE 16V ENGINE
Page 94 of 123
PRACTICAL ASPECTS OF YOUR VEHICLE
92
1 -
Power steering reservoir
2 - Windscreen and headlamp wash reservoir*
3 - Coolant reservoir 4 -
Brake fluid reservoir
5 - Battery
6 - Air filter 7 -
Dipstick
8 - Engine oil reservoir
* According to specification.
2 LITRE 16 V ENGINE
Page 96 of 123

PRACTICAL ASPECTS OF YOUR VEHICLE
94
Power steering reservoir
Open the reservoir, with the engine
cold. The level should always beabove the MINI mark, close to theMAXI mark.
Windscreen and headlamp wash reservoir* For best quality cleaning and for your
safety, we recommend that you useproducts approved by PEUGEOT(capacity 2.8 litres or 6.6 litres withheadlamp wash). Battery
At the start of winter, have your batte-
ry checked by a PEUGEOT dealer. Air filter Regular replacement of the filter ele- ment is essential.
If you drive in very
dusty conditions, change it twice asoften. Brake pads Brake pad wear depends on the style of driving, in particular for vehicleswhich are used in town, for short jour-neys. It may be necessary to checkthe thickness of the pads even bet-ween services.
* According to specification. Manual gearbox This does not need an oil change. Check the level according to themanufacturer's servicing schedule. Autoadaptive automatic gearbox This does not need an oil change: have the level checked by a
PEUGEOT dealer according to themanufacturer's servicing schedule.Only use products appro-
ved by Automobiles
PEUGEOT.
To ensure best performan-
ce from components as important as the power steering and the bra-king system, PEUGEOTselects and offers quite specificproducts.
Page 108 of 123
PRACTICAL ASPECTS OF YOUR VEHICLE
104
Fuse no. Rating*
Functions*
7 15A Driving school accessories - Alarm fitted as an accessory - Rain detector
9 30A Hydraulic pump
10 40A Driving mirror demisting 11 15A Windscreen wiper
12 30A Front windows
14 10A Engine module - Air bags - Steering wheel stalk
15 15A Instrument panel - Multifunction screen - Navigation control unit - Air conditioning - Audio system
16 30A Locking/unlocking of doors
20 10A Right-hand brake light
21 15A Left-hand brake light - 3rd brake light
22 30A Front courtesy light - Glove box lighting - Lighter
S1 Shunt PARC shunt
* According to specification.
Page 117 of 123

PRACTICAL ASPECTS OF YOUR VEHICLE113
Manual operation of the roof (emergency mode) In the event of
electric or hydraulic
malfunction of the roof, it is possible
to close it manually.
Consult a PEUGEOT dealer to have the system checked. This is an emergency solution .
If at all possible, this operation is to be carried out by two people. � Lower the windows.
� Switch off the ignition.
� Remove the steering lock key.
� Apply the handbrake.
� Open the boot.�
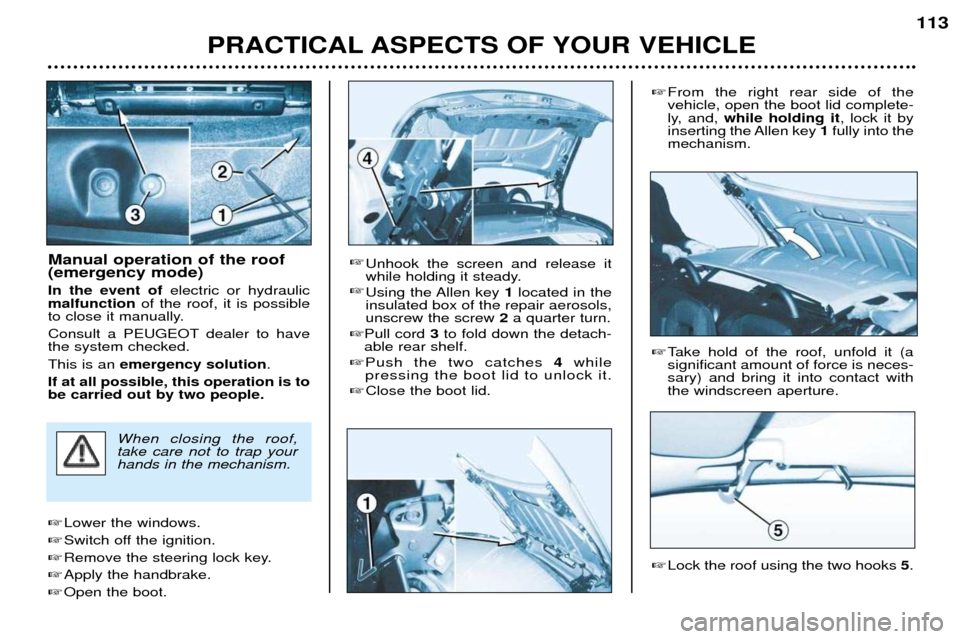
Unhook the screen and release it
while holding it steady.
� Using the Allen key 1located in the
insulated box of the repair aerosols,unscrew the screw 2a quarter turn.
� Pull cord 3to fold down the detach-
able rear shelf.
� Push the two catches 4while
pressing the boot lid to unlock it.
� Close the boot lid.
�From the right rear side of the vehicle, open the boot lid complete-
ly, and, while holding it , lock it by
inserting the Allen key 1fully into the
mechanism.
� Lock the roof using the two hooks 5.
When closing the roof, take care not to trap yourhands in the mechanism.
� Take hold of the roof, unfold it (a significant amount of force is neces-sary) and bring it into contact withthe windscreen aperture.