Page 6 of 107
Off Intermittent or continuous wipe Windscreen wash
Fog lamps off Front fog lamps on Front/rear fog lamps on
LIGHTING - HORN
Ring A Lighting controls Lights off Side lights
Rear fog lamp off Rear fog lamp onDipped/ main beam lights
Ring B Rear fog lamp control
Front/rear fog lamps control
FRONT AND REAR WINDSCREEN WIPER
Front 3 - High speed wipe
2 - Normal speed wipe
1 - Intermittent wipe
0 - Stop
4 - Single wipe
Pulling the stalk towards you washes the windscreen with timedsweep, and headlamp wash ifheadlamps are on.
YOUR 106 AT A GLANCE7
A
B
6263
3
2
1
0
4
Rear
06-05-2002
Page 49 of 107

YOUR 106 IN DETAIL50
Front head restraints Height adjustment: slide the head restraint. The adjustment is correct when the upper edge of the head restraint isat the same height as the top of thehead. This adjustment avoidsexcessive movement of the headrearwards, in cases of rear impact. Adjustment of angle*: tilt the head restraint.
To remove the head restraint: posi-
tion it at maximum height, press the two lugs then remove the headrestraint. W arning: never drive with the head
restraints removed; they must be in place and correctly adjusted.Adjustment of front seats Forwards/backwards adjustment: lift control 1, slide the seat, then let go to lock.
Adjustment of seat back:push control 2rearwards to obtain the required angle.
Access to rear seats: (3 doors)raise control 3or push control 2towards the front.
T ilt the back of the seat, then pull the seat forward.
The position of the seats is memorised*. To put them back as they were before, you need only return them to the original position.
The storage compartment for the handbook and Warranty book is located under the front right-hand seat*. * According to speciÞcation
13
2
06-05-2002
Page 53 of 107

YOUR 106 IN DETAIL54
Seat belts (5-door):
To adjust the height of the front
seat belts*:
Pull control 1towards you and slide it.
To fasten the seat belts:
Pull the strap, then insert the end into the buckle. Rear seat beltsThe rear seats are Þtted with two three-point inertia reel belts and alap belt.
1
To be effective, a seat
belt must be tensioned as close to the body aspossible.
Depending on the nature andseriousness of the impact thepre-tensioning system may betriggered before and indepen-dently of the airbags. In all cases, the airbag warning light comes on. Following an impact, have the system checked by a PEUGEOT
dealer. The system has been designed to be fully operational for tenyears. Have it replaced at the endof this period.Pre-tensioning and force- limiting front seat belts* Safety in the event of a front impact has been improved by theintroduction of pre-tensioning andforce-limiting front seat belts.Depending on the seriousness ofthe impact, the pre-tensioningsystem instantly tightens the seatbelts Þrmly against the body of theoccupant. The pre-tensioning seat belts are armed when the ignition is on. * According to speciÞcation
06-05-2002
Page 65 of 107

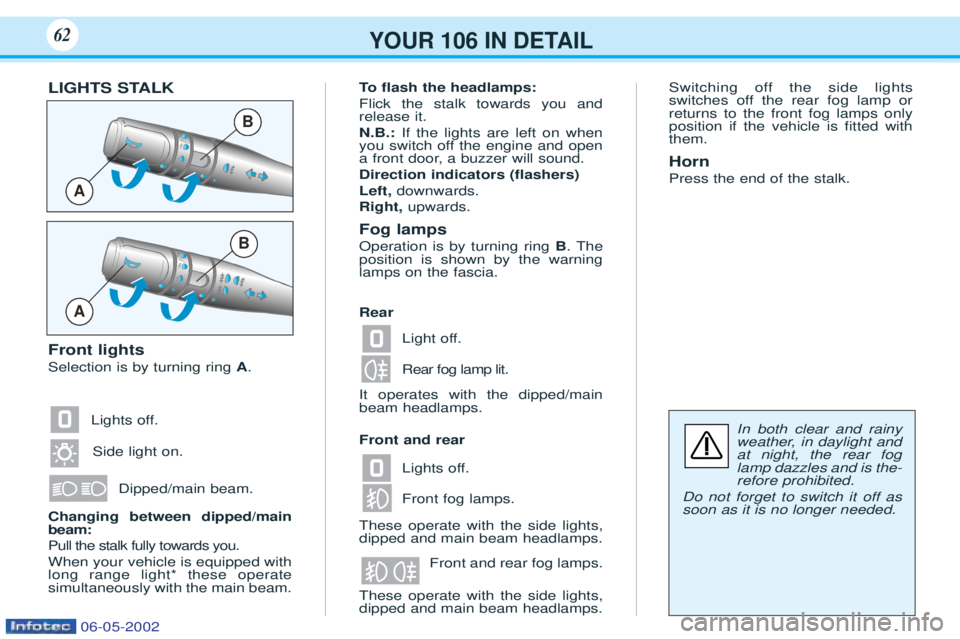
Light off. Rear fog lamp lit.
Lights off. Front fog lamps.Front and rear fog lamps.
These operate with the side lights, dipped and main beam headlamps.
Lights off.
Side light on.
Dipped/main beam.
YOUR 106 IN DETAIL62
In both clear and rainy
weather, in daylight andat night, the rear foglamp dazzles and is the-refore prohibited.
Do not forget to switch it off assoon as it is no longer needed.
A
B
A
B
LIGHTS STALK Front lights Selection is by turning ring A.
Changing between dipped/main beam: Pull the stalk fully towards you.When your vehicle is equipped with long range light* these operatesimultaneously with the main beam. To
flash the headlamps:
Flick the stalk towards you andrelease it. N.B.: If the lights are left on when
you switch off the engine and open
a front door, a buzzer will sound. Direction indicators ( flashers)
Left, downwards.
Right, upwards.
Fog lamps Operation is by turning ring B. The
position is shown by the warning lamps on the fascia. It operates with the dipped/main beam headlamps. These operate with the side lights, dipped and main beam headlamps. Switching off the side lights
switches off the rear fog lamp orreturns to the front fog lamps onlyposition if the vehicle is Þtted withthem. Horn Press the end of the stalk.
Rear Front and rear
06-05-2002
Page 66 of 107

YOUR 106 IN DETAIL63
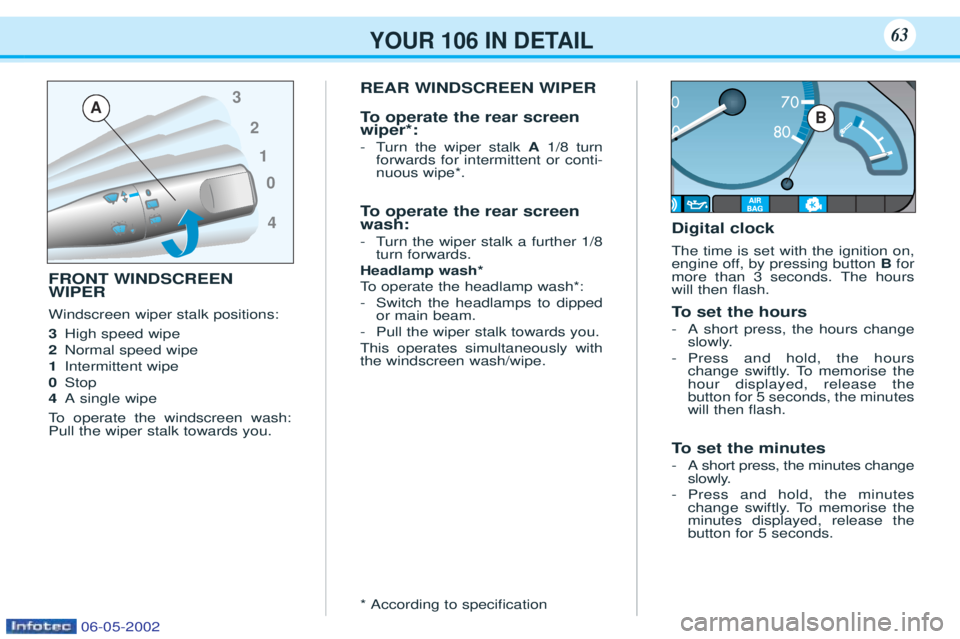
FRONT WINDSCREEN WIPER Windscreen wiper stalk positions: 3High speed wipe
2 Normal speed wipe
1 Intermittent wipe
0 Stop
4 A single wipe
To operate the windscreen wash:
Pull the wiper stalk towards you. REAR WINDSCREEN WIPER
To
operate the rear screen
wiper*: -T urn the wiper stalk A1/8 turn
forwards for intermittent or conti- nuous wipe*.
To operate the rear screen
wash: -T urn the wiper stalk a further 1/8
turn forwards.
Headlamp wash*
To operate the headlamp wash*:
- Switch the headlamps to dipped or main beam.
- Pull the wiper stalk towards you.
This operates simultaneously withthe windscreen wash/wipe. * According to speciÞcation Digital clock The time is set with the ignition on,
engine off, by pressing button
Bfor
more than 3 seconds. The hourswill then ßash.
To set the hours
-A short press, the hours change
slowly.
- Press and hold, the hours
change swiftly. To memorise thehour displayed, release thebutton for 5 seconds, the minuteswill then ßash.
To set the minutes
-A short press, the minutes change
slowly.
- Press and hold, the minutes
change swiftly. To memorise theminutes displayed, release thebutton for 5 seconds.
0
4
1
2
3
AB
06-05-2002
Page 84 of 107

PRACTICAL INFORMATION80
CHANGING A WHEEL Access to the spare wheel The spare wheel is outside, under the luggage compartment, in a
metal carrier. ÐTake out the wheel-brace 1.
Ð Using the wheel-brace 1, slacken
the spare wheel carrier bolt inside the luggage compartment,under the carpet.
ÐL
ift the carrier to disengage the
hook towards the rear, then lower it.
ÐT ake out the jack storage box 2
located in the spare wheel. Remove the wheel Ð
Use the wheel-brace to remove the wheel trim by pulling at thevalve location.
Ð Loosen the wheel bolts.
Ð
Use the jack storage box to chockthe wheel at the opposite corner tothe wheel being changed.
Ð Position the jack head in the jac-king point nearest to the wheelbeing changed, taking care thatthe entire base of the jack is incontact with the ground.
Ð Raise the jack, remove the wheelbolts and remove the wheel. Fit the spare wheel Ð
Position the wheel, then lightly pre-tighten the bolts using thewheel-brace.
Ð Lower the jack and release it.
ÐT ighten the bolts using the
wheel-brace.
Ð Fit the wheel trim, starting withthe valve location, and press withthe palm of the hand.
Replacing the wheel in the carrier Ð Lift the wheel to aid re-positio-
ning of the carrier.
Ð Do not forget to retighten thespare wheel carrier bolt.
80
3
2
1
06-05-2002
Page 95 of 107
PRACTICAL INFORMATION87
13 fuse box
13 fuse box in the passenger compartment
To
gain access to the passenger
compartment fuse box, press the lug on the upper section and pullthe ßap towards you.
F7 F2
F3F10
F11
F4F9F5
F8
F6
F1
F12 F13
06-05-2002
Page 99 of 107

PRACTICAL INFORMATION93
To tow your 106 without
lifting... A towing bar should always be used. From the front and rear:Ð Attach the towing bar to the towing eye.
T ow-bar
This device must be Þtted by a
PEUGEOT dealer. T
owing (boat, caravan, etc.)
¥ before setting out:
- check the pressure of thetyres, both on the vehicle and
on the trailer.
- check the electrical signals onthe trailer
- practice manoeuvring, in parti-cular reversing.
- grease the tow ball regularly,remove it when you have Þni-shed towing.
¥ In a caravan, distribute the loadinside evenly and do not exceedthe maximum load.
¥ Always drive at a moderate
speed, change gear early, bothgoing uphill and downhill. Payattention to side winds.
¥ When towing, fuel consumptionincreases. Do not forget to use a
roof deßector if necessary.
¥ Braking distance increases.
Brake gradually and gently. Avoidjerky braking. Do not exceed your vehicle’s
towing capacity. T
owing weight: see ÔTechnical dataÕ
section. Recommended nose weight: 50 kg.
06-05-2002