2000 YAMAHA YZF600 check engine light
[x] Cancel search: check engine lightPage 16 of 109
INSTRUMENT AND CONTROL FUNCTIONS
3-2
3
EAU01590
(Parking)
The steering is locked in this position,
and the taillight and auxiliary light come
on but all other circuits are off. The key
can be removed in this position.
To use the parking position, first lock
the steering, then turn the key to “ ”.
Do not use this position for an extend-
ed length of time as the battery may
discharge.
EAU00056
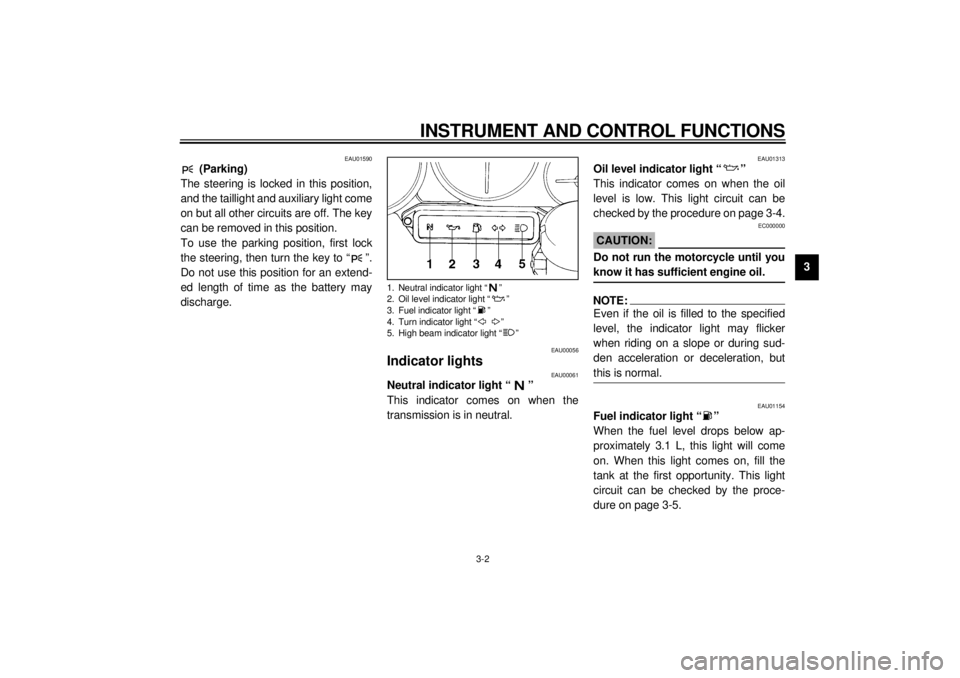
Indicator lights
EAU00061
Neutral indicator light “ ”
This indicator comes on when the
transmission is in neutral.
EAU01313
Oil level indicator light “ ”
This indicator comes on when the oil
level is low. This light circuit can be
checked by the procedure on page 3-4.
EC000000
CAUTION:@ Do not run the motorcycle until you
know it has sufficient engine oil. @NOTE:@ Even if the oil is filled to the specified
level, the indicator light may flicker
when riding on a slope or during sud-
den acceleration or deceleration, but
this is normal. @
EAU01154
Fuel indicator light “ ”
When the fuel level drops below ap-
proximately 3.1 L, this light will come
on. When this light comes on, fill the
tank at the first opportunity. This light
circuit can be checked by the proce-
dure on page 3-5.
1. Neutral indicator light “ ”
2. Oil level indicator light “ ”
3. Fuel indicator light “ ”
4. Turn indicator light “ ”
5. High beam indicator light “ ”
E_4tv_Functions.fm Page 2 Wednesday, September 1, 1999 11:10 AM
Page 18 of 109
INSTRUMENT AND CONTROL FUNCTIONS
3-4
3
EAU00071
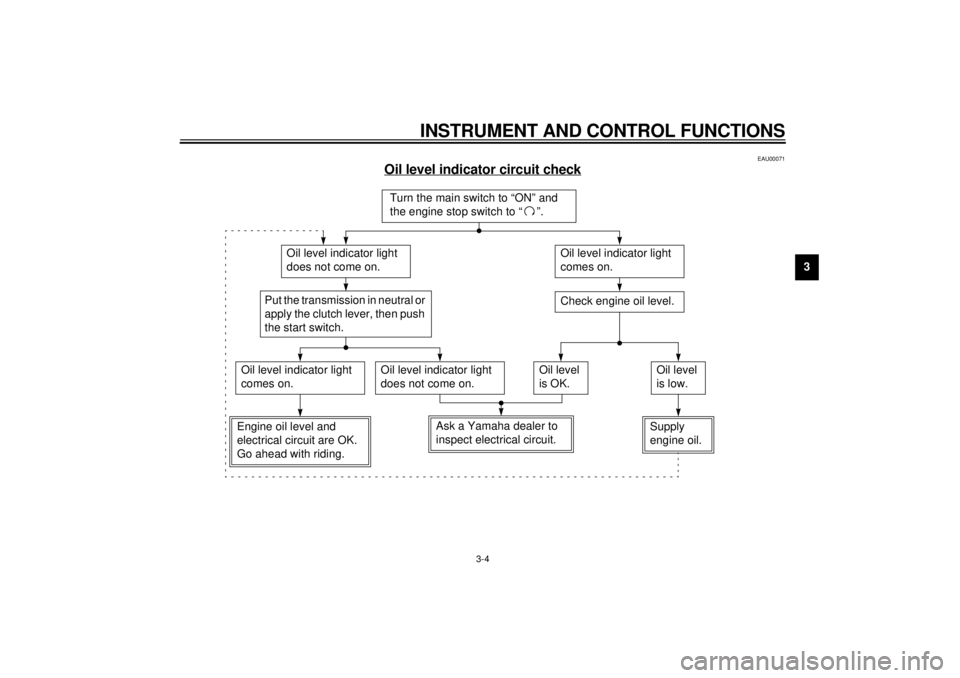
Oil level indicator circuit check
CB-48E
Turn the main switch to “ON” and
the engine stop switch to “ ”.
Oil level indicator light
does not come on.
Oil level indicator light
comes on.Check engine oil level.
Oil level indicator light
comes on.
Oil level indicator light
does not come on.
Engine oil level and
electrical circuit are OK.
Go ahead with riding.
Put the transmission in neutral or
apply the clutch lever, then push
the start switch.
Oil level
is OK.
Supply
engine oil.Oil level
is low.
Ask a Yamaha dealer to
inspect electrical circuit.
E_4tv_Functions.fm Page 4 Wednesday, September 1, 1999 11:10 AM
Page 19 of 109
INSTRUMENT AND CONTROL FUNCTIONS
3-5
3
EAU00085
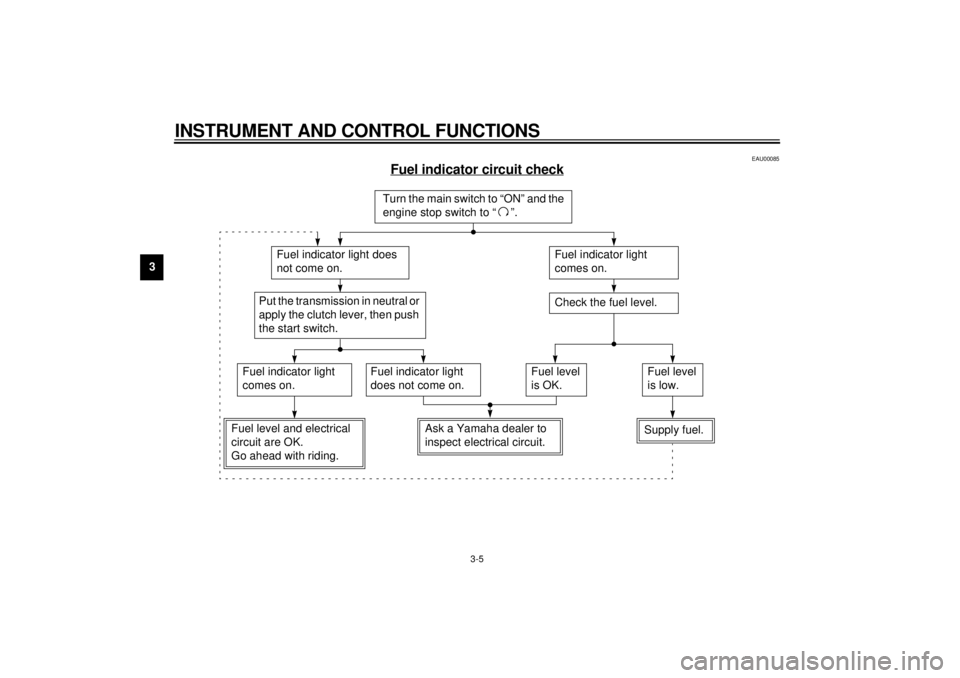
Fuel indicator circuit check
CB-46E
Turn the main switch to “ON” and the
engine stop switch to “ ”.
Fuel indicator light does
not come on.
Fuel indicator light
comes on.Check the fuel level.
Fuel indicator light
comes on.
Fuel indicator light
does not come on.
Fuel level and electrical
circuit are OK.
Go ahead with riding.
Put the transmission in neutral or
apply the clutch lever, then push
the start switch.
Fuel level
is OK.
Supply fuel.Fuel level
is low.
Ask a Yamaha dealer to
inspect electrical circuit.
E_4tv_Functions.fm Page 5 Wednesday, September 1, 1999 11:10 AM
Page 45 of 109
OPERATION AND IMPORTANT RIDING POINTS
5-3
51. Turn the main switch to “ON” and
the engine stop switch to “ ”.
EC000035
CAUTION:@ If the fuel indicator light comes on,
check the fuel level. If necessary, fill
the tank with fuel. @2. Shift the transmission into neutral.NOTE:@ When the transmission is in neutral, the
neutral indicator light should be on. If
the light does not come on, ask a
Yamaha dealer to inspect it. @3. Turn on the starter (choke) and
completely close the throttle grip.
4. Start the engine by pushing the
start switch.
NOTE:@ If the engine fails to start, release the
start switch, wait a few seconds, then
try again. Each attempt should be as
short as possible to preserve the bat-
tery. Do not crank the engine more
than 10 seconds on any one attempt. @
EC000036
CAUTION:@ The oil level indicator light and fuel
indicator light should come on when
the start switch is pushed and
should go off when the start switch
is released. If the oil level indicator
light flickers or remains on, immedi-
ately stop the engine and check the
engine oil level and for oil leakage. If
necessary, fill the engine with oil
and check to see that the oil level in-
dicator light goes off. If not, consult
a Yamaha dealer. @
5. After starting the engine, move the
starter (choke) to the halfway posi-
tion.NOTE:@ For maximum engine life, never accel-
erate hard with a cold engine! @6. After the engine is warm, turn off
the starter (choke) completely.NOTE:@ The engine is warm when it responds
normally to the throttle with the starter
(choke) turned off. @
E_4tv_Operation.fm Page 3 Wednesday, September 1, 1999 11:11 AM
Page 50 of 109
6
PERIODIC MAINTENANCE AND MINOR REPAIR
Tool kit................................................................... 6-1
Periodic maintenance and lubrication ................... 6-2
Cowling and panel removal and installation.......... 6-5
Cowling A and B ................................................... 6-5
Cowling C ............................................................. 6-7
Spark plugs........................................................... 6-7
Engine oil .............................................................. 6-9
Cooling system ................................................... 6-12
Changing the coolant.......................................... 6-13
Air filter ............................................................... 6-15
Air vent hose ....................................................... 6-17
Air intake duct ..................................................... 6-17
Carburetor adjustment ........................................ 6-17
Idle speed adjustment ........................................ 6-18
Throttle cable free play inspection ...................... 6-18
Valve clearance adjustment ................................ 6-19
Tires .................................................................... 6-19
Wheels................................................................ 6-22
Clutch lever free play adjustment........................ 6-23
Rear brake pedal height adjustment ................... 6-23
Brake light switch adjustment ............................. 6-24
Checking the front and rear brake pads.............. 6-25
Inspecting the brake fluid level............................ 6-25
Brake fluid replacement ...................................... 6-26Drive chain slack check...................................... 6-27
Drive chain slack adjustment ............................. 6-27
Drive chain lubrication........................................ 6-28
Cable inspection and lubrication ........................ 6-28
Throttle cable and grip lubrication ...................... 6-28
Brake and shift pedal lubrication ........................ 6-29
Brake and clutch lever lubrication ...................... 6-29
Sidestand lubrication.......................................... 6-29
Rear suspension lubrication............................... 6-30
Front fork inspection ........................................... 6-30
Steering inspection ............................................ 6-31
Wheel bearings .................................................. 6-31
Battery................................................................ 6-32
Fuse replacement .............................................. 6-33
Headlight bulb replacement ............................... 6-33
Tail/brake light bulb replacement ........................ 6-35
Turn signal light bulb replacement...................... 6-35
Front wheel removal ........................................... 6-35
Front wheel installation ...................................... 6-36
Rear wheel removal ........................................... 6-37
Rear wheel installation ....................................... 6-38
Troubleshooting .................................................. 6-39
Troubleshooting chart......................................... 6-40
E_4tv_PeriodicTOC.fm Page 1 Wednesday, September 1, 1999 11:11 AM
Page 59 of 109
PERIODIC MAINTENANCE AND MINOR REPAIR
6-9
6Installation
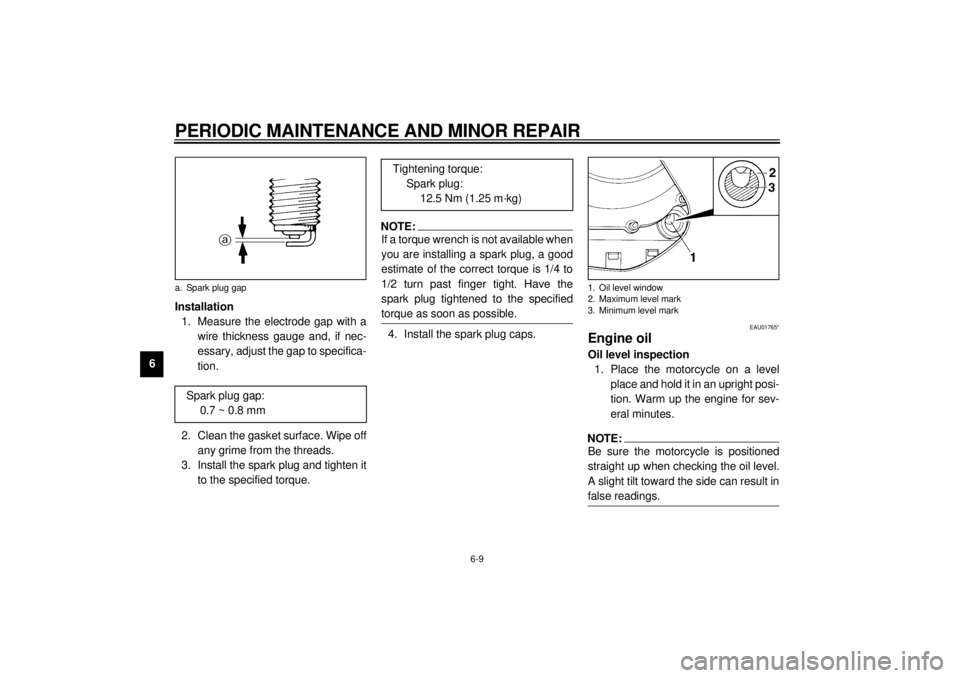
1. Measure the electrode gap with a
wire thickness gauge and, if nec-
essary, adjust the gap to specifica-
tion.
2. Clean the gasket surface. Wipe off
any grime from the threads.
3. Install the spark plug and tighten it
to the specified torque.
NOTE:@ If a torque wrench is not available when
you are installing a spark plug, a good
estimate of the correct torque is 1/4 to
1/2 turn past finger tight. Have the
spark plug tightened to the specified
torque as soon as possible. @4. Install the spark plug caps.
EAU01765*
Engine oilOil level inspection
1. Place the motorcycle on a level
place and hold it in an upright posi-
tion. Warm up the engine for sev-
eral minutes.NOTE:@ Be sure the motorcycle is positioned
straight up when checking the oil level.
A slight tilt toward the side can result in
false readings. @
a. Spark plug gap
Spark plug gap:
0.7 ~ 0.8 mm
Tightening torque:
Spark plug:
12.5 Nm (1.25 m·kg)
1. Oil level window
2. Maximum level mark
3. Minimum level mark
E_4tv_Periodic.fm Page 9 Wednesday, September 1, 1999 11:12 AM
Page 61 of 109
PERIODIC MAINTENANCE AND MINOR REPAIR
6-11
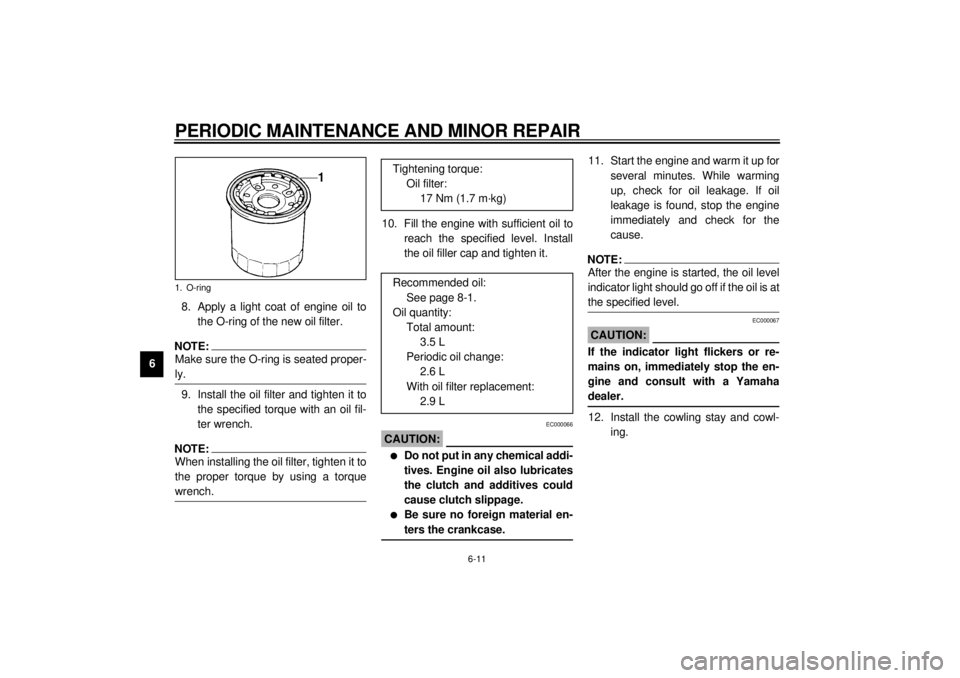
68. Apply a light coat of engine oil to
the O-ring of the new oil filter.
NOTE:@ Make sure the O-ring is seated proper-
ly. @9. Install the oil filter and tighten it to
the specified torque with an oil fil-
ter wrench.NOTE:When installing the oil filter, tighten it to
the proper torque by using a torque
wrench.
10. Fill the engine with sufficient oil to
reach the specified level. Install
the oil filler cap and tighten it.
EC000066
CAUTION:@ l
Do not put in any chemical addi-
tives. Engine oil also lubricates
the clutch and additives could
cause clutch slippage.
l
Be sure no foreign material en-
ters the crankcase.
@
11. Start the engine and warm it up for
several minutes. While warming
up, check for oil leakage. If oil
leakage is found, stop the engine
immediately and check for the
cause.NOTE:@ After the engine is started, the oil level
indicator light should go off if the oil is at
the specified level. @
EC000067
CAUTION:@ If the indicator light flickers or re-
mains on, immediately stop the en-
gine and consult with a Yamaha
dealer. @12. Install the cowling stay and cowl-
ing.
1. O-ring
Tightening torque:
Oil filter:
17 Nm (1.7 m·kg)
Recommended oil:
See page 8-1.
Oil quantity:
Total amount:
3.5 L
Periodic oil change:
2.6 L
With oil filter replacement:
2.9 L
E_4tv_Periodic.fm Page 11 Wednesday, September 1, 1999 11:12 AM
Page 107 of 109
10-INDEXAAir filter ..................................................6-15
Air intake duct ........................................6-17
Air vent hose .......................................... 6-17
Antitheft alarm (optional) .......................... 3-7BBattery ................................................... 6-32
Brake and clutch lever lubrication........... 6-29
Brake and shift pedal lubrication ............ 6-29
Brake fluid replacement ......................... 6-26
Brake light switch adjustment ................. 6-24CCable inspection and lubrication ............ 6-28
Carburetor adjustment ...........................6-17
Care.........................................................7-1
Changing the coolant ............................. 6-13
Checking the front and
rear brake pads ................................... 6-25
Clutch lever .............................................. 3-9
Clutch lever free play adjustment ........... 6-23
Controls/Instruments ................................2-3
Coolant temperature gauge ..................... 3-8
Cooling system ...................................... 6-12
Cowling A and B ......................................6-5
Cowling C ................................................6-7
Cowling and panel removal and
installation .............................................6-5
DDiagnosis device ..................................... 3-7
Dimmer switch ......................................... 3-8
Drive chain lubrication ........................... 6-28
Drive chain slack adjustment ................. 6-27
Drive chain slack check ......................... 6-27EEngine break-in ....................................... 5-5
Engine oil ................................................ 6-9
Engine stop switch................................... 3-9FFront brake lever ................................... 3-10
Front fork adjustment............................. 3-16
Front fork inspection .............................. 6-30
Front wheel installation .......................... 6-36
Front wheel removal .............................. 6-35
Fuel ....................................................... 3-11
Fuel indicator circuit check....................... 3-5
Fuel indicator light ................................... 3-2
Fuel tank breather hose
(for Germany only) .............................. 3-13
Fuel tank cap ......................................... 3-11
Fuse replacement.................................. 6-33GGive safety the right of way ..................... 1-1
HHandlebar switches ..................................3-8
Dimmer switch ....................................3-8
Engine stop switch..............................3-9
Horn switch.........................................3-8
Lights switch .......................................3-9
Pass switch ........................................3-8
Start switch .........................................3-9
Turn signal switch ...............................3-8
Headlight bulb replacement....................6-33
Helmet holder.........................................3-15
High beam indicator light ..........................3-3
Horn switch ..............................................3-8IIdentification number records ...................9-1
Idle speed adjustment ............................6-18
Indicator lights ..........................................3-2
Fuel indicator light...............................3-2
High beam indicator light ....................3-3
Neutral indicator light ..........................3-2
Oil level indicator light .........................3-2
Turn indicator light ..............................3-3
Inspecting the brake fluid level ...............6-25KKey identification number .........................9-1LLeft view...................................................2-1
Lights switch ............................................3-9
Luggage strap holders ...........................3-21
E_4tvIX.fm Page 1 Wednesday, September 1, 1999 11:15 AM