2000 YAMAHA YZF600 brake pads
[x] Cancel search: brake padsPage 50 of 109
6
PERIODIC MAINTENANCE AND MINOR REPAIR
Tool kit................................................................... 6-1
Periodic maintenance and lubrication ................... 6-2
Cowling and panel removal and installation.......... 6-5
Cowling A and B ................................................... 6-5
Cowling C ............................................................. 6-7
Spark plugs........................................................... 6-7
Engine oil .............................................................. 6-9
Cooling system ................................................... 6-12
Changing the coolant.......................................... 6-13
Air filter ............................................................... 6-15
Air vent hose ....................................................... 6-17
Air intake duct ..................................................... 6-17
Carburetor adjustment ........................................ 6-17
Idle speed adjustment ........................................ 6-18
Throttle cable free play inspection ...................... 6-18
Valve clearance adjustment ................................ 6-19
Tires .................................................................... 6-19
Wheels................................................................ 6-22
Clutch lever free play adjustment........................ 6-23
Rear brake pedal height adjustment ................... 6-23
Brake light switch adjustment ............................. 6-24
Checking the front and rear brake pads.............. 6-25
Inspecting the brake fluid level............................ 6-25
Brake fluid replacement ...................................... 6-26Drive chain slack check...................................... 6-27
Drive chain slack adjustment ............................. 6-27
Drive chain lubrication........................................ 6-28
Cable inspection and lubrication ........................ 6-28
Throttle cable and grip lubrication ...................... 6-28
Brake and shift pedal lubrication ........................ 6-29
Brake and clutch lever lubrication ...................... 6-29
Sidestand lubrication.......................................... 6-29
Rear suspension lubrication............................... 6-30
Front fork inspection ........................................... 6-30
Steering inspection ............................................ 6-31
Wheel bearings .................................................. 6-31
Battery................................................................ 6-32
Fuse replacement .............................................. 6-33
Headlight bulb replacement ............................... 6-33
Tail/brake light bulb replacement ........................ 6-35
Turn signal light bulb replacement...................... 6-35
Front wheel removal ........................................... 6-35
Front wheel installation ...................................... 6-36
Rear wheel removal ........................................... 6-37
Rear wheel installation ....................................... 6-38
Troubleshooting .................................................. 6-39
Troubleshooting chart......................................... 6-40
E_4tv_PeriodicTOC.fm Page 1 Wednesday, September 1, 1999 11:11 AM
Page 52 of 109
PERIODIC MAINTENANCE AND MINOR REPAIR
6-2
6
EAU00473
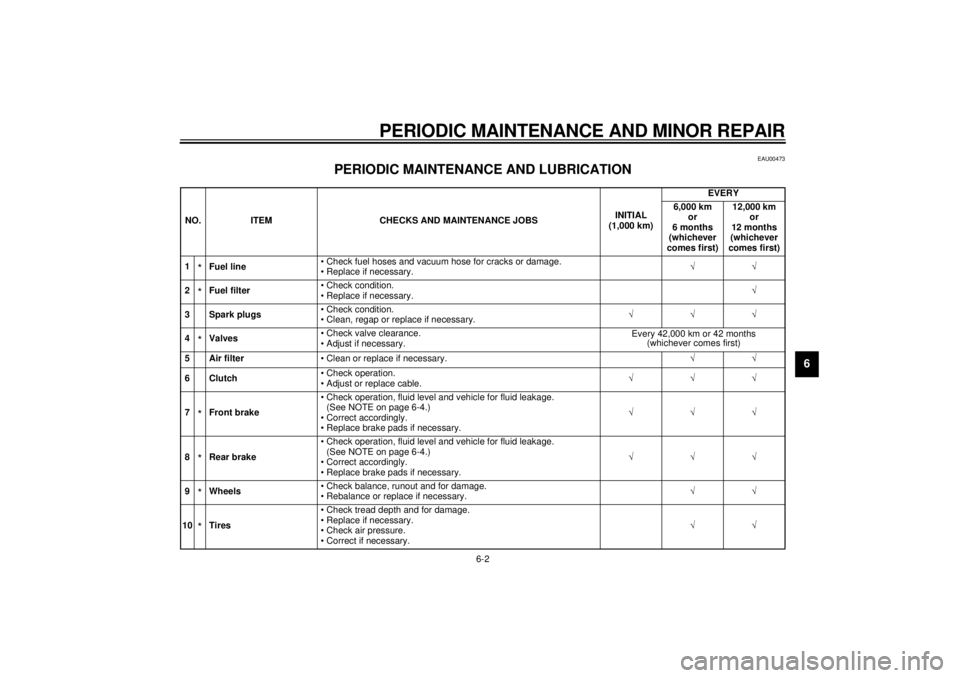
PERIODIC MAINTENANCE AND LUBRICATION
CP-01ENO. ITEM CHECKS AND MAINTENANCE JOBSINITIAL
(1,000 km)EVERY
6,000 km
or
6 months
(whichever
comes first)12,000 km
or
12 months
(whichever
comes first)
1
*Fuel line• Check fuel hoses and vacuum hose for cracks or damage.
• Replace if necessary.ÖÖ
2*Fuel filter• Check condition.
• Replace if necessary.Ö
3 Spark plugs• Check condition.
• Clean, regap or replace if necessary.ÖÖÖ
4*Valves• Check valve clearance.
• Adjust if necessary.Every 42,000 km or 42 months
(whichever comes first)
5 Air filter
• Clean or replace if necessary.ÖÖ
6Clutch• Check operation.
• Adjust or replace cable.ÖÖÖ
7*Front brake• Check operation, fluid level and vehicle for fluid leakage.
(See NOTE on page 6-4.)
• Correct accordingly.
• Replace brake pads if necessary.ÖÖÖ
8*Rear brake• Check operation, fluid level and vehicle for fluid leakage.
(See NOTE on page 6-4.)
• Correct accordingly.
• Replace brake pads if necessary.ÖÖÖ
9*Wheels• Check balance, runout and for damage.
• Rebalance or replace if necessary.ÖÖ
10*Tires• Check tread depth and for damage.
• Replace if necessary.
• Check air pressure.
• Correct if necessary.ÖÖ
E_4tv_Periodic.fm Page 2 Wednesday, September 1, 1999 11:12 AM
Page 75 of 109
PERIODIC MAINTENANCE AND MINOR REPAIR
6-25
6
EAU00715
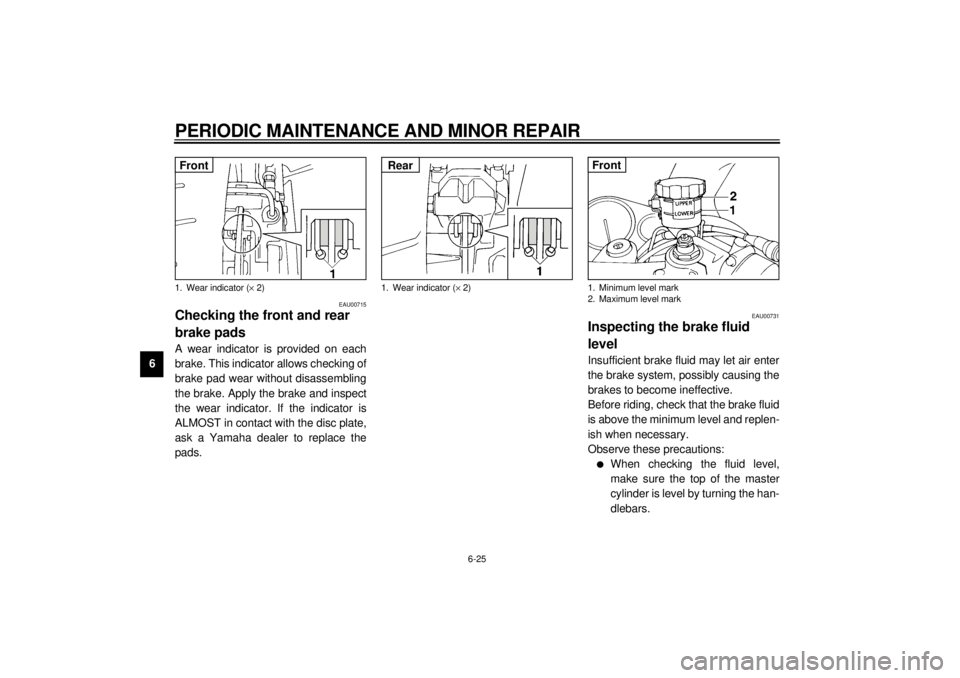
Checking the front and rear
brake padsA wear indicator is provided on each
brake. This indicator allows checking of
brake pad wear without disassembling
the brake. Apply the brake and inspect
the wear indicator. If the indicator is
ALMOST in contact with the disc plate,
ask a Yamaha dealer to replace the
pads.
EAU00731
Inspecting the brake fluid
levelInsufficient brake fluid may let air enter
the brake system, possibly causing the
brakes to become ineffective.
Before riding, check that the brake fluid
is above the minimum level and replen-
ish when necessary.
Observe these precautions:l
When checking the fluid level,
make sure the top of the master
cylinder is level by turning the han-
dlebars.
1. Wear indicator (´ 2)Front
1. Wear indicator (´ 2)Rear
1. Minimum level mark
2. Maximum level markFront
E_4tv_Periodic.fm Page 25 Wednesday, September 1, 1999 11:12 AM
Page 86 of 109
PERIODIC MAINTENANCE AND MINOR REPAIR
6-36
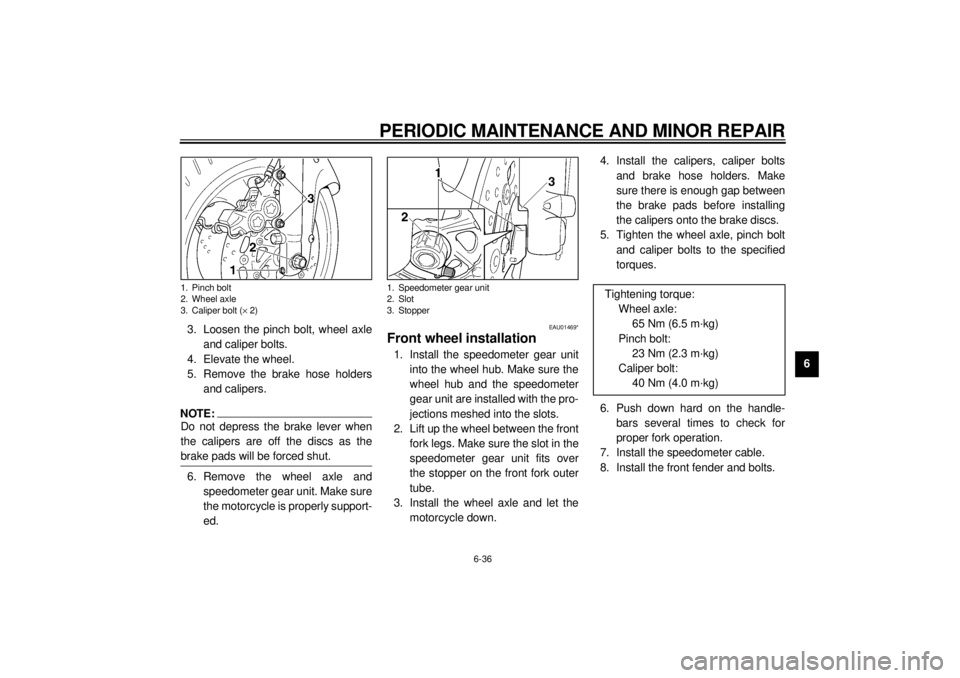
6 3. Loosen the pinch bolt, wheel axle
and caliper bolts.
4. Elevate the wheel.
5. Remove the brake hose holders
and calipers.
NOTE:@ Do not depress the brake lever when
the calipers are off the discs as the
brake pads will be forced shut. @6. Remove the wheel axle and
speedometer gear unit. Make sure
the motorcycle is properly support-
ed.
EAU01469*
Front wheel installation1. Install the speedometer gear unit
into the wheel hub. Make sure the
wheel hub and the speedometer
gear unit are installed with the pro-
jections meshed into the slots.
2. Lift up the wheel between the front
fork legs. Make sure the slot in the
speedometer gear unit fits over
the stopper on the front fork outer
tube.
3. Install the wheel axle and let the
motorcycle down.4. Install the calipers, caliper bolts
and brake hose holders. Make
sure there is enough gap between
the brake pads before installing
the calipers onto the brake discs.
5. Tighten the wheel axle, pinch bolt
and caliper bolts to the specified
torques.
6. Push down hard on the handle-
bars several times to check for
proper fork operation.
7. Install the speedometer cable.
8. Install the front fender and bolts.
1. Pinch bolt
2. Wheel axle
3. Caliper bolt (´ 2)
1. Speedometer gear unit
2. Slot
3. Stopper
Tightening torque:
Wheel axle:
65 Nm (6.5 m·kg)
Pinch bolt:
23 Nm (2.3 m·kg)
Caliper bolt:
40 Nm (4.0 m·kg)
E_4tv_Periodic.fm Page 36 Wednesday, September 1, 1999 11:12 AM
Page 88 of 109
PERIODIC MAINTENANCE AND MINOR REPAIR
6-38
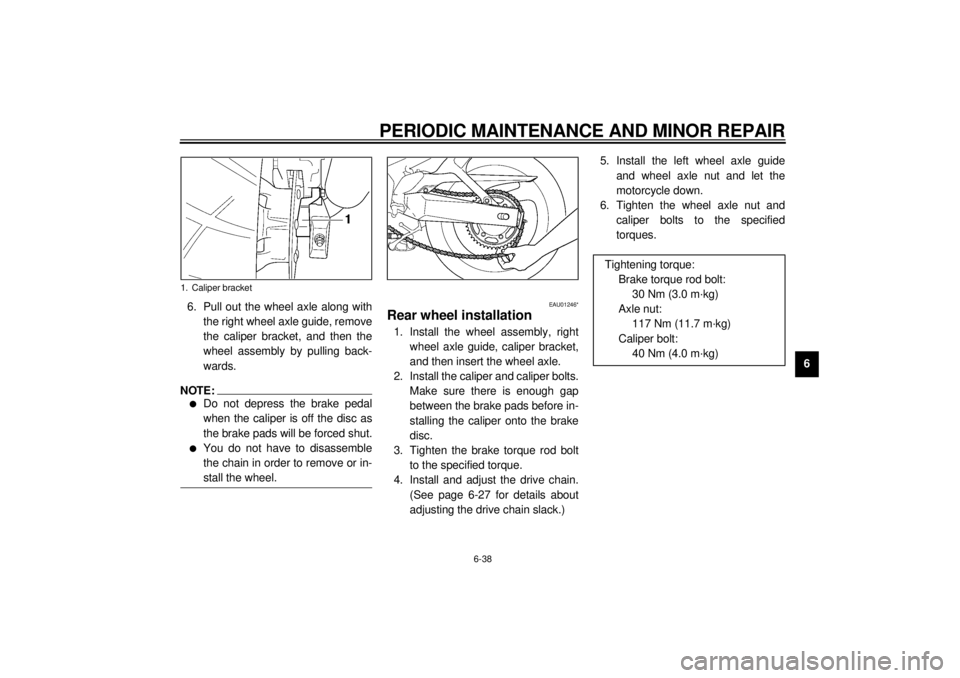
6 6. Pull out the wheel axle along with
the right wheel axle guide, remove
the caliper bracket, and then the
wheel assembly by pulling back-
wards.
NOTE:@ l
Do not depress the brake pedal
when the caliper is off the disc as
the brake pads will be forced shut.
l
You do not have to disassemble
the chain in order to remove or in-
stall the wheel.
@
EAU01246*
Rear wheel installation1. Install the wheel assembly, right
wheel axle guide, caliper bracket,
and then insert the wheel axle.
2. Install the caliper and caliper bolts.
Make sure there is enough gap
between the brake pads before in-
stalling the caliper onto the brake
disc.
3. Tighten the brake torque rod bolt
to the specified torque.
4. Install and adjust the drive chain.
(See page 6-27 for details about
adjusting the drive chain slack.)5. Install the left wheel axle guide
and wheel axle nut and let the
motorcycle down.
6. Tighten the wheel axle nut and
caliper bolts to the specified
torques.
1. Caliper bracket
Tightening torque:
Brake torque rod bolt:
30 Nm (3.0 m·kg)
Axle nut:
117 Nm (11.7 m·kg)
Caliper bolt:
40 Nm (4.0 m·kg)
E_4tv_Periodic.fm Page 38 Wednesday, September 1, 1999 11:12 AM
Page 107 of 109
10-INDEXAAir filter ..................................................6-15
Air intake duct ........................................6-17
Air vent hose .......................................... 6-17
Antitheft alarm (optional) .......................... 3-7BBattery ................................................... 6-32
Brake and clutch lever lubrication........... 6-29
Brake and shift pedal lubrication ............ 6-29
Brake fluid replacement ......................... 6-26
Brake light switch adjustment ................. 6-24CCable inspection and lubrication ............ 6-28
Carburetor adjustment ...........................6-17
Care.........................................................7-1
Changing the coolant ............................. 6-13
Checking the front and
rear brake pads ................................... 6-25
Clutch lever .............................................. 3-9
Clutch lever free play adjustment ........... 6-23
Controls/Instruments ................................2-3
Coolant temperature gauge ..................... 3-8
Cooling system ...................................... 6-12
Cowling A and B ......................................6-5
Cowling C ................................................6-7
Cowling and panel removal and
installation .............................................6-5
DDiagnosis device ..................................... 3-7
Dimmer switch ......................................... 3-8
Drive chain lubrication ........................... 6-28
Drive chain slack adjustment ................. 6-27
Drive chain slack check ......................... 6-27EEngine break-in ....................................... 5-5
Engine oil ................................................ 6-9
Engine stop switch................................... 3-9FFront brake lever ................................... 3-10
Front fork adjustment............................. 3-16
Front fork inspection .............................. 6-30
Front wheel installation .......................... 6-36
Front wheel removal .............................. 6-35
Fuel ....................................................... 3-11
Fuel indicator circuit check....................... 3-5
Fuel indicator light ................................... 3-2
Fuel tank breather hose
(for Germany only) .............................. 3-13
Fuel tank cap ......................................... 3-11
Fuse replacement.................................. 6-33GGive safety the right of way ..................... 1-1
HHandlebar switches ..................................3-8
Dimmer switch ....................................3-8
Engine stop switch..............................3-9
Horn switch.........................................3-8
Lights switch .......................................3-9
Pass switch ........................................3-8
Start switch .........................................3-9
Turn signal switch ...............................3-8
Headlight bulb replacement....................6-33
Helmet holder.........................................3-15
High beam indicator light ..........................3-3
Horn switch ..............................................3-8IIdentification number records ...................9-1
Idle speed adjustment ............................6-18
Indicator lights ..........................................3-2
Fuel indicator light...............................3-2
High beam indicator light ....................3-3
Neutral indicator light ..........................3-2
Oil level indicator light .........................3-2
Turn indicator light ..............................3-3
Inspecting the brake fluid level ...............6-25KKey identification number .........................9-1LLeft view...................................................2-1
Lights switch ............................................3-9
Luggage strap holders ...........................3-21
E_4tvIX.fm Page 1 Wednesday, September 1, 1999 11:15 AM