2000 YAMAHA YZF600 ABS
[x] Cancel search: ABSPage 11 of 109
2-1
2
EAU00026
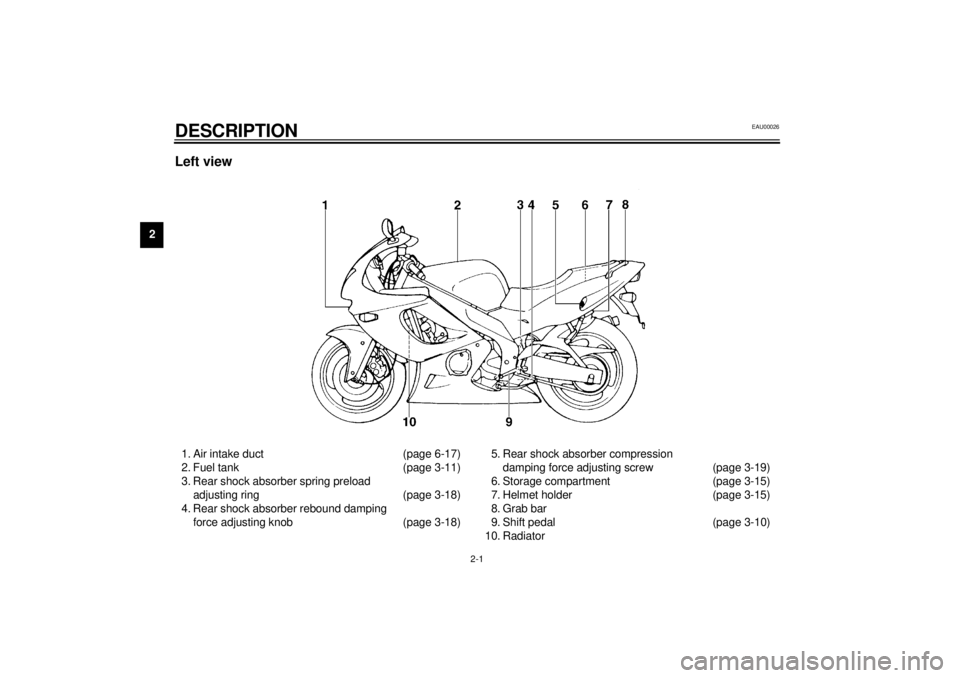
2-DESCRIPTIONLeft view1. Air intake duct (page 6-17)
2. Fuel tank (page 3-11)
3. Rear shock absorber spring preload
adjusting ring (page 3-18)
4. Rear shock absorber rebound damping
force adjusting knob (page 3-18)5. Rear shock absorber compression
damping force adjusting screw (page 3-19)
6. Storage compartment (page 3-15)
7. Helmet holder (page 3-15)
8. Grab bar
9. Shift pedal (page 3-10)
10. Radiator
E_4tv_Description.fm Page 1 Wednesday, September 1, 1999 11:09 AM
Page 14 of 109
3
INSTRUMENT AND CONTROL FUNCTIONS
Main switch/steering lock ...................................... 3-1
Indicator lights ...................................................... 3-2
Oil level indicator circuit check .............................. 3-4
Fuel indicator circuit check ................................... 3-5
Speedometer ........................................................ 3-6
Tachometer ........................................................... 3-6
Diagnosis device................................................... 3-7
Antitheft alarm (optional) ...................................... 3-7
Coolant temperature gauge .................................. 3-8
Handlebar switches .............................................. 3-8
Clutch lever ........................................................... 3-9
Shift pedal ........................................................... 3-10
Front brake lever ................................................. 3-10
Rear brake pedal ................................................ 3-10Fuel tank cap ..................................................... 3-11
Fuel .................................................................... 3-11
Fuel tank breather hose (for Germany only) ...... 3-13
Starter (choke) “ ” .......................................... 3-13
Seat.................................................................... 3-14
Helmet holder..................................................... 3-15
Storage compartment ........................................ 3-15
Front fork adjustment ......................................... 3-16
Rear shock absorber adjustment ....................... 3-18
Recommended combinations of
the front fork and the rear shock absorber
settings............................................................. 3-20
Luggage strap holders ....................................... 3-21
Sidestand ........................................................... 3-21
Sidestand/clutch switch operation check............ 3-22
E_4tv_FunctionsTOC.fm Page 1 Wednesday, September 1, 1999 11:09 AM
Page 31 of 109
INSTRUMENT AND CONTROL FUNCTIONS
3-17
3
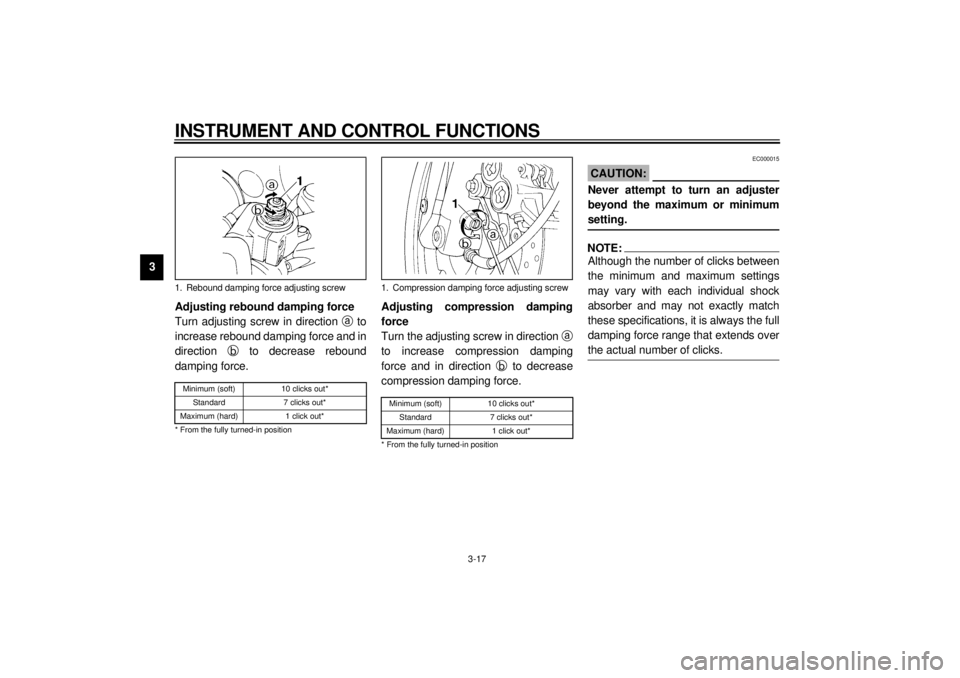
Adjusting rebound damping force
Turn adjusting screw in direction a
to
increase rebound damping force and in
direction b
to decrease rebound
damping force.
CI-33E
Adjusting compression damping
force
Turn the adjusting screw in direction a
to increase compression damping
force and in direction b
to decrease
compression damping force.CI-33EEC000015
CAUTION:@ Never attempt to turn an adjuster
beyond the maximum or minimum
setting. @NOTE:@ Although the number of clicks between
the minimum and maximum settings
may vary with each individual shock
absorber and may not exactly match
these specifications, it is always the full
damping force range that extends over
the actual number of clicks. @
1. Rebound damping force adjusting screwMinimum (soft) 10 clicks out*
Standard 7 clicks out*
Maximum (hard) 1 click out*
* From the fully turned-in position
1. Compression damping force adjusting screwMinimum (soft) 10 clicks out*
Standard 7 clicks out*
Maximum (hard) 1 click out*
* From the fully turned-in position
E_4tv_Functions.fm Page 17 Wednesday, September 1, 1999 11:10 AM
Page 32 of 109
INSTRUMENT AND CONTROL FUNCTIONS
3-18
3
EAU01592*
Rear shock absorber
adjustmentThis shock absorber is equipped with
spring preload and damping force ad-
justers.
EC000015
CAUTION:@ Never attempt to turn an adjuster
beyond the maximum or minimum
setting. @
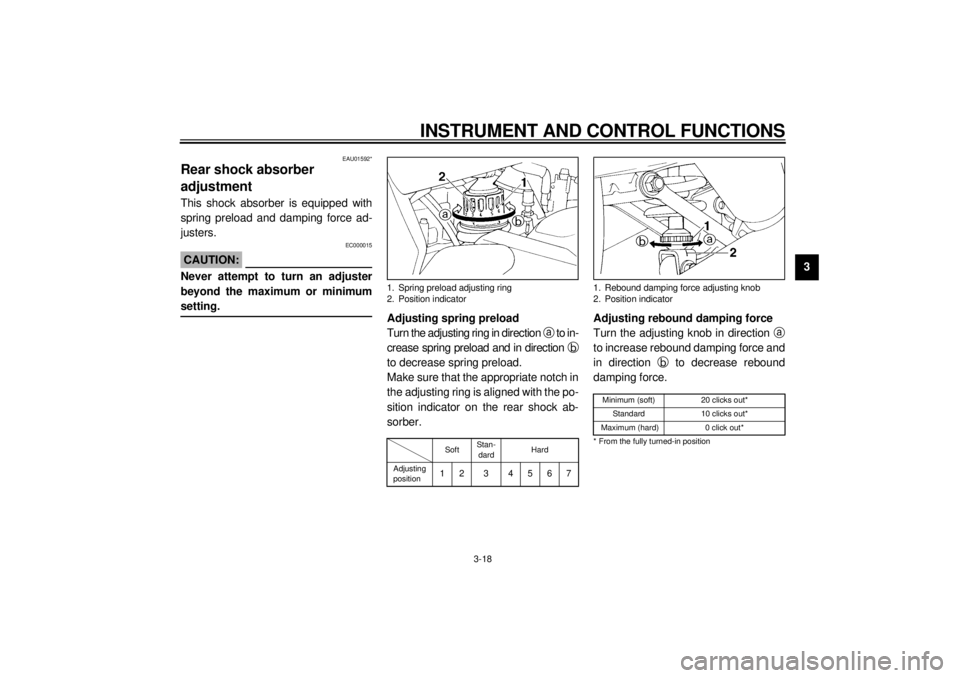
Adjusting spring preload
Turn the adjusting ring in direction a
to in-
crease spring preload and in direction b
to decrease spring preload.
Make sure that the appropriate notch in
the adjusting ring is aligned with the po-
sition indicator on the rear shock ab-
sorber.CI-15E
Adjusting rebound damping force
Turn the adjusting knob in direction a
to increase rebound damping force and
in direction b
to decrease rebound
damping force.CI-29E
1. Spring preload adjusting ring
2. Position indicator
SoftStan-
dardHard
Adjusting
position12 3 4567
1. Rebound damping force adjusting knob
2. Position indicatorMinimum (soft) 20 clicks out*
Standard 10 clicks out*
Maximum (hard) 0 click out*
* From the fully turned-in position
E_4tv_Functions.fm Page 18 Wednesday, September 1, 1999 11:10 AM
Page 33 of 109
INSTRUMENT AND CONTROL FUNCTIONS
3-19
3
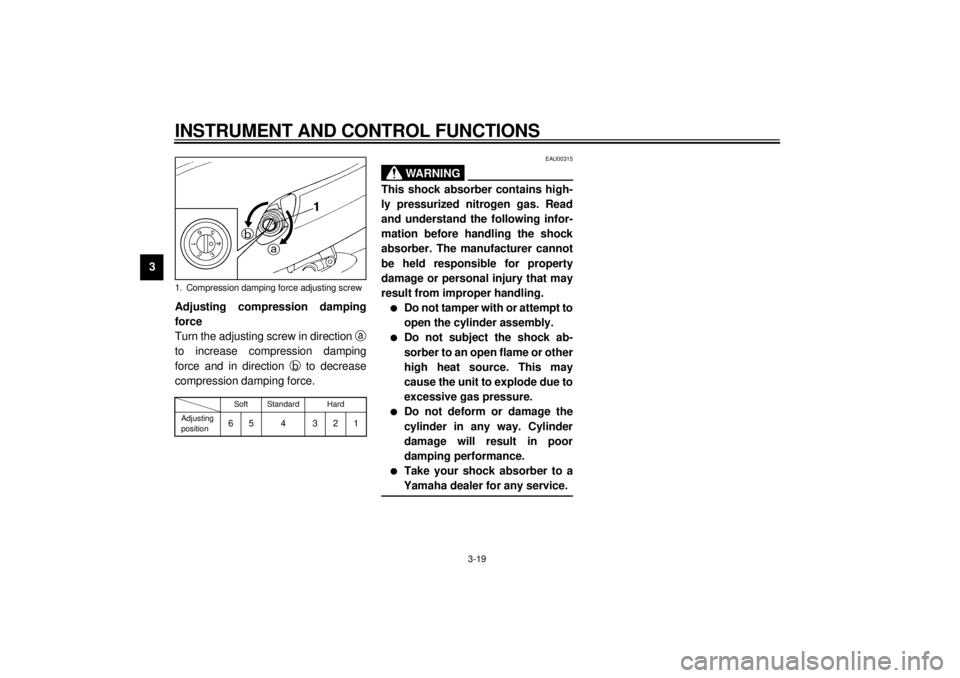
Adjusting compression damping
force
Turn the adjusting screw in direction a
to increase compression damping
force and in direction b
to decrease
compression damping force.
CI-15EEAU00315
WARNING
@ This shock absorber contains high-
ly pressurized nitrogen gas. Read
and understand the following infor-
mation before handling the shock
absorber. The manufacturer cannot
be held responsible for property
damage or personal injury that may
result from improper handling.l
Do not tamper with or attempt to
open the cylinder assembly.
l
Do not subject the shock ab-
sorber to an open flame or other
high heat source. This may
cause the unit to explode due to
excessive gas pressure.
l
Do not deform or damage the
cylinder in any way. Cylinder
damage will result in poor
damping performance.
l
Take your shock absorber to a
Yamaha dealer for any service.
@
1. Compression damping force adjusting screw
Soft Standard Hard
Adjusting
position65 4 321
E_4tv_Functions.fm Page 19 Wednesday, September 1, 1999 11:10 AM
Page 34 of 109
INSTRUMENT AND CONTROL FUNCTIONS
3-20
3
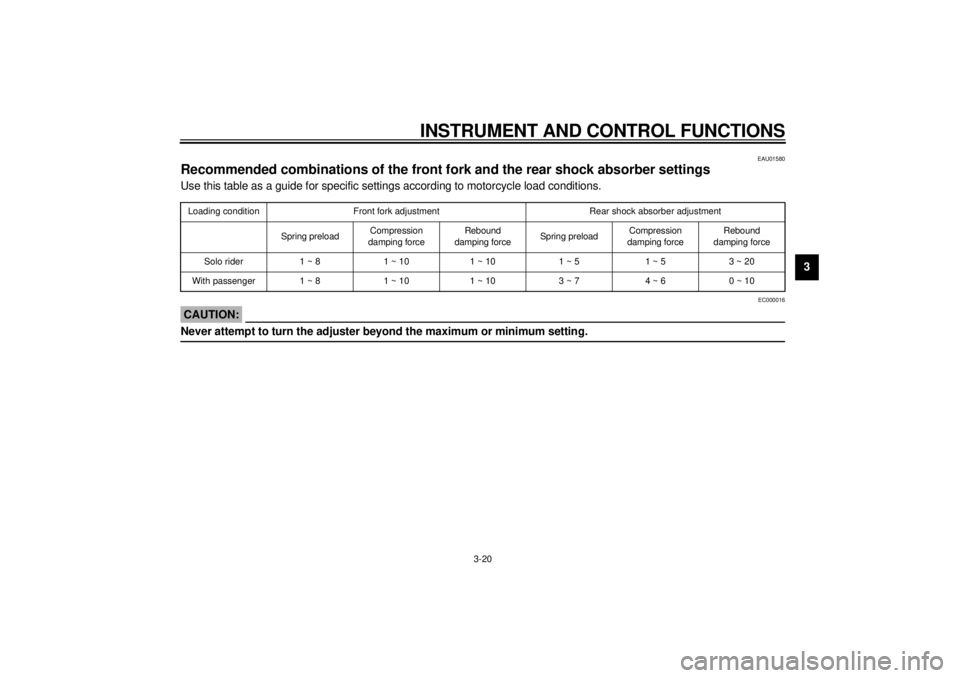
EAU01580
Recommended combinations of the front fork and the rear shock absorber settingsUse this table as a guide for specific settings according to motorcycle load conditions.CI-31E
EC000016CAUTION:@ Never attempt to turn the adjuster beyond the maximum or minimum setting. @Loading condition Front fork adjustment Rear shock absorber adjustment
Spring preload Compression
damping forceRebound
damping forceSpring preloadCompression
damping forceRebound
damping force
Solo rider 1 ~ 8 1 ~ 10 1 ~ 10 1 ~ 5 1 ~ 5 3 ~ 20
With passenger 1 ~ 8 1 ~ 10 1 ~ 10 3 ~ 7 4 ~ 6 0 ~ 10
E_4tv_Functions.fm Page 20 Wednesday, September 1, 1999 11:10 AM
Page 53 of 109

PERIODIC MAINTENANCE AND MINOR REPAIR
6-3
6
11
*Wheel bearings• Check bearing for looseness or damage.
• Replace if necessary. ÖÖ
12*Swingarm• Check swingarm pivoting point for play.
• Correct if necessary.
• Lubricate with molybdenum disulfide grease every 24,000 km or
24 months (whichever comes first).ÖÖ
13 Drive chain• Check chain slack.
• Adjust if necessary. Make sure that the rear wheel is properly
aligned.
• Clean and lubricate. Every 1,000 km and after washing the
motorcycle or riding in the rain
14*Steering bearings• Check bearing play and steering for roughness.
• Correct accordingly.
• Lubricate with lithium soap base grease every 24,000 km
or 24 months (whichever comes first).ÖÖ
15*Chassis fasteners• Make sure that all nuts, bolts and screws are properly tightened.
• Tighten if necessary.ÖÖ
16 Sidestand• Check operation.
• Lubricate and repair if necessary.ÖÖ
17*Sidestand switch• Check operation.
• Replace if necessary.ÖÖÖ
18*Front fork• Check operation and for oil leakage.
• Correct accordingly.ÖÖ
19*Rear shock absorber
assembly• Check operation and shock absorber for oil leakage.
• Replace shock absorber assembly if necessary. ÖÖ
20*Rear suspension relay
arm and connecting arm
pivoting points• Check operation.
• Lubricate with molybdenum disulfide grease every 24,000 km or
24 months (whichever comes first).ÖÖ NO. ITEM CHECKS AND MAINTENANCE JOBSINITIAL
(1,000 km)EVERY
6,000 km
or
6 months
(whichever
comes first)12,000 km
or
12 months
(whichever
comes first)
E_4tv_Periodic.fm Page 3 Wednesday, September 1, 1999 11:12 AM
Page 95 of 109
MOTORCYCLE CARE AND STORAGE
7-3
71. Clean your motorcycle with cold
water and soap after the engine
has cooled down.
ECA00012
CAUTION:@ Do not use warm water since it in-
creases the corrosive action of the
salt. @2. Be sure to apply a corrosion pro-
tection spray on all (even chrome-
and nickel-plated) metal surfaces
to prevent corrosion.After cleaning
1. Dry the motorcycle with a chamois
or an absorbing cloth.
2. Immediately dry the drive chain
and lubricate it to prevent it from
rusting.
3. Use a chrome polish to shine
chrome, aluminum and stainless-
steel parts, including the exhaust
system. (Even the thermally in-
duced discoloring of stainless-
steel exhaust systems can be re-
moved through polishing.)
4. To prevent corrosion, it is recom-
mended to apply a corrosion pro-
tection spray on all (even chrome-
and nickel-plated) metal surfaces.
5. Use spray oil as a universal clean-
er to remove any remaining dirt.
6. Touch up minor paint damage
caused by stones, etc.
7. Wax all painted surfaces.
8. Let the motorcycle dry completely
before storing it or covering it.
EWA00001
WA R N I N G
@ Make sure that there is no oil or wax
on the brakes and tires. If neces-
sary, clean the brake discs and lin-
ings with a regular brake disc
cleaner or acetone, and wash the
tires with warm water and mild soap.
Then, carefully test the motorcycle
for its braking performance and cor-
nering behavior. @
E_4tv_Cleaning.fm Page 3 Wednesday, September 1, 1999 11:13 AM