Page 11 of 91
2-1
2
EAU00026
2-DESCRIPTIONLeft view1. Shift pedal (page 3-6)
2. Starter (choke) knob (page 3-9)
3. Fuel cock (page 3-8)
4. Steering lock (page 3-9)
5. Tool kit (page 6-1)6. Seat lock (page 3-10)
7. Rear turn signal lights (page 6-28)
8. Tail/brake light (page 6-28)
9. Mufflers
10. Fuses (page 6-25)
E_4YP_Description.fm Page 1 Wednesday, October 6, 1999 10:03 AM
Page 12 of 91
DESCRIPTION
2-2
2
Right view11. Passenger footrest
12. Main switch (page 3-1)
13. Passenger seat
14. Helmet holders (page 3-11)
15. Rider seat (page 3-10)
16. Fuel tank (page 3-7)
17. Fuel tank cap (page 3-7)18. Headlight (page 6-27)
19. Front turn signal light (page 6-28)
20. Rear brake pedal (page 3-6)
21. Rider footrest
22. Rear shock absorber spring
preload adjusting nut (page 3-13)
E_4YP_Description.fm Page 2 Wednesday, October 6, 1999 10:03 AM
Page 14 of 91

3
INSTRUMENT AND CONTROL FUNCTIONS
Main switch......................................................................................... 3-1
Indicator lights .................................................................................... 3-1
Speedometer...................................................................................... 3-3
Antitheft alarm (optional) .................................................................... 3-3
Handlebar switches ............................................................................ 3-4
Clutch lever ........................................................................................ 3-5
Shift pedal .......................................................................................... 3-6
Front brake lever................................................................................. 3-6
Rear brake pedal ................................................................................ 3-6
Fuel tank cap...................................................................................... 3-7
Fuel .................................................................................................... 3-7
Fuel cock ............................................................................................ 3-8
Starter (choke) knob........................................................................... 3-9
Steering lock ...................................................................................... 3-9
Rider seat ......................................................................................... 3-10
Helmet holders ................................................................................. 3-11
Adjusting front fork preload .............................................................. 3-12
Adjusting rear shock absorber preload ............................................ 3-13
Sidestand ......................................................................................... 3-15
Sidestand/clutch switch operation check.......................................... 3-15
E_4YP_FunctionsTOC.fm Page 1 Wednesday, October 6, 1999 10:03 AM
Page 15 of 91

3-1
3
EAU00027
3-INSTRUMENT AND CONTROL FUNCTIONS
EAU00028
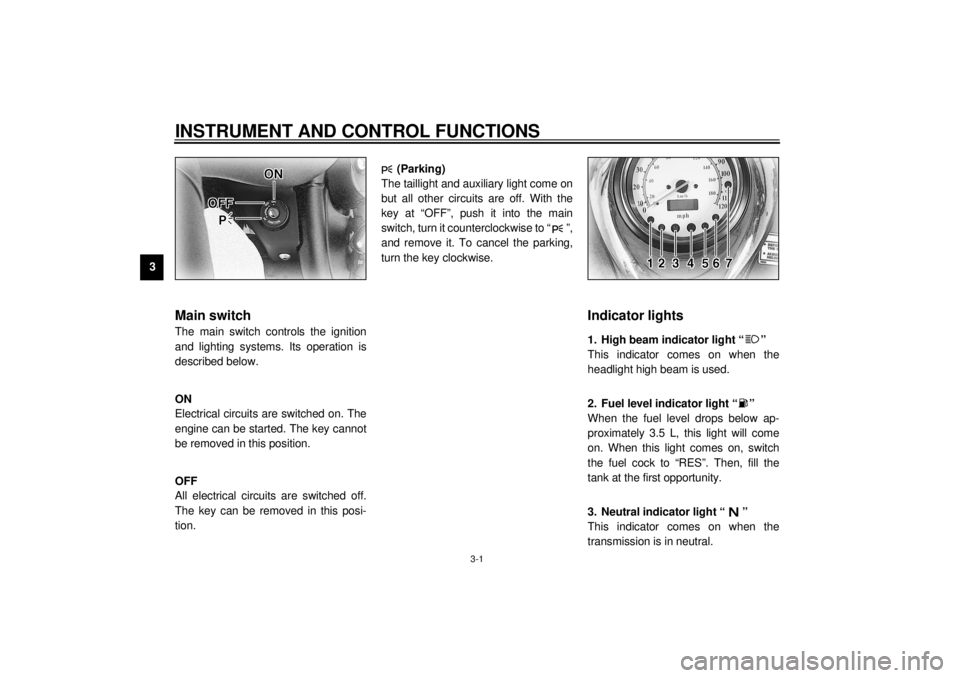
Main switchThe main switch controls the ignition
and lighting systems. Its operation is
described below.
EAU00036
ON
Electrical circuits are switched on. The
engine can be started. The key cannot
be removed in this position.
EAU00038
OFF
All electrical circuits are switched off.
The key can be removed in this posi-
tion.
EAU00054*
(Parking)
The taillight and auxiliary light come on
but all other circuits are off. With the
key at “OFF”, push it into the main
switch, turn it counterclockwise to “ ”,
and remove it. To cancel the parking,
turn the key clockwise.
EAU00056
Indicator lights
EAU00063
1. High beam indicator light “ ”
This indicator comes on when the
headlight high beam is used.
EAU00079
2. Fuel level indicator light “ ”
When the fuel level drops below ap-
proximately 3.5 L, this light will come
on. When this light comes on, switch
the fuel cock to “RES”. Then, fill the
tank at the first opportunity.
EAU00061
3. Neutral indicator light “ ”
This indicator comes on when the
transmission is in neutral.
E_4YP_Functions.fm Page 1 Wednesday, October 6, 1999 10:03 AM
Page 17 of 91

INSTRUMENT AND CONTROL FUNCTIONS
3-3
3
EAU01202
SpeedometerThis speedometer is equipped with an
odometer and a trip meter. Pushing the
“TRIP” button will change the display
from one to the other. When set to
“ODO”, it indicates the motorcycle’s to-
tal mileage. When set to “TRIP”, it indi-
cates the motorcycle’s mileage since
the trip meter was last reset. Use the
trip meter to estimate how far you can
ride on a tank of fuel. This information
will enable you to plan fuel stops in the
future.To reset the trip meter to “0”, push the
“TRIP” button until it displays “TRIP”,
then push it once again and hold it
down for at least one second.
NOTE:@ This motorcycle does not have a ta-
chometer. However, it is equipped with
an engine speed limiter, which pre-
vents the engine speed from exceed-
ing approximately 6,000 r/min and the
vehicle from exceeding a top riding
speed of approximately 180 km/h. @
EAU00109
Antitheft alarm (optional)An antitheft alarm can be equipped to
this motorcycle. Consult your Yamaha
dealer to obtain and install the alarm.
1. “TRIP” button
2. Odometer/Trip meterE_4YP_Functions.fm Page 3 Wednesday, October 6, 1999 10:03 AM
Page 21 of 91

INSTRUMENT AND CONTROL FUNCTIONS
3-7
3
EAU02917
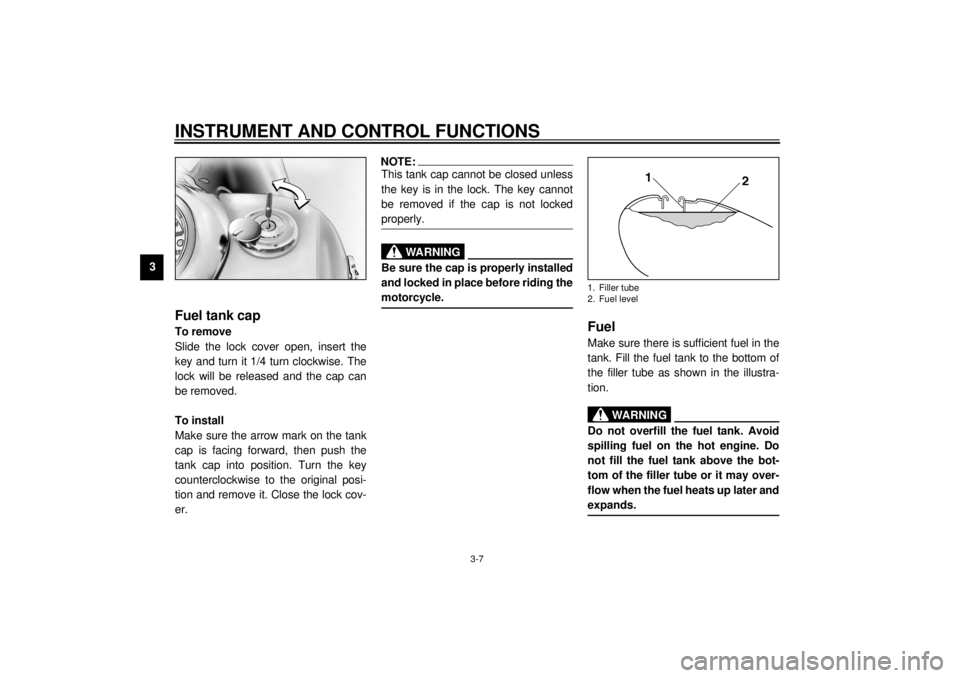
Fuel tank capTo remove
Slide the lock cover open, insert the
key and turn it 1/4 turn clockwise. The
lock will be released and the cap can
be removed.
To install
Make sure the arrow mark on the tank
cap is facing forward, then push the
tank cap into position. Turn the key
counterclockwise to the original posi-
tion and remove it. Close the lock cov-
er.
NOTE:@ This tank cap cannot be closed unless
the key is in the lock. The key cannot
be removed if the cap is not locked
properly. @
EW000023
WARNING
@ Be sure the cap is properly installed
and locked in place before riding the
motorcycle. @
EAU01183
FuelMake sure there is sufficient fuel in the
tank. Fill the fuel tank to the bottom of
the filler tube as shown in the illustra-
tion.
EW000130
WARNING
@ Do not overfill the fuel tank. Avoid
spilling fuel on the hot engine. Do
not fill the fuel tank above the bot-
tom of the filler tube or it may over-
flow when the fuel heats up later and
expands. @1. Filler tube
2. Fuel level
E_4YP_Functions.fm Page 7 Wednesday, October 6, 1999 10:03 AM
Page 22 of 91

INSTRUMENT AND CONTROL FUNCTIONS
3-8
3
EAU00185
CAUTION:@ Always wipe off spilled fuel immedi-
ately with a dry and clean soft cloth.
Fuel may deteriorate painted surfac-
es or plastic parts. @
EAU00191
NOTE:@ If knocking or pinging occurs, use a dif-
ferent brand of gasoline or higher oc-
tane grade. @
EAU02969
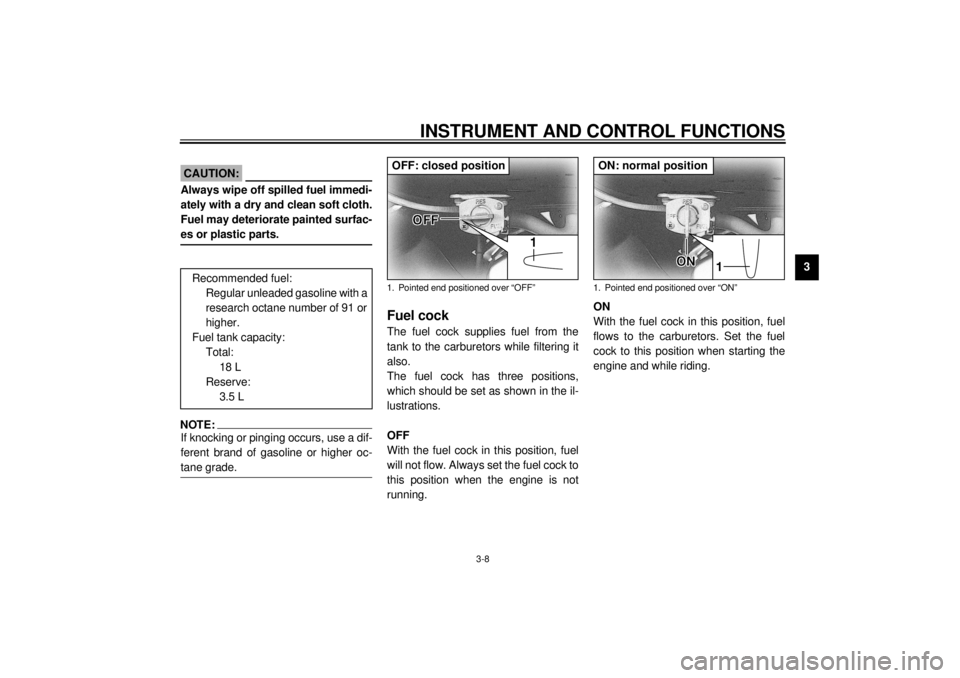
Fuel cockThe fuel cock supplies fuel from the
tank to the carburetors while filtering it
also.
The fuel cock has three positions,
which should be set as shown in the il-
lustrations.
OFF
With the fuel cock in this position, fuel
will not flow. Always set the fuel cock to
this position when the engine is not
running.ON
With the fuel cock in this position, fuel
flows to the carburetors. Set the fuel
cock to this position when starting the
engine and while riding. Recommended fuel:
Regular unleaded gasoline with a
research octane number of 91 or
higher.
Fuel tank capacity:
Total:
18 L
Reserve:
3.5 L1. Pointed end positioned over “OFF”OFF: closed position
1. Pointed end positioned over “ON”ON: normal position
E_4YP_Functions.fm Page 8 Wednesday, October 6, 1999 10:03 AM
Page 23 of 91

INSTRUMENT AND CONTROL FUNCTIONS
3-9
3
RES
This indicates reserve. If you run out of
fuel while riding, set the fuel cock to this
position. Fill the tank at the first oppor-
tunity. Be sure to set the fuel cock back
to “ON” after refueling!
EAU03032
Starter (choke) knobStarting a cold engine requires a richer
air-fuel mixture, which is supplied by
the starter (choke).
Move the knob in direction
a to turn on
the starter (choke).
Move the knob in direction
b to turn off
the starter (choke).
EAU01214
Steering lockThe steering lock is located on the left
side of the head pipe.
To lock the steering
1. Turn the handlebars all the way to
the right.
2. Open the steering lock cover.
3. Insert the key and turn it counter-
clockwise 1/8 turn.
4. Push the key in and turn it back
1/8 turn clockwise.
5. Check that the steering is locked.
6. Remove the key and close the
steering lock cover.
1. Pointed end positioned over “RES”RES: reserve position
1. Steering lock
E_4YP_Functions.fm Page 9 Wednesday, October 6, 1999 10:03 AM