Page 47 of 91

PERIODIC MAINTENANCE AND MINOR REPAIR
6-5
6
EAU02971
NOTE:@ l
The air filter needs more frequent service if you are riding in unusually wet or dusty areas.
l
Hydraulic brake and clutch systems
• After disassembling the master cylinder, caliper or clutch release cylinder, always replace the brake fluid. Check the
brake fluid level of the master cylinder and clutch release cylinder regularly and fill as required.
• Replace the oil seals on the inner parts of the master cylinder, caliper and clutch release cylinder every two years.
• Replace the brake and clutch hoses every four years or if cracked or damaged.
@20
*Carburetors• Check engine idling speed, synchronization and starter operation.
• Adjust if necessary.ÖÖÖ
21 Engine oil• Check oil level and vehicle for oil leakage.
• Correct if necessary.
• Change. (Warm engine before draining.)ÖÖÖ
22 Engine oil filter cartridge•Replace.ÖÖ
23*Cooling system• Check coolant level and vehicle for coolant leakage.
• Correct if necessary.
• Change coolant every 24,000 km or 24 months (whichever comes
first).ÖÖ
24 Final gear oil• Check oil level and vehicle for oil leakage.
• Change oil at initial 1,000 km and thereafter every 24,000 km
or 24 months (whichever comes first).ÖÖÖ NO. ITEM CHECKS AND MAINTENANCE JOBSINITIAL
(1,000 km)EVERY
6,000 km
or
6 months
(whichever
comes first)12,000 km
or
12 months
(whichever
comes first)
* Since these items require special tools, data and technical skills, they should be serviced by a Yamaha dealer.
E_4YP_Periodic.fm Page 5 Wednesday, October 6, 1999 10:05 AM
Page 56 of 91

PERIODIC MAINTENANCE AND MINOR REPAIR
6-14
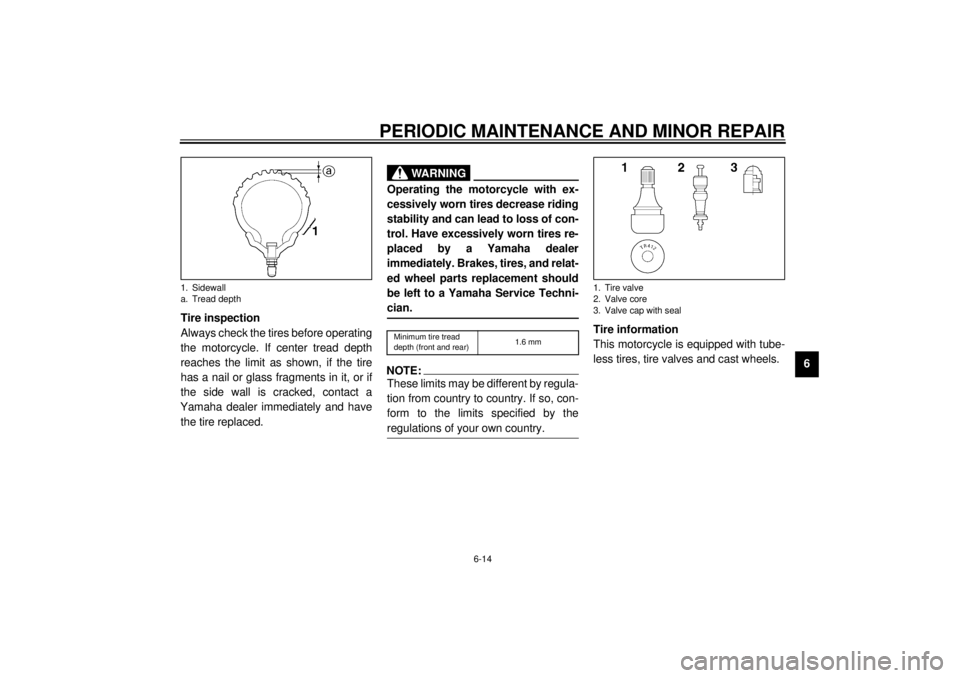
6 Tire inspection
Always check the tires before operating
the motorcycle. If center tread depth
reaches the limit as shown, if the tire
has a nail or glass fragments in it, or if
the side wall is cracked, contact a
Yamaha dealer immediately and have
the tire replaced.
EW000079
WARNING
@ Operating the motorcycle with ex-
cessively worn tires decrease riding
stability and can lead to loss of con-
trol. Have excessively worn tires re-
placed by a Yamaha dealer
immediately. Brakes, tires, and relat-
ed wheel parts replacement should
be left to a Yamaha Service Techni-
cian. @CE-11ENOTE:@ These limits may be different by regula-
tion from country to country. If so, con-
form to the limits specified by the
regulations of your own country. @
Tire information
This motorcycle is equipped with tube-
less tires, tire valves and cast wheels.
1. Sidewall
a. Tread depth
Minimum tire tread
depth (front and rear)1.6 mm
1. Tire valve
2. Valve core
3. Valve cap with seal
E_4YP_Periodic.fm Page 14 Wednesday, October 6, 1999 10:05 AM
Page 59 of 91

PERIODIC MAINTENANCE AND MINOR REPAIR
6-17
6
EAU00696
Front brake lever free play
adjustmentThe free play at the front brake lever
should be 2 ~ 5 mm.
1. Loosen the locknut.
2. Turn the adjusting bolt in
direction
a to increase free play
or in direction
b to decrease free
play.
3. After adjusting, tighten the locknut.
EW000099
WARNING
@ l
Check the brake lever free play.
Be sure the brake is working
properly.
l
A soft or spongy feeling in the
brake lever can indicate the
presence of air in the brake sys-
tem. This air must be removed
by bleeding the brake system
before the motorcycle is operat-
ed. Air in the system will cause
greatly diminished braking ca-
pability and can result in loss of
control and an accident. Have a
Yamaha dealer inspect and
bleed the system if necessary.
@
EAU00712
Rear brake pedal height
adjustmentThe top of the brake pedal should be
positioned 100 mm below the top of the
footrest. If not, ask a Yamaha dealer to
adjust it.
1. Locknut
2. Adjusting bolt
c. Free play
a. Brake pedal height
E_4YP_Periodic.fm Page 17 Wednesday, October 6, 1999 10:05 AM
Page 60 of 91

PERIODIC MAINTENANCE AND MINOR REPAIR
6-18
6
EW000109
WARNING
@ A soft or spongy feeling in the brake
pedal can indicate the presence of
air in the brake system. This air
must be removed by bleeding the
brake system before the motorcycle
is operated. Air in the system will
cause greatly diminished braking
capability and can result in loss of
control and an accident. Have a
Yamaha dealer inspect and bleed
the system if necessary. @
EAU00713
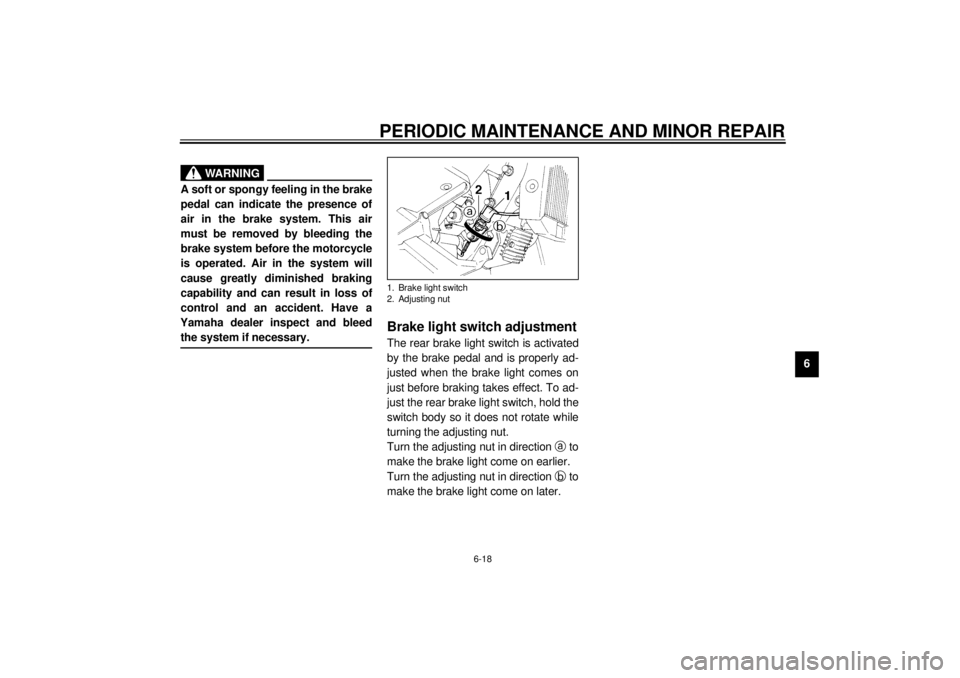
Brake light switch adjustmentThe rear brake light switch is activated
by the brake pedal and is properly ad-
justed when the brake light comes on
just before braking takes effect. To ad-
just the rear brake light switch, hold the
switch body so it does not rotate while
turning the adjusting nut.
Turn the adjusting nut in direction
a to
make the brake light come on earlier.
Turn the adjusting nut in direction
b to
make the brake light come on later.1. Brake light switch
2. Adjusting nut
E_4YP_Periodic.fm Page 18 Wednesday, October 6, 1999 10:05 AM
Page 61 of 91

PERIODIC MAINTENANCE AND MINOR REPAIR
6-19
6
EAU00721
Checking the front and rear
brake pads
EAU01119
Front brake
Wear indicator grooves are provided
on each brake pad. These indicators
allow checking of brake pad wear with-
out disassembling the brake. Inspect
the grooves. If they have almost disap-
peared, ask a Yamaha dealer to re-
place the pads.
EAU01198
Rear brake
A wear indicator groove is provided on
each brake pad. This indicator allows
checking of brake pad wear without
disassembling the brake. Inspect the
groove. If the groove has almost disap-
peared, ask a Yamaha dealer to re-
place the pads.
EAU01800
Inspecting the brake fluid
levelInsufficient brake fluid may let air enter
the brake or clutch system, possibly
causing them to become ineffective.
Before riding, check that the brake fluid
is above the minimum level and fill
when necessary. Low brake fluid levels
may indicate worn brake pads and/or
brake system leakage. If the brake lev-
el is low, be sure to inspect the brake
pads for wear or brake system for leak-
age.
1. Wear indicator groove (´ 2)Front
1. Wear indicator grooveRear
1. Minimum level mark
E_4YP_Periodic.fm Page 19 Wednesday, October 6, 1999 10:05 AM
Page 62 of 91
PERIODIC MAINTENANCE AND MINOR REPAIR
6-20
6 Observe these precautions:
l
When checking the fluid level,
make sure the top of the master
cylinder is level by turning the han-
dlebars.
l
Use only the designated quality
brake fluid. Otherwise, the rubber
seals may deteriorate, causing
leakage and poor brake or clutch
performance.
l
Refill with the same type of brake
fluid. Mixing fluids may result in a
harmful chemical reaction and
lead to poor brake or clutch perfor-
mance.
l
Be careful that water does not en-
ter the master cylinder when refill-
ing. Water will significantly lower
the boiling point of the fluid and
may result in vapor lock.
l
Brake fluid may deteriorate paint-
ed surfaces or plastic parts. Al-
ways clean up spilled fluid
immediately.
l
Have a Yamaha dealer check the
cause if the brake fluid level goes
down.
1. Minimum level mark
Recommended brake fluid: DOT 4
1. Minimum level mark
E_4YP_Periodic.fm Page 20 Wednesday, October 6, 1999 10:05 AM
Page 63 of 91
PERIODIC MAINTENANCE AND MINOR REPAIR
6-21
6
EAU00742
Brake fluid replacementThe brake fluid should be replaced only
by trained Yamaha service personnel.
Have the Yamaha dealer replace the
following components during periodic
maintenance or when they are dam-
aged or leaking:l
oil seals (every two years)
l
brake hoses (every four years)
EAU02984
Brake and shift pedal
lubricationLubricate the pivoting parts.
Recommended lubricant:
Engine oil
E_4YP_Periodic.fm Page 21 Wednesday, October 6, 1999 10:05 AM
Page 64 of 91
PERIODIC MAINTENANCE AND MINOR REPAIR
6-22
6
EAU02985
Brake and clutch lever
lubricationLubricate the pivoting parts.
EAU02986
Sidestand lubricationLubricate the sidestand pivoting point
and metal-to-metal contact surfaces.
Check that the sidestand moves up
and down smoothly.
EW000113
WARNING
@ If the sidestand does not move
smoothly, consult a Yamaha dealer. @
Recommended lubricant:
Engine oil
Recommended lubricant:
Engine oil
E_4YP_Periodic.fm Page 22 Wednesday, October 6, 1999 10:05 AM