Page 12 of 97
DESCRIPTION
2-2
2
Right view8. Tail/brake light (page 6-19)
9. Fuse boxes (page 6-25)
10. Seat (page 3-15)
11. Tool kit (page 6-1)
12. Air filter (page 6-11)13. Front fork spring preload
adjusting bolt (page 3-16)
14. Engine oil level window (page 6-8)
15. Rear brake pedal (page 3-11)
Page 15 of 97

3-1
3
EAU00027
3-INSTRUMENT AND CONTROL FUNCTIONS
EAU00029*
Main switch/steering lockThe main switch controls the ignition
and lighting systems. Its operation is
described below.
EAU00036
ON
Electrical circuits are switched on. The
engine can be started. The key cannot
be removed in this position.
EAU00038
OFF
All electrical circuits are switched off.
The key can be removed in this posi-
tion.
EAU00040
LOCK
The steering is locked in this position
and all electrical circuits are switched
off. The key can be removed in this po-
sition.
To lock the steering, turn the handle-
bars all the way to the left. While push-
ing the key into the main switch, turn it
from “OFF” to “LOCK” and remove it.
To release the lock, turn the key to
“OFF” while pushing.
EW000016
WARNING
@ Never turn the key to “OFF” or
“LOCK” when the motorcycle is
moving. The electrical circuits will
be switched off which may result in
loss of control or an accident. Be
sure the motorcycle is stopped be-
fore turning the key to “OFF” or
“LOCK”. @1. Push
2. Turn
Page 17 of 97

INSTRUMENT AND CONTROL FUNCTIONS
3-3
3
EAU00056
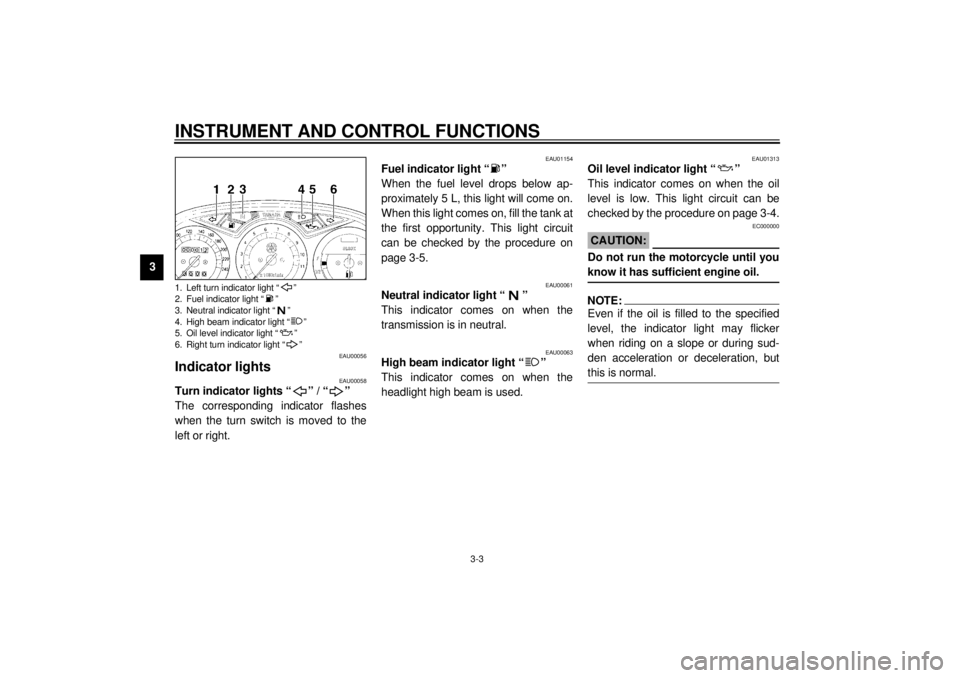
Indicator lights
EAU00058
Turn indicator lights “ ” / “ ”
The corresponding indicator flashes
when the turn switch is moved to the
left or right.
EAU01154
Fuel indicator light “ ”
When the fuel level drops below ap-
proximately 5 L, this light will come on.
When this light comes on, fill the tank at
the first opportunity. This light circuit
can be checked by the procedure on
page 3-5.
EAU00061
Neutral indicator light “ ”
This indicator comes on when the
transmission is in neutral.
EAU00063
High beam indicator light “ ”
This indicator comes on when the
headlight high beam is used.
EAU01313
Oil level indicator light “ ”
This indicator comes on when the oil
level is low. This light circuit can be
checked by the procedure on page 3-4.
EC000000
CAUTION:@ Do not run the motorcycle until you
know it has sufficient engine oil. @NOTE:@ Even if the oil is filled to the specified
level, the indicator light may flicker
when riding on a slope or during sud-
den acceleration or deceleration, but
this is normal. @
1. Left turn indicator light “ ”
2. Fuel indicator light “ ”
3. Neutral indicator light “ ”
4. High beam indicator light “ ”
5. Oil level indicator light “ ”
6. Right turn indicator light “ ”
Page 18 of 97
INSTRUMENT AND CONTROL FUNCTIONS
3-4
3
EAU00071
Oil level indicator circuit check
CB-48E
Turn the main switch to “ON” and
the engine stop switch to “ ”.
Oil level indicator light
does not come on.
Oil level indicator light
comes on.Check engine oil level.
Oil level indicator light
comes on.
Oil level indicator light
does not come on.
Engine oil level and
electrical circuit are OK.
Go ahead with riding.
Put the transmission in neutral or
apply the clutch lever, then push
the start switch.
Oil level
is OK.
Supply
engine oil.Oil level
is low.
Ask a Yamaha dealer to
inspect electrical circuit.
Page 19 of 97
INSTRUMENT AND CONTROL FUNCTIONS
3-5
3
EAU00085
Fuel indicator circuit check
CB-46E
Turn the main switch to “ON” and the
engine stop switch to “ ”.
Fuel indicator light does
not come on.
Fuel indicator light
comes on.Check the fuel level.
Fuel indicator light
comes on.
Fuel indicator light
does not come on.
Fuel level and electrical
circuit are OK.
Go ahead with riding.
Put the transmission in neutral or
apply the clutch lever, then push
the start switch.
Fuel level
is OK.
Supply fuel.Fuel level
is low.
Ask a Yamaha dealer to
inspect electrical circuit.
Page 20 of 97
INSTRUMENT AND CONTROL FUNCTIONS
3-6
3
EAU00094
SpeedometerThe speedometer shows riding speed.
This speedometer is equipped with an
odometer and trip odometer. The trip
odometer can be reset to “0” with the
reset button. Use the trip odometer to
estimate how far you can ride on a tank
of fuel. This information will enable you
to plan fuel stops in the future.
EAU00101
TachometerThis model is equipped with an electric
tachometer so the rider can monitor the
engine speed and keep it within the
ideal power range.
EC000003
CAUTION:@ Do not operate in the red zone.
Red zone: 9,500 r/min and above @
1. Tripmeter
2. Odometer
3. Reset button
1. Tachometer
2. Red zone
Page 21 of 97

INSTRUMENT AND CONTROL FUNCTIONS
3-7
3
EAU01559*
Diagnosis deviceThis model is equipped with a diagno-
sis device for the following circuits.l
Throttle Position Sensor (T.P.S.)
l
Ignition circuit
If some trouble should occur in any of
these circuits, the tachometer will re-
peatedly display as follows:
CB-72EUse this chart to identify what circuit is
faulty according to the specified r/min
displayed.CB-73E
If the tachometer displays as described
above, take note of the specified r/min
and then take your motorcycle to a
Yamaha dealer for repair.
EC000004
CAUTION:@ To prevent engine damage, be sure
to consult a Yamaha dealer as soon
as possible if the tachometer dis-
plays a repeated change in r/min. @
EAU00109
Antitheft alarm (optional)An antitheft alarm can be equipped to
this motorcycle. Consult your Yamaha
dealer to obtain and install the alarm.
Specified r/min
Faulty circuit
10,000 r/min
Throttle Position Sensor
(T.P.S.)
9,000 r/min
Ignition circuitSpecified
r/min for the
faulty circuit
for 3 sec-
onds (see
chart below)
0 r/min for
3 seconds
Current en-
gine r/min for
3 seconds
Page 24 of 97

INSTRUMENT AND CONTROL FUNCTIONS
3-10
3
EAU00138
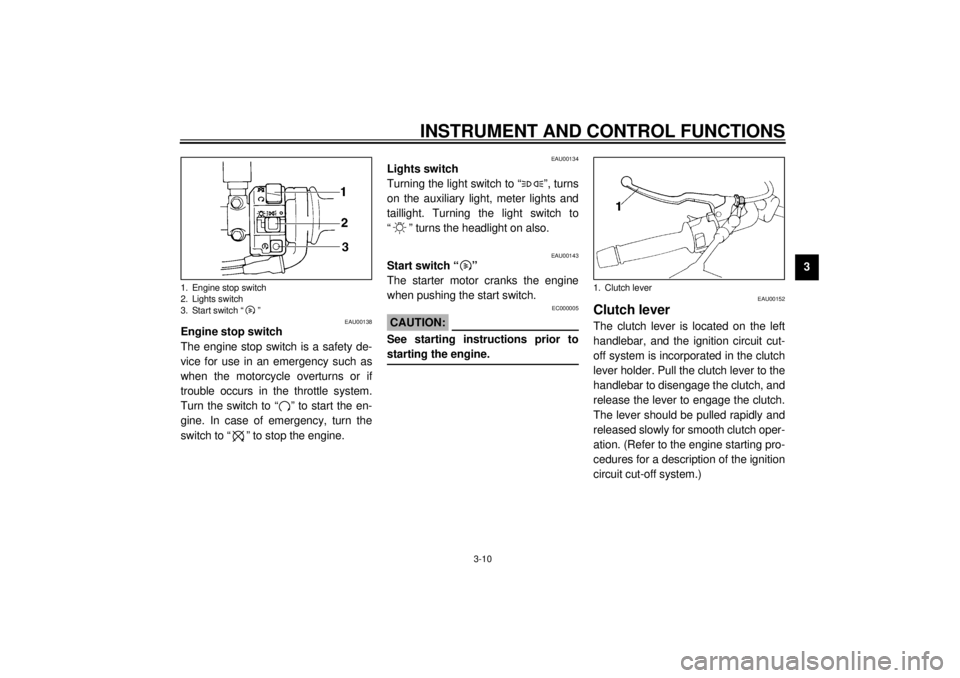
Engine stop switch
The engine stop switch is a safety de-
vice for use in an emergency such as
when the motorcycle overturns or if
trouble occurs in the throttle system.
Turn the switch to “ ” to start the en-
gine. In case of emergency, turn the
switch to “ ” to stop the engine.
EAU00134
Lights switch
Turning the light switch to “ ”, turns
on the auxiliary light, meter lights and
taillight. Turning the light switch to
“ ” turns the headlight on also.
EAU00143
Start switch “ ”
The starter motor cranks the engine
when pushing the start switch.
EC000005
CAUTION:@ See starting instructions prior to
starting the engine. @
EAU00152
Clutch leverThe clutch lever is located on the left
handlebar, and the ignition circuit cut-
off system is incorporated in the clutch
lever holder. Pull the clutch lever to the
handlebar to disengage the clutch, and
release the lever to engage the clutch.
The lever should be pulled rapidly and
released slowly for smooth clutch oper-
ation. (Refer to the engine starting pro-
cedures for a description of the ignition
circuit cut-off system.)
1. Engine stop switch
2. Lights switch
3. Start switch “ ”
1. Clutch lever