2000 YAMAHA XJ900S ESP
[x] Cancel search: ESPPage 17 of 97
INSTRUMENT AND CONTROL FUNCTIONS
3-3
3
EAU00056
Indicator lights
EAU00058
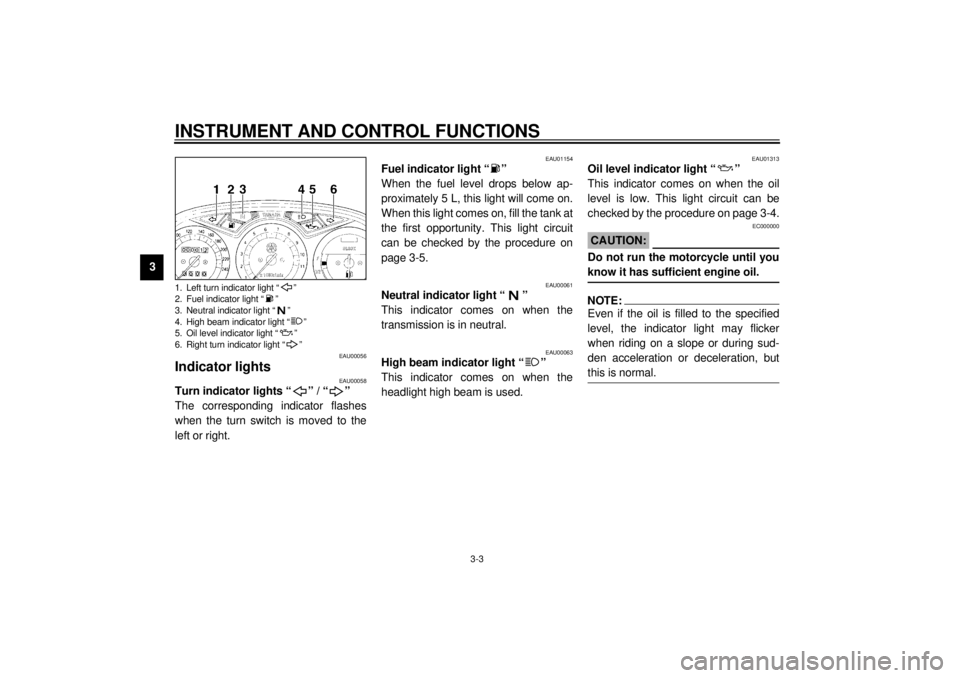
Turn indicator lights “ ” / “ ”
The corresponding indicator flashes
when the turn switch is moved to the
left or right.
EAU01154
Fuel indicator light “ ”
When the fuel level drops below ap-
proximately 5 L, this light will come on.
When this light comes on, fill the tank at
the first opportunity. This light circuit
can be checked by the procedure on
page 3-5.
EAU00061
Neutral indicator light “ ”
This indicator comes on when the
transmission is in neutral.
EAU00063
High beam indicator light “ ”
This indicator comes on when the
headlight high beam is used.
EAU01313
Oil level indicator light “ ”
This indicator comes on when the oil
level is low. This light circuit can be
checked by the procedure on page 3-4.
EC000000
CAUTION:@ Do not run the motorcycle until you
know it has sufficient engine oil. @NOTE:@ Even if the oil is filled to the specified
level, the indicator light may flicker
when riding on a slope or during sud-
den acceleration or deceleration, but
this is normal. @
1. Left turn indicator light “ ”
2. Fuel indicator light “ ”
3. Neutral indicator light “ ”
4. High beam indicator light “ ”
5. Oil level indicator light “ ”
6. Right turn indicator light “ ”
Page 31 of 97
INSTRUMENT AND CONTROL FUNCTIONS
3-17
3
EAU00295*
Rear shock absorber
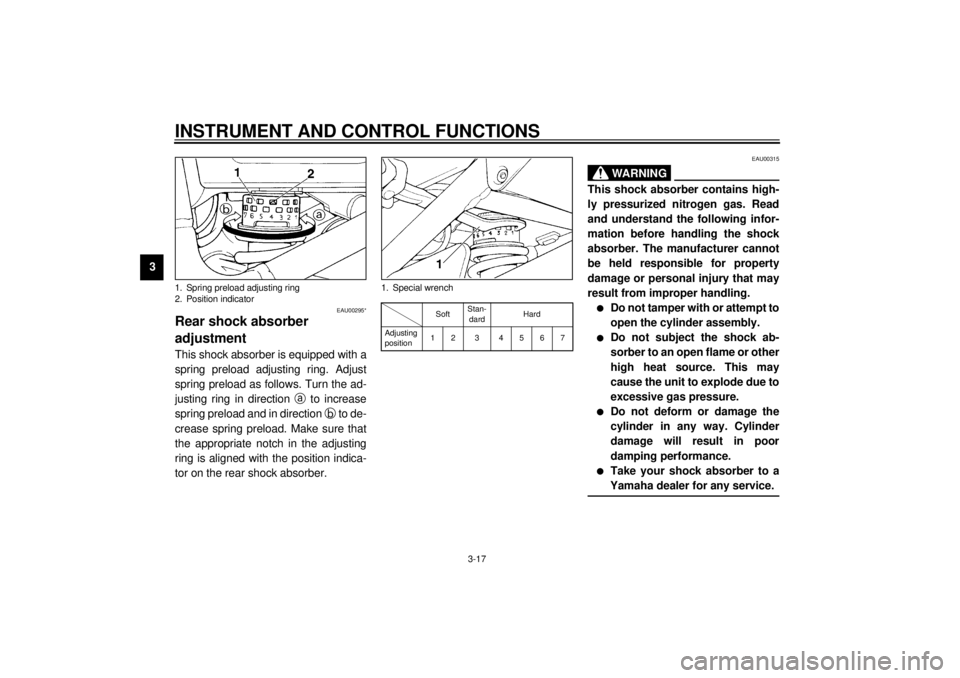
adjustmentThis shock absorber is equipped with a
spring preload adjusting ring. Adjust
spring preload as follows. Turn the ad-
justing ring in direction
a to increase
spring preload and in direction
b to de-
crease spring preload. Make sure that
the appropriate notch in the adjusting
ring is aligned with the position indica-
tor on the rear shock absorber.
CI-18EEAU00315
WARNING
@ This shock absorber contains high-
ly pressurized nitrogen gas. Read
and understand the following infor-
mation before handling the shock
absorber. The manufacturer cannot
be held responsible for property
damage or personal injury that may
result from improper handling.l
Do not tamper with or attempt to
open the cylinder assembly.
l
Do not subject the shock ab-
sorber to an open flame or other
high heat source. This may
cause the unit to explode due to
excessive gas pressure.
l
Do not deform or damage the
cylinder in any way. Cylinder
damage will result in poor
damping performance.
l
Take your shock absorber to a
Yamaha dealer for any service.
@
1. Spring preload adjusting ring
2. Position indicator
1. Special wrench
SoftStan-
dardHard
Adjusting
position12 3 4567
Page 35 of 97

4-1
4
EAU01114
4-PRE-OPERATION CHECKSOwners are personally responsible for their vehicle’s condition. Your motorcycle’s vital functions can start to deteriorate
quickly and unexpectedly, even if it remains unused (for instance, if it is exposed to the elements). Any damage, fluid leak or
loss of tire pressure could have serious consequences. Therefore, it is very important that, in addition to a thorough visual in-
spection, you check the following points before each ride.
EAU00340
PRE-OPERATION CHECK LIST
ITEM CHECKS PAGE
Front brake• Check operation, free play, fluid level and fluid leakage.
• Fill with DOT 4 brake fluid if necessary.
6-19 ~ 6-21
Rear brake• Check operation, free play, fluid level and fluid leakage.
• Fill with DOT 4 brake fluid if necessary.
Clutch• Check operation condition and free play.
• Adjust if necessary.6-18
Throttle grip and housing• Check for smooth operation.
• Lubricate if necessary.6-14, 6-21
Engine oil• Check oil level.
• Fill with oil if necessary.6-8 ~ 6-10
Final gear oil• Check for leakage. 6-11
Wheels and tires• Check tire pressure, wear and damage. 6-15 ~ 6-18, 6-27 ~ 6-31
Control and meter cables• Check for smooth operation.
• Lubricate if necessary.6-21
Brake and shift pedal
shafts• Check for smooth operation.
• Lubricate if necessary.6-22
Brake and clutch lever
pivots• Check for smooth operation.
• Lubricate if necessary.6-22
Center and sidestand
pivots• Check for smooth operation.
• Lubricate if necessary.6-22
Page 41 of 97
OPERATION AND IMPORTANT RIDING POINTS
5-3
51. Turn the main switch to “ON” and
the engine stop switch to “ ”.
EC000035
CAUTION:@ If the fuel indicator light comes on,
check the fuel level. If necessary, fill
the tank with fuel. @2. Shift the transmission into neutral.NOTE:@ When the transmission is in neutral, the
neutral indicator light should be on. If
the light does not come on, ask a
Yamaha dealer to inspect it. @3. Turn on the starter (choke) and
completely close the throttle grip.
4. Start the engine by pushing the
start switch.
NOTE:@ If the engine fails to start, release the
start switch, wait a few seconds, then
try again. Each attempt should be as
short as possible to preserve the bat-
tery. Do not crank the engine more
than 10 seconds on any one attempt. @
EC000036
CAUTION:@ The oil level indicator light and fuel
indicator light should come on when
the start switch is pushed and
should go off when the start switch
is released. If the oil level indicator
light flickers or remains on, immedi-
ately stop the engine and check the
engine oil level and for oil leakage. If
necessary, fill the engine with oil
and check to see that the oil level in-
dicator light goes off. If not, consult
a Yamaha dealer. @
5. After starting the engine, move the
starter (choke) to the halfway posi-
tion.NOTE:@ For maximum engine life, never accel-
erate hard with a cold engine! @6. After the engine is warm, turn off
the starter (choke) completely.NOTE:@ The engine is warm when it responds
normally to the throttle with the starter
(choke) turned off. @
Page 59 of 97
PERIODIC MAINTENANCE AND MINOR REPAIR
6-13
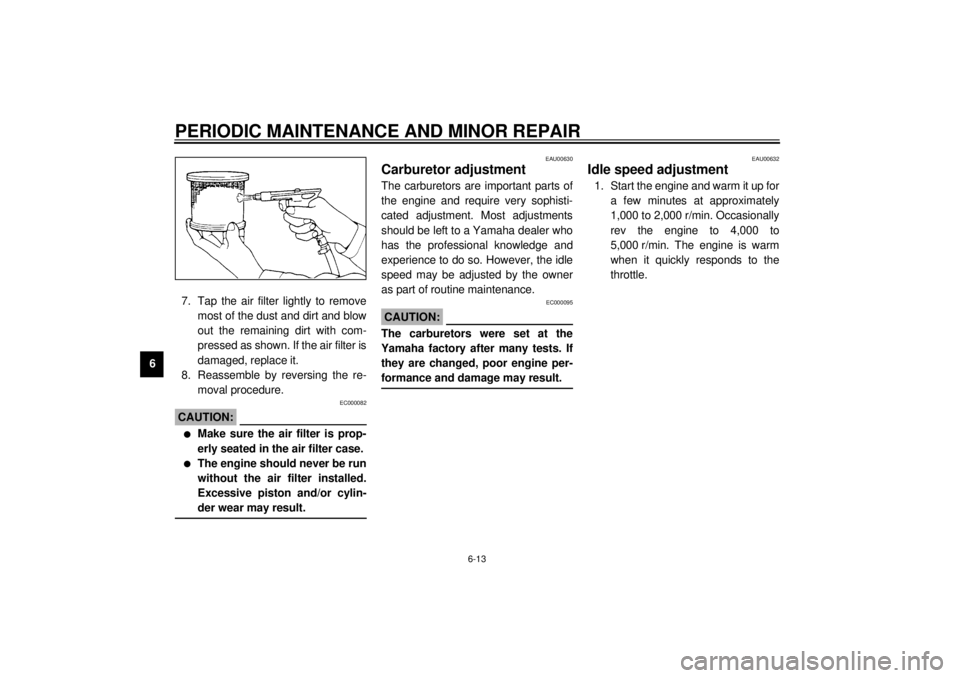
67. Tap the air filter lightly to remove
most of the dust and dirt and blow
out the remaining dirt with com-
pressed as shown. If the air filter is
damaged, replace it.
8. Reassemble by reversing the re-
moval procedure.
EC000082
CAUTION:@ l
Make sure the air filter is prop-
erly seated in the air filter case.
l
The engine should never be run
without the air filter installed.
Excessive piston and/or cylin-
der wear may result.
@
EAU00630
Carburetor adjustmentThe carburetors are important parts of
the engine and require very sophisti-
cated adjustment. Most adjustments
should be left to a Yamaha dealer who
has the professional knowledge and
experience to do so. However, the idle
speed may be adjusted by the owner
as part of routine maintenance.
EC000095
CAUTION:@ The carburetors were set at the
Yamaha factory after many tests. If
they are changed, poor engine per-
formance and damage may result. @
EAU00632
Idle speed adjustment1. Start the engine and warm it up for
a few minutes at approximately
1,000 to 2,000 r/min. Occasionally
rev the engine to 4,000 to
5,000 r/min. The engine is warm
when it quickly responds to the
throttle.
Page 82 of 97
MOTORCYCLE CARE AND STORAGE
7-2
7
ECA00010
CAUTION:@ l
Avoid using strong acidic wheel
cleaners, especially on spoked
wheels. If you do use such
products for hard-to-remove
dirt, do not leave it on any long-
er than instructed, then thor-
oughly rinse it off with water,
immediately dry the area and
apply a corrosion protection
spray.
l
Improper cleaning can damage
windshields, cowlings, panels
and other plastic parts. Use
only a soft, clean cloth or
sponge with mild detergent and
water to clean plastic.
l
Do not use any harsh chemical
products on plastic parts. Be
sure to avoid using cloths or
sponges which have been in
contact with strong or abrasive
cleaning products, solvent or
thinner, fuel (gasoline), rust re-
movers or inhibitors, brake flu-
id, antifreeze or electrolyte.
l
Do not use high-pressure wash-
ers or steam-jet cleaners since
they cause water seepage and
deterioration in the following ar-
eas: seals (of wheel bearings,
swingarm bearings, forks and
brakes), electric components
(couplers, connectors, instru-
ments, switches and lights),
breather hoses and vents.
l
For motorcycles equipped with
a windshield: Do not use strong
cleaners or hard sponges as
they will cause dulling or
scratching. Some cleaning
compounds for plastic may
leave scratches on the wind-
shield. Test the product on a
small hidden part of the wind-
shield to make sure they do not
leave any marks. If the wind-
shield is scratched, use a quali-
ty plastic polishing compound
after washing.
@After riding in the rain, near the sea oron salt-sprayed roadsSince sea salt or salt sprayed on the
roads in the winter are extremely corro-
sive in combination with water, carry
out the following steps after each ride
in the rain, near the sea or on salt-
sprayed roads. (Salt sprayed in the
winter may remain on the roads well
into spring.)