Page 29 of 104

3-14
INSTRUMENT AND CONTROL FUNCTIONS
1
2
3
4
5
6
7
8
9
EAU00260Helmet holder
To open the helmet holder, insert the
key in the lock and turn it as shown.
To lock the helmet holder, replace
the holder in its original position.
EW000030
w
Never ride with a helmet in the hel-
met holder. The helmet may hit
objects, causing loss of control
and possibly an accident.
EAU00295
Rear shock absorber
adjustment
This shock absorber is equipped with
a spring preload adjusting ring.
Adjust spring preload as follows.
Turn the adjusting ring in direction a
to increase spring preload and in
direction bto decrease spring pre-
load.
Make sure that the appropriate notch
in the adjusting ring is aligned with
the position indicator on the rear
shock absorber. To install
Insert the projection on the front of
the seat into the seat holder. Push
down on the seat and remove the
key.
NOTE:
Make sure that the seat is securely
fitted.
1
2
1. Projection
2. Seat holder
1
1. Open
a
b1
1. Adjusting ring
5AE-9-E3 (ENG) 4/11/0 11:06 AM Page 27
Page 62 of 104

6-17
PERIODIC MAINTENANCE AND MINOR REPAIR
1
2
3
4
5
6
7
8
9
EAU00647Tires
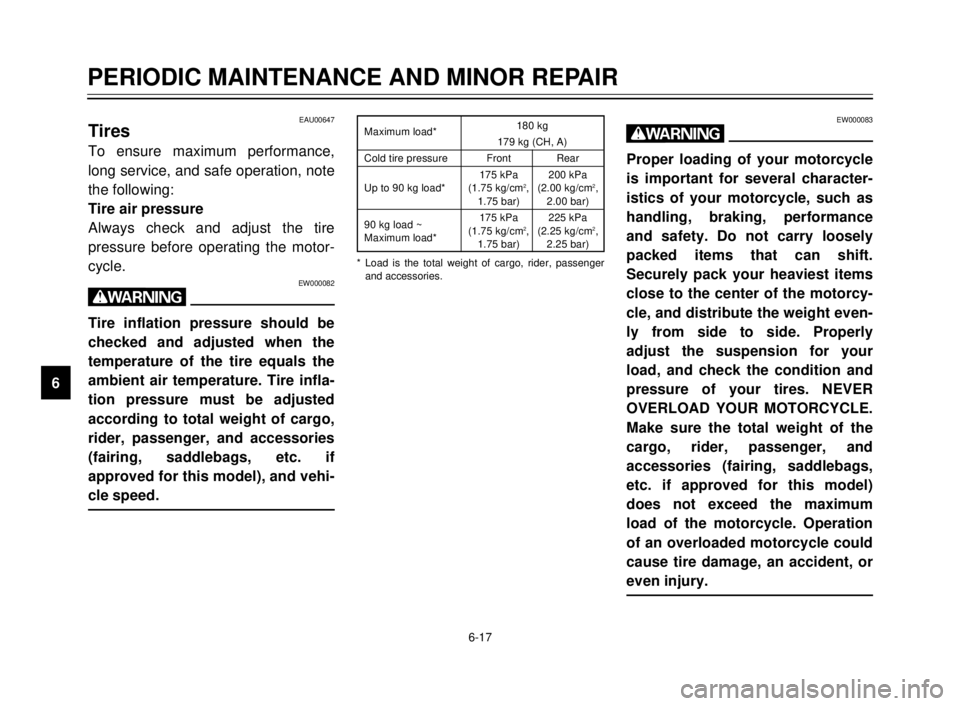
To ensure maximum performance,
long service, and safe operation, note
the following:
Tire air pressure
Always check and adjust the tire
pressure before operating the motor-
cycle.
EW000082
w
Tire inflation pressure should be
checked and adjusted when the
temperature of the tire equals the
ambient air temperature. Tire infla-
tion pressure must be adjusted
according to total weight of cargo,
rider, passenger, and accessories
(fairing, saddlebags, etc. if
approved for this model), and vehi-
cle speed.
* Load is the total weight of cargo, rider, passenger
and accessories. Maximum load*180 kg
179 kg (CH, A)
Cold tire pressure Front Rear
175 kPa 200 kPa
Up to 90 kg load* (1.75 kg/cm
2, (2.00 kg/cm2,1.75 bar) 2.00 bar)
90 kg load ~175 kPa 225 kPa
Maximum load*(1.75 kg/cm
2, (2.25 kg/cm2,
1.75 bar) 2.25 bar)
EW000083
w
Proper loading of your motorcycle
is important for several character-
istics of your motorcycle, such as
handling, braking, performance
and safety. Do not carry loosely
packed items that can shift.
Securely pack your heaviest items
close to the center of the motorcy-
cle, and distribute the weight even-
ly from side to side. Properly
adjust the suspension for your
load, and check the condition and
pressure of your tires. NEVER
OVERLOAD YOUR MOTORCYCLE.
Make sure the total weight of the
cargo, rider, passenger, and
accessories (fairing, saddlebags,
etc. if approved for this model)
does not exceed the maximum
load of the motorcycle. Operation
of an overloaded motorcycle could
cause tire damage, an accident, or
even injury.
5AE-9-E3 (ENG) 4/11/0 11:06 AM Page 60
Page 72 of 104
6-27
PERIODIC MAINTENANCE AND MINOR REPAIR
1
2
3
4
5
6
7
8
9
EAU02986
Sidestand lubrication
Lubricate the sidestand pivoting point
and metal-to-metal contact surfaces.
Check that the sidestand moves up
and down smoothly.
EW000113
w
If the sidestand does not move
smoothly, consult a Yamaha deal-
er.
Recommended lubricant:
Engine oil
EAU00791
Rear suspension lubrication
Lubricate the pivoting parts.
Recommended lubricant:
Lithium soap base grease
EAU02939
Front fork inspection
Visual checkEW000115
w
Securely support the motorcycle
so there is no danger of it falling
over.
Check for scratches or damage on
the inner tube and excessive oil leak-
age from the front fork.
5AE-9-E3 (ENG) 4/11/0 11:06 AM Page 70
Page 73 of 104
6-28
PERIODIC MAINTENANCE AND MINOR REPAIR
1
2
3
4
5
6
7
8
9 Operation check
1. Place the motorcycle on a level
place.
2. Hold the motorcycle in an upright
position and apply the front
brake.
3. Push down hard on the handle-
bars several times and check if
the fork rebounds smoothly.
EC000098
cC
If any damage or unsmooth move-
ment is found with the front fork,
consult a Yamaha dealer.
EAU00794Steering inspection
Periodically inspect the condition of
the steering. Worn out or loose steer-
ing bearings may be dangerous.
Place a stand under the engine to
raise the front wheel off the ground.
Hold the lower end of the front forks
and try to move them forward and
backward. If any free play can be felt,
ask a Yamaha dealer to inspect and
adjust the steering. Inspection is eas-
ier if the front wheel is removed.
EW000115
w
Securely support the motorcycle
so there is no danger of it falling
over.
5AE-9-E3 (ENG) 4/11/0 11:06 AM Page 71
Page 76 of 104

6-31
PERIODIC MAINTENANCE AND MINOR REPAIR
1
2
3
4
5
6
7
8
9
2
1
2
1
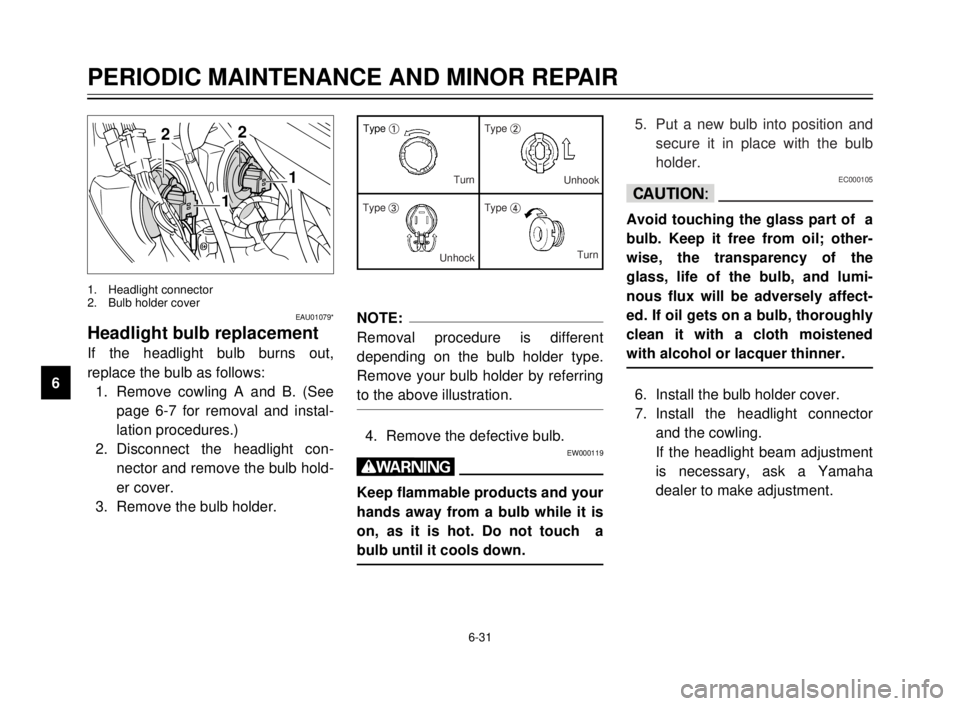
1. Headlight connector
2. Bulb holder cover
EAU01079*
Headlight bulb replacement
If the headlight bulb burns out,
replace the bulb as follows:
1. Remove cowling A and B. (See
page 6-7 for removal and instal-
lation procedures.)
2. Disconnect the headlight con-
nector and remove the bulb hold-
er cover.
3. Remove the bulb holder.
NOTE:
Removal procedure is different
depending on the bulb holder type.
Remove your bulb holder by referring
to the above illustration.
4. Remove the defective bulb.EW000119
w
Keep flammable products and your
hands away from a bulb while it is
on, as it is hot. Do not touch a
bulb until it cools down.
Type 1Type 2
Type 3Type 4 Turn
Unhook
UnhockTurn5. Put a new bulb into position and
secure it in place with the bulb
holder.
EC000105
cC
Avoid touching the glass part of a
bulb. Keep it free from oil; other-
wise, the transparency of the
glass, life of the bulb, and lumi-
nous flux will be adversely affect-
ed. If oil gets on a bulb, thoroughly
clean it with a cloth moistened
with alcohol or lacquer thinner.
6. Install the bulb holder cover.
7. Install the headlight connector
and the cowling.
If the headlight beam adjustment
is necessary, ask a Yamaha
dealer to make adjustment.
5AE-9-E3 (ENG) 4/11/0 11:06 AM Page 74
Page 78 of 104
6-33
PERIODIC MAINTENANCE AND MINOR REPAIR
1
2
3
4
5
6
7
8
9
1
1. Speedometer cable
EAU00894Front wheel removalEW000122
w
8 8
It is advisable to have a
Yamaha dealer service the
wheel.
8 8
Securely support the motorcy-
cle so there is no danger of it
falling over.
1. Remove the speedometer cable
from the front wheel side.
2
1
1. Pinch bolt
2. Wheel axle
2. Loosen the pinch bolt and wheel
axle.
3. Elevate the front wheel by plac-
ing a suitable stand under the
engine.
4. Remove the wheel axle and the
front wheel.
NOTE:
Do not depress the brake lever when
the disc and caliper are separated.
1
1. Bulb
3. Install a new bulb by pushing it
inward and turning it clockwise.
4. Install the lens and tighten the
screw.
5AE-9-E3 (ENG) 4/11/0 11:06 AM Page 76
Page 79 of 104

6-34
PERIODIC MAINTENANCE AND MINOR REPAIR
1
2
3
4
5
6
7
8
9
3. Install the wheel axle and let the
motorcycle down.
4. Push down hard on the handle-
bars several times to check for
proper fork operation.
5. Tighten the wheel axle to the
specified torque.
6. Install the pinch bolt and tighten
it to the specified torque.
7. Install the speedometer cable.Tightening torque:
Wheel axle:
59 Nm (5.9 m0kg)
Pinch bolt:
20 Nm (2.0 m0kg)
312
EAU01618Rear wheel removalEW000122
w
8 8
It is advisable to have a
Yamaha dealer service the
wheel.
8 8
Securely support the motorcy-
cle so there is no danger of it
falling over.
1. Loosen the axle nut.
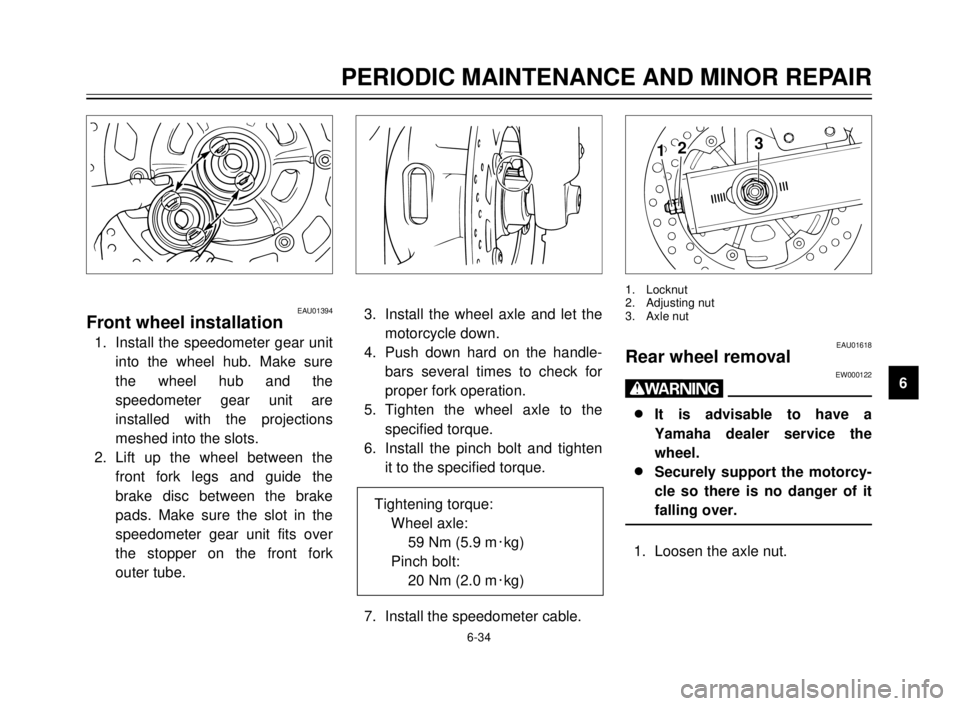
1. Locknut
2. Adjusting nut
3. Axle nut
EAU01394Front wheel installation
1. Install the speedometer gear unit
into the wheel hub. Make sure
the wheel hub and the
speedometer gear unit are
installed with the projections
meshed into the slots.
2. Lift up the wheel between the
front fork legs and guide the
brake disc between the brake
pads. Make sure the slot in the
speedometer gear unit fits over
the stopper on the front fork
outer tube.
5AE-9-E3 (ENG) 4/11/0 11:06 AM Page 77