Page 75 of 104

6-30
PERIODIC MAINTENANCE AND MINOR REPAIR
1
2
3
4
5
6
7
8
9 Battery storage
When the motorcycle is not used for
a month or longer, remove the bat-
tery, fully charge it and store it in a
cool, dry place.
EC000102
cC
8
8
Completely recharge the bat-
tery before storing. Storing a
discharged battery can cause
permanent battery damage.
8 8
Use a battery charger
designed for a sealed-type
(MF) battery. Using a conven-
tional battery charger will
cause battery damage. If you
do not have a sealed-type bat-
tery charger, contact your
Yamaha dealer.
8 8
Always make sure the connec-
tions are correct when rein-
stalling the battery.
1
2
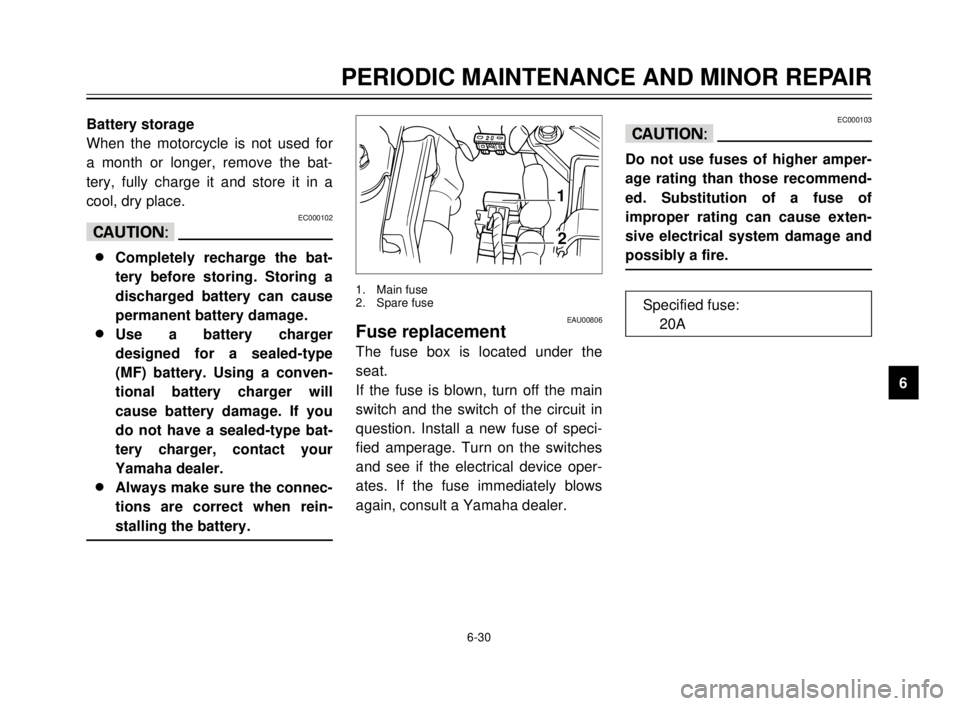
EAU00806Fuse replacement
The fuse box is located under the
seat.
If the fuse is blown, turn off the main
switch and the switch of the circuit in
question. Install a new fuse of speci-
fied amperage. Turn on the switches
and see if the electrical device oper-
ates. If the fuse immediately blows
again, consult a Yamaha dealer.
1. Main fuse
2. Spare fuse
EC000103
cC
Do not use fuses of higher amper-
age rating than those recommend-
ed. Substitution of a fuse of
improper rating can cause exten-
sive electrical system damage and
possibly a fire.
Specified fuse:
20A
5AE-9-E3 (ENG) 4/11/0 11:06 AM Page 73
Page 76 of 104

6-31
PERIODIC MAINTENANCE AND MINOR REPAIR
1
2
3
4
5
6
7
8
9
2
1
2
1
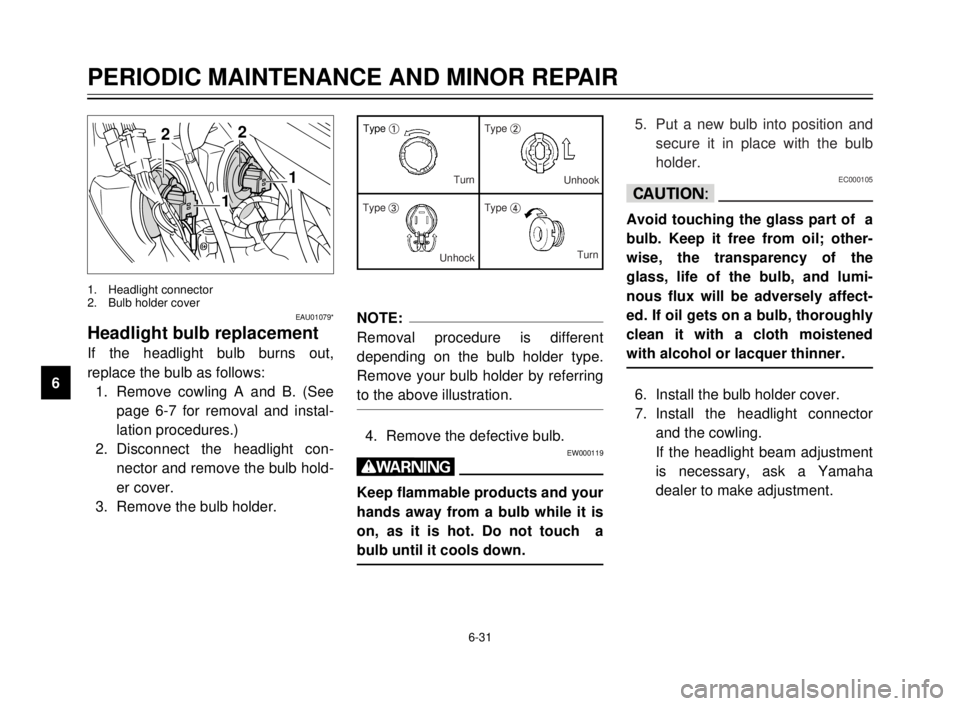
1. Headlight connector
2. Bulb holder cover
EAU01079*
Headlight bulb replacement
If the headlight bulb burns out,
replace the bulb as follows:
1. Remove cowling A and B. (See
page 6-7 for removal and instal-
lation procedures.)
2. Disconnect the headlight con-
nector and remove the bulb hold-
er cover.
3. Remove the bulb holder.
NOTE:
Removal procedure is different
depending on the bulb holder type.
Remove your bulb holder by referring
to the above illustration.
4. Remove the defective bulb.EW000119
w
Keep flammable products and your
hands away from a bulb while it is
on, as it is hot. Do not touch a
bulb until it cools down.
Type 1Type 2
Type 3Type 4 Turn
Unhook
UnhockTurn5. Put a new bulb into position and
secure it in place with the bulb
holder.
EC000105
cC
Avoid touching the glass part of a
bulb. Keep it free from oil; other-
wise, the transparency of the
glass, life of the bulb, and lumi-
nous flux will be adversely affect-
ed. If oil gets on a bulb, thoroughly
clean it with a cloth moistened
with alcohol or lacquer thinner.
6. Install the bulb holder cover.
7. Install the headlight connector
and the cowling.
If the headlight beam adjustment
is necessary, ask a Yamaha
dealer to make adjustment.
5AE-9-E3 (ENG) 4/11/0 11:06 AM Page 74
Page 77 of 104
6-32
PERIODIC MAINTENANCE AND MINOR REPAIR
1
2
3
4
5
6
7
8
9
12
EAU01078
Taillight bulb replacement
1. Remove the seat.
2. Remove panel A. (See page
6-7 for panel removal and instal-
lation procedures.)
3. To remove the socket, turn it
counterclockwise.
1. Screw (´2)
2. Panel A
1
4. To remove the defective bulb,
turn it counterclockwise.
5. Push a new bulb into the socket
and turn it clockwise.
6. Install the socket and turn it
clockwise.
7. Install the panel and the seat.
1. Socket
12
EAU01095
Turn signal light bulb
replacement
1. Remove the screw and the lens.
2. Remove the defective bulb by
pushing it inward and turning it
counterclockwise.
1. Lens
2. Screw
5AE-9-E3 (ENG) 4/11/0 11:06 AM Page 75
Page 78 of 104
6-33
PERIODIC MAINTENANCE AND MINOR REPAIR
1
2
3
4
5
6
7
8
9
1
1. Speedometer cable
EAU00894Front wheel removalEW000122
w
8 8
It is advisable to have a
Yamaha dealer service the
wheel.
8 8
Securely support the motorcy-
cle so there is no danger of it
falling over.
1. Remove the speedometer cable
from the front wheel side.
2
1
1. Pinch bolt
2. Wheel axle
2. Loosen the pinch bolt and wheel
axle.
3. Elevate the front wheel by plac-
ing a suitable stand under the
engine.
4. Remove the wheel axle and the
front wheel.
NOTE:
Do not depress the brake lever when
the disc and caliper are separated.
1
1. Bulb
3. Install a new bulb by pushing it
inward and turning it clockwise.
4. Install the lens and tighten the
screw.
5AE-9-E3 (ENG) 4/11/0 11:06 AM Page 76
Page 79 of 104

6-34
PERIODIC MAINTENANCE AND MINOR REPAIR
1
2
3
4
5
6
7
8
9
3. Install the wheel axle and let the
motorcycle down.
4. Push down hard on the handle-
bars several times to check for
proper fork operation.
5. Tighten the wheel axle to the
specified torque.
6. Install the pinch bolt and tighten
it to the specified torque.
7. Install the speedometer cable.Tightening torque:
Wheel axle:
59 Nm (5.9 m0kg)
Pinch bolt:
20 Nm (2.0 m0kg)
312
EAU01618Rear wheel removalEW000122
w
8 8
It is advisable to have a
Yamaha dealer service the
wheel.
8 8
Securely support the motorcy-
cle so there is no danger of it
falling over.
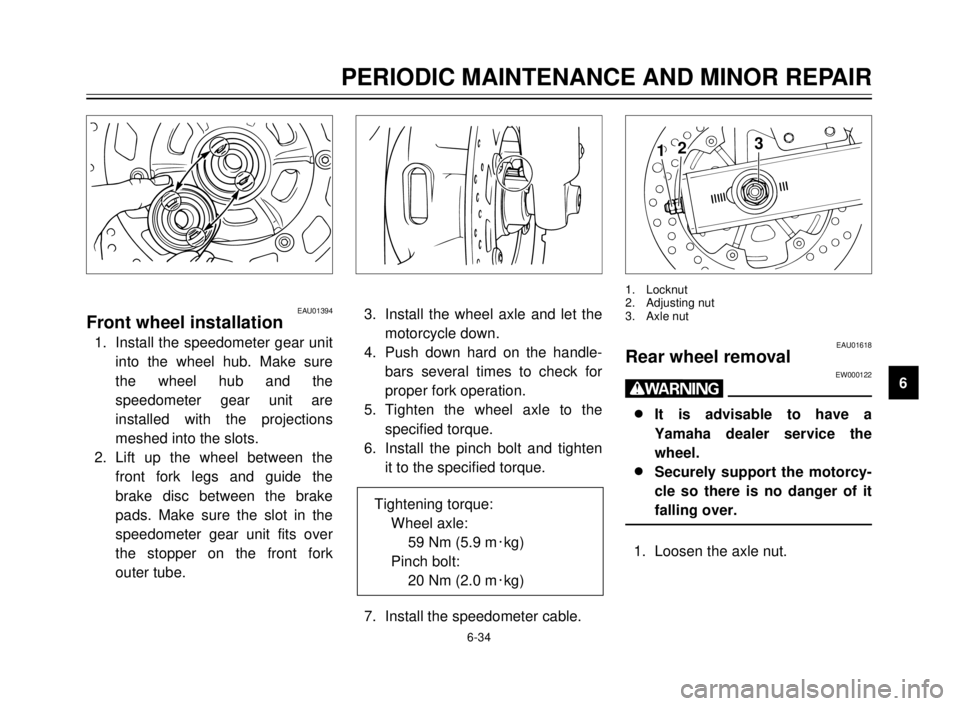
1. Loosen the axle nut.
1. Locknut
2. Adjusting nut
3. Axle nut
EAU01394Front wheel installation
1. Install the speedometer gear unit
into the wheel hub. Make sure
the wheel hub and the
speedometer gear unit are
installed with the projections
meshed into the slots.
2. Lift up the wheel between the
front fork legs and guide the
brake disc between the brake
pads. Make sure the slot in the
speedometer gear unit fits over
the stopper on the front fork
outer tube.
5AE-9-E3 (ENG) 4/11/0 11:06 AM Page 77
Page 80 of 104
6-35
PERIODIC MAINTENANCE AND MINOR REPAIR
1
2
3
4
5
6
7
8
9
2. Elevate the rear wheel by placing
a suitable stand under the
engine.
3. Remove the axle nut.
4. Loosen the locknuts and chain
adjusting nuts on each side.
5. Push the wheel forward and
remove the drive chain.
6. While supporting the brake
caliper, pull out the wheel axle.
7. Remove the wheel assembly.
NOTE:
8Do not depress the brake pedal
when the disc and caliper are
separated.
8You do not have to disassemble
the chain in order to remove or
install the rear wheel.
EAU01620
Rear wheel installation
1. Install the rear brake caliper.
Make sure the slot in the caliper
bracket is fit over the stopper on
the swingarm.
2. Install the rear wheel and chain.
Guide the brake disc between
the brake pads. Make sure there
is enough gap between the
brake pads before inserting the
brake disc.
3. Install the wheel axle and axle
nut, and let the motorcycle down.
5AE-9-E3 (ENG) 4/11/0 11:06 AM Page 78
Page 81 of 104

6-36
PERIODIC MAINTENANCE AND MINOR REPAIR
1
2
3
4
5
6
7
8
9 4. Adjust the drive chain. (See page
6-24 for adjusting the drive chain
slack.)
5. Tighten the axle nut to the speci-
fied torque.
Tightening torque:
Axle nut:
104 Nm (10.4 m0kg)
EAU01008Troubleshooting
Although Yamaha motorcycles
receive a rigid inspection before ship-
ment from the factory, trouble may
occur during operation.
Any problem in the fuel, compres-
sion, or ignition systems can cause
poor starting and loss of power. The
troubleshooting chart describes a
quick, easy procedure for making
checks.
If your motorcycle requires any
repair, bring it to a Yamaha dealer.
The skilled technicians at a Yamaha
dealership have the tools, experi-
ence, and know-how to properly ser-
vice your motorcycle. Use only gen-
uine Yamaha parts on your
motorcycle. Imitation parts may look
like Yamaha parts, but they are often
inferior. Consequently, they have a
shorter service life and can lead to
expensive repair bills.
5AE-9-E3 (ENG) 4/11/0 11:06 AM Page 79
Page 82 of 104
6-37
PERIODIC MAINTENANCE AND MINOR REPAIR
1
2
3
4
5
6
7
8
9
EAU01581Troubleshooting chartEW000125
w
Never check the fuel system while smoking or in the vicinity of an open flame.
1. Fuel
2. Compression
3. Ignition
4. Battery
Use electric starter.
Remove spark
There is compression.
Go to ignition check.
No compression.
Ask a Yamaha dealer to inspect.
Wet.
Dry.Wipe clean with dry cloth and correct
Open throttle half-way and start
Ask a Yamaha dealer to inspect.
Check if there is fuel
Enough fuel.
No fuel.Go to compression check.
Supply fuel.
in the fuel tank.
electrodes. plug and check
Engine doesn’t start, go to battery
check. the engine. spark gap or replace spark plug.
Engine turns over
Engine turns overBattery good.
Check connections or
quickly.
slowly. recharge.Engine doesn’t start, ask aYamaha dealer to inspect.
Engine doesn’t start, go to compression check.
5AE-9-E3 (ENG) 4/11/0 11:06 AM Page 80