2000 YAMAHA MAJESTY 250 battery
[x] Cancel search: batteryPage 76 of 106

6-32
PERIODIC MAINTENANCE AND MINOR REPAIR
1
2
3
4
56
7
8
9
EW000116
w8Electrolyte is poisonous and
dangerous since it contains
sulfuric acid, which causes
severe burns. Avoid any con-
tact with skin, eyes or clothing
and always shield your eyes
when working near batteries.
In case of contact, administer
the following FIRST AID.
8EXTERNAL: Flush with
plenty of water.
8INTERNAL: Drink large
quantities of water or milk
and immediately call a
physician.
8EYES: Flush with water for
15 minutes and seek
prompt medical attention.
8Batteries produce explosive
hydrogen gas. Therefore, keep
sparks, flames, cigarettes,
etc., away from the battery and
provide sufficient ventilation
when charging it in an en-
closed space.To store the battery
1.If the scooter will not be used for
more than one month, remove
the battery, fully charge it, and
then place it in a cool, dry place.
2.If the battery will be stored for
more than two months, check it
at least once a month and fully
charge it if necessary.
3.Fully charge the battery before
installation.
EC000102
cC8Always keep the battery
charged. Storing a discharged
battery can cause permanent
battery damage.
8To charge a sealed-type (MF)
battery, a special (constant-
voltage) battery charger is
required. Using a conventional
battery charger will damage
the battery. If you do not have
access to a sealed-type (MF)
battery charger, have a
Yamaha dealer charge your
battery.
8KEEP THIS AND ALL BATTER-
IES OUT OF THE REACH OF
CHILDREN.
5GM-9-E1(No ABS) 9/27/00 2:18 PM Page 75
Page 77 of 106

2.Remove the blown fuse, and
then install a new fuse of the
specified amperage.
EC000103
cCDo not use a fuse of a higher
amperage rating than recommend-
ed to avoid causing extensive
damage to the electrical system
and possibly a fire.3.Turn the key to ÒONÓ and turn on
the electrical circuit in question to
check if the device operates.
6-33
PERIODIC MAINTENANCE AND MINOR REPAIR
1
2
3
4
56
7
8
94.If the fuse immediately blows
again, have a Yamaha dealer
check the electrical system.
Specified fuses:
Main fuse:30 A
Clock fuse:10 A
Radiator fan fuse:4 A
Ignition fuse:7.5 A
Headlight fuse:15 A
Signaling system fuse:15 A
4
5
67
1
32
78
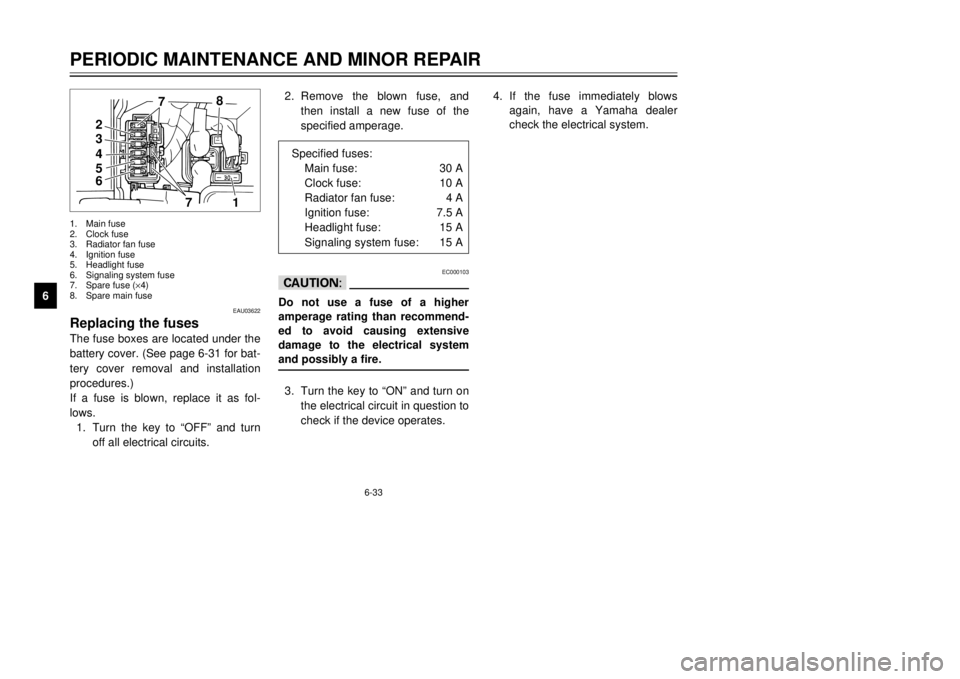
EAU03622
Replacing the fusesThe fuse boxes are located under the
battery cover. (See page 6-31 for bat-
tery cover removal and installation
procedures.)
If a fuse is blown, replace it as fol-
lows.
1.Turn the key to ÒOFFÓ and turn
off all electrical circuits.1.Main fuse
2.Clock fuse
3.Radiator fan fuse
4.Ignition fuse
5.Headlight fuse
6.Signaling system fuse
7.Spare fuse (´4)
8.Spare main fuse
5GM-9-E1(No ABS) 9/27/00 2:18 PM Page 76
Page 83 of 106

6-39
PERIODIC MAINTENANCE AND MINOR REPAIR
1
2
3
4
56
7
8
9
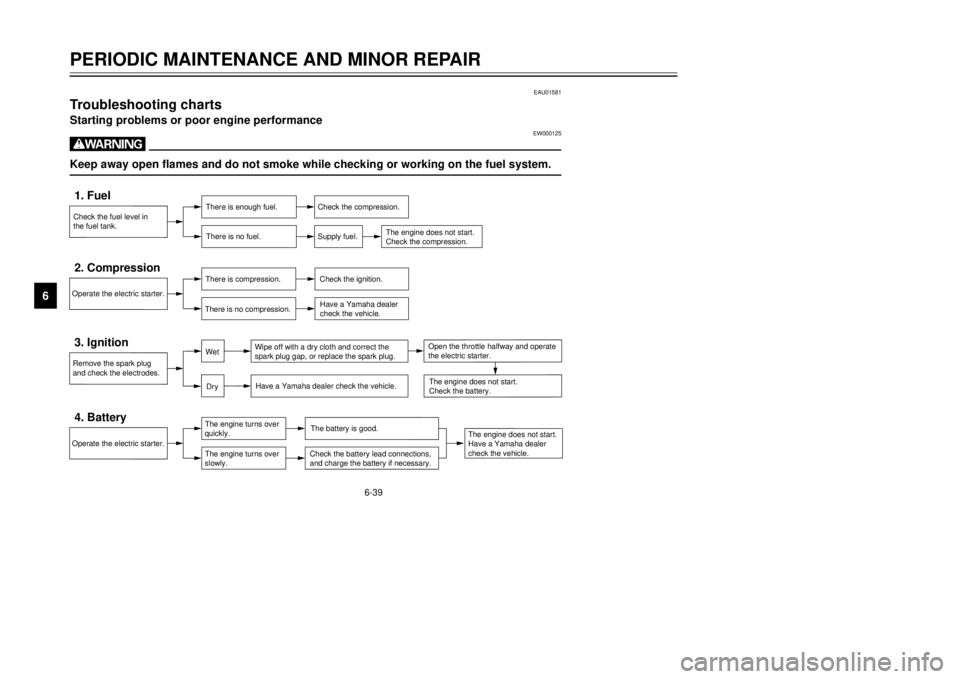
EAU01581
Troubleshooting chartsStarting problems or poor engine performance
EW000125
wKeep away open flames and do not smoke while checking or working on the fuel system.Check the fuel level in
the fuel tank.1. Fuel
There is enough fuel.
There is no fuel.
Check the compression.
Supply fuel.
The engine does not start.
Check the compression.
Operate the electric starter.2. Compression
There is compression.
There is no compression.
Check the ignition.
Have a Yamaha dealer
check the vehicle.
Remove the spark plug
and check the electrodes.3. Ignition
Wipe off with a dry cloth and correct the
spark plug gap, or replace the spark plug.
Have a Yamaha dealer check the vehicle.
The engine does not start.
Have a Yamaha dealer
check the vehicle.
The engine does not start.
Check the battery.
Operate the electric starter.4. Battery
The engine turns over
The engine turns over
The battery is good.Check the battery lead connections,
and charge the battery if necessary.
DryWet
Open the throttle halfway and operate
the electric starter.
quickly.
slowly.
5GM-9-E1(No ABS) 9/27/00 2:18 PM Page 82
Page 91 of 106

7-5
SCOOTER CARE AND STORAGE
1
2
3
4
5
67
8
95.Lubricate all control cables and
the pivoting points of all levers
and pedals as well as of the
sidestand/centerstand.
6.Check and, if necessary, correct
the tire air pressure, and then lift
the scooter so that both of its
wheels are off the ground.
Alternatively, turn the wheels a
little every month in order to pre-
vent the tires from becoming
degraded in one spot.
7.Cover the muffler outlet with a
plastic bag to prevent moisture
from entering it.8.Remove the battery and fully
charge it. Store it in a cool, dry
place and charge it once a
month. Do not store the battery
in an excessively cold or warm
place (less than 0 ¡C or more
than 30 ¡C). For more informa-
tion on storing the battery, see
page 6-32.
NOTE:
Make any necessary repairs before
storing the scooter.
5GM-9-E1(No ABS) 9/27/00 2:18 PM Page 90
Page 95 of 106

Wheels
Front
TypeCast wheel
Size12 ´MT2.75
Rear
TypeCast wheel
Size12 ´MT3.50
Brakes
Front
TypeSingle disc brake
OperationRight hand
FluidDOT 4
Rear
TypeSingle disc brake
OperationLeft hand
FluidDOT 4
Suspension
FrontTelescopic fork
RearUnit swingSpring/shock absorbers
FrontCoil spring/oil damper
RearCoil spring/oil damper
Wheel travel
Front100 mm
Rear90 mm
Electrical
Ignition systemTransistorized coil ignition
(digital)
Charging system
TypeA.C. magneto
Standard output14 V, 19.5 A @ 5,000 r/min
Battery
TypeGT7B-4
Voltage, capacity12 V, 6.5 AH
Headlight bulb typeHalogen bulb
Bulb voltage, wattage ´quantity
Headlight12 V, 60/55 W ´1
12 V, 55 W ´1
Tail/brake light12 V, 5/21 W ´2
Front turn signal light12 V, 21 W ´2
Rear turn signal light12 V, 16 W ´2
SPECIFICATIONS
1
2
3
4
5
6
78
9
8-3
5GM-9-E1(No ABS) 9/27/00 2:18 PM Page 94
Page 101 of 106

INDEX
F
Final gear oil..........................................6-17
Front and rear brake lever free play,
adjusting.............................................6-25
Front and rear brake pads, checking.....6-26
Front fork, checking...............................6-29
Fuel.......................................................3-10
Fuel consumption, tips for reducing........5-4
Fuel gauge..............................................3-4
Fuel tank cap...........................................3-9
Fuses, replacing....................................6-33
H
Handlebar switches.................................3-5
Pass switch.........................................3-5
Dimmer switch....................................3-5
Turn signal switch...............................3-6
Horn switch.........................................3-6
Light switch.........................................3-6
Headlight variations............................3-7
Engine stop switch..............................3-8
Start switch.........................................3-8
Headlight bulb, replacing.......................6-34
I
Identification numbers.............................9-1
Ignition circuit cut-off system.................3-15
Indicator lights.........................................3-2
Oil change indicator light....................3-2
High beam indicator light....................3-2
Turn signal indicator lights..................3-2
K
Key identification number........................9-1
L
License plate light bulb, replacing.........6-37
M
Main switch/steering lock........................3-1
Model label..............................................9-2
P
Parking....................................................5-5
Part locations...........................................2-1
Periodic maintenance and lubrication
chart......................................................6-3
Pre-operation check list...........................4-1
R
Rider seat..............................................3-11
Rider seat, adjusting..............................3-12
S
Safe-riding points....................................1-2
Self-diagnosis device..............................3-3
Shock absorber assemblies, adjusting..3-14
Sidestand..............................................3-15
Spark plug, checking.............................6-12
Specifications..........................................8-1
Speedometer unit....................................3-3
Starting off...............................................5-2
Starting the engine..................................5-1
Steering, checking.................................6-30
Storage....................................................7-4
A
Acceleration and deceleration.................5-3
Air filter and V-belt case air filter
elements, cleaning..............................6-20
Air flow louver........................................6-22
Anti-theft alarm (optional)........................3-4
B
Battery...................................................6-31
Battery cover, removing........................6-31
Brake fluid level, checking.....................6-27
Brake fluid, changing.............................6-28
Brake lever (front)....................................3-8
Brake lever (rear)....................................3-8
Brake levers, lubricating........................6-28
Braking....................................................5-3
C
Cables, checking and lubricating...........6-28
Care.........................................................7-1
Catalytic converter.................................3-10
Centerstand and sidestand, checking
and lubricating....................................6-29
Clock.......................................................3-5
Conversion table.....................................8-5
Coolant..................................................6-18
Coolant temperature gauge.....................3-4
Cowlings and panel, removing and
installing................................................6-6
E
Engine break-in.......................................5-4
Engine oil...............................................6-14
5GM-9-E1(No ABS) 9/27/00 2:18 PM Page 100