Page 205 of 283
TUNDRA (34413U)
205
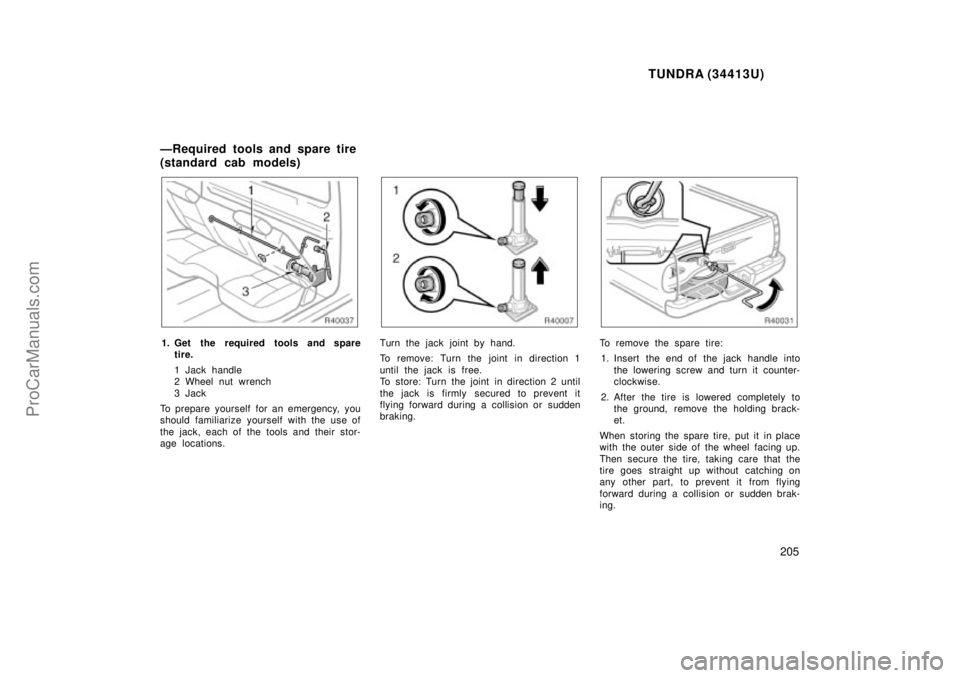
1. Get the required tools and sparetire.
1 Jack handle
2 Wheel nut wrench
3Jack
To prepare yourself for an emergency, you
should fam iliarize yourself with the use of
the jack, each of the tools and their stor-
age locations.
Turn the jack joint by hand.
To remove: Turn the joint in direction 1
until the jack is free.
To store: Turn the joint in direction 2 until
the jack is firmly secured to prevent it
flying forward during a collision or s udden
braking.To remove the spare tire:
1. Insert the end of the jack handle into the lowering screw and turn it counter-
clockwise.
2. After the tire is lowered completely to the ground, remove the holding brack-
et.
When storing the spare tire, put it in place
with the outer side of the wheel facing up.
Then secure the tire, taking care that the
tire goes straight up without catching on
any other part, to prevent it from flying
forward during a collision or s udden brak-
ing.
ÐRequired tools and spare tire
(standard cab models)
ProCarManuals.com
Page 207 of 283
TUNDRA (34413U)
207
2. Insert the end of the jack handle exten-sion into the lowering screw and turn
it counterclockwise with the handle,
making sure the handle remains firmly
fitted onto the jack handle extension.
3. After the tire is lowered completely to the ground, remove the holding brack-
et.
When storing the spare tire, put it in place
with the outer side of the wheel facing up.
Then secure the tire, taking care that the
tire goes straight up without catching on
any other part, to prevent it from flying
forward during a collision or s udden brak-
ing.
ÐBlocking the wheel
2. Block the wheel diagonally opposite the flat tire to keep the vehicle from
rolling when it is j acked up.
When blocking the wheel, place a wheel
block from the front for the front wheels
or from the rear for the rear wheels.
ÐRemoving wheel ornament
Ty p e A
Ty p e B
ProCarManuals.com
Page 208 of 283
TUNDRA (34413U)
208
Ty p e C
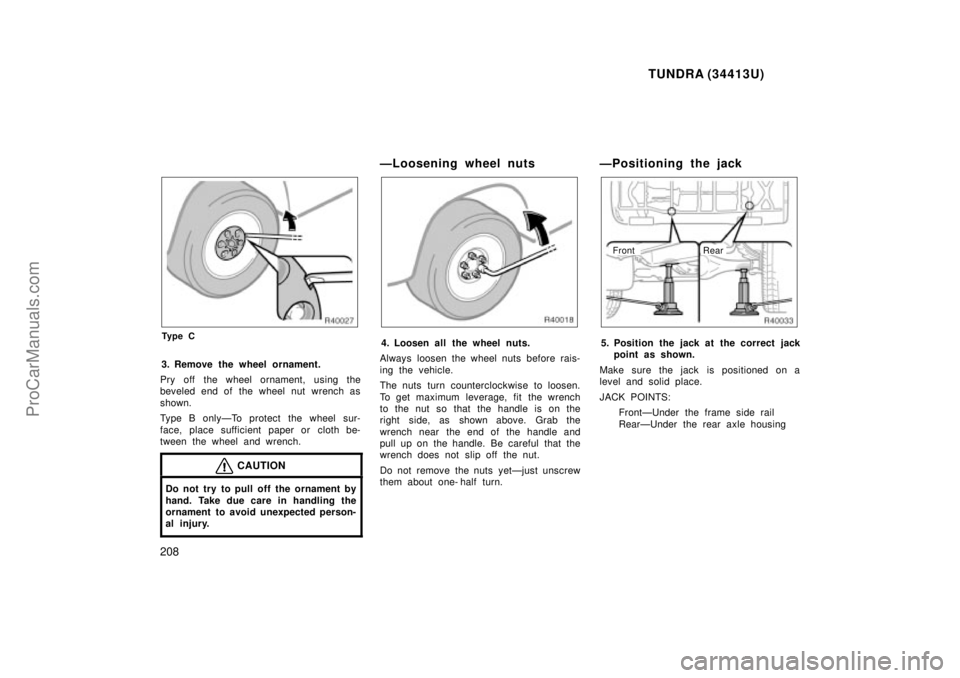
3. Remove the wheel ornament.
Pry off the wheel ornament, using the
beveled end of the wheel nut wrench as
shown.
Type B onlyÐTo protect the wheel sur-
face, place sufficient paper or cloth be-
tween the wheel and wrench.
CAUTION
Do not try to pull off the ornament by
hand. Take due care in handling the
ornament to avoid unexpected person-
al injury.
ÐLoosening wheel nuts
4. Loosen all the wheel nuts.
Always loosen the wheel nuts before rais-
ing the vehicle.
The nuts turn counterclockwise to loosen.
To get maximum leverage, fit the wrench
to the nut so that the handle is on the
right side, as shown above. Grab the
wrench near the end of the handle and
pull up on the handle. Be careful that the
wrench does not slip off the nut.
Do not remove the nuts yetÐjust unscrew
them about one- half turn.
ÐPositioning the jack
Front Rear
5. Position the jack at the correct jack
point as shown.
Make sure the jack is positioned on a
level and solid place.
JACK POINTS: FrontÐUnder the frame side rail
RearÐUnder the rear axle housing
ProCarManuals.com
Page 209 of 283
TUNDRA (34413U)
209
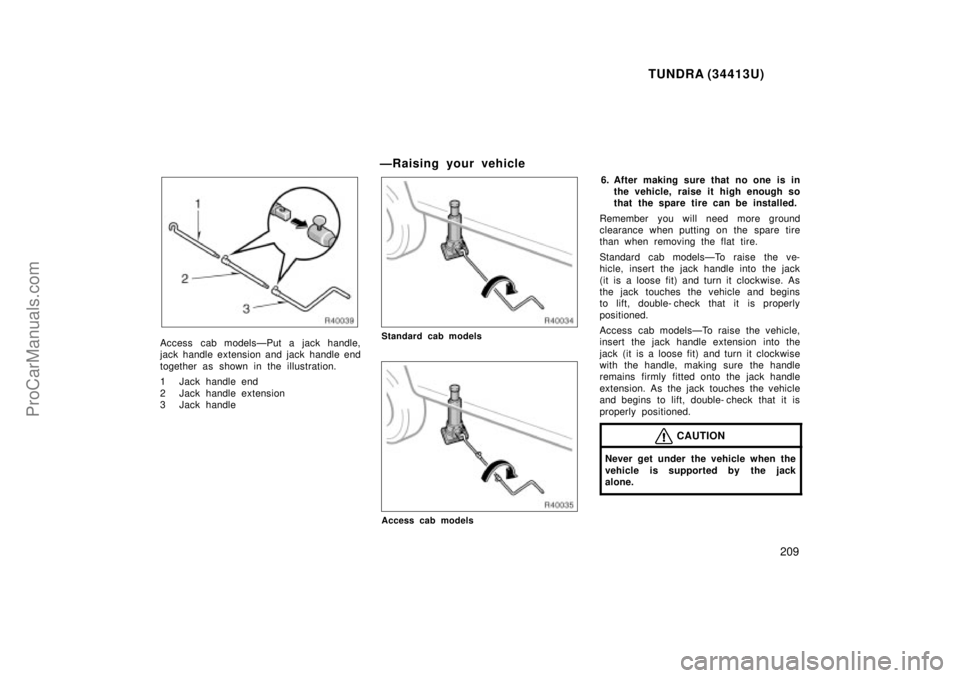
Access cab modelsÐPut a jack handle,
jack handle extension and jack handle end
together as shown in the illustration.
1 Jack handle end
2 Jack handle extension
3 Jack handle
ÐRaising your vehicle
Standard cab models
Access cab models
6. After making sure that no one is inthe vehicle, raise it high enough so
that the spare tire can be installed.
Remember you will need more ground
clearance when putting on the spare tire
than when removing the flat tire.
Standard cab modelsÐTo raise the ve-
hicle, insert the jack handle into the jack
(it is a loose fit) and turn it clockwise. As
the jack touches the vehicle and begins
to lift, double- check that it is properly
positioned.
Access cab modelsÐTo raise the vehicle,
insert the jack handle extension into the
jack (it is a loose fit) and turn it clockwise
with the handle, making sure the handle
remains firmly fitted onto the jack handle
extension. As the jack touches the vehicle
and begins to lift, double- check that it is
properly positioned.
CAUTION
Never get under the vehicle when the
vehicle is supported by the jack
alone.
ProCarManuals.com
Page 211 of 283
TUNDRA (34413U)
211
ÐLowering your vehicle
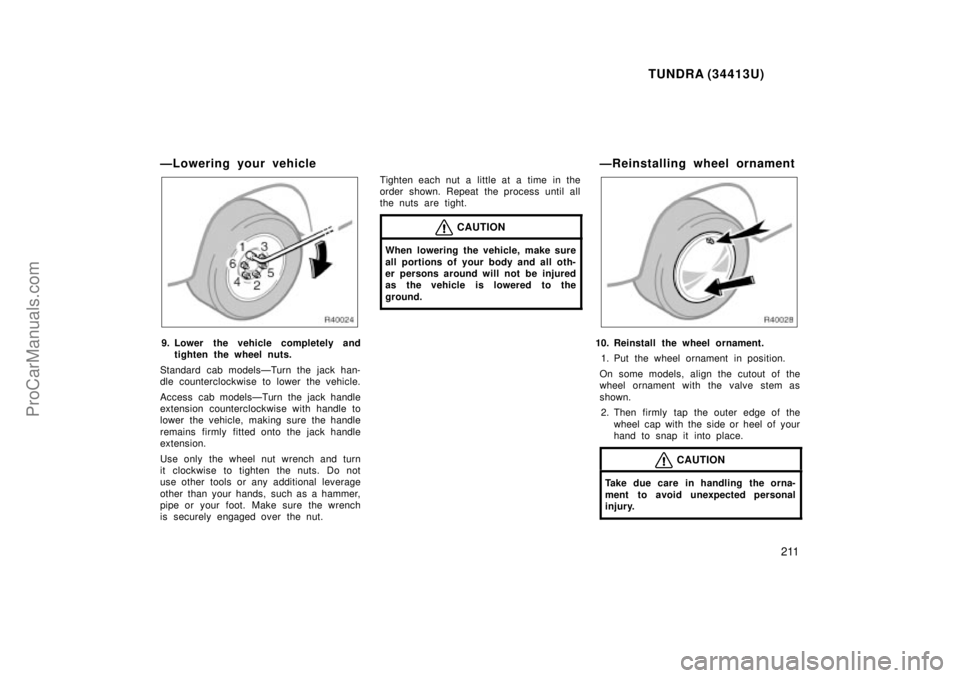
9. Lower the vehicle completely andtighten the wheel nuts.
Standard cab modelsÐTurn the jack han-
dle counterclockwise to lower the vehicle.
Access cab modelsÐTurn the jack handle
extension counterclockwise with handle to
lower the vehicle, making sure the handle
remains firmly fitted onto the jack handle
extension.
Use only the wheel nut wrench and turn
it clockwise to tighten the nuts. Do not
use other tools or any additional leverage
other than your hands, such as a hammer,
pipe or your foot. Make sure the wrench
is securely engaged over the nut. Tighten each nut a little at a time in the
order shown. Repeat the process until all
the nuts are tight.
CAUTION
When lowering the vehicle, make sure
all portions of your body and all oth-
er persons around will not be injured
as the vehicle is lowered to the
ground.
ÐReinstalling wheel ornament
10. Reinstall the wheel ornament.
1. Put the wheel ornament in position.
On some models, align the cutout of the
wheel ornament with the valve stem as
shown. 2. Then firmly tap the outer edge of the wheel cap with the side or heel of your
hand to snap it into place.
CAUTION
Take due care in handling the orna-
ment to avoid unexpected personal
injury.
ProCarManuals.com
Page 242 of 283
TUNDRA (34413U)
242
Checking brake fluid
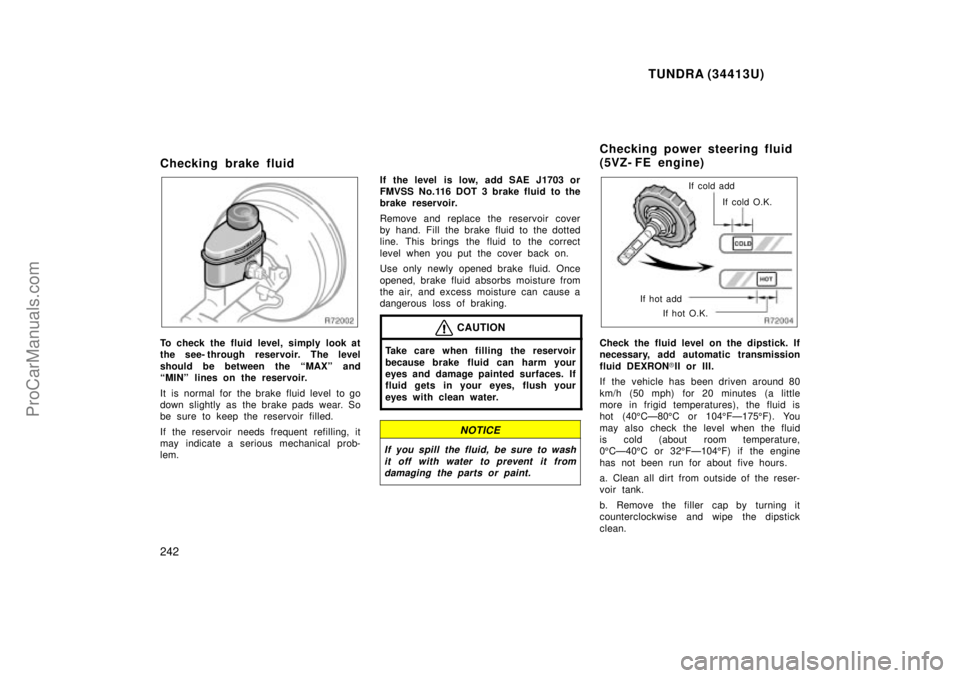
To check the fluid level, simply look at
the see- through reservoir. The level
should be between the MAXº and
MINº lines on the reservoir.
It is normal for the brake fluid level to go
down slightly as the brake pads wear. So
be sure to keep the reservoir filled.
If the reservoir needs frequent refilling, it
may indicate a serious mechanical prob-
lem. If the level is low, add SAE J1703 or
FMVSS No.116 DOT 3 brake fluid to the
brake reservoir.
Remove and replace the reservoir cover
by hand. Fill the brake fluid to the dotted
line. This brings the fluid to the correct
level when you put the cover back on.
Use only newly opened brake fluid. Once
opened, brake fluid absorbs moisture from
the air, and excess moisture can cause a
dangerous loss of braking.
CAUTION
Take care when filling the r
eservoir
because brake fluid can harm your
eyes and damage painted surfaces. If
fluid gets in your eyes, flush your
eyes with clean water.
NOTICE
If you spill the fluid, be sure to wash it off with water to prevent it fromdamaging the parts or paint.
If cold add
If cold O.K.
If hot add If hot O.K.
Check the fluid level on the dipstick. If
necessary, add automatic transmission
fluid DEXRON �II or III.
If the vehicle has been driven around 80
km/h (50 mph) for 20 minutes (a little
more in frigid temperatures), the fluid is
hot (40 5CÐ80 5C or 104 5FÐ175 5F). You
may also check the level when the fluid
is cold (about room temperature,
0 5CÐ40 5C or 32 5FÐ104 5F) if the engine
has not been run for about five hours.
a. Clean all dirt from outside of the reser-
voir tank.
b. Remove the filler cap by turning it
counterclockwise and wipe the dipstick
clean.
Checking power steering fluid
(5VZ- FE engine)
ProCarManuals.com
Page 243 of 283
TUNDRA (34413U)
243
c. Reinstall the filler cap.
d. Remove the filler cap again and look at
the fluid level. If the fluid is cold, the
level should be in the COLDº range on
the dipstick. Similarly, if it is hot, the fluid
level should be in the HOTº range. If the
level is at the low side of either range,
add automatic transmission fluid
DEXRON�II or III to bring the level within
the range.
e. After replacing the filler cap, visually
check the steering box case, vane pump
and hose connections for leaks or dam-
age.
CAUTION
The reservoir tank may be hot so be
careful not to burn yourself.
NOTICE
Avoid overfilling, or the power steer-
ing could be damaged.
If hot O.K. Close Open
If cold O.K.
If hot add If cold add
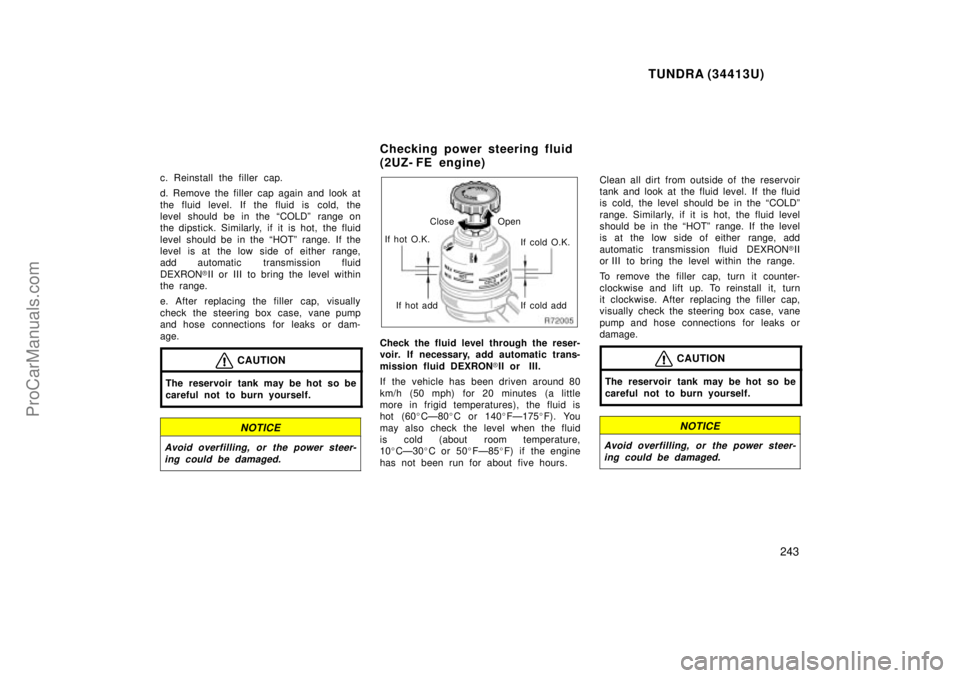
Check the fluid level through the reser-
voir. If necessary, add automatic trans-
mission fluid DEXRON �II or III.
If the vehicle has been driven around 80
km/h (50 mph) for 20 minutes (a little
more in frigid temperatures), the fluid is
hot (60 �CÐ80 �C or 140 �FÐ175 �F). You
may also check the level when the fluid
is cold (about room temperature,
10 �CÐ30 �C or 50 �FÐ85 �F) if the engine
has not been run for about five hours. Clean all dirt from outside of the reservoir
tank and look at the fluid level. If the fluid
is cold, the level should be in the COLDº
range. Similarly, if it is hot, the fluid level
should be in the HOTº range. If the level
is at the low side of either range, add
automatic transmission fluid DEXRON
�II
or III to bring the level within the range.
To remove the filler cap, turn it c ounter-
clockwise and lift up. To reinstall it, turn
it clockwise. After replacing the filler cap,
visually check the steering box case, vane
pump and hose connections for leaks or
damage.
CAUTION
The reservoir tank may be hot so be
careful not to burn yourself.
NOTICE
Avoid overfilling, or the power steer- ing could be damaged.
Checking power steering fluid
(2UZ- FE engine)
ProCarManuals.com
Page 255 of 283
TUNDRA (34413U)
255
ÐFront fog lights
1. Turn the bulb base counterclockwiseto the front of the vehicle as shown.2. Pull the bulb out of the bulb base.
If the connector is tight, wiggle it.3. Install a new bulb base by turning it clockwise to the front of the vehicle.
Aiming is not necessary after replacing
the bulb. When aiming adjustment is nec-
essary, contact your Toyota dealer.
ProCarManuals.com
Page:
< prev 1-8 9-16 17-24