Page 30 of 282

24
The wireless remote control system al-
lows you to lock or unlock all the
doors from a distance within approxi-
mately 1 m (3 ft.) of the vehicle. On
some models, the system also allow")
00 SIENNA(U)
24
The wireless remote control system al-
lows you to lock or unlock all the
doors from a distance within approxi-
mately 1 m (3 ft.) of the vehicle. On
some models, the system also allows
you to activate the theft deterrent sys-
tem from the same distance.
LOCKING AND UNLOCKING THE
DOORS
To lock and unlock all the doors, push
the switches of the transmitter slowly
and securely.
To lock: Push the “LOCK” switch. All the
doors are locked simultaneously. At this
time, parking lights, side marker lights and
tail lights flash.
Check to see that the doors are securely
locked.
If any of the doors is not securely closed,
or if the key is in the ignition switch,
locking cannot be performed by the
“LOCK” switch.
To unlock: Push the “UNLOCK” switch
once to unlock the driver ’s door alone.
Pushing the switch twice within 3 seconds
unlocks all the doors simultaneously. At
this time, parking lights, side marker lights
and tail lights flash twice.You have 30 seconds to open a door after
using the wireless remote unlock feature.
If a door is not opened by then, all the
doors will automatically lock again.
If the “LOCK” or “UNLOCK” switch is kept
pressed in, the locking or unlocking opera-
tion is not repeated. Release the button
and then push again.
“POWER DOOR” SWITCH (on some
models)
This switch of the transmitter is used
to open and close the power sliding
door. Push the switch slowly and se-
curely.
To open: Push the switch. The sliding
door opens completely.
To close: Push the switch again. The slid-
ing door closes completely.
ProCarManuals.com
Page 33 of 282

27
2. Remove the discharged transmitter bat-
tery.
NOTICE
Do not bend the terminals.
3. Put a new transmitter battery with posi-
tive (+) side up.
Close the transmitter case securely.
NOT")
00 SIENNA(U)
27
2. Remove the discharged transmitter bat-
tery.
NOTICE
Do not bend the terminals.
3. Put a new transmitter battery with posi-
tive (+) side up.
Close the transmitter case securely.
NOTICE
�Make sure the positive side and
negative side of the transmitter bat-
tery should be faced correctly.
�Be careful not to bend the electrode
of the transmitter battery insertion
and that dust or oils do not adhere
to the transmitter case.
�Close the transmitter case securely.
After replacing battery, check that the
transmitter operates properly. If the trans-
mitter still does not operate properly, con-
tact your Toyota dealer.
If you lose your transmitter, contact your
Toyota dealer as soon as possible to
avoid the possibility of theft, or an acci-
dent. (See “If you lose your wireless re-
mote control transmitter” in Section 4.)
MODEL/FCC ID: GQ43VT14T
CAN: 1470102849
MADE IN U.S.A.
This complies with Section 15 of the
FCC rules. Operation is subject to the
following two conditions:
(1) This device may not cause harmful
interference, and (2) this device must
accept any interference received, includ-
ing interference that may cause unde-
sired operation.
ProCarManuals.com
Page 37 of 282
00 SIENNA(U)
31
Strap
Handle
When closing the back door, use the
inside strap or handle for easier reach
to the back door.
To close the back door, lower it and press
down on it. After closing the back door,
try pulling it up to make sure it is secure-
ly closed.
See “Luggage stowage precautions” in
Section 2 for precautions to observe for
loading luggage.
CAUTION
Keep the back door closed while driv-
ing. This not only keeps the luggage
from being thrown out but also pre-
vents exhaust gases from entering
the vehicle.
NOTICE
To prevent damage to the back door
dampers, do not apply any force,
paint or let any other foreign matter
on them.
Hood
To open the hood:
1. Pull the hood lock release lever. The
hood will spring up slightly.
CAUTION
Before driving, be sure that the hood
is closed and securely locked. Other-
wise, the hood may open unexpected-
ly while driving and an accident may
occur.
ProCarManuals.com
Page 38 of 282
00 SIENNA(U)
32
2. In front of the vehicle, pull up the
auxiliary catch lever and lift the
hood.3. Hold the hood open by inserting the
support rod into the slot.
Before closing the hood, check to see that
you have not forgotten any tools, rags,
etc. and return the support rod to its
clip—this prevents rattles. Then lower the
hood make sure it locks into place. If
necessary, press down gently on the front
edge to lock it.
CAUTION
After inserting the support rod into
the slot, make sure the rod supports
the hood securely from falling down
on to your head or body.
Theft deterrent system
To deter the vehicle theft, the system
is designed to give an alarm if any of
the front, sliding or back doors or hood
is forcibly unlocked or the battery ter-
minal is disconnected and then recon-
nected when the vehicle is locked.
The alarm blows the horn intermittently
and flashes the headlights, tail lights and
other exterior lights.
ProCarManuals.com
Page 41 of 282

35
NOTICE
5−door models—Avoid opening the
fuel filler door when the left side slid-
ing door is fully opened. Otherwise,
the fuel filler door may be damaged.
2. To remove the fuel tan")
00 SIENNA(U)
35
NOTICE
5−door models—Avoid opening the
fuel filler door when the left side slid-
ing door is fully opened. Otherwise,
the fuel filler door may be damaged.
2. To remove the fuel tank cap, turn
the cap slowly counterclockwise,
then pause slightly before removing
it. After removing the cap, hang it
on the cap hanger.
It is not unusual to hear a slight swoosh
when the cap is opened. When installing,
turn the cap clockwise till you hear a
click.
If the cap is not tightened securely, the
malfunction indicator lamp comes on.
Make sure the cap is tightened securely.The indicator lamp goes off after driving
several times. If the indicator lamp does
not go off, contact your Toyota dealer as
soon as possible.
The left side sliding door does not open
fully if the fuel filler door is opened.
CAUTION
�Make sure the cap is tightened se-
curely to prevent fuel spillage in
case of an accident.
�Use only a genuine Toyota fuel tank
cap for replacement. It has a built−
in check valve to reduce fuel tank
vacuum.
ProCarManuals.com
Page 49 of 282

43
CAUTION
�Any operations should not be made
while the vehicle is moving.
�When adjusting the seat, be careful
not to hit the seat against a pas-
senger or luggage.
�After adjusting the")
00 SIENNA(U)
43
CAUTION
�Any operations should not be made
while the vehicle is moving.
�When adjusting the seat, be careful
not to hit the seat against a pas-
senger or luggage.
�After adjusting the seat position,
try sliding it forward and backward
to make sure it is lock in position.
�After adjusting the seatback, exert
body pressure to make sure it is
locked in position.
�When returning seats to their origi-
nal position:
Make sure the seat belts are not
twisted or caught under the seat
and are arranged in their proper
position and are ready to use.
Make sure the seat is securely
locked by pushing forward and rear-
ward on the top of the seatback or
by trying to pull up the edge of the
bottom cushion. Failure to do so
will prevent seat belt from operat-
ing properly.
Folding the seats up will enlarge the lug-
gage compartment. See “Luggage stowage
precautions” in Section 2 for precautions
to observe for loading luggage.
Rear seats—
—Rear seat precautions—Adjusting second seat
(bench seat)
ProCarManuals.com
Page 51 of 282
00 SIENNA(U)
45
For access to the third seat, do this.
1. Pull the lever behind the seatback.
The seat will slide forward.
2. Move the seat to the front−most posi-
tion.
After passengers are in, lift up the seat-
back and return the seat until it locks.
CAUTION
�After putting back the seat, try
pushing the seat forward and rear-
ward to make sure it is secured in
place.
�Passengers sitting in the third seat
must be careful not to accidentally
pull the release lever while the ve-
hicle is moving.
Lift the seatback angle adjusting lever
(1) or press the lever (2) behind the
seatback and fold the seatback down.
—Moving second seat for
third seat entry
(right side captain seat)—Folding second seat
(bench seat)
ProCarManuals.com
Page 55 of 282
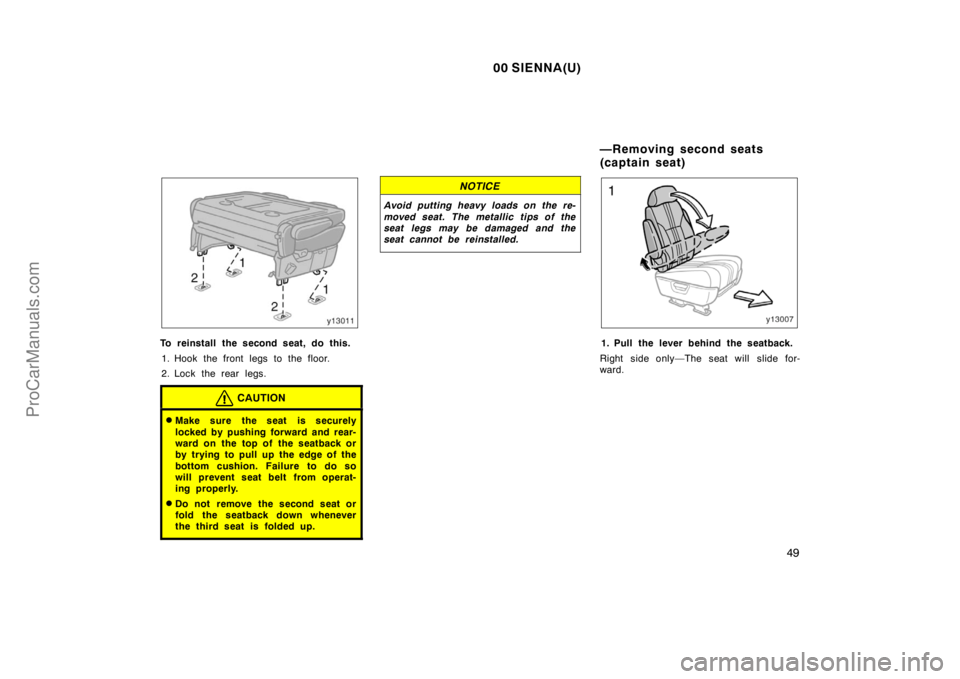
00 SIENNA(U)
49
To reinstall the second seat, do this.
1. Hook the front legs to the floor.
2. Lock the rear legs.
CAUTION
�Make sure the seat is securely
locked by pushing forward and rear-
ward on the top of the seatback or
by trying to pull up the edge of the
bottom cushion. Failure to do so
will prevent seat belt from operat-
ing properly.
�Do not remove the second seat or
fold the seatback down whenever
the third seat is folded up.
NOTICE
Avoid putting heavy loads on the re-
moved seat. The metallic tips of the
seat legs may be damaged and the
seat cannot be reinstalled.
1. Pull the lever behind the seatback.
Right side only—The seat will slide for-
ward.
—Removing second seats
(captain seat)
ProCarManuals.com

31
Strap
Handle
When closing the back door, use the
inside strap or handle for easier reach
to the back door.
To close the back door, lower it and press
down on it. After closing the")

32
2. In front of the vehicle, pull up the
auxiliary catch lever and lift the
hood.3. Hold the hood open by inserting the
support rod into the slot.
Before closing the hood, check to see")

45
For access to the third seat, do this.
1. Pull the lever behind the seatback.
The seat will slide forward.
2. Move the seat to the front−most posi-
tion.
After passengers are in, lif")