Page 60 of 282

54
2. Remove the head restraint. Unlock
the seat legs by pulling up the left
side handle under the seat, and
swing the whole seat up and for-
ward.
After returning the seat to its origi-")
00 SIENNA(U)
54
2. Remove the head restraint. Unlock
the seat legs by pulling up the left
side handle under the seat, and
swing the whole seat up and for-
ward.
After returning the seat to its origi-
nal position, be certain to replace
the head restraint.
Folding the third seats will enlarge the
luggage compartment. See “Luggage
stowage precautions” in Section 2 for pre-
cautions to observe for loading luggage.
CAUTION
�When folding up the seat or return-
ing it to its original position, be
careful not to get your hands or
feet pinched in the seat.
�Be certain to replace head restraint.
�Make sure the seat is securely
locked by pushing forward and rear-
ward on the top of the seatback or
by trying to pull up the edge of the
bottom cushion. Failure to do so
will prevent seat belt from operat-
ing properly.
—Removing third seats
BEFORE REMOVING THIRD SEAT
Stow the third center seat belt as
shown in the illustration.
This prevents the belt from falling out
when you remove the third seat.
NOTICE
�The third center seat belt must be
stowed before you remove the third
seat.
ProCarManuals.com
Page 61 of 282
00 SIENNA(U)
55
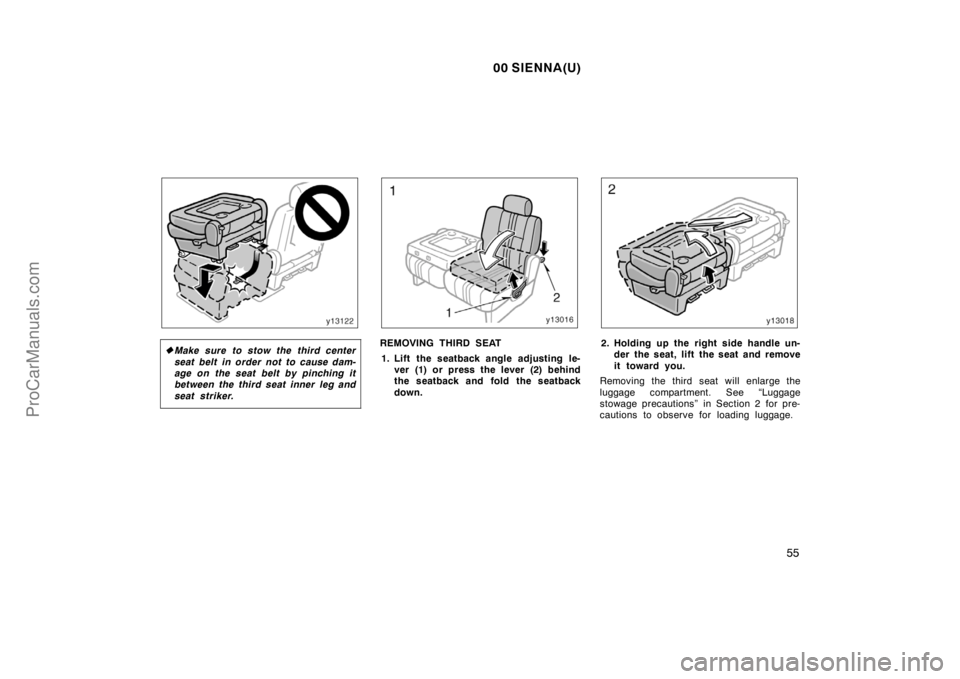
�Make sure to stow the third center
seat belt in order not to cause dam-
age on the seat belt by pinching it
between the third seat inner leg and
seat striker.REMOVING THIRD SEAT
1. Lift the seatback angle adjusting le-
ver (1) or press the lever (2) behind
the seatback and fold the seatback
down.2. Holding up the right side handle un-
der the seat, lift the seat and remove
it toward you.
Removing the third seat will enlarge the
luggage compartment. See “Luggage
stowage precautions” in Section 2 for pre-
cautions to observe for loading luggage.
ProCarManuals.com
Page 106 of 282

100
This model sold in Canada is provided
with a bracket set in the glove box, de-
signed for use with any of the 3 anchor
locations shown in the illustrations.
If your child restraint sy")
00 SIENNA(U)
100
This model sold in Canada is provided
with a bracket set in the glove box, de-
signed for use with any of the 3 anchor
locations shown in the illustrations.
If your child restraint system does not
provide any of the necessary parts, ask
your Toyota dealer. (See “—Child restraint
system”.)
Tilt steering wheel
To change the steering wheel angle,
hold the steering wheel, pull the lock
release lever toward you, tilt the steer-
ing wheel to the desired angle and re-
lease the lever.
When the steering wheel is in a low posi-
tion, it will spring up as you release the
lock release lever.
CAUTION
�Do not adjust the steering wheel
while the vehicle is moving.
�After adjusting the steering wheel,
try moving it up and down to make
sure it is locked in position.
Outside rear view mirrors—
Adjust the mirror so that you can just
see the side of your vehicle in the mir-
ror.
Be careful when judging the size or dis-
tance of any object seen in the outside
rear view mirror on the passenger ’s side.
It is a convex mirror with a curved sur-
face. Any object seen in a convex mirror
will look smaller and farther away than
when seen in a flat mirror.
On some models, when you push the rear
window defogger switch, the heater panels
in the outside rear view mirrors will quick-
ly clear the mirror surface.
ProCarManuals.com
Page 120 of 282

11 4
To turn on the windshield wipers, move
the lever to the desired setting.
The key must be in the “ON” position.
Lever position
Speed setting
Position 1Intermittent
Position 2Slow")
00 SIENNA(U)
11 4
To turn on the windshield wipers, move
the lever to the desired setting.
The key must be in the “ON” position.
Lever position
Speed setting
Position 1Intermittent
Position 2Slow
Position 3Fast
With interval adjuster: The “INT TIME”
band lets you adjust the wiping time inter-
val when the wiper lever is in the intermit-
tent position (position 1). Twist the band
upward to increase the time between
sweeps, and downward to decrease it.To squirt washer fluid, pull the lever
toward you.
If the windshield wipers are off, they will
operate a couple of times after the washer
squirts.
For instructions on adding washer fluid,
see “Adding washer fluid” in Section 7−3.
In freezing weather, warm the windshield
with the defroster before using the washer.
This will help prevent the washer fluid
from freezing on your windshield, which
can block your vision.
NOTICE
Do not operate the wipers if the wind-
shield is dry. It may scratch the
glass.
Rear window wiper and washer
To turn on the rear window wiper, twist
the lever knob upward.
The key must be in the “ON” position.
Lever position
Speed setting
Position 1Intermittent
Position 2Normal
To squirt washer fluid on the rear window,
twist the knob upward or downward as far
as it will go (position 3 or 4). The knob
automatically returns from these positions
after you release it.
For instructions on adding washer fluid,
see “Adding washer fluid” in Section 7−3.
Windshield wipers and
washer
ProCarManuals.com
Page 125 of 282

11 9
The gauge indicates the engine coolant
temperature when the ignition switch is
on. The engine operating temperature
will vary with changes in weather and
engine load.
If the needle m")
00 SIENNA(U)
11 9
The gauge indicates the engine coolant
temperature when the ignition switch is
on. The engine operating temperature
will vary with changes in weather and
engine load.
If the needle moves into the red zone,
your engine is too hot. If your vehicle
overheats, stop your vehicle and allow the
engine to cool.
Your vehicle may overheat during severe
operating conditions, such as:
�Driving up a long hill on a hot day.
�Reducing speed or stopping after high
speed driving.
�Idling for a long period with the air
conditioning on in stop−and−go traffic.
�Towing a trailer.
NOTICE
�Do not remove the thermostat in
the engine cooling system as this
may cause the engine to overheat.
The thermostat is designed to con-
trol the flow of coolant to keep the
temperature of the engine within
the specified operating range.
�Do not continue driving with an
overheated engine. See “If your ve-
hicle overheats” in Section 4.
Tachometer
The tachometer indicates engine speed
in thousands of rpm( revolutions per
minute). Use it while driving to select
correct shift points and to prevent en-
gine lugging and overrevving.
Driving with the engine running too fast
causes excessive engine wear and poor
fuel economy. Remember, in most cases
the slower the engine speed, the greater
the fuel economy.
NOTICE
Do not let the indicator needle get
into the red zone. This may cause
severe engine damage.
ProCarManuals.com
Page 127 of 282

121
(h) Take vehicle to
Toyota dealer. (g) Stop and check. (f) Fill up tank.
Low fuel level
warning light
(type A)
(type B)
(type A)
(type B)
(e) Take vehicle to
Toyota dealer.
(type A)")
00 SIENNA(U)
121
(h) Take vehicle to
Toyota dealer. (g) Stop and check. (f) Fill up tank.
Low fuel level
warning light
(type A)
(type B)
(type A)
(type B)
(e) Take vehicle to
Toyota dealer.
(type A)
(type B)
If the indicator or
buzzer comes on...Do this.
(l) Add washer
fluid. (k) Take vehicle to
Toyota dealer
immediately. (j) Close the right
side sliding door. (i) Close all doors.
(m) Adjust tire
pressure.
(n) Remove key.
Key reminder
buzzer
(indicator and buzzer)
If the indicator or
buzzer comes on...Do this.(a) Brake System Warning Light
This light has the following functions:
Parking brake reminder
If this light is on, make sure the parking
brake is fully released. The light should
go off.
Low brake fluid level warning
If this light comes on and stays on while
you are driving, slow down and pull off
the road. Then stop the vehicle carefully.
Remember that stopping distance and ped-
al effort may be increased. There maybe
a problem somewhere in the brake sys-
tem. Check the fluid level of the see−
through reservoir.
To make sure the parking brake has not
caused the warning light to come on,
check to see that the parking brake is
fully released.
If the brake fluid level is low...
At a safe place, test your brakes by start-
ing and stopping.
�If you judge that the brakes still work
adequately, drive cautiously to your
nearest dealer or shop for repairs.
�If the brakes are not working, have the
vehicle towed in for repairs. (For tow-
ing information, see Section 4.)
ProCarManuals.com
Page 135 of 282
00 SIENNA(U)
129
Automatic transmission
Your automatic transmission has a shift
lock system to minimize the possibility of
incorrect operation. This means you can
only shift out of “P” position when the
brake pedal is depressed (with the ignition
switch in “ON” or “ACC” position and the
selector lever pulled toward you).
(a) Selector lever
The shift position is displayed on the in-
strument cluster.
P:Parking, engine starting and
key removal
R:Reverse
N:Neutral
D:Normal driving (with overdrive on)
2:Stronger engine braking
L:Maximum engine braking
With the brake pedal
depressed, shift while pulling
the selector lever toward you
(The ignition switch must be
in “ON” or “ACC” position.)
Shift while pulling
the selector lever
toward you
Shift normallySelector lever Overdrive switch
ProCarManuals.com
Page 136 of 282

130
(b) Overdrive switch
You can select either a third gear (with
overdrive off) or fourth gear (with over-
drive on) by pushing this switch.
To turn the overdrive off, push the switch.")
00 SIENNA(U)
130
(b) Overdrive switch
You can select either a third gear (with
overdrive off) or fourth gear (with over-
drive on) by pushing this switch.
To turn the overdrive off, push the switch.
The “O/D OFF” indicator light should come
on. To turn the overdrive on again, push
the switch again. The “O/D OFF” indicator
light should go off.
Always drive your vehicle with the over-
drive on for better fuel economy and
quieter driving.
If the engine is turned off when the over-
drive is off and restarted, the overdrive
will automatically be on.Vehicles with cruise control—When the
cruise control is being used, even if you
downshift the transmission by pushing and
releasing the overdrive switch, engine
braking will not be applied because the
cruise control is not cancelled.
For ways to decrease the vehicle speed,
see “Cruise control” in this section.
(c) Normal driving
1. Start the engine as instructed in “How
to start the engine” in Section 3. The
transmission must be in “P” or “N”.
2. With your foot holding down the brake
pedal, shift the selector lever to “D”.
When the lever is in the “D” position, the
automatic transmission system will select
the most suitable gear for running condi-
tions such as normal cruising, hill climb-
ing, hard towing, etc.
Always turn the overdrive on for better
fuel economy and quieter driving. If the
engine coolant temperature is low, the
transmission will not shift into overdrive
gear even with the overdrive on.
CAUTION
Never put your foot on the accelera-
tor pedal while shifting.
3. Release the parking brake and brake
pedal. Depress the accelerator pedal
slowly for smooth starting.
(d) Using engine braking
To use engine braking, you can downshift
the transmission as follows:
�Push the overdrive switch. The “O/D
OFF” indicator light will come on and
the transmission will downshift to the
third gear.
�Shift into the “2” position. The trans-
mission will downshift to the second
gear when the vehicle speed drops
down to or lower than 114 km/h (70
mph), and stronger engine braking will
be enable.
�Shift into the “L” position. The trans-
mission will downshift to the first gear
when the vehicle speed drops down to
or lower than 59 km/h (36 mph), and
maximum engine braking will be en-
able.
Vehicles with cruise control—When the
cruise control is being used, even if you
downshift the transmission by pushing and
releasing the overdrive switch, engine
braking is not applied because the cruise
control is not cancelled.
ProCarManuals.com

129
Automatic transmission
Your automatic transmission has a shift
lock system to minimize the possibility of
incorrect operation. This means you can
only shift out of “P” position w")