2000 TOYOTA LAND CRUISER check engine light
[x] Cancel search: check engine lightPage 147 of 235
L/C 100_U169
2000 L/C 100 (OM60866U)
For detailed information on oil level check,
see ”Checking the engine oil level” in Sec-
tion 7
−2.
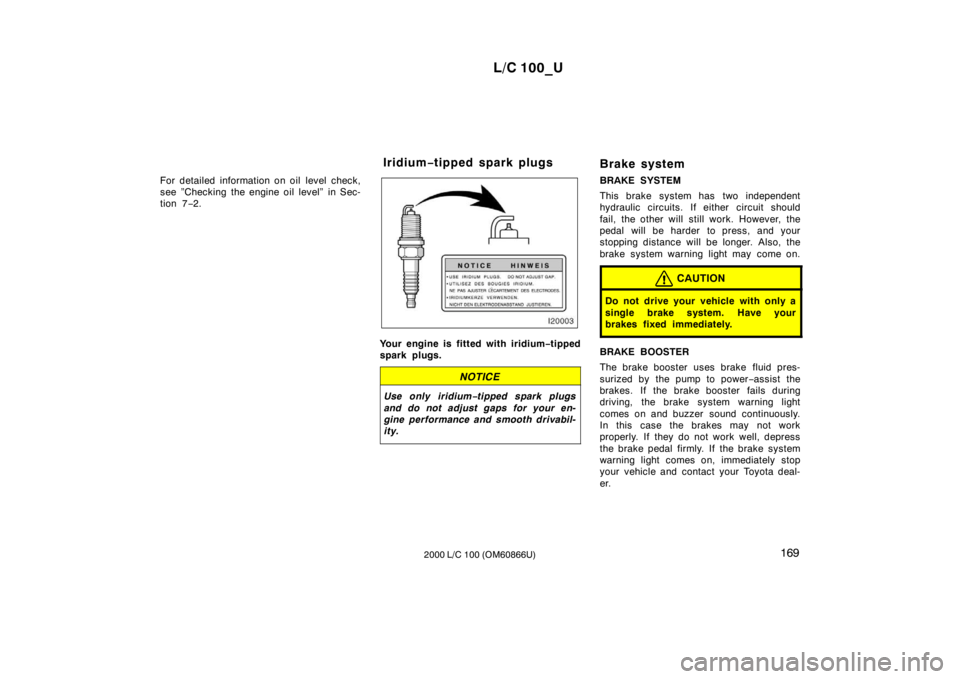
Your engine is fitted with iridium −tipped
spark plugs.
NOTICE
Use only iridium −tipped spark plugs
and do not adjust gaps for your en-
gine performance and smooth drivabil-
ity.
Brake system
BRAKE SYSTEM
This brake system has two independent
hydraulic circuits. If either circuit should
fail, the other will still work. However, the
pedal will be harder to press, and your
stopping distance will be longer. Also, the
brake system warning light may come on.
CAUTION
Do not drive your vehicle with only a
single brake system. Have your
brakes fixed immediately.
BRAKE BOOSTER
The brake booster uses brake fluid pres-
surized by the pump to power −assist the
brakes. If the brake booster fails during
driving, the brake system warning light
comes on and buzzer sound continuously.
In this case the brakes may not work
properly. If they do not work well, depress
the brake pedal firmly. If the brake system
warning light comes on, immediately stop
your vehicle and contact your Toyota deal-
er.
Iridium
−tipped spark plugs
Page 148 of 235
L/C 100_U
170 2000 L/C 100 (OM60866U)
There may be the case that the brake
system warning light stays on for a
bout
60 seconds after the engine is started. It
is normal if the light goes out after a
while.
Depressing the brake pedal repeatedly
may turn on the brake system warning
light and buzzer. It is normal if the light
goes out and the buzzer stops sounding
after a few seconds.
You may hear a small sound in the engine
compartment after the engine is started or
the brake pedal is depressed repeatedly.
This is a pump pulsating sound of the
brake system, and it is not a malfunction.
CAUTION
� Do not pump the brake pedal if the
engine stalls. Each push on the
pedal uses up your brake fluid
pressure reserve.
� Even if the power assist is com-
pletely lost, the brakes will still
work. But you will have to push the
pedal hard, much harder than nor-
mal. And your braking distance will
be longer.
ANTI −LOCK BRAKE SYSTEM
(with “ABS” warning light)
The anti −lock brake system is designed
to help prevent lock −up of the wheels
during a sudden braking or braking on
slippery road surfaces. This assists in
providing stability and steering perfor-
mance of the vehicle under these cir-
cumstances.
Effective way to press the ”ABS” brake
pedal: When the anti −lock brake system
function is in action, just hold the brake
pedal down more firmly. Especially in a
panic stop, you need to keep it de-
pressed more firmly, and do not pump
the brake. Pumping the brake pedal
makes the stopping distance longer.
The anti −lock brake system becomes op-
erative after the vehicle has accelerated
to a speed in excess of approximately 10
km/h (6 mph). It stops operating when the
vehicle decelerates to a speed below
approximately 5 km/h (3 mph).
Depressing the brake pedal on slippery
road surfaces such as on the manhole
cover, the steel plate under the construc-
tion, joints in the bridge, etc. on a rainy
day tends to activate the anti −lock brake
system. You may hear a click or motor sound in
the engine compartment for a few seconds
when the engine is started or just after
the vehicle is started. This means that the
anti
−lock brake system is in the self
check mode, and does not indicate a mal-
function.
When the anti −lock brake system is ac-
tivated, the following conditions may
occur, however, do not indicate a mal-
function of the system:
� You may hear the anti −lock brake sys-
tem operating and feel the brake pedal
pulsating and the vibrations of the body
and steering wheel. You may also hear
the motor sound in the engine compart-
ment even after the vehicle is stopped.
� At the end of the anti −lock brake sys-
tem activation, the brake pedal may
move a little forward.
Page 151 of 235
L/C 100_U173
2000 L/C 100 (OM60866U)
The brake assist system may not work for
about 60 seconds after the engine is
started.
For an explanation of this system’s warn-
ing light, see “Service reminder indicators
and warning buzzers” in Section 1
−5. Brake pad wear limit indicators
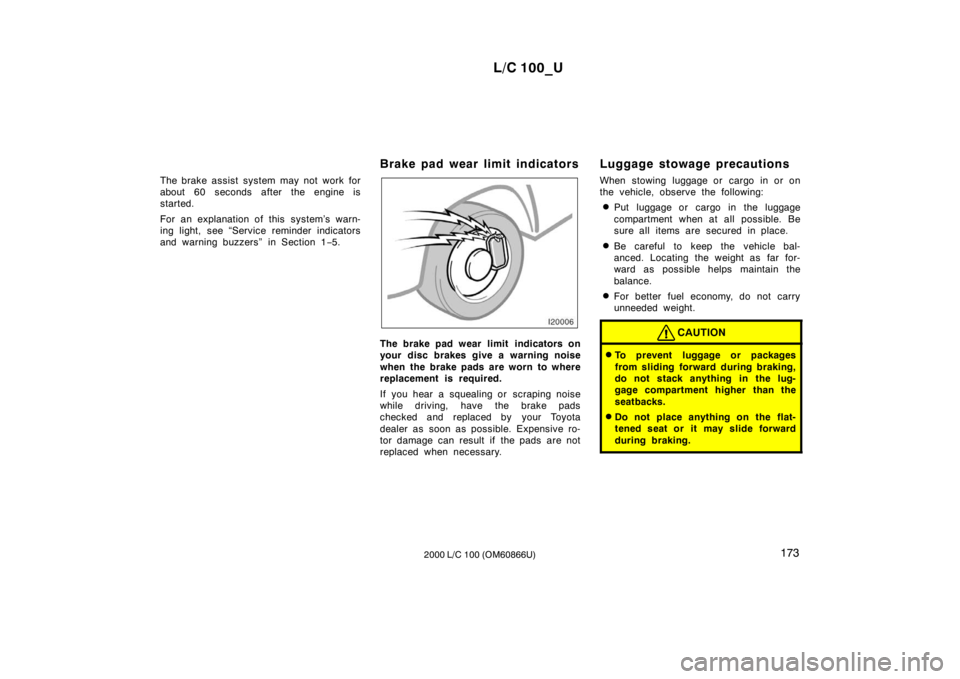
The brake pad wear limit indicators on
your disc brakes give a warning noise
when the brake pads are worn to where
replacement is required.
If you hear a squealing or scraping noise
while driving, have the brake pads
checked and replaced by your Toyota
dealer as soon as possible. Expensive ro-
tor damage can result if the pads are not
replaced when necessary. Luggage stowage pr
ecautions
When stowing luggage or cargo in or on
the vehicle, observe the following: � Put luggage or cargo in the luggage
compartment when at all possible. Be
sure all items are secured in place.
� Be careful to keep the vehicle bal-
anced. Locating the weight as far for-
ward as possible helps maintain the
balance.
� For better fuel economy, do not carry
unneeded weight.CAUTION
�To prevent luggage or packages
from sliding forward during braking,
do not stack anything in the lug-
gage compartment higher than the
seatbacks.
� Do not place anything on the flat-
tened seat or it may slide forward
during braking.
Page 158 of 235
L/C 100_U
194 2000 L/C 100 (OM60866U)
Before making these checks, make sure
you have followed the correct starting
procedure given in ”How to start the
engine” in Section 3 and that you have
sufficient fuel. Also check whether the
other keys will start the engine. If they
work, your key may be broken. Have the
key checked at your Toyota dealer. If
none of your keys work, the system is
possibly broken. Call your Toyota dealer.
(See ”Keys” in Section 1
−2.)
If the engine is not turning over or is
turning over too slowly— 1. Check that the battery terminals are tight and clean.
2. If the battery terminals are O.K., switch on the interior light.
3. If the light is out, dim or goes out when the starter is cranked, the battery
is discharged. You may try jump start-
ing. See ”(c) Jump starting” for further
instructions. If the light is O.K., but the engine still will
not start, it needs adjustment or repair.
Call a Toyota dealer or qualified repair
shop.
NOTICE
Do not pull
− or push −start the ve-
hicle. It may damage the vehicle or
cause a collision when the engine
starts. Also the three −way catalytic
converter may overheat and become a
fire hazard.
If the engine turns over at its normal
speed but will not start—
1. The engine may be flooded because of repeated cranking. See ”(b) Starting a
flooded engine” for further instructions.
2. If the engine still will not start, it needs adjustment or repair. Call a Toyota
dealer or qualified repair shop.
If your vehicle will not start—
(a) Simple checks
Page 161 of 235
L/C 100_U197
2000 L/C 100 (OM60866U)
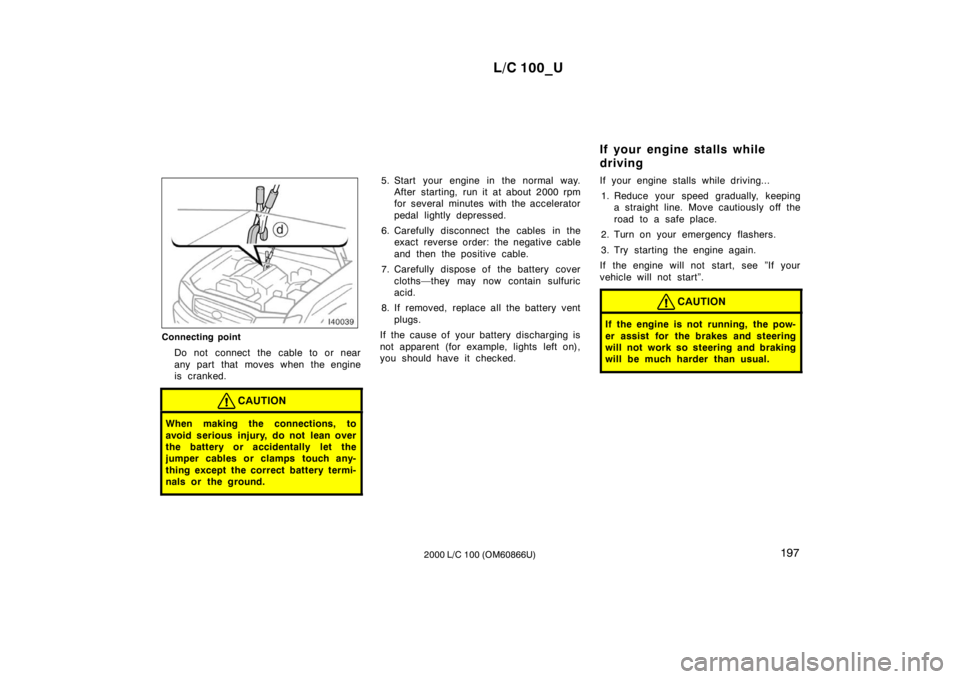
Connecting point
Do not connect the cable to or near
any part that moves when the engine
is cranked.
CAUTION
When making the connections, to
avoid serious injury, do not lean over
the battery or accidentally let the
jumper cables or clamps touch any-
thing except the correct battery termi-
nals or the ground.
5. Start your engine in the normal way. After starting, run it at about 2000 rpm
for several minutes with the accelerator
pedal lightly depressed.
6. Carefully disconnect the cables in the exact reverse order: the negative cable
and then the positive cable.
7. Carefully dispose of the battery cover cloths—they may now contain sulfuric
acid.
8. If removed, replace all the battery vent plugs.
If the cause of your battery discharging is
not apparent (for example, lights left on),
you should have it checked. If your engine stalls while driving...
1. Reduce your speed gradually, keeping a straight line. Move cautiously off the
road to a safe place.
2. Turn on your emergency flashers.
3. Try starting the engine again.
If the engine will not start, see ”If your
vehicle will not start”.
CAUTION
If the engine is not running, the pow-
er assist for the brakes and steering
will not work so steering and braking
will be much harder than usual.
If your engine stalls while
driving
Page 162 of 235
L/C 100_U
198 2000 L/C 100 (OM60866U)
If you cannot incr
ease the en-
gine speed
If the engine speed does not increase
when the accelerator pedal is de-
pressed, the electronic throttle control
system may be faulty. Move the vehicle
to a safe place by means of creeping
and call a Toyota dealer for assistance:
1. Depress the brake pedal and shift to the ”D” position.
2. Gradually release the brake pedal, and the vehicle starts to move by creeping.
After arriving at a safe place, stop the
vehicle and call a Toyota dealer for
assistance.
CAUTION
�The above method of moving the
vehicle is for emergency. Use it
only for moving minimum distances
to a safe place.
� Be especially careful to prevent er-
roneous pedal operation.
If your vehicle overheats
If your engine coolant temperature
gauge indicates overheating, if you ex-
perience a loss of power, or if you hear
a loud knocking or pinging noise, the
engine has probably overheated. You
should follow this procedure...
1. Pull safely off the road, stop the ve- hicle and turn on your emergency
flashers. Put the transmission in ”P”
and apply the parking brake. Turn off
the air conditioning if it is being used.
2. If coolant or steam is boiling out of the radiator or reservoir, stop the engine.
Wait until the steam subsides before
opening the hood. If there is no coolant
boiling over or steam, leave the engine
running.
CAUTION
To help avoid personal injury, keep
the hood closed until there is no
steam. Escaping steam or coolant is
a sign of very high pressure.
3. Visually check to see if the engine drive belt (fan belt) is broken or loose.
Look for obvious coolant leaks from the
radiator, hoses, and under the vehicle.
However, note that water draining from
the air conditioning is normal if it has
been used.
CAUTION
When the engine is running, keep
hands and clothing away from the
moving fan and engine drive belts.
4. If the engine drive belt is broken or thecoolant is leaking, stop the engine im-
mediately. Call a Toyota dealer for as-
sistance.
5. If the engine drive belt is O.K. and there are no obvious leaks, you may
help the engine cool down more quickly
by running it at about 1500 rpm for a
few minutes with the accelerator pedal
lightly depressed.
6. Check the coolant reservoir. If it is dry, add coolant to the reservoir while the
engine is running. Fill it about half full.
Page 186 of 235

L/C 100_U
222 2000 L/C 100 (OM60866U)
INSIDE THE VEHICLE
Items listed below should be checked
regularly, e.g. while performing periodic
services, cleaning the vehicle, etc.
Lights
Make sure the headlights, stop lights, tail
lights, turn signal lights, and other lights
are all working. Check headlight aim.
Service reminder indicators and warning
buzzers
Check that all service reminder indicators
and warning buzzers function properly.
Steering wheel
Be alert for changes in steering condition,
such as hard steering or strange noise.
Seats
Check that all front seat controls such as
seat adjusters, seatback recliner, etc. op-
erate smoothly and that all latches lock
securely in any position. Check that the
head restraint move up and down smooth-
ly and that the locks hold securely in any
latched position. For folding
−down rear
seatbacks, swing −up rear seat cushions
and detachable third seats, check that the
latches lock securely. Seat belts
Check that the seat belt system such as
buckles, retractors and anchors operate
properly and smoothly. Make sure the belt
webbing is not cut, frayed, worn or dam-aged.
Accelerator pedal
Check the pedal for smooth operation and
uneven pedal effort or catching.
Brake pedal
Check the pedal for smooth operation and
that the pedal has the proper clearance.
Check the brake booster function.
Brakes
At a safe place, check that the brakes do
not pull to one side when applied.
Parking brake
Check that the lever has the proper travel
and that, on a safe incline, your vehicle
is held securely with only the parking
brake applied.
Automatic transmission ”Park” mecha-
nism
Check the lock release button of the se-
lector lever for proper and smooth opera-
tion. On a safe incline, check that your
vehicle is held securely with the selector
lever in ”P” position and all brakes re-
leased.
IN THE ENGINE COMPARTMENT
Items listed below should be checked
from time to time, e.g. each time when
refueling.
Washer fluid
Make sure there is sufficient fluid in the
tank. See Section 7
−3 for additional in-
formation.
Engine coolant level
Make sure the coolant level is between
the ”FULL” and ”LOW” lines on the see −
through reservoir when the engine is cold.
See Section 7 −2 for additional information.
Battery electrolyte level
Make sure the electrolyte level of all bat-
tery cells is between upper and lower lev-
el lines on the case. Add only distilled
water when replenishing. See Section 7 −3
for additional information.
Page 196 of 235
L/C 100_U
232 2000 L/C 100 (OM60866U)
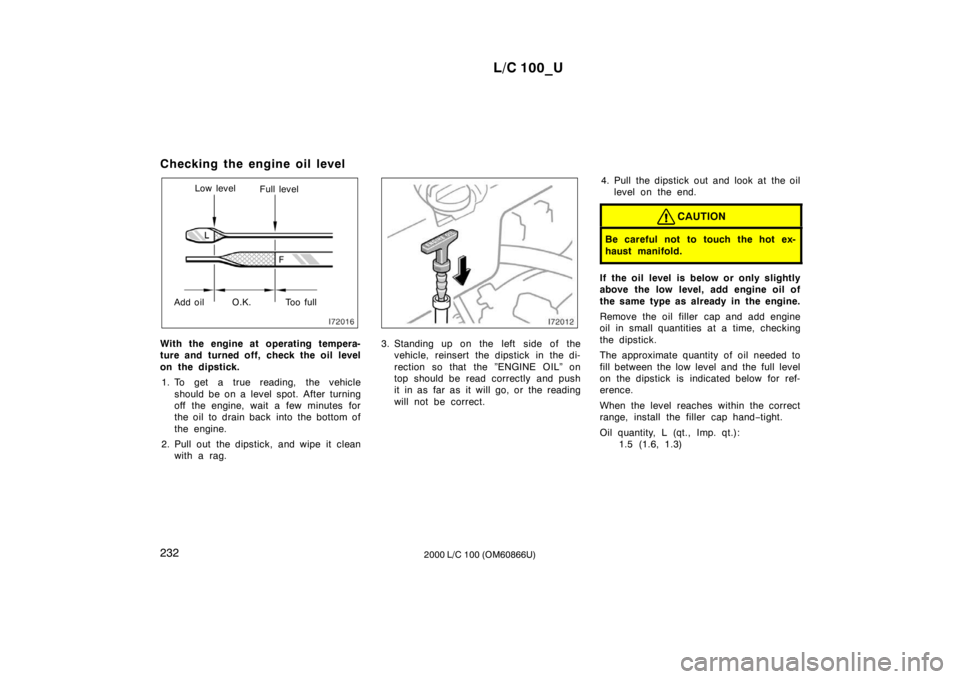
Checking the engine oil level
Low level
Full level
Add oil Too full O.K.
With the engine at operating tempera-
ture and turned off, check the oil level
on the dipstick. 1. To get a true reading, the vehicle should be on a level spot. After turning
off the engine, wait a few minutes for
the oil to drain back into the bottom of
the engine.
2. Pull out the dipstick, and wipe it clean with a rag.
3. Standing up on the left side of the vehicle, reinsert the dipstick in the di-
rection so that the ”ENGINE OIL” on
top should be read correctly and push
it in as far as it will go, or the reading
will not be correct. 4. Pull the dipstick out and look at the oil
level on the end.
CAUTION
Be careful not to touch the hot ex-
haust manifold.
If the oil level is below or only slightly
above the low level, add engine oil of
the same type as already in the engine.
Remove the oil filler cap and add engine
oil in small quantities at a time, checking
the dipstick.
The approximate quantity of oil needed to
fill between the low level and the full level
on the dipstick is indicated below for ref-
erence.
When the level reaches within the correct
range, install the filler cap hand −tight.
Oil quantity, L (qt., Imp. qt.): 1.5 (1.6, 1.3)