Page 153 of 219

ECHO_U
1522000 ECHO (OM52411U)
Before making these checks, make sure
you have followed the correct starting pro-
cedure given in "How to start the engine"
in Section 3 and that you have sufficient
fuel.
If the engine is not turning over or is
turning over too slowly1. Check that the battery terminals are tight and clean.
2. If the battery terminals are O.K., switch on the interior light.
3. If the light is out, dim or goes out when the starter is cranked, the battery
is discharged. You may try jump start-
ing. See "(c) Jump starting" for further
instructions.
If the light is O.K., but the engine still will
not start, it needs adjustment or repair.
Call a Toyota dealer or qualified repair
shop.
NOTICE
Do not pull− or push−start the ve-
hicle. It may damage the vehicle or
cause a collision when the engine
starts. Also the three−way catalytic
converter may overheat and become a
fire hazard.
If the engine turns over at its normal
speed but will not start 1. The engine may be flooded because of repeated cranking. See (b) Starting a
flooded engine" for further instructions.
2. If the engine still will not start, it needs adjustment or repair. Call a Toyota
dealer or qualified repair shop.
(b) Starting a flooded engine
If the engine will not start, your engine
may be flooded because of repeated
cranking.
If this happens, turn the key to "START"
with the accelerator pedal held down.
Keep the key and accelerator pedal in this
way for 15 seconds and release them.
Then try starting the engine with your foot
off the accelerator pedal.
If the engine does not start after 30 se-
conds of cranking, release the key, wait
a few minutes and try again.
If the engine still will not start, it needs
adjustment or repair. Call a Toyota dealer
or qualified repair shop for assistance.
NOTICE
Do not crank for more than 30 se-
conds at a time. This may overheat
the starter and wiring systems.
If your vehicle will not start
(a) Simple checks
Page 154 of 219

ECHO_U
1532000 ECHO (OM52411U)
(c) Jump starting
To avoid serious personal injury and
damage to your vehicle which might re-
sult from battery explosion, acid burns,
electrical burns, or damaged electronic
components, these instructions must be
followed precisely.
If you are unsure about how to follow this
procedure, we strongly recommend that
you seek the help of a competent me-
chanic or towing service.
CAUTION
Batteries contain sulfuric acid
which is poisonous and corrosive.
Wear protective safety glasses when
jump starting, and avoid spilling
acid on your skin, clothing, or ve-
hicle.
If you should accidentally get acid
on yourself or in your eyes, remove
any contaminated clothing and flush
the affected area with water imme-
diately. Then get immediate medical
attention. If possible, continue to
apply water with a sponge or cloth
while en route to the medical office.
The gas normally produced by a
battery will explode if a flame or
spark is brought near. Use only
standardized jumper cables and do
not smoke or light a match while
jump starting.
NOTICE
The battery used for boosting must
be 12 V. Do not jump start unless you
are sure that the booster battery is
correct.
JUMP STARTING PROCEDURE1. If the booster battery is installed in another vehicle, make sure the vehicles
are not touching. Turn off all unneces-
sary lights and accessories.
2. If required, remove all the vent plugs from the booster and discharged batter-
ies. Lay a cloth over the open vents
on the batteries. (This helps reduce the
explosion hazard, personal injuries and
burns.)
3. If the engine in the vehicle with the booster battery is not running, start it
and let it run for a few minutes. During
jump starting, run the engine at about
2000 rpm with the accelerator pedal
lightly depressed.
Page 155 of 219

ECHO_U
1542000 ECHO (OM52411U)
SY41001
Jumper cable
Positive terminal ( "+" mark)
Discharged
battery Booster battery ( " +" mark)Positive
terminal
4. Make the cable connections in the or-
der a, b, c, d.
a. Connect the clamp of the positive
(red) jumper cable to the positive (
)
terminal on the discharged battery.
b. Connect the clamp at the other end
of the positive (red) jumper cable to
the positive (
) terminal on the booster
battery.
SY41002
Jumper cable
Booster battery Negative terminal
Discharged
battery ( "–" mark )
c. Connect the clamp of the negative
(black) jumper cable to the negative (−)
terminal on the booster battery.
d. Connect the clamp at the other end
of the negative (black) jumper cable to
a solid, stationary, unpainted, metallic
point of the vehicle with the discharged
battery.
The recommended connecting point is
shown in the following illustration:
SU41003
Connecting point
Do not connect the cable to or near any
part that moves when the engine is
cranked.
CAUTION
When making the connections, to
avoid serious injury, do not lean over
the battery or accidentally let the
jumper cables or clamps touch any-
thing except the correct battery termi-
nals or the ground.
Page 156 of 219

ECHO_U
1552000 ECHO (OM52411U)
5. Start your engine in the normal way.After starting, run it at about 2000 rpm
for several minutes with the accelerator
pedal lightly depressed.
6. Carefully disconnect the cables in the exact reverse order: the negative cable
and then the positive cable.
7. Carefully dispose of the battery cover clothsthey may now contain sulfuric
acid.
8. If removed, replace all the battery vent plugs.
If the cause of your battery discharging is
not apparent (for example, lights left on),
you should have it checked. If your engine stalls while driving...
1. Reduce your speed gradually, keeping a straight line. Move cautiously off the
road to a safe place.
2. Turn on your emergency flashers.
3. Try starting the engine again.
If the engine will not start, see "If your
vehicle will not start".
CAUTION
If the engine is not running, the pow-
er assist for the brakes and steering
will not work so steering and braking
will be much harder than usual.
If your engine coolant temperature
gauge indicates overheating, if you ex-
perience a loss of power, or if you hear
a loud knocking or pinging noise, the
engine has probably overheated. You
should follow this procedure...
1. Pull safely off the road, stop the ve- hicle and turn on your emergency
flashers. Put the transmission in "P"
(automatic) or neutral (manual) and ap-
ply the parking brake. Turn off the air
conditioning if it is being used.
2. If coolant or steam is boiling out of the radiator or reservoir,stop the engine.
Wait until the steam subsides before
opening the hood. If there is no coolant
boiling over or steam, leave the engine
running and make sure the electric
cooling fan is operating. If it is not,
turn the ignition off.
CAUTION
To help avoid personal injury, keep
the hood closed until there is no
steam. Escaping steam or coolant is
a sign of very high pressure.
If your engine stalls while
driving If your vehicle overheats
Page 157 of 219

ECHO_U
1562000 ECHO (OM52411U)
3. Look for obvious coolant leaks from theradiator, hoses,and under the vehicle.
However, note that water draining from
the air conditioning is normal if it has
been used.
CAUTION
When the engine is running, keep
hands and clothing away from the
moving fan and engine drive belts.
4. If the coolant is leaking, stop the en-gine immediately. Call a Toyota dealer
for assistance.
5. If there are no obvious leaks, check the coolant reservoir. If it is dry, add
coolant to the reservoir while the en-
gine is running. Fill it about half full.
CAUTION
Do not attempt to remove the radiator
cap when the engine and radiator are
hot. Serious injury could result from
scalding hot fluid and steam blown
out under pressure.
6. After the engine coolant temperaturehas cooled to normal, again check the
coolant level in the reservoir. If neces-
sary, bring it up to half full again. Seri-
ous coolant loss indicates a leak in the
system. You s hould have it checked as
soon as possible at your Toyota dealer.
If you have a flat tire
1. Reduce your speed gradually, keeping a straight line. Move cautiously off the
road to a safe place well away from
the traffic. Avoid stopping on the center
divider of a highway. Park on a level
spot with firm ground.
2. Stop the engine and turn on your emergency flashers.
3. Firmly set the parking brake and put the transmission in "P" (automatic) or
reverse (manual).
4. Have everyone get out of the vehicle on the side away from traffic.
5. Read the following instructions thor- oughly.
CAUTION
When jacking, be sure to observe the
following to reduce the possibility of
personal injury:
Follow jacking instructions.
Do not put any part of your body
under the vehicle supported by the
jack. Personal injury may occur.
Do not start or run the engine while
your vehicle is supported by the
jack.
Page 158 of 219

ECHO_U
1572000 ECHO (OM52411U)
Stop the vehicle on a level firm
ground, firmly set the parking brake
and put the transmission in "P"
(automatic) or reverse (manual).
Block the wheel diagonally opposite
to the one being changed if neces-
sary.
Make sure to set the jack properly
in the jack point. Raising the ve-
hicle with jack improperly posi-
tioned will damage the vehicle or
may allow the vehicle to fall off the
jack and cause personal injury.
Never get under the vehicle when
the vehicle is supported by the jack
alone.
Use the jack only for lifting your
vehicle during wheel changing.
Do not raise the vehicle with some-
one in the vehicle.
When raising the vehicle, do not
put an object on or under the jack.
Raise the vehicle only high enough
to remove and change the tire.
NOTICE
Do not continue driving with a de-
flated tire. Driving even a short dis-
tance can damage a tire beyond re-
pair.
SY41004a
Compact spare tire
The compact spare tire is designed for
temporary emergency use only.
The compact spare tire is identified by the
distinctive wording "TEMPORARY USE
ONLY" molded into the side wall of the
tire.
The standard tire should be repaired and
replaced as soon as possible.
To keep the compact spare tire noticeable,
do not hide the wheel by a wheel cover
or such.
Page 159 of 219

ECHO_U
1582000 ECHO (OM52411U)
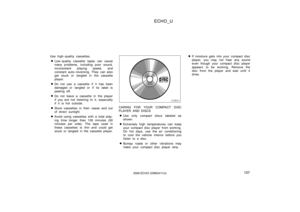
The compact spare tire saves space in
your luggage compartment, and its lighter
weight helps to improve fuel economy and
permits easier installation in case of a flat
tire.
The compact spare tire can be used many
times, if necessary. It has tread life of up
to 4800 km (3000 miles) depending on
road conditions and your driving habits.
When tread wear indicators appear on the
tire, replace the tire.
See also the tire section in Section 7−2
for details on the tread wear indicators
and other service information.
CAUTION
The compact spare tire was de-
signed especially for your Toyota.
Do not use it on any other vehicle.
Do not exceed 80 km/h (50 mph)
when driving with the compact
spare tire.
Avoid sudden acceleration, sudden
deceleration and sharp turns with
the compact spare tire.
NOTICE
Your ground clearance is reduced
when the compact spare tire is
installed so avoid driving over ob-
stacles and drive slowly on rough,
unpaved roads and speed bumps.
Also, do not attempt to go through an
automatic car wash as the vehicle
may get caught, resulting in damage.
SU41005
1. Get the required tools and sparetire.
Vehicles with compact spare tire 1.Jack handle
2.Wheel nut wrench
3.Jack
3.Spare tire
To prepare yourself for an emergency, you
should fam iliarize yourself with the use of
the jack, each of the tools and their stor-
age locations.
Required tools and spare
tire
Page 160 of 219
ECHO_U
1592000 ECHO (OM52411U)
SU41006
Turn the jack joint by hand.
To remove: Turn the joint in direction 1
until the jack is free.
To store: Turn the joint in direction 2 until
the jack is firmly secured to prevent it
flying forward during a collision or sudden
braking.
SU41007
To remove the spare tire:
1. Remove the spare tire cover
2. Loosen the bolt and remove it.
Then take the spare tire out of the ve-
hicle.
When storing the spare tire, put it in place
with the outer side of the wheel facing up.
Then secure the tire by repeating the
above removal steps in reverse order to
prevent it from flying forward during a
collision or sudden braking.
Blocking the wheel
SU41008
2. Block the wheel diagonally opposite the flat tire to keep the vehicle from
rolling when it is jacked up.
When blocking the wheel, place a wheel
block from the front for the front wheels
or from the rear for the rear wheels.