Page 117 of 447
AUTOMATIC TRANSMISSION (4 A/T) 7B-75
TRANSMISSION UNIT REPAIR OVERHAUL
NOTE:
When transmission is replaced, or when clutch or brake disc, plate and/or flange is changed to new
and/or used one, all learned contents which are stored in TCM memory should be erased referring to
“LEARNING CONTROL INITIALIZATION” in this section.
1. Torque converter 9. Counter drive gear 17. 1st & 2nd brake (B1) assembly
2. Torque converter housing 10. Reverse brake (B2) piston assembly 18. Planetary gear assembly
3. Oil pump assembly 11. A/T oil pan 19. O/D brake (B0) assembly
4. Front clutch (C2) assembly 12. Oil strainer 20. Planetary sun gear No.1 assembly
5. Rear Clutch (C1) assembly 13. Valve body assembly 21. Direct clutch (C0) assembly
6. Reverse brake (B2) assembly 14. Transmission case 22. O/D brake (B0) piston and rear cover assembly
7. Intermediate shaft 15. Counter driven gear assembly
8. Follow shaft 16. 1st & 2nd brake (B1) piston assembly
Page 119 of 447

AUTOMATIC TRANSMISSION (4 A/T) 7B-77
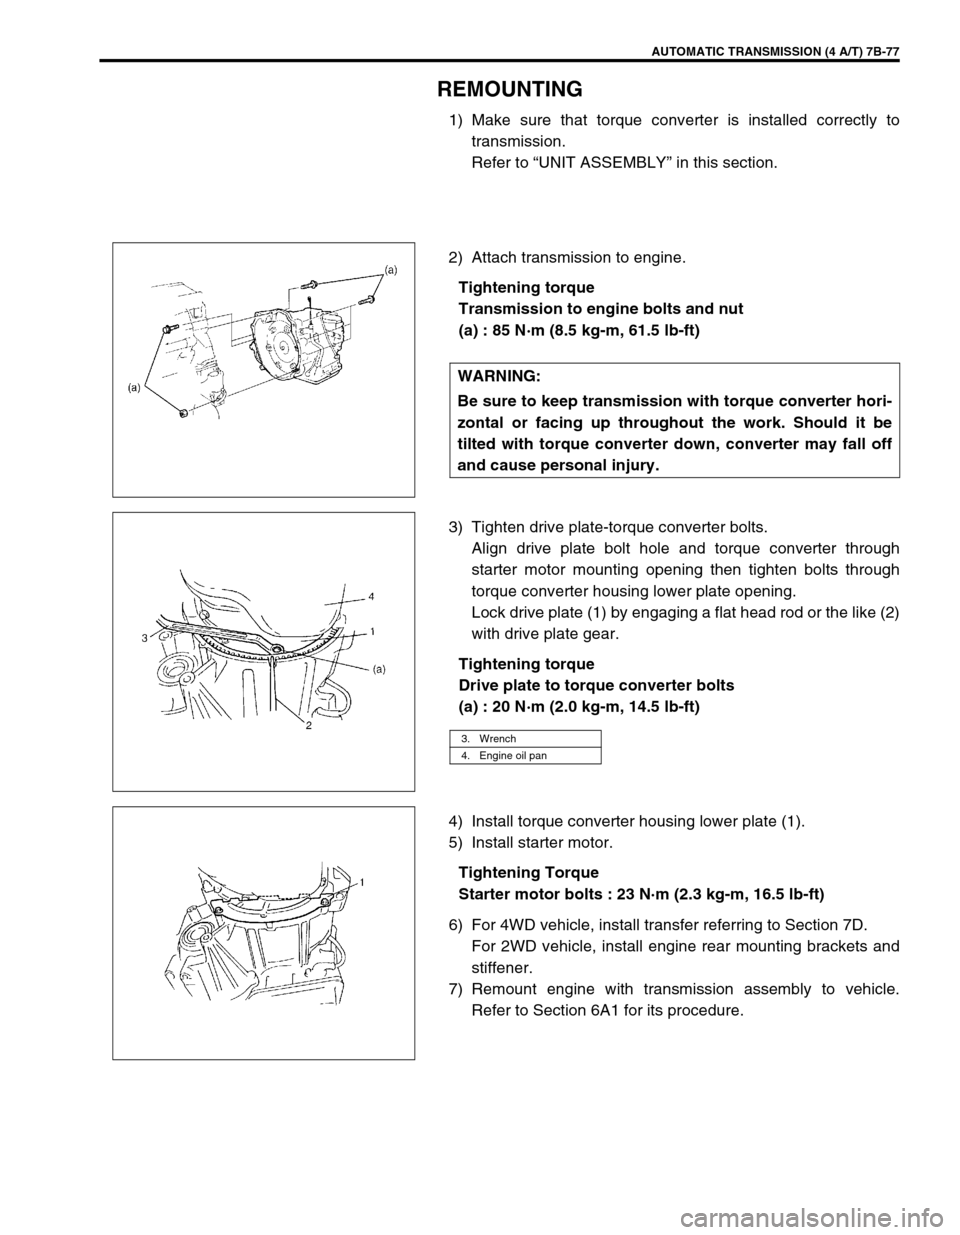
REMOUNTING
1) Make sure that torque converter is installed correctly to
transmission.
Refer to “UNIT ASSEMBLY” in this section.
2) Attach transmission to engine.
Tightening torque
Transmission to engine bolts and nut
(a) : 85 N·m (8.5 kg-m, 61.5 lb-ft)
3) Tighten drive plate-torque converter bolts.
Align drive plate bolt hole and torque converter through
starter motor mounting opening then tighten bolts through
torque converter housing lower plate opening.
Lock drive plate (1) by engaging a flat head rod or the like (2)
with drive plate gear.
Tightening torque
Drive plate to torque converter bolts
(a) : 20 N·m (2.0 kg-m, 14.5 lb-ft)
4) Install torque converter housing lower plate (1).
5) Install starter motor.
Tightening Torque
Starter motor bolts : 23 N·m (2.3 kg-m, 16.5 lb-ft)
6) For 4WD vehicle, install transfer referring to Section 7D.
For 2WD vehicle, install engine rear mounting brackets and
stiffener.
7) Remount engine with transmission assembly to vehicle.
Refer to Section 6A1 for its procedure. WARNING:
Be sure to keep transmission with torque converter hori-
zontal or facing up throughout the work. Should it be
tilted with torque converter down, converter may fall off
and cause personal injury.
3. Wrench
4. Engine oil pan
Page 120 of 447
7B-78 AUTOMATIC TRANSMISSION (4 A/T)
UNIT DISASSEMBLY
1) Remove torque converter (1).
2) Remove engine mounting LH bracket.
3) Remove oil cooler (1) and battery ground cable (2) (if still
attached). CAUTION:
Thoroughly clean transmission exterior before over-
hauling it.
Keep working table, tools and hands clean while over-
hauling.
Use special care to handle aluminum parts so as not to
damage them.
Do not expose removed parts to dust. Keep them
always clean.
Page 121 of 447
AUTOMATIC TRANSMISSION (4 A/T) 7B-79
4) Remove output shaft speed sensor (1) and input shaft speed
sensor (2).
5) Remove transmission range sensor (3).
6) Remove dropping resistor (4).
7) Remove breather hose (5).
8) Remove A/T fluid level gauge (1) and filler tube (2).
9) Remove vehicle speed sensor (1) (for speedometer), shift
cable bracket (2) and connector clamp bracket (3).
10) Remove oil pan and oil pan gasket.
11) Remove oil strainer assembly (1), and detach transmission
temperature sensor (2).
NOTE:
For removal of oil pan, do not turn transmission over
as this will contaminate valve body with foreign materi-
als in the bottom of oil pan.
When removing oil pan, tap around it lightly with a
plastic hammer. Do not force it off by using a screw-
driver or the like.
Page 123 of 447
AUTOMATIC TRANSMISSION (4 A/T) 7B-81
17) Remove thrust needle roller bearing (1) and thrust bearing
race (2) from the top of counter driven gear assembly (3).
18) Remove differential gear assembly (1).
19) Remove oil pump assembly and gasket (1).
20) Remove front clutch assembly (1).
21) Remove thrust bearing race (1) and thrust needle roller bear-
ing (2).
Page 124 of 447
7B-82 AUTOMATIC TRANSMISSION (4 A/T)
22) Remove rear clutch assembly (1).
23) Remove intermediate shaft assembly (1) and follow shaft
assembly (2).
24) Remove reverse brake (B2) snap ring, brake flange, brake
discs, brake plates and cushion plate.
25) Remove oil guide plate (1) parking lock pawl cover (2), shaft,
torsional spring (3) and parking lock pawl (4).
26) Remove parking lock pawl sleeve (5).
Page 130 of 447

7B-88 AUTOMATIC TRANSMISSION (4 A/T)
DISASSEMBLY/ASSEMBLY OF SUBASSEMBLY
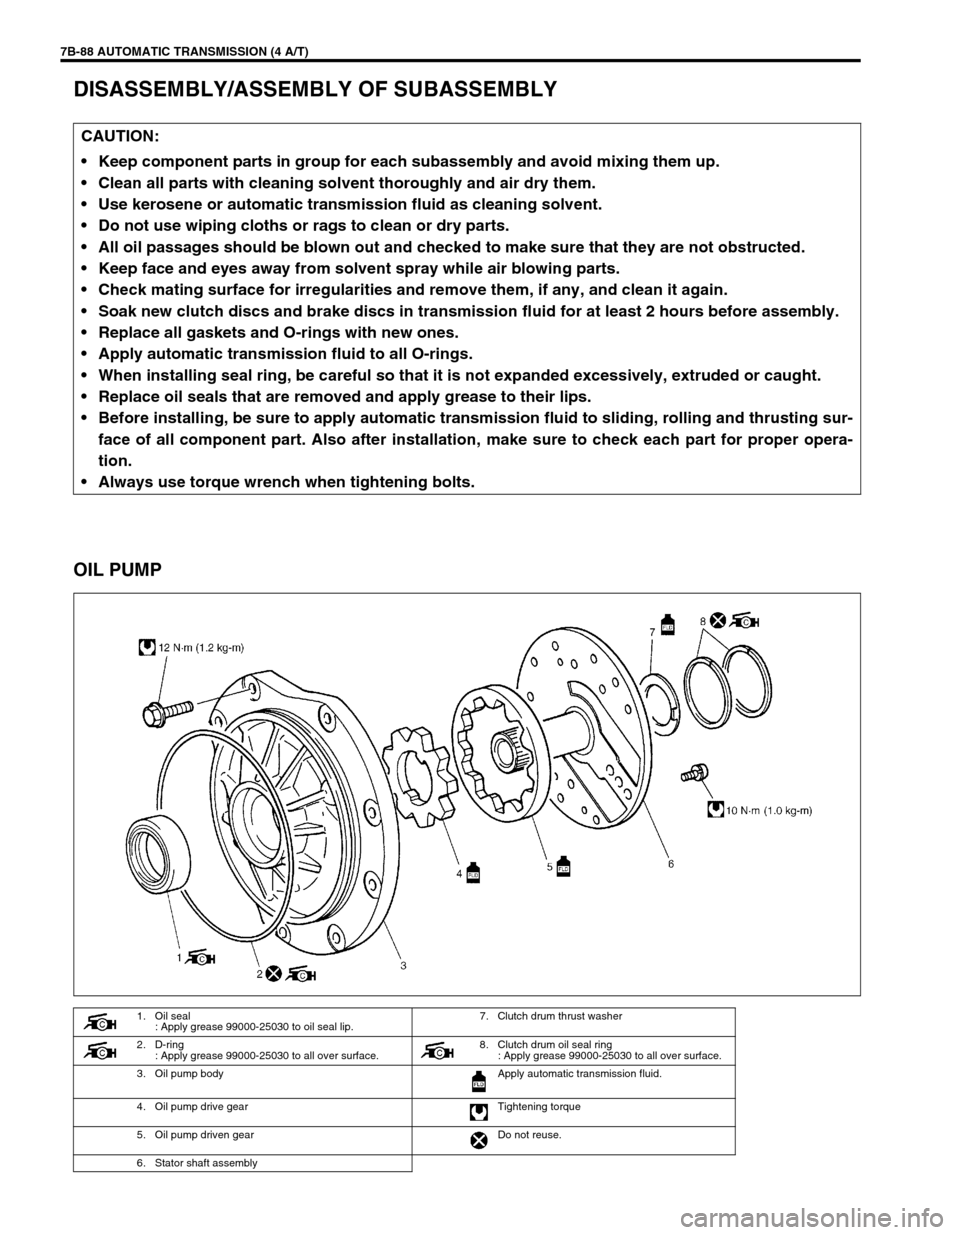
OIL PUMP
CAUTION:
Keep component parts in group for each subassembly and avoid mixing them up.
Clean all parts with cleaning solvent thoroughly and air dry them.
Use kerosene or automatic transmission fluid as cleaning solvent.
Do not use wiping cloths or rags to clean or dry parts.
All oil passages should be blown out and checked to make sure that they are not obstructed.
Keep face and eyes away from solvent spray while air blowing parts.
Check mating surface for irregularities and remove them, if any, and clean it again.
Soak new clutch discs and brake discs in transmission fluid for at least 2 hours before assembly.
Replace all gaskets and O-rings with new ones.
Apply automatic transmission fluid to all O-rings.
When installing seal ring, be careful so that it is not expanded excessively, extruded or caught.
Replace oil seals that are removed and apply grease to their lips.
Before installing, be sure to apply automatic transmission fluid to sliding, rolling and thrusting sur-
face of all component part. Also after installation, make sure to check each part for proper opera-
tion.
Always use torque wrench when tightening bolts.
1. Oil seal
: Apply grease 99000-25030 to oil seal lip.7. Clutch drum thrust washer
2. D-ring
: Apply grease 99000-25030 to all over surface. 8. Clutch drum oil seal ring
: Apply grease 99000-25030 to all over surface.
3. Oil pump body Apply automatic transmission fluid.
4. Oil pump drive gear Tightening torque
5. Oil pump driven gear Do not reuse.
6. Stator shaft assembly
Page 131 of 447

AUTOMATIC TRANSMISSION (4 A/T) 7B-89
DISASSEMBLY
1) Remove D-ring from pump body.
2) Remove 2 oil seal rings and clutch drum thrust washer.
3) Remove 11 bolts.
4) Separate pump body from stator shaft assembly.
5) Remove oil seal from pump body.
INSPECTION
1) Inspect pump body oil seal.
Check for wear, damage or cracks.
Replace oil seal if necessary and apply grease to its lip por-
tion slightly when it is installed.
2) Check body clearance of driven gear.
Push driven gear to one side of body. Using a feeler gauge,
measure clearance between driven gear and body.
If clearance exceeds its standard value, replace oil pump
assembly.
Clearance between oil pump driven gear and oil pump
body
Standard : 0.08 – 0.15 mm (0.0027 – 0.0059 in.)
Limit : 0.30 mm (0.018 in.)
3) Check tip clearance of both drive and driven gears.
Measure radial clearance between gear tooth and crescent.
If clearance exceeds its standard value, replace oil pump
assembly.
.Radial clearance between oil pump gear tooth and oil
pump crescent
Standard : 0.13 – 0.20 mm (0.0051 – 0.0079 in.)
Limit : 0.30 mm (0.018 in.)
4) Check side clearance of both gears.
Using a straightedge (1) and a feeler gauge (2), measure
side clearance between gear and pump body.
If clearance exceeds its standard value, replace oil pump
assembly.
Side clearance between gear and oil pump body
Standard : 0.02 – 0.04 mm (0.0008 – 0.0015 in.)
1. Oil pump drive gear
2. Driven gear
3. Body
1. Pump body crescent portion