Page 252 of 447

8-8 BODY ELECTRICAL SYSTEM
POWER DOOR MIRROR CONTROL SYSTEM (IF EQUIPPED)
INTERIOR LIGHT
HORN
IGNITION KEY REMAINDER (IF EQUIPPED) AND LIGHT REMAINDER WARN-
ING BUZZER
SEAT BELT WARNING LIGHT (IF EQUIPPED)
Condition Possible Cause Correction
All power mirrors do
not operate“CIGAR” fuse blown Replace fuse to check for short.
Power door mirror switch faulty Check switch.
Wiring or grounding faulty Repair circuit.
One power mirror
does not operatePower door mirror switch faulty Check switch.
Actuator (power door mirror motor) faulty Check actuator.
Wiring or grounding faulty Repair circuit.
Condition Possible Cause Correction
Interior lights do not
light upBulbs blown Replace bulbs.
“RADIO/DOME” fuse blown Replace fuse to check for short.
Interior light switch faulty Check switch.
Door switch faulty Check switch.
Wiring or grounding Repair circuit.
One of interior light
does not light upBulb blown Replace bulb.
Interior light switch faulty Check switch.
Door switch faulty Check switch.
Wiring or grounding Repair circuit.
Condition Possible Cause Correction
Horn does not operate
“HORN/HAZARD” fuse blown Replace fuse to check for short.
Horn switch faulty Check horn switch.
Horn relay faulty Check horn relay.
Horn faulty Replace horn.
Condition Possible Cause Correction
Ignition key remain-
der and light remain-
der warning buzzer
shows no soundingBuzzer faulty Replace buzzer.
Wiring or grounding faulty Repair circuit.
Driver side door switch faulty Check door switch.
Ignition switch faulty Check ignition switch.
Condition Possible Cause Correction
Seat belt warning light
does not light upBulb in combination meter blown Replace bulb.
“IG/METER” fuse blown Replace fuse to check for short.
Seat belt switch faulty Check seat belt switch.
Wiring or grounding faulty Repair circuit.
Page 253 of 447

BODY ELECTRICAL SYSTEM 8-9
FRONT SEAT HEATER (IF EQUIPPED)
ON-VEHICLE SERVICE
CAUTIONS IN SERVICING
When performing works related to electric systems, observe the cautions described in GENERAL INFORMA-
TION (Section 0A) of this manual for the purpose of protection of electrical parts and prevention of a fire from
occurrence.
HEADLIGHT
HEADLIGHT SWITCH
REMOVAL AND INSTALLATION
Refer to “CONTACT COIL AND COMBINATION SWITCH ASSEMBLY” in Section 3C. Condition Possible Cause Correction
Both seat back and
cushion do not
become hot although
seat heater switch is
LO/HI position“SEAT HTR” fuse blown Replace fuse to check for short.
Seat heater switch faulty Check switch.
Seat heater circuit in seat back and/or seat
cushion faultyCheck heater front back and/or
heater front cushion.
Wiring or grounding faulty Repair circuit.
Only seat back does
not become hot
although seat heater
switch is HI positionSeat heater circuit in seat back faulty Check heater front back.
Seat heater switch faulty Check switch.
Wiring faulty Repair.
Only seat cushion
does not become hot
although seat heater
switch is HI positionSeat heater circuit in seat back and/or seat
cushion faultyCheck heater front back and/or
heater front cushion.
Seat heater switch faulty Check switch.
Wiring faulty Repair.
Page 257 of 447
BODY ELECTRICAL SYSTEM 8-13
TURN SIGNAL AND HAZARD RELAY
The turn signal and hazard relay (1) is located near the fuse box
(2).
INSPECTION
Connect turn signal and hazard relay (1), battery (3) and two test
bulbs (12 V, 27 W) (2) as shown.
Unless a continued flash on and off is visible, replace.
Reference flashing cycle
: 60 - 120 cycle/minute
HAZARD SWITCH
INSPECTION
Check for continuity between terminals at each switch position as
shown below. if check result is not as specified, replace.
FRONT FOG LIGHTS (IF EQUIPPED)
FRONT FOG LIGHT SWITCH
INSPECTION
Check for continuity between terminals at each switch position as
shown below. if check result is not as specified, replace.
1
2
Hazard SWTerminal
OFF
ON+B TR+ IG TRS TLL TLR IL ILE
Switch
PositionTerminal
ONIG LOAD E IL ILE
OFF
Page 259 of 447

BODY ELECTRICAL SYSTEM 8-15
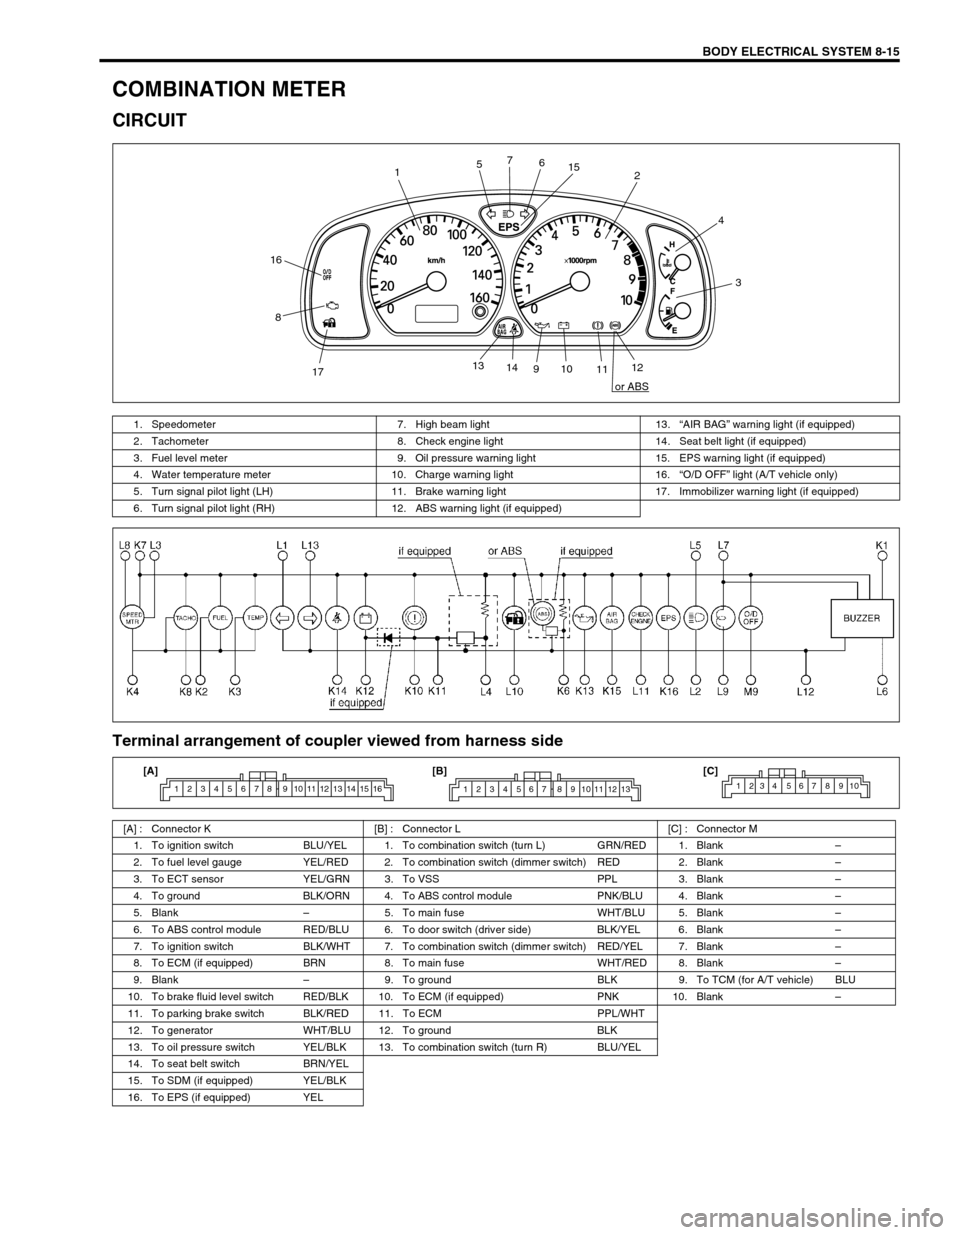
COMBINATION METER
CIRCUIT
Terminal arrangement of coupler viewed from harness side
12
3 4
56 7
8
910
1112 13
14
1715
16
or ABS
1. Speedometer 7. High beam light 13.“AIR BAG” warning light (if equipped)
2. Tachometer 8. Check engine light 14. Seat belt light (if equipped)
3. Fuel level meter 9. Oil pressure warning light 15. EPS warning light (if equipped)
4. Water temperature meter 10. Charge warning light 16.“O/D OFF” light (A/T vehicle only)
5. Turn signal pilot light (LH) 11. Brake warning light 17. Immobilizer warning light (if equipped)
6. Turn signal pilot light (RH) 12. ABS warning light (if equipped)
[A] : Connector K [B] : Connector L [C] : Connector M
1. To ignition switch BLU/YEL 1. To combination switch (turn L) GRN/RED 1. Blank–
2. To fuel level gauge YEL/RED 2. To combination switch (dimmer switch) RED 2. Blank–
3. To ECT sensor YEL/GRN 3. To VSS PPL 3. Blank–
4. To ground BLK/ORN 4. To ABS control module PNK/BLU 4. Blank–
5. Blank–5. To main fuse WHT/BLU 5. Blank–
6. To ABS control module RED/BLU 6. To door switch (driver side) BLK/YEL 6. Blank–
7. To ignition switch BLK/WHT 7. To combination switch (dimmer switch) RED/YEL 7. Blank–
8. To ECM (if equipped) BRN 8. To main fuse WHT/RED 8. Blank–
9. Blank–9. To ground BLK 9. To TCM (for A/T vehicle) BLU
10. To brake fluid level switch RED/BLK 10. To ECM (if equipped) PNK 10. Blank–
11. To parking brake switch BLK/RED 11. To ECM PPL/WHT
12. To generator WHT/BLU 12. To ground BLK
13. To oil pressure switch YEL/BLK 13. To combination switch (turn R) BLU/YEL
14. To seat belt switch BRN/YEL
15. To SDM (if equipped) YEL/BLK
16. To EPS (if equipped) YEL
1 2 3 4 5 6 7 8 9 10 11 12 13 14 15 161 2 3 4 5 6 7 8 9 10 11 12 131234 567 8910[A] [B] [C]
Page 272 of 447

8-28 BODY ELECTRICAL SYSTEM
POWER DOOR LOCK SYSTEM (IF
EQUIPPED)
DOOR LOCK CONTROLLER
INSPECTION
Check voltage between each terminal and body ground with con-
necting controller coupler.
If check result is not as specified, replace.
Door lock controller specification
DRIVER’S DOOR KNOB SWITCH
ON-VEHICLE INSPECTION
1) Remove driver’s door trim and disconnect door lock switch
coupler.
2) Check for continuity between “ULS” terminal and “COM” ter-
minal at each switch condition.
Driver’s door knob switch specification
UNLOCK position (1) : Continuity
LOCK position (2) : No continuityTermi-
nalVoltage (V) Condition
B10 - 14–
L10 - 14“LOCK” position
0 - 1 Other position than “LOCK”
UL10 - 14“UNLOCK” position
0 - 1 Other position than “UNLOCK”
ULS0 - 1“UNLOCK” position
“A”
(Refer to the figure.)“LOCK” position
KL“B”
(Refer to the figure.)Approx. 75 ms while “LOCK”
position or “UNLOCK” position
signal received
5Other condition than above
mentioned
E0Always
1. Door lock controller
2. Fuse box
1
2
Page 275 of 447

BODY ELECTRICAL SYSTEM 8-31
CODE REGISTRATION PROCEDURE
1) Confirm that IG switch is OFF position.
2) Remove DOOR LOCK fuse and install it again.
3) Press the button on the transmitter one time toward the
receiver within 30 seconds.
4) If two transmitters are registered, repeat step 1) to 3) with
other transmitter.
POWER DOOR MIRROR CONTROL SYSTEM
(IF EQUIPPED)
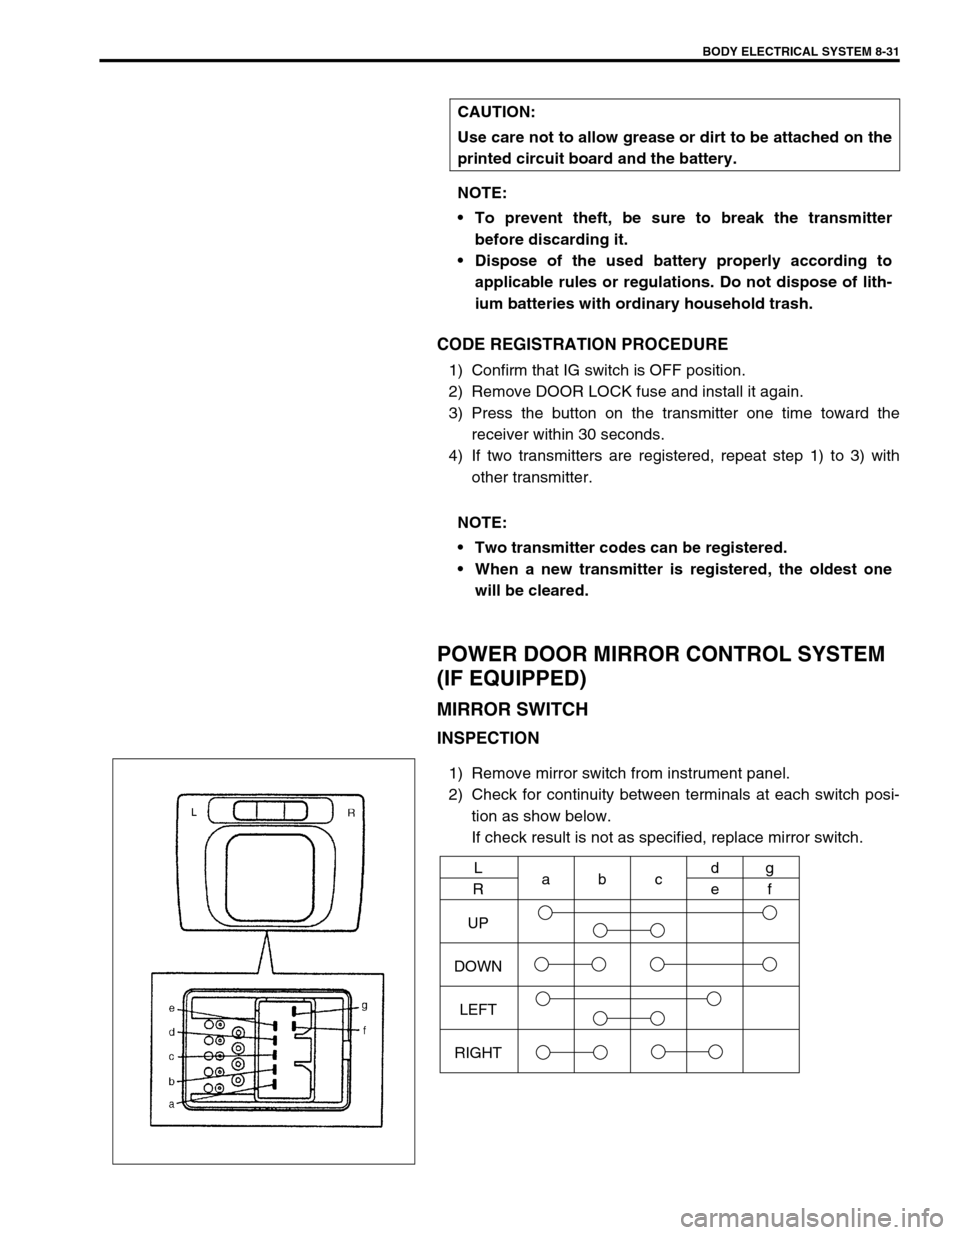
MIRROR SWITCH
INSPECTION
1) Remove mirror switch from instrument panel.
2) Check for continuity between terminals at each switch posi-
tion as show below.
If check result is not as specified, replace mirror switch. CAUTION:
Use care not to allow grease or dirt to be attached on the
printed circuit board and the battery.
NOTE:
To prevent theft, be sure to break the transmitter
before discarding it.
Dispose of the used battery properly according to
applicable rules or regulations. Do not dispose of lith-
ium batteries with ordinary household trash.
NOTE:
Two transmitter codes can be registered.
When a new transmitter is registered, the oldest one
will be cleared.
UP
DOWN
LEFT
RIGHTL
Rabcd
eg
f
Page 281 of 447
IMMOBILIZER CONTROL SYSTEM 8G-3
WIRING CIRCUIT
1. Immobilizer Control Module 4. Ignition switch 7. Data link connector
2. ECM 5. Fuse 8. To ABS control module, SDM and TCM
3. Main relay 6. Main fuse 9. Immobilizer indicator lamp
BRN/WHT
BLK/RED
BLK/WHT
PNK
BLK/RED
BLK/WHT
BLK
BLK
BLK/ORG
BLK/ORG
BLU
YEL
YEL
BLK/YEL
6
G02-7 G02-5
C42-2
C42-1
C42-3 C41-10
C41-5/6
G02-6
G02-12
G06-4
G06-3
G06-1G06-2
3
45 5
2
8
97
1
BB
BB
Page 288 of 447

8G-10 IMMOBILIZER CONTROL SYSTEM
TABLE A - IMMOBILIZER INDICATOR LAMP CHECK (IMMOBILIZER INDICA-
TOR LAMP DOES NOT LIGHT AT IGNITION SWITCH ON)
WIRING DIAGRAM
INSPECTION
1. Main fuse 2. Main relay 3. ECM 4. Immobilizer indicator lamp
BRN/WHT
BLK/RED
BLK/WHT
PNKBLK
BLK/ORG
BLK/ORG
BLK/YEL
C42-2
C42-1
C42-3 C41-10
C41-5/6
G02-6
G02-12
4
1
2
3
Step Action Yes No
1 1) Turn ignition switch ON.
Do other indicator/warning lights in combination
meter come ON?Go to Step 2.“IG” fuse blown, main fuse
blown, ignition switch mal-
function, “BLK/WHT” circuit
between “IG” fuse and com-
bination meter or poor cou-
pler connection at
combination meter.
2 1) Turn ignition switch OFF and disconnect
connectors from ECM.
2) Check for proper connection to ECM at ter-
minal G02-12.
3) If OK, then using service wire, ground termi-
nal G02-12 in connector disconnected.
Does immobilizer indicator lamp turn on at igni-
tion switch ON?Substitute a known-
good ECM and
recheck.Bulb burned out or “PNK”
wire circuit open.