2000 SUBARU FORESTER roof
[x] Cancel search: roofPage 16 of 322
Index13-7
Rear wind ow wip er and washer switc h (if eq uip p ed ) 3-
19
. . . . . . . . . . . . . . . . . . .
Removal and installation of the c rossb ars 1-31 . . . . . . . . . . . . . . . . . . . . . . . . . . . . . . . . .
Rep lac ement of b rake p ad and lining 10-37 . . . . . . . . . . . . . . . . . . . . . . . . . . . . . . . . . . . . . .
Rep lac ement of wind shield wip er b lad es 10-32 . . . . . . . . . . . . . . . . . . . . . . . . . . . . . . . . . .
Rep lac ing b ulb s 10-46
. . . . . . . . . . . . . . . . . . . . . . . . . . . . . . . . . . . . . . . . . . . . . . . . . . . . . . . . . . . . . . . . . .
Rep orting safety d efec ts (USA) 12-4
. . . . . . . . . . . . . . . . . . . . . . . . . . . . . . . . . . . . . . . . . . . . . .
Roc king the vehic le 7-45
. . . . . . . . . . . . . . . . . . . . . . . . . . . . . . . . . . . . . . . . . . . . . . . . . . . . . . . . . . . . . .
Roof rail and c rossb ar (if eq uip p ed ) 1-29 . . . . . . . . . . . . . . . . . . . . . . . . . . . . . . . . . . . . . . .
S
Seatb elt maintenanc e 2-20
. . . . . . . . . . . . . . . . . . . . . . . . . . . . . . . . . . . . . . . . . . . . . . . . . . . . . . . . . . .
Seatb elts 2-12
. . . . . . . . . . . . . . . . . . . . . . . . . . . . . . . . . . . . . . . . . . . . . . . . . . . . . . . . . . . . . . . . . . . . . . . . . . . .
Seatb elt safety tip s 2-12
. . . . . . . . . . . . . . . . . . . . . . . . . . . . . . . . . . . . . . . . . . . . . . . . . . . . . . . . . . . . . . .
Seatb elt warning lig ht and c hime 2-14, 3-5 . . . . . . . . . . . . . . . . . . . . . . . . . . . . . . . . . . . . . .
Seat heater (if eq uip p ed ) 2-7
. . . . . . . . . . . . . . . . . . . . . . . . . . . . . . . . . . . . . . . . . . . . . . . . . . . . . . .
Sec urity system (if eq uip p ed ) 1-12
. . . . . . . . . . . . . . . . . . . . . . . . . . . . . . . . . . . . . . . . . . . . . . . . .
Selec tor lever 7-20
. . . . . . . . . . . . . . . . . . . . . . . . . . . . . . . . . . . . . . . . . . . . . . . . . . . . . . . . . . . . . . . . . . . . . .
Shift loc k release 7-24
. . . . . . . . . . . . . . . . . . . . . . . . . . . . . . . . . . . . . . . . . . . . . . . . . . . . . . . . . . . . . . . . .
Shop p ing b ag hook 6-27
. . . . . . . . . . . . . . . . . . . . . . . . . . . . . . . . . . . . . . . . . . . . . . . . . . . . . . . . . . . . . .
Snow tires 7-44
. . . . . . . . . . . . . . . . . . . . . . . . . . . . . . . . . . . . . . . . . . . . . . . . . . . . . . . . . . . . . . . . . . . . . . . . . .
Sp ark p lug s 10-17
. . . . . . . . . . . . . . . . . . . . . . . . . . . . . . . . . . . . . . . . . . . . . . . . . . . . . . . . . . . . . . . . . . . . . . . .
Sp ec ific ations 11-2
. . . . . . . . . . . . . . . . . . . . . . . . . . . . . . . . . . . . . . . . . . . . . . . . . . . . . . . . . . . . . . . . . . . . .
Sp eed ometer 3-2
. . . . . . . . . . . . . . . . . . . . . . . . . . . . . . . . . . . . . . . . . . . . . . . . . . . . . . . . . . . . . . . . . . . . . .
Sp otlig ht 6-24, 10-53
. . . . . . . . . . . . . . . . . . . . . . . . . . . . . . . . . . . . . . . . . . . . . . . . . . . . . . . . . . . . . . . . . . . .
SRS airb ag (Sup p lemental Restraint System airb ag ) 2- 27
. . . . . . . . . . . . . . . . . . .
SRS airb ag op eration 2-32
. . . . . . . . . . . . . . . . . . . . . . . . . . . . . . . . . . . . . . . . . . . . . . . . . . . . . . . . . . .
SRS airb ag system monitors 2-37
. . . . . . . . . . . . . . . . . . . . . . . . . . . . . . . . . . . . . . . . . . . . . . . . . .
SRS airb ag system servic ing 2-38
. . . . . . . . . . . . . . . . . . . . . . . . . . . . . . . . . . . . . . . . . . . . . . . . . .
SRS airb ag system warning lig ht 3-5
. . . . . . . . . . . . . . . . . . . . . . . . . . . . . . . . . . . . . . . . . . . . .
Starting the eng ine 7-13
. . . . . . . . . . . . . . . . . . . . . . . . . . . . . . . . . . . . . . . . . . . . . . . . . . . . . . . . . . . . . . .
State emission testing (U.S. only) 7-5
. . . . . . . . . . . . . . . . . . . . . . . . . . . . . . . . . . . . . . . . . . . .
Steering 7-26
. . . . . . . . . . . . . . . . . . . . . . . . . . . . . . . . . . . . . . . . . . . . . . . . . . . . . . . . . . . . . . . . . . . . . . . . . . . . .
Stop p ing the eng ine 7-15
. . . . . . . . . . . . . . . . . . . . . . . . . . . . . . . . . . . . . . . . . . . . . . . . . . . . . . . . . . . . .
Storag e c omp artment 6-2
. . . . . . . . . . . . . . . . . . . . . . . . . . . . . . . . . . . . . . . . . . . . . . . . . . . . . . . . . . .
Sun visors 6-2
. . . . . . . . . . . . . . . . . . . . . . . . . . . . . . . . . . . . . . . . . . . . . . . . . . . . . . . . . . . . . . . . . . . . . . . . . .
Page 20 of 322
1
Doors and locks Keys1-2
. . . . . . . . . . . . . . . . . . . . . . . . . . . . . . . . . . . . . . . . . . . . . . . . . . . . . . . . . . . . . . . . . . . . . . . . . . .
Master, submaster and valet key 1-2 . . . . . . . . . . . . . . . . . . . . . . . . . . . . . . . . . . . . .
Key number 1-2
. . . . . . . . . . . . . . . . . . . . . . . . . . . . . . . . . . . . . . . . . . . . . . . . . . . . . . . . . . . . . . .
Door locks 1-3
. . . . . . . . . . . . . . . . . . . . . . . . . . . . . . . . . . . . . . . . . . . . . . . . . . . . . . . . . . . . . . . . . . .
Power door locking switches (if equipped) 1-6 . . . . . . . . . . . . . . . . . . . . . . . . .
Child safety locks 1-7
. . . . . . . . . . . . . . . . . . . . . . . . . . . . . . . . . . . . . . . . . . . . . . . . . . . . . . .
Keyless entry system (if equipped) 1-8 . . . . . . . . . . . . . . . . . . . . . . . . . . . . . . . . .
Security system (if equipped) 1-12 . . . . . . . . . . . . . . . . . . . . . . . . . . . . . . . . . . . . . . . .
Power windows 1-22
. . . . . . . . . . . . . . . . . . . . . . . . . . . . . . . . . . . . . . . . . . . . . . . . . . . . . . . . . . . .
Rear gate 1-25
. . . . . . . . . . . . . . . . . . . . . . . . . . . . . . . . . . . . . . . . . . . . . . . . . . . . . . . . . . . . . . . . . . . .
Fuel filler door and cap 1-26
. . . . . . . . . . . . . . . . . . . . . . . . . . . . . . . . . . . . . . . . . . . . . . . . .
Engine hood 1-28
. . . . . . . . . . . . . . . . . . . . . . . . . . . . . . . . . . . . . . . . . . . . . . . . . . . . . . . . . . . . . . . .
Roof rail and crossbar (if equipped) 1-29 . . . . . . . . . . . . . . . . . . . . . . . . . . . . . . .
When luggage is put on the slats (Vehicles with roof slats only) 1-30
. . . . . . . . . . . . . . . . . . . . . . . . . . . . . . . . . . . . . . . . . . . . . . . . . . . . . . . . . . . . . . .
Installing carrying attachments on the cross bars 1-30 . . . . . . . . . . . . . . . .
Removal and installation of the crossbars 1-31 . . . . . . . . . . . . . . . . . . . . . . . . .
Page 48 of 322
Doors and locks1-29
–
CONTINUED –
To c lose the hood :
1. Lift the hood slig htly and remove the hood p rop f
rom the slot in the
hood and return the p rop to its retainer.
2. Lower the hood until it ap p roac hes ab out 6 in. (1 5 c m) from the
c losed p osition and let it d rop .
3. After c losing the hood , b e sure the hood is sec ur ely loc ked .
If this d oes not c lose the hood , release it from a slig htly hig her p osition.
Do not p ush the hood forc ib ly to c lose it. It c ould d eform the metal.
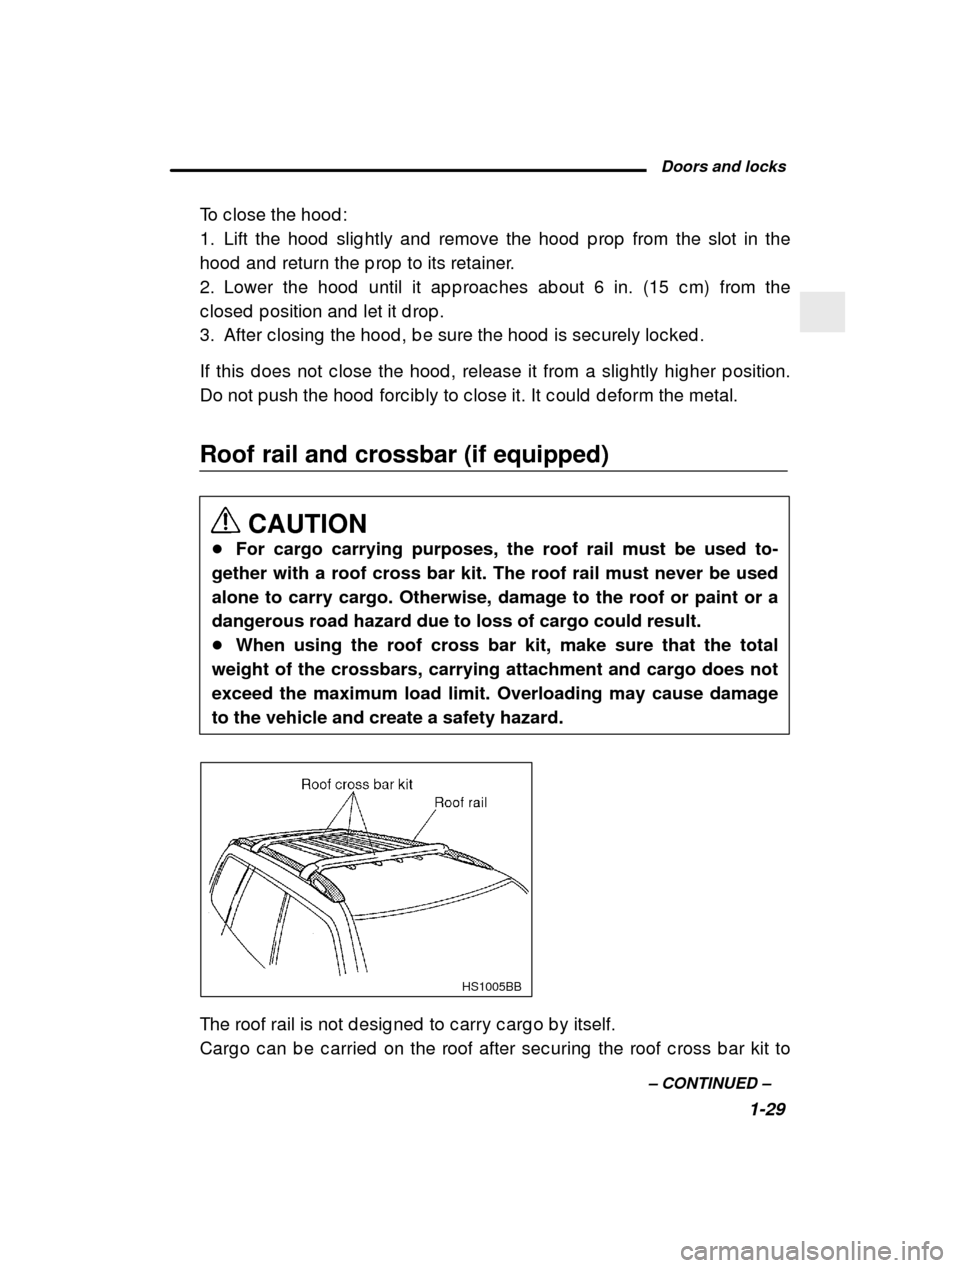
Roof rail and crossbar (if equipped)
CAUTION
� For cargo carrying purposes, the roof rail must be used to-
gether with a roof cross bar kit. The roof rail must never be used
alone to carry cargo. Otherwise, damage to the roof or paint or adangerous road hazard due to loss of cargo could result.� When using the roof cross bar kit, make sure that the total
weight of the crossbars, carrying attachment and cargo does not
exceed the maximum load limit. Overloading may cause damageto the vehicle and create a safety hazard.
HS1005BB
The roof rail is not d esig ned to c arry c arg o b y its elf.
Carg o c an b e c arried on the roof after sec uring the roof c ross b ar kit to
Page 49 of 322

1-30the roof rail. When installing the roof c ross b ar k
it on the roof rail, follow
the manufac turer ’s instruc tions. When you c arry c arg o on the roof us ing
the roof c ross b ar kit, never exc eed maximum load l imit exp lained b elow.
You should also b e c areful that your vehic le d oes n ot exc eed the Gross
Vehic le Weig ht Rating (GVWR) and front and rear Gro ss Axle Weig ht Rat-
ing (GAWR). See the “Load ing your vehic le ” sec tion in c hap ter 7 for in-
formation on load ing c arg o into or onto your vehic l e.
� When luggage is put on the slats (Vehicles with roof slats only)
When p utting any lug g ag e on the slats, make sure th e total weig ht of the
lug g ag e on the slats of the roof c ross b ar kit d oes not exc eed 100 lb. (45
kg) . Overload ing may c ause d amag e to the roof and c rea te a safety haz-
ard . Plac e the heaviest load at the b ottom, nearest the roof, and evenly
d istrib ute the lug g ag e. Always sec ure the lug g ag e w ith strap s, rop es or
nets. � Installing carrying attachments on the cross bars
When installing any c arrying attac hment suc h as a b ike c arrier, ski c arri-
er, kayak c arrier, etc . on the c ross b ars, follow t he manufac turer’s instruc -
tions and make sure that the attac hment is sec urely fixed to the c ross
b ars. Use only attac hments d esig ned sp ec ific ally fo r the c rossb ars. A
set of the c ross b ars is d esig ned to c arry load s (c arg o and attac hment)
of not more than 150 lb. (68 kg). Before op erating the vehic le, make sure
that the c arg o is p rop erly sec ured on the attac hmen t.
NOTE Remember that the vehicle ’s center of gravity is altered with the
weight of the load on the roof, thus affecting driving characteristics.
Drive carefully. Avoid rapid starts, hard cornering and abrupt stops.Crosswind effects will be increased.
Page 50 of 322
Doors and locks1-31
–
CONTINUED –
�
Removal and installation of the crossbars
CAUTION
Do not carry cargo on the roof when the crossbars are removed. Luggage on the roof will be thrown forward or backward in sud-den stops or rapid accelerations, resulting in a dangerous roadhazard.
The c rossb ars c an b e removed when you d o not use th e roof to c arry
c arg o.
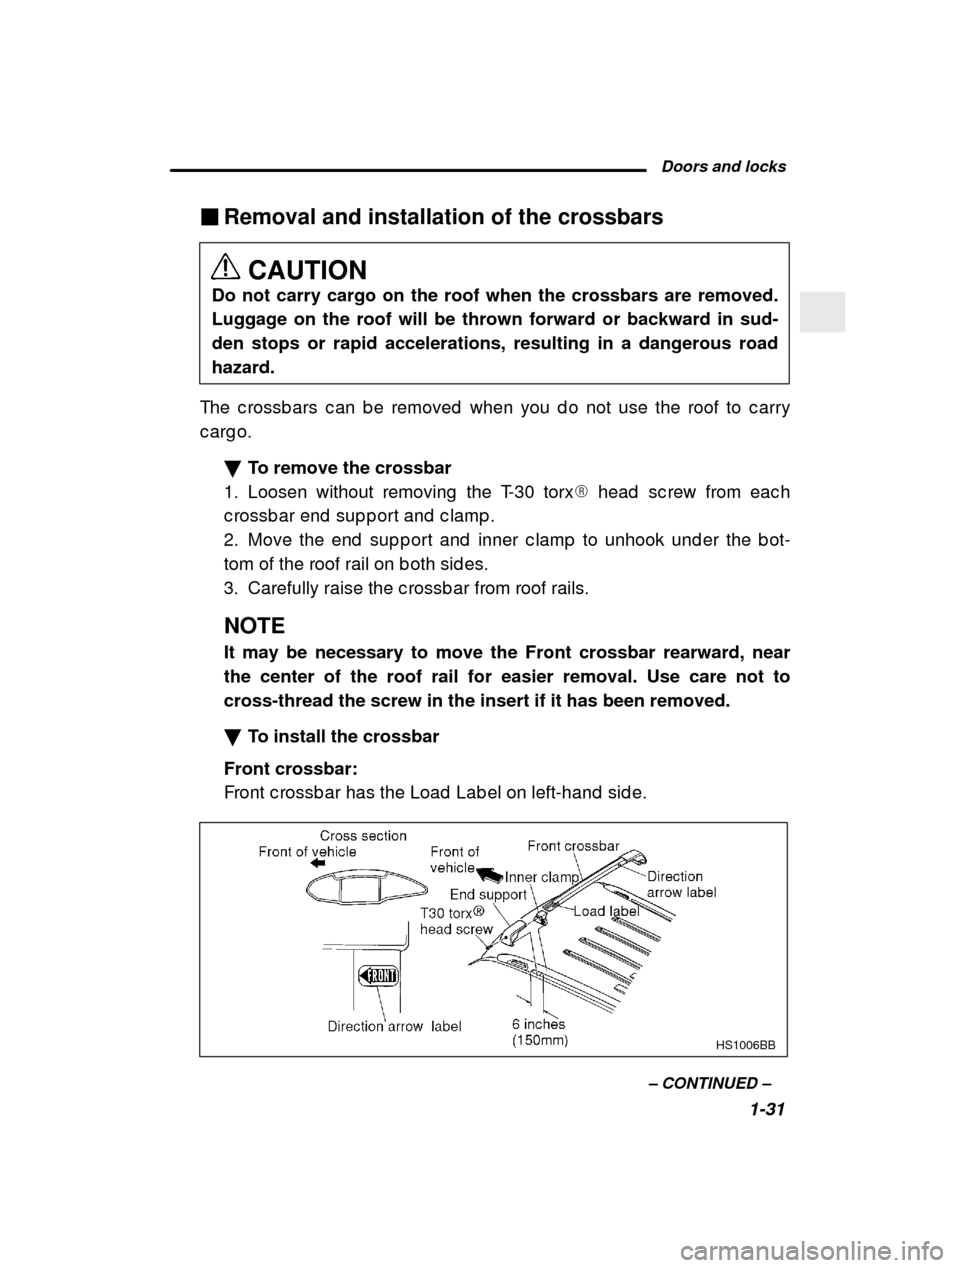
� To remove the crossbar
1. Loosen without removing the T-30 torx � head sc rew from eac h
c rossb ar end sup p ort and c lamp .
2. Move the end sup p ort and inner c lamp to unhook un d er the b ot-
tom of the roof rail on b oth sid es.
3. Carefully raise the c rossb ar from roof rails. NOTE It may be necessary to move the Front crossbar rearward, near the center of the roof rail for easier removal. Use care not tocross-thread the screw in the insert if it has been removed. � To install the crossbar
Front crossbar:
Front c rossb ar has the Load Lab el on left-hand sid e .
HS1006BB
Page 51 of 322

1-321. Before p lac ing the c rossb ar on the roof rails, ma
ke sure that the
T-30 torx � head sc rew is fully loosened from eac h end sup p ort .
2. Slid e the inner c lamp on the end sup p ort outward as far as p os-
sib le.
3. With the front d irec tion arrow lab el on the top r ig ht sid e of the
c rossb ar p ointing toward the front of the vehic le, c arefully p lac e the
c rossb ar ac ross the top of the vehic le so that the c rossb ar end sup -
p orts rest on the top of the roof rails ap p roximate ly 6 inc hes (150 mm)
rearward in the front rad ius of the roof rail.
4. Move the end sup p ort and inner c lamp to hook und e r the b ottom
of the roof rail on b oth sid es and loosely assemb le the T-30 torx�
head sc rew with the tool p rovid ed into the thread ed insert in the inner
c lamp on eac h end of the c rossb ar. NOTE It may be necessary to start the inner clamp and end support at the center of the roof rail for easier installation, then move the
crossbar forward. Use care not to cross-thread the screw in theinsert if it has been removed.
5. Ad just the alig nment of the c rossb ar on the roof rails and tig hten to
30 to 35 inc h lb s. (3.4 to 4.0 N-m, 0.35 to 0.41 kg -m) with the torx�
tool p rovid ed . If availab le, you may use a T-30 tor x� b it and torq ue
wrenc h to tig hten the c rossb ar torx � head sc rew.
Rear crossbar:
HS1007BB
Page 52 of 322
Doors and locks1-33
–
CONTINUED –
Install the rear c rossb ar in the same manner as the
front c rossb ar.
NOTE The rear crossbar should be positioned 6 inches (150 mm) for- ward of the rear radius in the roof rail.
NOTE
Before each use of the roof crossbar, make sure the four T-30 cross- bar clamp screws have been checked, and re-tightened, if neces-
sary, to 35 in. lbs. (4.0 N-m, 0.41 kg-m), as outlined in Step #5 above.
Page 77 of 322
Seat, seat belt and SRS airbag2-25
–
CONTINUED –
HS0045
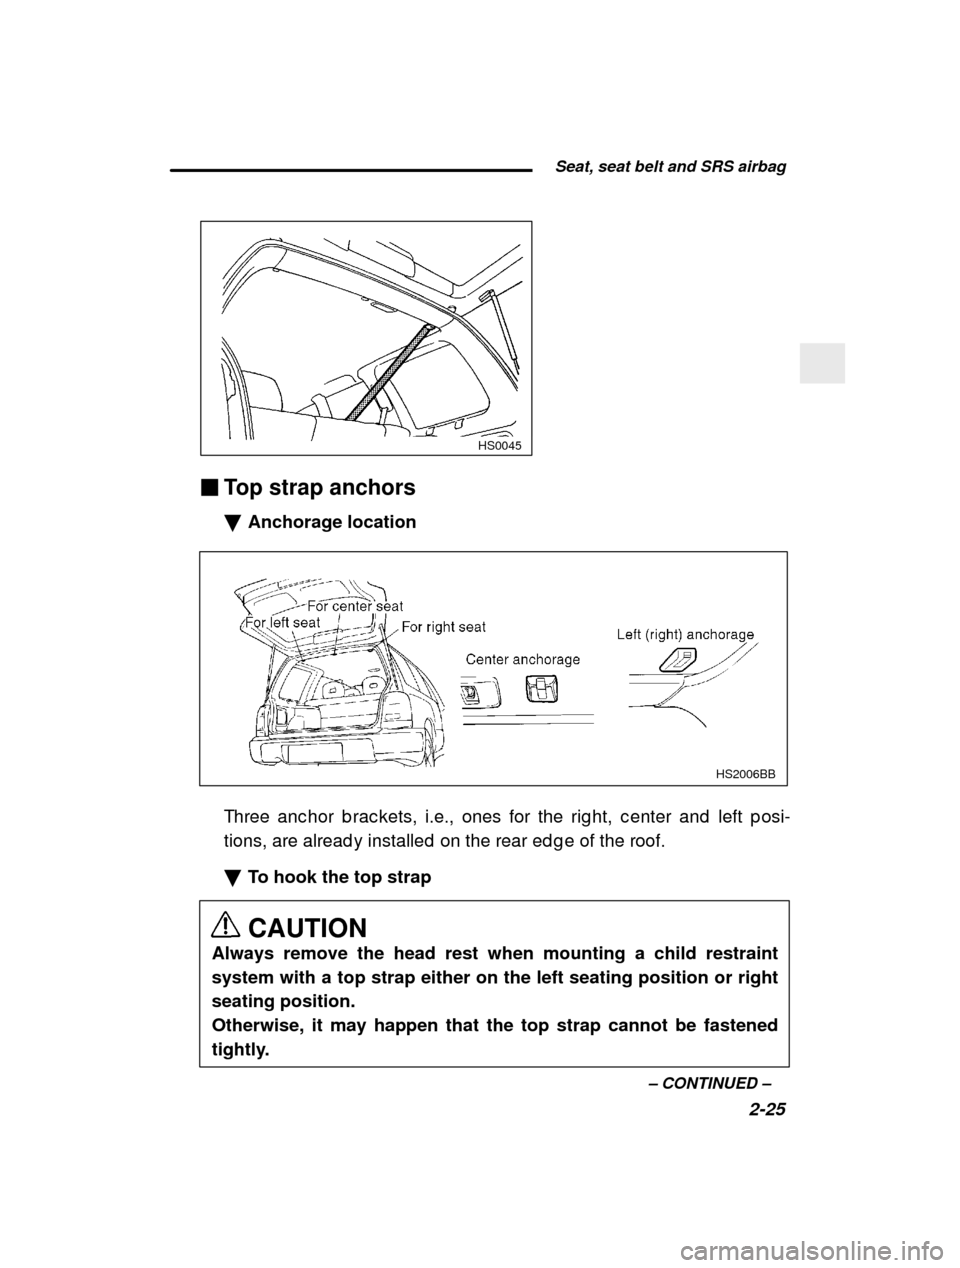
�Top strap anchors �Anchorage location
HS2006BB
Three anc hor b rac kets, i.e., ones for the rig ht, c e nter and left p osi-
tions, are alread y installed on the rear ed g e of th e roof.
� To hook the top strap CAUTION
Always remove the head rest when mounting a child restraint
system with a top strap either on the left seating position or rightseating position.Otherwise, it may happen that the top strap cannot be fastened
tightly.