2000 SKODA FABIA wheel
[x] Cancel search: wheelPage 66 of 86

Downloaded from www.Manualslib.com manuals search engine FABIA 2000➤Inspection and Maintenance
Electrical SystemEdition 09.04
S00.5301.14.2002-6 page 12 02
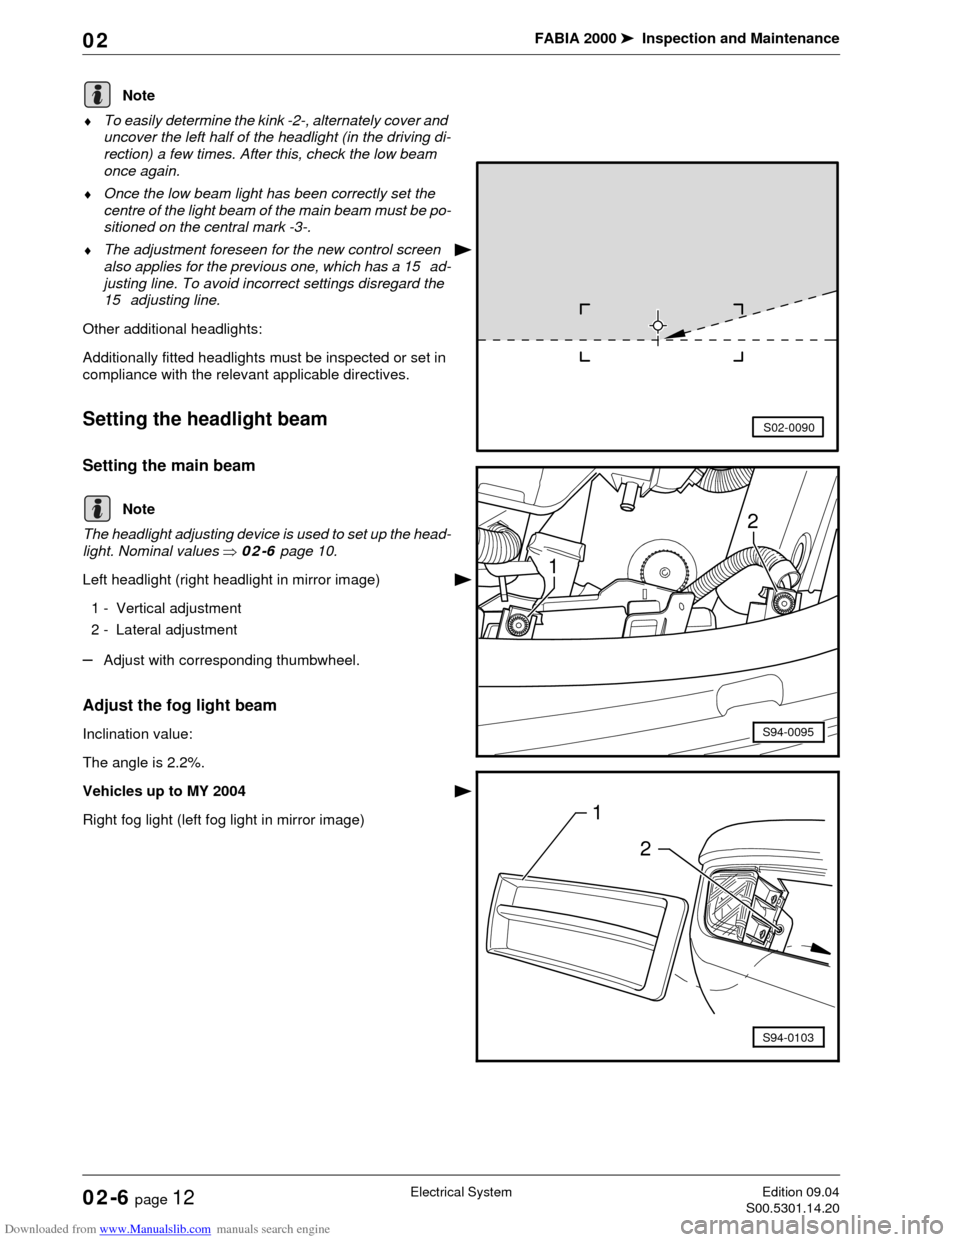
♦To easily determine the kink -2-, alternately cover and
uncover the left half of the headlight (in the driving di-
rection) a few times. After this, check the low beam
once again.
♦Once the low beam light has been correctly set the
centre of the light beam of the main beam must be po-
sitioned on the central mark -3-.
♦The adjustment foreseen for the new control screen
also applies for the previous one, which has a 15 ad-
justing line. To avoid incorrect settings disregard the
15 adjusting line.
Other additional headlights:
Additionally fitted headlights must be inspected or set in
compliance with the relevant applicable directives.
Setting the headlight beam
Setting the main beam
The headlight adjusting device is used to set up the head-
light. Nominal values ⇒02-6 page 10.
Left headlight (right headlight in mirror image)
1 - Vertical adjustment
2 - Lateral adjustment
–Adjust with corresponding thumbwheel.
Adjust the fog light beam
Inclination value:
The angle is 2.2%.
Vehicles up to MY 2004
Right fog light (left fog light in mirror image)
Note
S02-0090
Note2
1
S94-0095
1
2
S94-0103
Page 69 of 86

Downloaded from www.Manualslib.com manuals search engine FABIA 2000➤Inspection and Maintenance
BodyEdition 09.04
S00.5301.14.2002-7 page 1 02
02-7 Body
Airbag units: Visual inspection
Inspecting operation of airbag unit
When the ignition is switched on the airbag warning lamp
K75 lights up for approximately 4 seconds. Should the
warning lamp flash again for a further 12 seconds this is
an indication that the front passenger airbag or the side
airbag unit on the front passenger is electronically locked
(valid for vehicles which do not have an airbag switch-off
function).
The warning lamp will go out after 4 seconds for vehicles
which are fitted with an airbag switch-off function and
switching off of the front passenger airbag will be sig-
nalled by the warning lamp „AIRBAG OFF“ in the middle
of the dash panel.
♦If warning lamp K75 does not go out after 4 seconds
and lights up continously there is a fault.
♦If the warning lamp goes out and then lights up again
the control unit is not coded, the wrong control unit has
been fitted or there is a fault.
♦If the airbag warning light K75 flashes constantly, it is
then necessary to replace the airbag control unit J234.
If the warning light indicates a fault, the fault must be
rectified (repair measure) Body Work; Rep. Gr. 01.
Inspecting airbag for external damage
Driver and front passenger airbag units
The logo „AIRBAG“ on the padded boss of the steering
wheel (driver's side) and on the right side of the dash pan-
el (passenger side) indicates that an airbag is fitted.
–Carry out a visual inspection of the padded boss of the
steering wheel -1- and surface of the dash panel -2-
on the front passenger side for external damage.
–Undertake a visual inspection of the front seats to de-
termine any damage (valid for vehicles with side air-
bags).
♦Only use original seat upholstery approved for side
airbags.
♦The use of commercially available protective seat cov-
ers is prohibited as this impairs the operation of the
side airbags.
♦Replace all harpoon clips with new original parts.
♦In the event of damage to the upholstery - tears, burn
holes etc. - in the area of the side airbag always re-
place the upholstery with a new original part for safety
reasons.
1
S02-0297
2
Page 70 of 86

Downloaded from www.Manualslib.com manuals search engine FABIA 2000➤Inspection and Maintenance
BodyEdition 09.04
S00.5301.14.2002-7 page 2 02
Do not affix any stickers or cover over the padded boss of
the steering wheel -1- and the foam-lined surface of the
airbag unit on the front passenger side -2- or do not carry
out any modifications to these parts. These parts must
only be cleaned with a dry and slightly moistened cloth.
Inspect key switch for deactivation of
front passenger airbag
–Switch off ignition.
–Turn the key switch for deactivation of front passenger
airbag to the position „OFF“.
When the ignition is switched on the airbag warning lamp
must light up in the front interior light.
–Switch off ignition.
–Turn the key switch for deactivation of front passenger
airbag to the position „ON“.
After the ignition and the front passenger airbag is
switched on, the airbag warning light in the front interior
light must no longer light up after approx. 3 seconds.
Key switch for deactivation of front passenger airbag
must only be turned when ignition is switched off. If the
position of the switch is changed, the airbag control unit
can evaluate a fault; the individual contacts in the switch
make contact during different time intervals and subse-
quently the warning lamp lights up in the dash panel in-
sert (there is no risk of airbag activation).
Check underbody protection and body
paintwork for damage
The inspection of the underbody sealant and paintwork
should cover the following points:
1) undamaged layer of PVC Plastisol
–Vehicle floor
–Wings and wheel housings
–Sills
2) undamaged paintwork
–all body joints
–surround of windscreen
–surround of rear window
–flange of inner surfaces of engine hood
–horizontal and vertical painted surfaces
–Connection of the roof in the area of the luggage com-
partment lid
It is essential to rectify any defects found!
Note
Note
Page 74 of 86

Downloaded from www.Manualslib.com manuals search engine FABIA 2000➤Inspection and Maintenance
BodyEdition 09.04
S00.5301.14.2002-7 page 6 02
–Separate filter element from the frame.
Installing:
Installation is carried out in the reverse order.
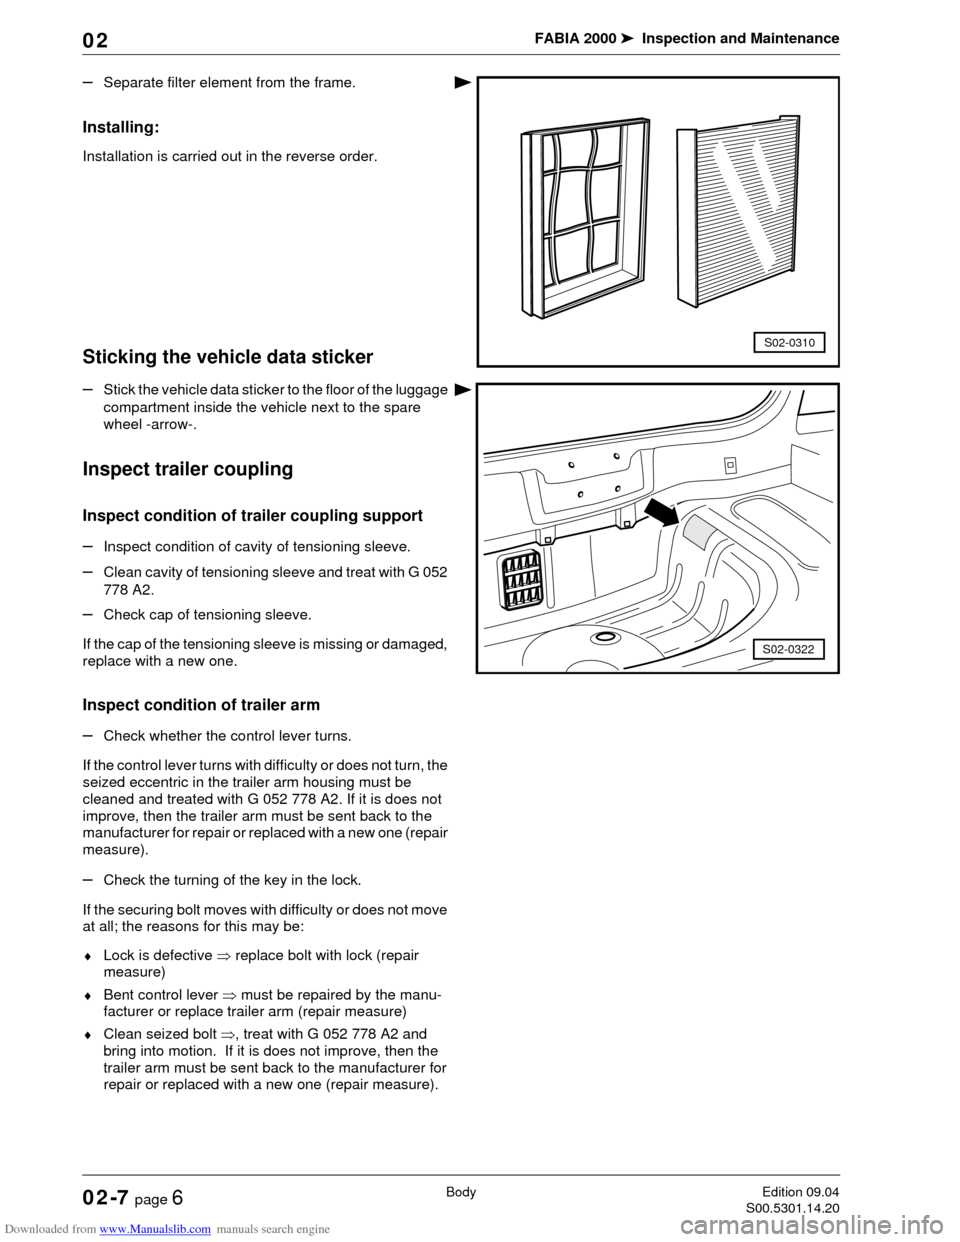
Sticking the vehicle data sticker
–Stick the vehicle data sticker to the floor of the luggage
compartment inside the vehicle next to the spare
wheel -arrow-.
Inspect trailer coupling
Inspect condition of trailer coupling support
–Inspect condition of cavity of tensioning sleeve.
–Clean cavity of tensioning sleeve and treat with G 052
778 A2.
–Check cap of tensioning sleeve.
If the cap of the tensioning sleeve is missing or damaged,
replace with a new one.
Inspect condition of trailer arm
–Check whether the control lever turns.
If the control lever turns with difficulty or does not turn, the
seized eccentric in the trailer arm housing must be
cleaned and treated with G 052 778 A2. If it is does not
improve, then the trailer arm must be sent back to the
manufacturer for repair or replaced with a new one (repair
measure).
–Check the turning of the key in the lock.
If the securing bolt moves with difficulty or does not move
at all; the reasons for this may be:
♦Lock is defective ⇒ replace bolt with lock (repair
measure)
♦Bent control lever ⇒ must be repaired by the manu-
facturer or replace trailer arm (repair measure)
♦Clean seized bolt ⇒, treat with G 052 778 A2 and
bring into motion. If it is does not improve, then the
trailer arm must be sent back to the manufacturer for
repair or replaced with a new one (repair measure).
S02-0310
S02-0322
Page 83 of 86

Downloaded from www.Manualslib.com manuals search engine FABIA 2000➤Inspection and Maintenance
MiscellaneousEdition 06.01
S00.5301.06.2002-9 page 1 02
02-9 Miscellaneous
Tow starting/Towing
♦A towing rope or towing bar must only be fitted to the
above towing lugs.
♦The towing rope must be elastic to protect the vehicle.
Therefore only use synthetic ropes or ropes manufac-
tured in an equally elastic material. However, it is saf-
er to use a towing bar!
♦Make sure no unauthorised traction forces and no jolt-
ing loads are exerted. During towing manoeuvres
away from hardened road surfaces there is a risk of
overloading and damaging the fixation parts.
♦Before starting the engine by towing, first use the bat-
tery of another vehicle as a start aid.
Front: The threaded hole of the front towing lug is located
in the front right part of the bumper behind the cover grill.
Screw in the towing lug by hand by turning it to the left (in
the direction of the arrow) up to the stop.
Rear: The towing lug is located below the rear right part
of the bumper.
♦Comply with the legal regulations on towing.
♦Both drivers must be familiar with the specificities of
the towing process.
♦When using a towing rope the driver of the towing ve-
hicle must press the clutch very smoothly when driv-
ing off and changing gear.
♦The driver of the towed vehicle must make sure the
rope is kept taut.
♦The ignition must be switched on to ensure the steer-
ing wheel does not lock and the turn signals, horn,
windscreen wipers and windscreen washer system
can be activated.
♦As the brake servo unit only operates with the engine
running, the brake pedal must be pressed much hard-
er when the engine is switched off.
♦On vehicles with power steering the steering is much
harder when the engine is switched off.
♦If there is no lubricant in the gearbox or automatic
gearbox the vehicle must only be towed with the drive
wheels raised.
When towing vehicles with a manual gearbox
pay attention to the following:
–Before towing engage 2nd or 3rd gear.
–Switch on ignition.
Note
S02-0302
Note
Note
Page 84 of 86

Downloaded from www.Manualslib.com manuals search engine FABIA 2000➤Inspection and Maintenance
MiscellaneousEdition 06.01
S00.5301.06.2002-9 page 2 02
–As soon as the engine starts, press clutch and remove
gear to avoid driving into the towing vehicle.
Do not start the engine of vehicles fitted with an exhaust
catalyst by towing over a long distance as unburnt fuel
may get into the catalyst and burn there. This may result
in overheating and hence in the destruction of the cata-
lyst.
Perform a test drive
The following must be assessed within the scope of a test
drive according to the vehicle equipment and the availa-
ble possibilities (city/country, weather)
–Inspect engine for performance, misfiring, idling be-
haviour and acceleration.
–Foot and handbrake: Functional test (jerking, squeak-
ing, pulling to one side) ABS operation. Brake pedal-
idle travel: max.
1/3 of the idle travel.
–Inspect the lever position and smooth operation of the
gearshifts.
–Inspect the driving behaviour of the clutch as well as
the pedal force and smell.
–Inspect automatic gearbox: Selector lever position,
selector lever lock, shifting behaviour, display indica-
tion in dash panel insert.
–Inspect steering clearance of the vehicle standing on
its wheels, with engine running by turning the steering
wheel one way and then the other (wheels straight
ahead). There must be no play on the steering.
–Inspecting the sun roof operation.
–Pay attention to pulling and to the straigt ahead posi-
tion of the steering wheel during driving.
–Inspect the imbalance of the wheels, drive shafts and
propshafts.
–Inspecting functions: Heating, air conditioning, venti-
lation, instruments and warning lights, mirror adjust-
ment.
–Inspect engine, gearbox, axles, steering, brakes,
clutch, bodywork for abnormal noises
Raising the vehicle
Using a lift platform and a workshop jack
The vehicle must only be raised with a workshop jack in
the indicated jacking points -arrows-.
To avoid damage use a suitable rubber or wood insert.
Note
S02-0316
Page 85 of 86

Downloaded from www.Manualslib.com manuals search engine FABIA 2000➤Inspection and Maintenance
MiscellaneousEdition 06.01
S00.5301.06.2002-9 page 3 02
The rear support points are located in the make axle em-
bossed in the sill -arrow-.
S02-0317
WARNING!
Under no circumstances may the arms of the lift
platform or jack be positioned under the engine,
the gearbox, the front or rear axles.
Never start the engine or engage a gear when
the vehicle is raised, while a driving wheel is in
contact with the ground.
Secure the vehicle on the lift platform before its
centre of gravity shifts considerably because of
successive disassembly operations.
The vehicle must not be supported at the front
under the sill.