Page 7 of 184
��������
�������� � ��������� � ������ � ����� ����
X65 - CLIOC:\Documentum\Checkout_47\Nu607-8gb_T1.WIN 12/10/2000 16:22-page7
0.05
Tyre inflation pressures when cold(in bar) (continued)
Tyre safety and use of chains
Refer to the paragraph “Tyres” in section 5 for information on maintenance and, depending on the version, the conditions
under which chains may be fitted to the vehicle.
Special points relating to the 2.0 litre
16Vversion
This vehicle is equipped with wheels which cannot be fitted with chains. If you wish to fit chains, it is essential to use
specific equipment.Consult your Renault Dealer.
(1)Special note concerning vehicles used at full load(maximum permissible all-up weight and weight towed)and towing
a vehicle:
The maximum speed must be limited to 60 mph (100 km/h) and the tyre inflation pressure increased by0.2 bar.
Refer to the information on “weights” in section 6 for more details.
(2) Wheel size: 3J14; tyre dimension: 105/70 R14
Page 12 of 184
1
2
4
3
5
��������
�������� � ��������� � ������ � ����� ����
X65 - CLIOC:\Documentum\Checkout_47\Nu607-8gb_T1.WIN 12/10/2000 16:22-page12
1.04
OPENING THE DOORS
Opening the doors from the
outside
Front: Unlock using the key in one
of the front door locks2.Place your
hand under handle1and pull
towards you.
Rear: When one of the front doors is
open just lift the unlocking knob3
from the inside and move the handle.
Opening the doors from inside
the vehicle
Move handle4.
Lights on reminder buzzer
When one of the doors is opened, an
alarm will sound to remind you that
the lights have been left on after the
engine has been switched off (to
prevent the battery discharging, etc.).
Childproof locks
To prevent the rear doors being
opened from inside the vehicle,
move lever5on each door and
check from inside the car that both
doors are securely locked.
Page 17 of 184

1
1
A
��������
�������� � ��������� � ������ � ����� ����
X65 - CLIOC:\Documentum\Checkout_47\Nu607-8gb_T1.WIN 12/10/2000 16:22-page17
1.09
HEAD RESTRAINTS
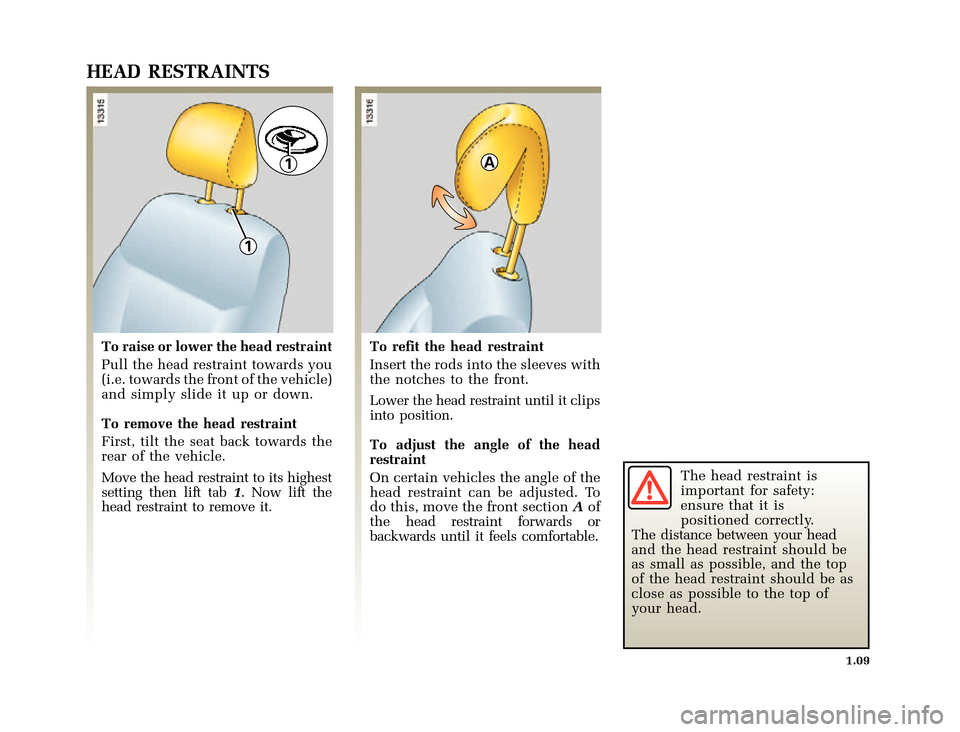
To raise or lower the head restraint
Pull the head restraint towards you
(i.e. towards the front of the vehicle)
and simply slide it up or down.
To remove the head restraint
First, tilt the seat back towards the
rear of the vehicle.
Move the head restraint to its highest
setting then lift tab1. Now lift the
head restraint to remove it.To refit the head restraint
Insert the rods into the sleeves with
the notches to the front.
Lower the head restraint until it clips
into position.
To adjust the angle of the head
restraint
On certain vehicles the angle of the
head restraint can be adjusted. To
do this, move the front sectionAof
the head restraint forwards or
backwards until it feels comfortable.The head restraint is
important for safety:
ensure that it is
positioned correctly.
The distance between your head
and the head restraint should be
as small as possible, and the top
of the head restraint should be as
close as possible to the top of
your head.
Page 18 of 184

121
2
��������
�������� � ��������� � ������ � ����� ����
X65 - CLIOC:\Documentum\Checkout_47\Nu607-8gb_T1.WIN 12/10/2000 16:22-page18
1.10
REAR HEAD RESTRAINTS
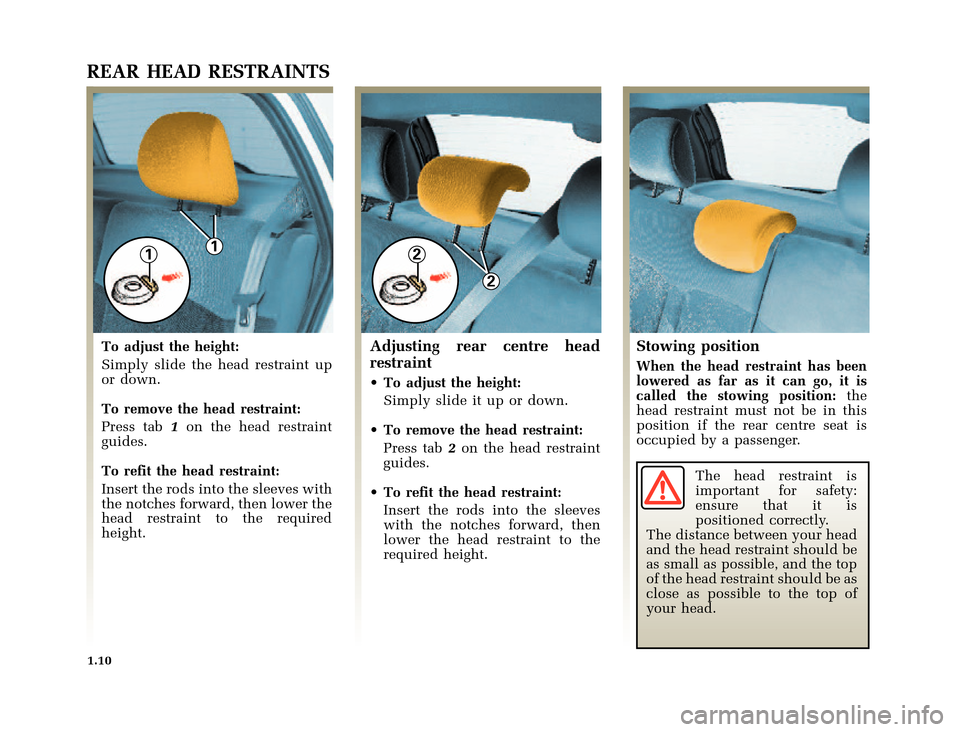
To adjust the height:
Simply slide the head restraint up
or down.
To remove the head restraint:
Press tab1on the head restraint
guides.
To refit the head restraint:
Insert the rods into the sleeves with
the notches forward, then lower the
head restraint to the required
height.Adjusting rear centre head
restraint
• To adjust the height:
Simply slide it up or down.
•To remove the head restraint:
Press tab2on the head restraint
guides.
•To refit the head restraint:
Insert the rods into the sleeves
with the notches forward, then
lower the head restraint to the
required height.
Stowing position
When the head restraint has been
lowered as far as it can go, it is
called the stowing position:the
head restraint must not be in this
position if the rear centre seat is
occupied by a passenger.
The head restraint is
important for safety:
ensure that it is
positioned correctly.
The distance between your head
and the head restraint should be
as small as possible, and the top
of the head restraint should be as
close as possible to the top of
your head.
Page 63 of 184

1
2
1
3
��������
�������� � ��������� � ������ � ����� ����
X65 - CLIOC:\Documentum\Checkout_47\Nu607-8gb_T1.WIN 12/10/2000 16:22-page63
1.55
EXTERNAL LIGHTING AND SIGNALS
Side lights
Turn the end of stalk1to
align the symbol opposite the mark3.
The instrument panel illuminates.
The brightness of the lights can be
modified by turning wheel2,ifthis
feature is fitted to the vehicle.
Dipped headlights
Turn the end of stalk1to
align the symbol opposite the mark3.
A warning light illuminates on the
instrument panel.
Before driving at night:
check that the electrical
equipment is in good condition
and adjust the headlight beam (if
your vehicle is not carrying its
normal load).
Main beam headlights
With stalk1in the dipped
beam headlight position, move the
stalk towards you.
When the main beam headlights are
on, a warning light illuminates on
the instrument panel.
To return to the dipped beam
headlight position, move the stalk
towards you once more.
Turning the lights off
Return stalk1to its initial
position.
Lights on reminder buzzer
If the driver’s door is opened, a
buzzer will sound to indicate that
the lights have been left on after the
ignition has been switched off (to
prevent discharge of the battery
etc.).
Page 67 of 184

1
A
B
C
D
1
E
��������
�������� � ��������� � ������ � ����� ����
X65 - CLIOC:\Documentum\Checkout_47\Nu607-8gb_T1.WIN 12/10/2000 16:22-page67
1.59
WINDSCREEN WASHERS / WIPERS
Front wiper
Ignition on, move stalk1
parallel to the steering wheel:
•APark.
•BIntermittent wipe.
Between wipes, the blades will
stop for several seconds.
Depending on version, it may
be possible to alter the time
between wipes by turning the
central ring2of stalk1.
•CContinuous slow wiping.
•DContinuous fast wiping.In freezing conditions, make sure that
the wiper blades are not stuck to the
windscreen (risk of overheating the
motor).
Keep an eye on the condition of the
blades. Change them as soon as they
become less efficient: approximately
once a year.
If you turn the engine off before
stopping the wipers (positionA)the
blades may stop anywhere on the
windscreen.
Windscreen washer,
headlight washer
Ignition on, pull stalkEtowards you.
• Headlights off
The windscreen washers will
activate.
• Headlights on
The headlight washers will also
be activated.
Page 70 of 184

1
22
3
1
0
��������
�������� � ��������� � ������ � ����� ����
X65 - CLIOC:\Documentum\Checkout_47\Nu607-8gb_T1.WIN 12/10/2000 16:22-page70
1.62
AUDIBLE AND VISIBLE SIGNALS
Horn
Press the end of stalk1or, for
vehicles fitted with an air bag, press
buttons2.
Headlight flasher
To flash the headlights, even if the
lights are not in use, pull stalk1
towards you.
Hazard warning lights
Press switch3.
This switch illuminates all four
indicators at the same time.
It is to be used in cases of danger to
warn other road users that you:
• are obliged to stop in a normally
prohibited location,
• are obliged to drive under
particular conditions.
Direction indicators
Move stalk1parallel to the steering
wheel and in the direction in which
you are going to turn.
When driving on the motorway, the
steering wheel is not often turned
far enough to return the stalk
automatically to position0. There is
an intermediate position in which
the stalk can be held when changing
lanes.
When the stalk is released, it
automatically returns to0.
Page 80 of 184

�1�8�����������I�U�B�*���D���T�[�G�� �� ������������������ �� ������������ �� �3�D�J�H�� ��������
X65 - CLIOC:\Documentum\Checkout\Nu607-8gb_T2.WIN 30/9/2000 11:04-page8
2.08
ADVICE ON ANTIPOLLUTION AND HOW TO ECONOMISE ON FUEL WHEN DRIVING(continued)
General hints
•Electricity is “fuel”; switch off all
the electrical units which are not
really needed.
However,(with safety always in
mind), keep your lights on when
the visibility is bad (see and be
seen).
• Try to use the air vents. Driving at
a speed of 60 mph (100 km/h)
with the windows open will
increase the use of fuel by 4%.•For vehicles fitted with air
conditioning,morefuelmaybe
used during urban driving; switch
off the system when it is not really
needed.
• Never fill the fuel tank up to the
brim to avoid it overflowing.
• Do not leave an empty roof rack in
position.
• Use a trailer for carrying bulky
objects.
• When towing a caravan, fit a wind
deflector and adjust it properly.
• Avoid using the car for door to
door calls (short journeys with
long stops in between), as the
engine never reaches its ideal
temperature. Try to group your
calls.
Tyres
•Inflation pressures which are too
low may increase fuel
consumption.
• The use of non-recommended
tyres may also increase fuel
consumption.