Page 162 of 376

3-
3-1
Section 3 Comfort Controls and Audio Systems
In this section, you'll find out how to operate the comfort control and audio systems offered with your vehicle.
Be sure to read about the particular systems supplied with your vehicle.
3
-2 Comfort Controls
3
-2 Air Conditioning with Electronic Controls
3
-4 Air Conditioning with Automatic and
Auxiliary Temperature Control (If Equipped)
3
-8 Rear Window Defogger
3
-9 Ventilation System
3
-10 Audio Systems
3
-10 Setting the Clock
3
-10 AM-FM Stereo with Cassette Tape Player
3
-14 AM-FM Stereo with Compact Disc Player
(If Equipped)
3
-17 AM-FM Stereo with Compact Disc Player and
Equalizer (If Equipped)3
-20 Trunk-Mounted CD Changer (Option)
3
-23 Theft-Deterrent Feature
3
-26 Audio Steering Wheel Controls (If Equipped)
3
-27 Understanding Radio Reception
3
-27 Tips About Your Audio System
3
-28 Care of Your Cassette Tape Player
3
-29 Care of Your Compact Discs
3
-29 Care of Your Compact Disc Player
3
-29 Fixed Mast Antenna
3
-30 Backglass Antenna (If Equipped)
Page 181 of 376
3-20 Trunk-Mounted CD Changer (Option)
With the optional compact disc changer, you can play up
to 12 discs continuously. Normal size discs may be
played using the trays supplied in the magazine.
The small discs (8 cm) can be played only with specially
designed trays.
You must first load the magazine with discs before you
can play a compact disc. Each of the 12 trays holds one
disc. Press the button on the back of the magazine and pull gently on one of the trays. Load the trays from
bottom to top, placing a disc on the tray label side down.
If you load a disc label side up, the disc will not play
and an error will occur. Gently push the tray back into
the magazine slot. Repeat this procedure for loading up
to 12 discs in the magazine.
Once you have loaded the discs in the magazine,
slide open the door of the compact disc (CD) changer.
Push the magazine into the changer in the direction of
the arrow marked on top of the magazine.
Page 187 of 376

If your vehicle has this feature, you can control certain
radio and remote playback functions using the buttons
on your steering wheel.
VOLUME: Press")
3-26 Audio Steering Wheel Controls
(If Equipped)
If your vehicle has this feature, you can control certain
radio and remote playback functions using the buttons
on your steering wheel.
VOLUME: Press the up or down arrow to increase or
decrease volume.
PLAY: Press this button to play a cassette tape or
compact disc when the radio is playing.MUTE: Press this button to silence the system. Press it
again, or any other radio button, to turn on the sound.
SEEK: Press the up arrow to tune to the next radio
station and the down arrow to tune to the previous radio
station. If a cassette tape or compact disc is playing, the
player will advance to the next selection with the up
arrow and go to the previous selection with the
down arrow.
PRESET: Press this button to play a station you have
programmed on the radio preset buttons. When a
cassette tape is playing, press this button to change tape
sides. If you have the trunk
-mounted CD changer, press
this button to advance to the next disc in the magazine.
AM FM: Press this button to choose AM, FM1 or FM2.
If a cassette tape or compact disc is playing, it will stop
and the radio will play.
Page 218 of 376
4-27
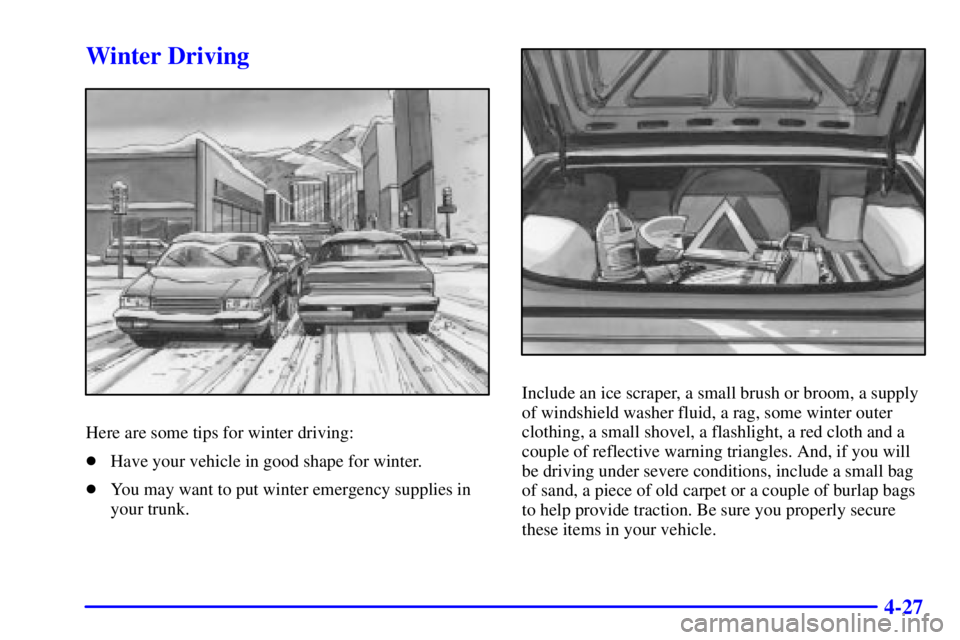
Winter Driving
Here are some tips for winter driving:
�Have your vehicle in good shape for winter.
�You may want to put winter emergency supplies in
your trunk.
Include an ice scraper, a small brush or broom, a supply
of windshield washer fluid, a rag, some winter outer
clothing, a small shovel, a flashlight, a red cloth and a
couple of reflective warning triangles. And, if you will
be driving under severe conditions, include a small bag
of sand, a piece of old carpet or a couple of burlap bags
to help provide traction. Be sure you properly secure
these items in your vehicle.
Page 222 of 376

4-31
Then, shut the engine off and close the window almost
all the way to preserve the heat. Start the engine again
and repeat this only when you feel really uncomfortable
from the cold. But do it as little as possible. Preserve the
fuel as long as you can. To help keep warm, you can get
out of the vehicle and do some fairly vigorous exercises
every half hour or so until help comes.
Recreational Vehicle Towing
Your vehicle was not designed to be towed with all four
wheels on the ground. If your vehicle must be towed,
see ªTowing Your Vehicleº in the Index.
NOTICE:
Towing your vehicle with all four wheels on the
ground will damage drivetrain components.
Loading Your Vehicle
Two labels on your vehicle show how much weight it
may properly carry. The Tire
-Loading Information label
is on the inside of the trunk lid. The label tells you the
proper size, speed rating and recommended inflation
pressures for the tires on your vehicle. It also gives you
important information about the number of people that
can be in your vehicle and the total weight you can
carry. This weight is called the vehicle capacity weight
and includes the weight of all occupants, cargo and all
nonfactory
-installed options.
Page 223 of 376
. The")
4-32
The other label is the Certification label, found on the
rear edge of the driver's door. It tells you the gross
weight capacity of your vehicle, called the Gross
Vehicle Weight Rating (GVWR). The GVWR includes
the weight of the vehicle, all occupants, fuel and cargo.
Never exceed the GVWR for your vehicle or the Gross
Axle Weight Rating (GAWR) for either the front or
rear axle.
If you do have a heavy load, spread it out. Don't carry
more than 167 pounds (75 kg) in your trunk.
CAUTION:
Do not load your vehicle any heavier than the
GVWR, or either the maximum front or rear
GAWR. If you do, parts on your vehicle can
break, and it can change the way your vehicle
handles. These could cause you to lose control
and crash. Also, overloading can shorten the life
of your vehicle.
NOTICE:
Your warranty does not cover parts or
components that fail because of overloading.
If you put things inside your vehicle -- like suitcases,
tools, packages or anything else
-- they will go as fast as
the vehicle goes. If you have to stop or turn quickly, or
if there is a crash, they'll keep going.
Page 224 of 376

4-33
CAUTION:
Things you put inside your vehicle can strike and
injure people in a sudden stop or turn, or in
a crash.
�Put things in the trunk of your vehicle. In a
trunk, put them as far forward as you can.
Try to spread the weight evenly.
�Never stack heavier things, like suitcases,
inside the vehicle so that some of them are
above the tops of the seats.
�Don't leave an unsecured child restraint in
your vehicle.
�When you carry something inside the
vehicle, secure it whenever you can.
Towing a Trailer
CAUTION:
If you don't use the correct equipment and drive
properly, you can lose control when you pull a
trailer. For example, if the trailer is too heavy, the
brakes may not work well
-- or even at all. You
and your passengers could be seriously injured.
You may also damage your vehicle; the resulting
repairs would not be covered by your warranty.
Pull a trailer only if you have followed all the
steps in this section. Ask your dealer for advice
and information about towing a trailer with
your vehicle.
Do not tow a trailer if your vehicle is equipped with the
3800 (L67) Supercharged engine.
Page 227 of 376
 should weigh 10 percent of the total loaded
trailer weight (B). If you have a weight
-distributing
hitch, the trailer tongue (A) sh")
4-36
If you're using a weight-carrying hitch, the trailer
tongue (A) should weigh 10 percent of the total loaded
trailer weight (B). If you have a weight
-distributing
hitch, the trailer tongue (A) should weigh 12 percent of
the total loaded trailer weight (B).
After you've loaded your trailer, weigh the trailer and
then the tongue, separately, to see if the weights are
proper. If they aren't, you may be able to get them right
simply by moving some items around in the trailer.
Total Weight on Your Vehicle's Tires
Be sure your vehicle's tires are inflated to the upper limit
for cold tires. You'll find these numbers on the
Tire
-Loading Information label, found on the inside of
the trunk lid, or see ªLoading Your Vehicleº in the Index.
Then be sure you don't go over the GVW limit for your
vehicle, including the weight of the trailer tongue.
Hitches
It's important to have the correct hitch equipment.
Crosswinds, large trucks going by and rough roads are a
few reasons why you'll need the right hitch. Here are
some rules to follow:
�The rear bumper on your vehicle is not intended for
hitches. Do not attach rental hitches or other
bumper
-type hitches to it. Use only a frame-mounted
hitch that does not attach to the bumper.
�Will you have to make any holes in the body of your
vehicle when you install a trailer hitch? If you do,
then be sure to seal the holes later when you remove
the hitch. If you don't seal them, deadly carbon
monoxide (CO) from your exhaust can get into your
vehicle (see ªCarbon Monoxideº in the Index). Dirt
and water can, too.

With the optional compact disc changer, you can play up
to 12 discs continuously. Normal size discs may be
played using the trays supplied in the magazine.
The s")