2000 NISSAN XTERRA belt
[x] Cancel search: beltPage 147 of 263
CAUTION
Always use tires of the same type, size,
brand, construction (bias, bias-belted
or radial), and tread pattern on all four
wheels. Failure to do so may result in a
circumference difference between tires
on the front and rear axles which will
cause excessive tire wear and may
damage the transmission, transfer
case and differential gears.
If excessive tire wear is found, it is recom-
mended that all four tires be replaced with
tires of the same size, brand, construction
and tread pattern. The tire pressure and
wheel alignment should also be checked
and corrected as necessary. Contact an
authorized NISSAN dealer.
Snow tires
If you install snow tires, they must also be
the same size, brand, construction and
tread pattern on all four wheels.
Tire inflation pressure
Periodically check the pressure in all tires,
including the spare, with a gauge. Adjust to
the specified pressure if necessary. Tirepressures are shown on the tire placard
affixed to the glove box.
Tire chain
Tire chains must be installed only on the
rear wheels and not on the front wheels.
Do not drive with tire chains on paved roads
which are clear of snow. Driving with chains
in such conditions can cause damage to the
various mechanisms of the vehicle due to
some overstress. When driving on clear
paved roads, be sure to change to 2WD.
TIRES OF FOUR-WHEEL
DRIVE
5-22Starting and driving
ZX
Page 149 of 263
verse) position. When parking on an up-
hill grade, place the gearshift lever in the
1st position.
Automatic transmission models:
Move the gearshift lever to the P (Park)
position.
3. To help prevent the vehicle from rolling
into the street when parked on an incline,
it is a good practice to turn the wheels as
illustrated.
O
HEADED DOWNHILL WITH CURB:s1
Turn the wheels into the curb and move
the vehicle forward until the curb side
wheel gently touches the curb.
OHEADED UPHILL WITH CURB:
s2
Turn the wheels away from the curb and
move the vehicle back until the curb side
wheel gently touches the curb.
OHEADED UPHILL OR DOWNHILL, NO
CURB:
s3
Turn the wheels toward the side of the
road so the vehicle will move away from
the center of the road if it moves.
4. Turn the ignition key to the LOCK posi-
tion and remove the key.The power assisted steering is designed to
use a hydraulic pump, driven by the engine,
to assist steering.
If the engine stops or drive belt breaks, you
will still have control of the vehicle. How-
ever, much greater steering effort is needed,
especially in sharp turns and at low speeds.
WARNING
If the engine is not running or is turned
off while driving, the power assist for
the steering will not work. Steering will
be much harder to operate.The brake system has two separate hydrau-
lic circuits. If one circuit develops a problem,
you will still have braking at two wheels.
Vacuum assisted brakes
The brake booster aids braking by using
engine vacuum. If the engine stops, you can
stop the vehicle by depressing the brake
pedal. However, greater foot pressure on
the brake pedal will be required to stop the
vehicle and stopping distance will be longer.
Wet brakes
When the vehicle is washed or driven
through water, the brakes may get wet. As a
result, your braking distance will be longer
and the vehicle may pull to one side during
braking.
To dry the brakes, drive the vehicle at a safe
speed while lightly pressing the brake pedal
to heat the brakes. Do this until the brakes
return to normal. Avoid driving the vehicle at
high speeds until the brakes function cor-
rectly.
POWER STEERING SYSTEM BRAKE SYSTEM
5-24Starting and driving
ZX
Page 164 of 263
perature control to maximum hot and fan
control to high speed.
3. If engine overheating is caused by climb-
ing a long hill on a hot day, run the engine
at a fast idle (approximately 1,500 r/min)
until the temperature gauge indicator re-
turns to normal.
4. Get out of the vehicle. Look and listen for
steam or coolant escaping from the ra-
diator before opening the hood. Wait until
no steam or coolant can be seen before
proceeding.
5. Open the hood.
WARNING
If steam or water is coming from the
engine, stand clear to prevent getting
burned.
6. Visually check drive belts for damage or
looseness. Also check if the cooling fan is
running. The radiator hoses and radiator
should not leak water. If coolant is leak-
ing, or the water pump belt is missing or
loose, or the cooling fan does not run,
stop the engine.
WARNING
Be careful not to allow your hands, hair,
jewelry or clothing to come into contact
with, or get caught in, engine belts or
the engine cooling fan. The engine
cooling fan can start at any time when
the coolant temperature is high.
7. After the engine cools down, check the
coolant level in the reservoir tank with the
engine running. Add coolant to the reser-
voir tank if necessary. Have your vehicle
repaired at an authorized NISSAN
dealer.When towing your vehicle, U.S. States, Ca-
nadian provinces and local regulations for
towing must be followed. Incorrect towing
equipment could damage your vehicle. Tow-
ing instructions are available from an autho-
rized NISSAN dealer. Local service operators
are generally familiar with the applicable laws
and procedures for towing. To assure proper
towing and to prevent accidental damage to
your vehicle, NISSAN recommends having a
service operator tow your vehicle. It is advis-
able to have the service operator carefully
read the following precautions:
WARNING
ONever ride in a vehicle that is being
towed.
ONever get under your vehicle after it
has been lifted by a tow truck.
CAUTION
OWhen towing, make sure that the
transmission, axles, steering system
and powertrain are in working con-
dition. If any unit is damaged, dollies
must be used.
TOW TRUCK TOWING
In case of emergency6-11
ZX
Page 171 of 263
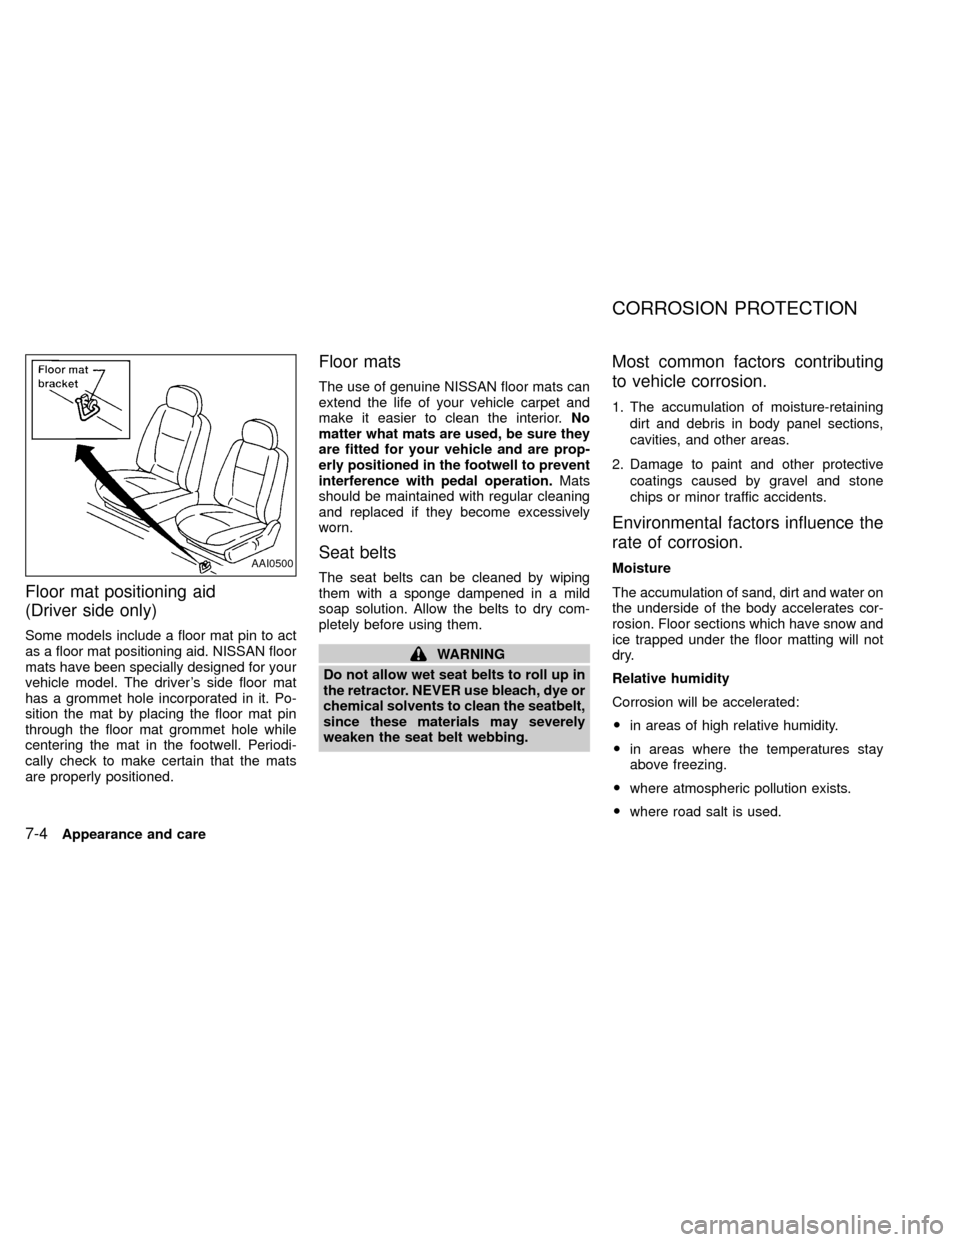
Floor mat positioning aid
(Driver side only)
Some models include a floor mat pin to act
as a floor mat positioning aid. NISSAN floor
mats have been specially designed for your
vehicle model. The driver's side floor mat
has a grommet hole incorporated in it. Po-
sition the mat by placing the floor mat pin
through the floor mat grommet hole while
centering the mat in the footwell. Periodi-
cally check to make certain that the mats
are properly positioned.
Floor mats
The use of genuine NISSAN floor mats can
extend the life of your vehicle carpet and
make it easier to clean the interior.No
matter what mats are used, be sure they
are fitted for your vehicle and are prop-
erly positioned in the footwell to prevent
interference with pedal operation.Mats
should be maintained with regular cleaning
and replaced if they become excessively
worn.
Seat belts
The seat belts can be cleaned by wiping
them with a sponge dampened in a mild
soap solution. Allow the belts to dry com-
pletely before using them.
WARNING
Do not allow wet seat belts to roll up in
the retractor. NEVER use bleach, dye or
chemical solvents to clean the seatbelt,
since these materials may severely
weaken the seat belt webbing.
Most common factors contributing
to vehicle corrosion.
1. The accumulation of moisture-retaining
dirt and debris in body panel sections,
cavities, and other areas.
2. Damage to paint and other protective
coatings caused by gravel and stone
chips or minor traffic accidents.
Environmental factors influence the
rate of corrosion.
Moisture
The accumulation of sand, dirt and water on
the underside of the body accelerates cor-
rosion. Floor sections which have snow and
ice trapped under the floor matting will not
dry.
Relative humidity
Corrosion will be accelerated:
Oin areas of high relative humidity.
Oin areas where the temperatures stay
above freezing.
Owhere atmospheric pollution exists.
Owhere road salt is used.AAI0500
CORROSION PROTECTION
7-4Appearance and care
ZX
Page 174 of 263

8 Do-it-yourself
Maintenance precautions .......................................8-2
Engine compartment check locations ....................8-3
Engine cooling system ...........................................8-5
Checking engine coolant level ...............................8-5
Changing engine coolant .......................................8-6
Engine oil ...............................................................8-9
Checking engine oil level .......................................8-9
Changing engine oil .............................................8-10
Changing engine oil filter .....................................8-12
Automatic transmission fluid (ATF) ......................8-13
Temperature conditions for checking ATF............8-13
Power steering fluid..............................................8-14
Brake and clutch fluid...........................................8-15
Window washer fluid ............................................8-16
Battery ..................................................................8-16
Jump starting ........................................................8-17
Drive belts ............................................................8-18Spark plug replacement .......................................8-19
Air cleaner housing filter ......................................8-20
Wiper blades ........................................................8-22
Parking brake check.............................................8-24
Brake pedal ..........................................................8-24
Brake booster .......................................................8-25
Clutch pedal .........................................................8-26
Fuses ....................................................................8-27
Multi-remote controller battery replacement ........8-28
Light bulbs ............................................................8-29
Headlights ............................................................8-29
Bulb replacement .................................................8-30
Front fog light bulb replacement
(if so equipped) ....................................................8-33
Wheels and tires ..................................................8-34
Four-wheel drive models ......................................8-37
ZX
Page 175 of 263
When performing any inspection or mainte-
nance work on your vehicle, always take
care to prevent serious accidental injury to
yourself or damage to the vehicle. The
following are general precautions which
should be closely observed.
WARNING
OPark the vehicle on a level surface,
apply the parking brake securely and
block the wheels to prevent the ve-
hicle from moving. For manual trans-
mission models, move the shift lever
to N (Neutral). For automatic trans-
mission models, move the shift lever
to P (Park).
OBe sure the ignition key is in the OFF
or LOCK position when performing
any parts replacement or repairs.
ONever leave the engine or automatic
transmission related component
harnesses disconnected while the
ignition switch is in the ON position.
ONever connect or disconnect the bat-
tery or any transistorized compo-
nent while the ignition switch is in
the ON position.O
If you must work with the engine run-
ning, keep your hands, clothing, hair
and tools away from moving fans,
belts, and any other moving parts.
OIt is advisable to secure or remove
any loose clothing and remove any
jewelry, such as rings, watches, etc.
before working on your vehicle.
OAlways wear eye protection when-
ever you work on your vehicle.
OIf you must run the engine in an
enclosed space such as a garage, be
sure there is proper ventilation for
exhaust gases to escape.
ONever get under the vehicle while it
is supported only by a jack. If it is
necessary to work under the vehicle,
support it with safety stands.
OKeep smoking materials, flame and
sparks away from the fuel tank and
battery.
OOn gasoline engine models with the
multiport fuel injection (MFI) system,
the fuel filter or fuel lines should be
serviced by an authorized NISSAN
dealer because the fuel lines are
under high pressure even when the
engine is off.
CAUTION
ODo not work under the hood while
the engine is hot. Turn the engine off
and wait until it cools down.
ONever connect or disconnect either
the battery or any transistorized
component connector while the igni-
tion is on.
OAvoid contact with used engine oil.
Improperly disposed engine oil
and/or other vehicle fluids can dam-
age the environment. Always con-
form to local regulations for disposal
of vehicle fluid.
This ``Do-it-yourself'' section gives instruc-
tions regarding only those items which are
relatively easy for an owner to perform.
You should be aware that incomplete or
improper servicing may result in operating
difficulties or excessive emissions, and
could affect your warranty coverage.If in
doubt about any servicing, have it done
by an authorized NISSAN dealer.
MAINTENANCE
PRECAUTIONS
8-2Do-it-yourself
ZX
Page 186 of 263
WARNING
OWhen the engine is running, keep
hands, jewelry and clothing away
from any moving parts such as the
cooling fan and drive belts.
OAutomatic transmission fluid is poi-
sonous and should be stored care-
fully in marked containers out of the
reach of children.
TEMPERATURE CONDITIONS
FOR CHECKING ATF
OThe fluid level should be checked using
the HOT range on the dipstick after the
following conditions have been met:
Ð The engine should be warmed up to
operating temperature.
Ð The vehicle should be driven at least 5
minutes.
Ð The ATF should be warmed to between
122 and 176ÉF (50 and 80ÉC).
OThe ATF can be checked at fluid tem-
peratures of 86 to 122ÉF (30 to 50ÉC)
using the COLD range on the dipstickafter the engine is warmed up and before
driving. However, the fluid should be
re-checked using the HOT range.
1. Park the vehicle on a level surface and
set the parking brake.
2. Start the engine and then move the se-
lector lever through each gear range,
ending in P (Park).3. Check the fluid level with the engine
idling.
4. Remove the dipstick and wipe it clean
with lint-free paper.
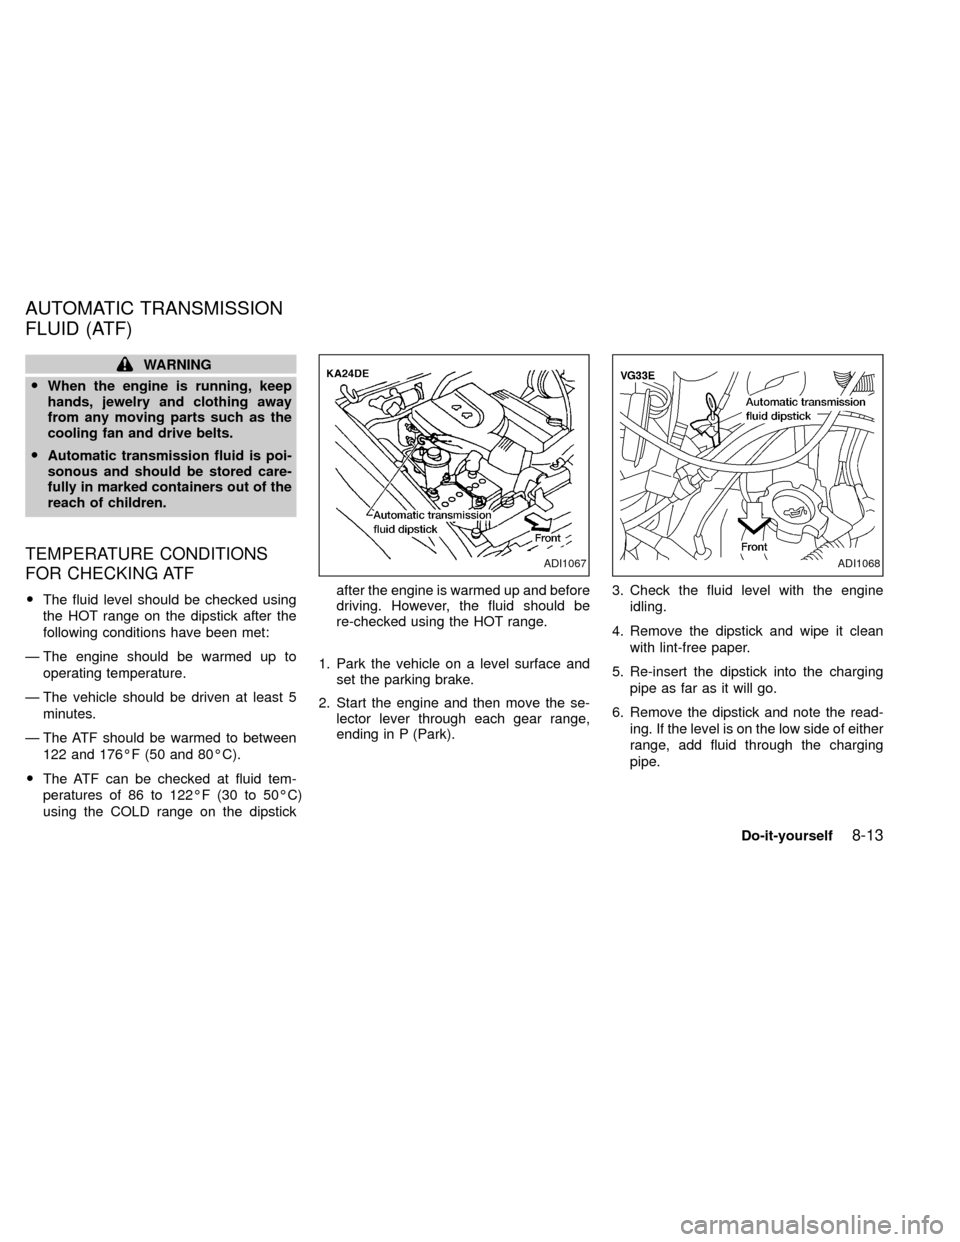
5. Re-insert the dipstick into the charging
pipe as far as it will go.
6. Remove the dipstick and note the read-
ing. If the level is on the low side of either
range, add fluid through the charging
pipe.
ADI1067ADI1068
AUTOMATIC TRANSMISSION
FLUID (ATF)
Do-it-yourself8-13
ZX
Page 191 of 263
WARNING
Be sure the ignition key is OFF or LOCK
position. The engine could rotate unex-
pectedly.
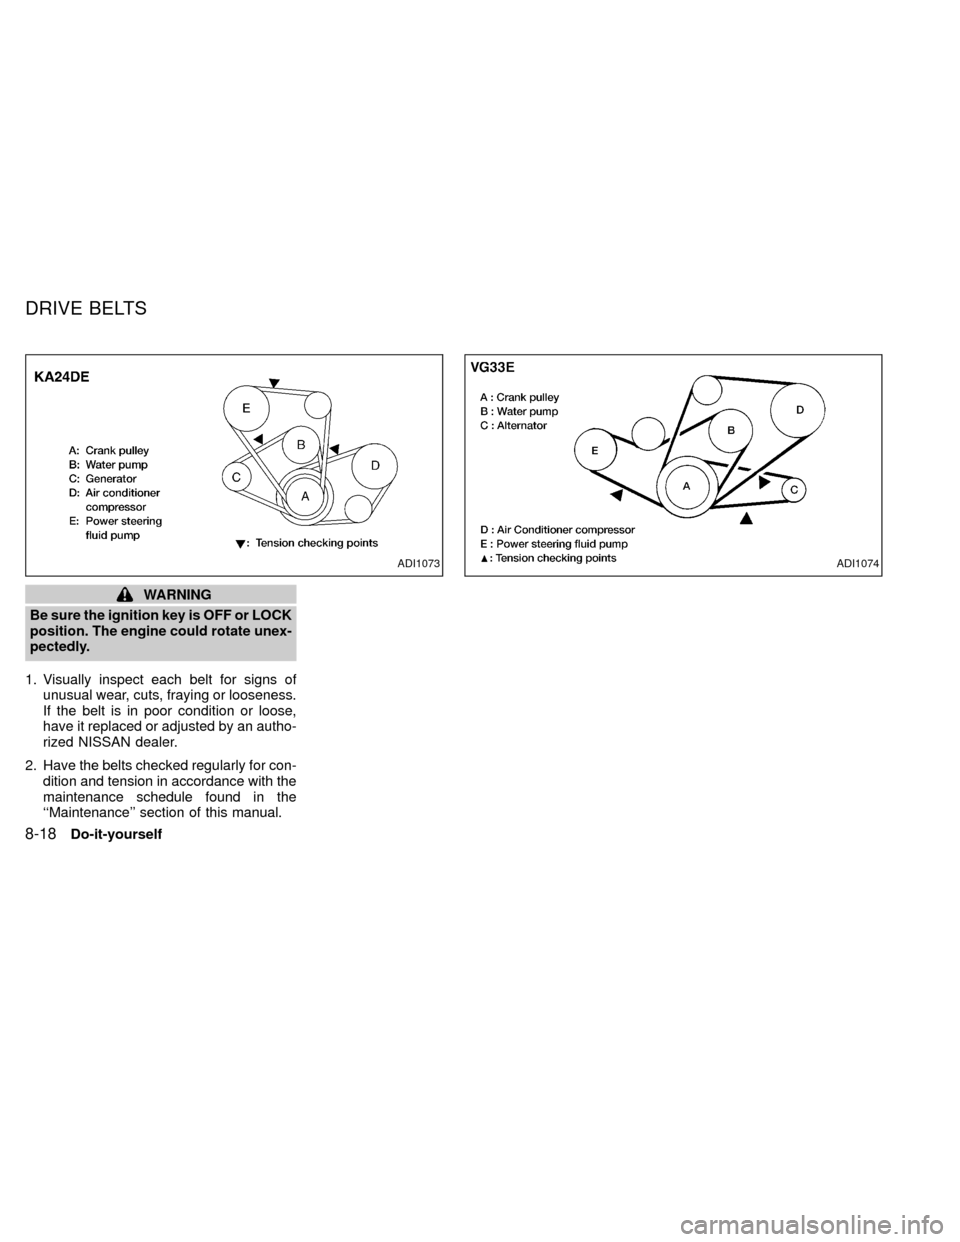
1. Visually inspect each belt for signs of
unusual wear, cuts, fraying or looseness.
If the belt is in poor condition or loose,
have it replaced or adjusted by an autho-
rized NISSAN dealer.
2. Have the belts checked regularly for con-
dition and tension in accordance with the
maintenance schedule found in the
``Maintenance'' section of this manual.
ADI1074ADI1073
DRIVE BELTS
8-18Do-it-yourself
ZX