2000 NISSAN XTERRA clock
[x] Cancel search: clockPage 111 of 263

AM-FM RADIO WITH COMPACT
DISC PLAYER (if so equipped)
ONzOFF/VOL control knob
Turn the ignition key to the ACC or ON, then
push the ONzOFF/VOL control knob. The
mode (radio or CD) which was playing im-
mediately before the system was turned off
resumes playing. When no CD is loaded, the
radio comes on. Pushing the ONzOFF/VOL
button again turns the system off.
Turn the ONzOFF/VOL control knob to ad-
just the volume.
Clock operation
Pressing the clock button alternates the
clock and the radio/CD player options in the
display.
Clock set
Depressing the clock andbuttons to-
gether sets hours. Depressing the clock and
buttons together sets minutes.
AHA1096
4-22Heater, air conditioner and audio systems
ZX
Page 112 of 263
Clock priority mode
In this mode the clock is shown in the
display. If any radio or CD functions are
activated, the radio or CD display illumi-
nates for 10 seconds then returns to the
clock mode.
NOTE:
After clock adjustment, the radio is in the
clock priority mode.
FM/AM band select button
If the radio is off push thebutton to
turn the radio on and to change from AM to
FM reception.
The FM stereo indicator, ST, illuminates
during FM stereo reception. When the ste-
reo broadcast signal is weak, the radio
automatically changes from stereo to mon-
aural reception.
Radio reception is affected by station signal
strength, distance from radio transmitter,
buildings, bridges, mountains and other ex-
ternal influences. Intermittent changes in
reception quality normally are caused by
these external influences.
Using a cellular phone in or near thevehicle may influence radio reception
quality.
TUNE buttons
WARNING
The radio should not be tuned while
driving so full attention may be given to
vehicle operation.
Use these buttons for manual tuning. To
move quickly through the channels, hold
either of the tuning buttons down for more
than 0.5 seconds.
SEEK/SCAN buttons
SEEK tuning
Push the SEEK/SCAN tuning button
or
for less than 1.5 seconds. SEEK tuning
begins from high to low frequencies or low
to high frequencies, depending on which
button is pressed, and stops at the next
broadcasting station. Once the highest
broadcasting station is reached, the radio
continues in the SEEK mode at the lowest
broadcasting station. If using the
button, once the lowest broadcasting
station is reached, the radio continues in theSEEK mode at the highest broadcasting
station.
SCAN tuning
Push and hold the SEEK/SCAN tuning but-
ton
orfor more than 1.5 seconds.
SCAN appears in the display window.
SCAN tuning begins from high to low fre-
quencies or low to high frequencies, de-
pending on which button is pressed. SCAN
tuning stops at each broadcasting station
for five seconds. Pushing the button again
during this five second period stops SCAN
tuning and the radio remains tuned to that
station.
Heater, air conditioner and audio systems
4-23
ZX
Page 117 of 263

AM-FM RADIO WITH CASSETTE
PLAYER AND COMPACT DISC
PLAYER (if so equipped)
ONzOFF/VOL control knob
Turn the ignition key to the ACC or ON
position, then push the ONzOFF/VOL con-
trol knob button. If you listen to the radio
with the engine not running, turn the key to
the ACC position. The mode (radio, tape or
CD) which was playing immediately before
the system was turned off resumes playing.
When no CD or tape is loaded, the radio
comes on. Push the ONzOFF/VOL control
knob button again turns the system off.
Turn the ONzOFF/VOL control knob to ad-
just the volume.
Clock operation
Pressing the clock button displays the clock.
Clock set
Press the CLOCK button for more than 2
seconds the radio beeps and the hours
flash, use the TUNE/FF-REW
but-
tons to set the hour, press the CLOCK
button again until the radio beeps and the
minutes flash, use the TUNE/FF-REW
AHA1112
4-28Heater, air conditioner and audio systems
ZX
Page 118 of 263
buttons to set the minutes. The
display will return to regular clock display in
7 seconds or you may press the CLOCK
button again to return to the regular clock
display.
FM-AM band select button
Push thebutton to change from AM to
FM1 or FM2 reception.
The FM stereo indicator, ST, illuminates
during FM stereo reception. When the ste-
reo broadcast signal is weak, the radio
automatically changes from stereo to mon-
aural reception.
Radio reception is affected by station signal
strength, distance from radio transmitter,
buildings, bridges, mountains, and other
external influences. Intermittent changes in
reception quality normally are caused by
these external influences.
Using a cellular phone in or near the
vehicle may influence radio reception
quality.
TUNE/FF-REW buttons
WARNING
The radio should not be tuned while
driving in so full attention may be given
to vehicle operation.
Use the
andbuttons for manual
tuning. To move quickly through the chan-
nels, hold either of the tuning buttons down.
SEEK/SCAN buttons
SEEK tuning
Push the SEEK/SCAN tuning buttonor
for less than 1.5 seconds. SEEK tuning
begins from low to high frequencies or high
to low frequencies, depending on which but-
ton is pressed, and stops at the next broad-
casting station. If using the
button once
the highest broadcasting station is reached,
the radio continues in the SEEK mode at the
lowest broadcasting station. If using the
button once the lowest broadcasting sta-
tion is reached, the radio continues in the
SEEK mode at the highest broadcasting
station.
SCAN tuning
Push and hold the SEEK/SCAN tuning but-
tonorfor more than 1.5 seconds.
SCAN illuminates in the display window, and
the radio station blinks. SCAN tuning begins
from low to high frequencies or from high to
low frequencies, depending on which button
is pressed. SCAN tuning stops at each
broadcasting station for five seconds. When
scanning, SCAN is solid and the radio sta-
tion blinks. When temporarily stopped on a
station, SCAN blinks and the station display
is solid. Pushing the button again during this
five second period stops SCAN tuning and
the radio remains tuned to that station.
Heater, air conditioner and audio systems4-29
ZX
Page 124 of 263
CD CARE AND CLEANING
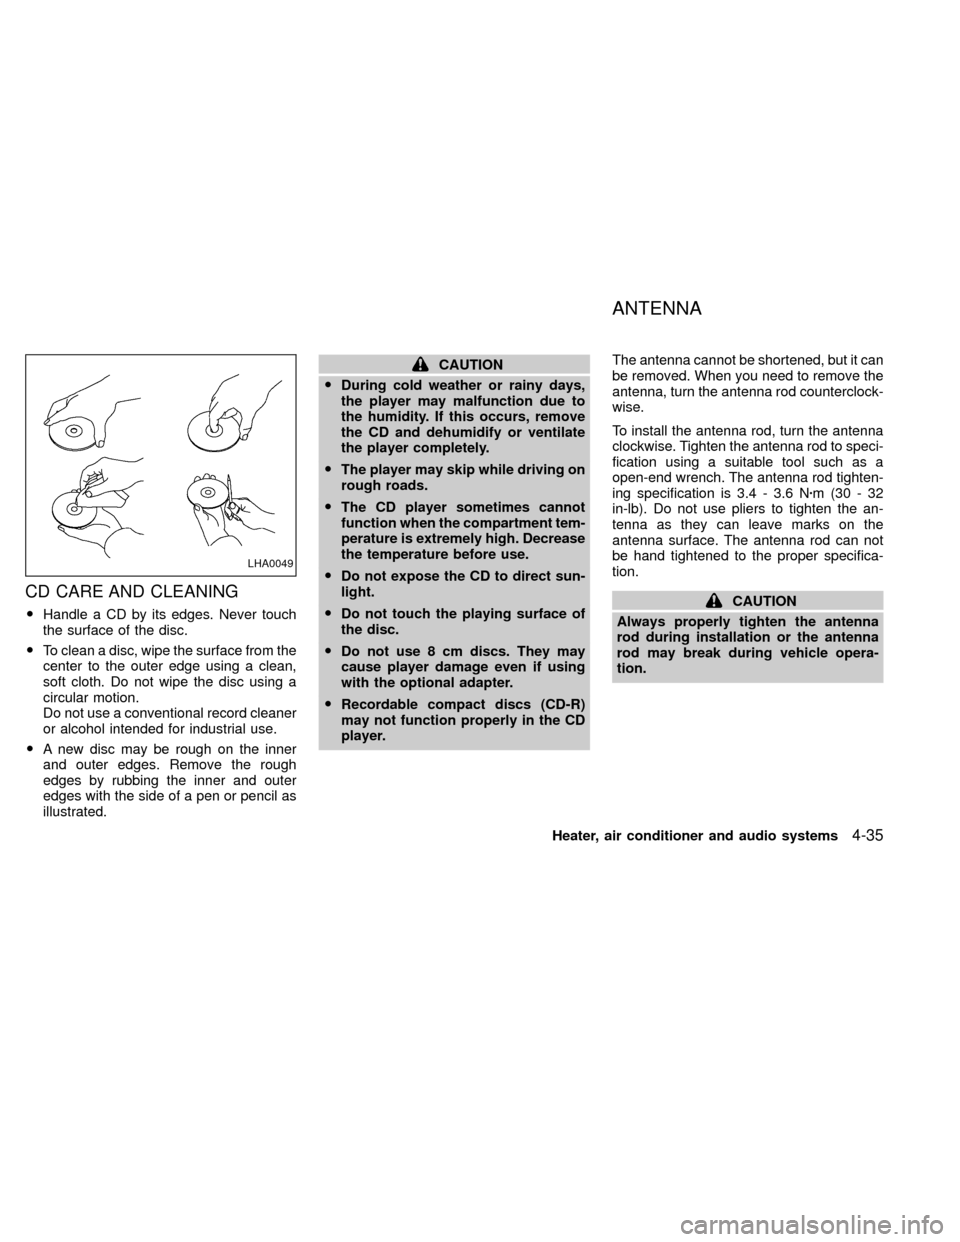
OHandle a CD by its edges. Never touch
the surface of the disc.
OTo clean a disc, wipe the surface from the
center to the outer edge using a clean,
soft cloth. Do not wipe the disc using a
circular motion.
Do not use a conventional record cleaner
or alcohol intended for industrial use.
OA new disc may be rough on the inner
and outer edges. Remove the rough
edges by rubbing the inner and outer
edges with the side of a pen or pencil as
illustrated.
CAUTION
ODuring cold weather or rainy days,
the player may malfunction due to
the humidity. If this occurs, remove
the CD and dehumidify or ventilate
the player completely.
OThe player may skip while driving on
rough roads.
OThe CD player sometimes cannot
function when the compartment tem-
perature is extremely high. Decrease
the temperature before use.
ODo not expose the CD to direct sun-
light.
ODo not touch the playing surface of
the disc.
ODo not use 8 cm discs. They may
cause player damage even if using
with the optional adapter.
ORecordable compact discs (CD-R)
may not function properly in the CD
player.The antenna cannot be shortened, but it can
be removed. When you need to remove the
antenna, turn the antenna rod counterclock-
wise.
To install the antenna rod, turn the antenna
clockwise. Tighten the antenna rod to speci-
fication using a suitable tool such as a
open-end wrench. The antenna rod tighten-
ing specification is 3.4 - 3.6 Nzm(30-32
in-lb). Do not use pliers to tighten the an-
tenna as they can leave marks on the
antenna surface. The antenna rod can not
be hand tightened to the proper specifica-
tion.
CAUTION
Always properly tighten the antenna
rod during installation or the antenna
rod may break during vehicle opera-
tion.
LHA0049
ANTENNA
Heater, air conditioner and audio systems4-35
ZX
Page 131 of 263
correctly could result in loss of con-
trol and/or a rollover accident.
OAlways use tires of the same type,
size, brand, construction (bias, bias
belted or radial), and tread pattern
on all four wheels. Install tire chains
on the rear wheels when driving on
slippery roads and drive carefully.
OBe sure to check the brakes immedi-
ately after driving in mud or water.
See ``Brake system'' later in this sec-
tion for ``Wet brakes''.
OAvoid parking your vehicle on steep
hills. If you get out of the vehicle and
it rolls forward, backward or side-
ways, you could be injured.
OWhenever you drive off-road
through sand, mud or water as deep
as the wheel hub, more frequent
maintenance may be required. See
``Periodic maintenance'' in the
``Maintenance'' section of this
manual.
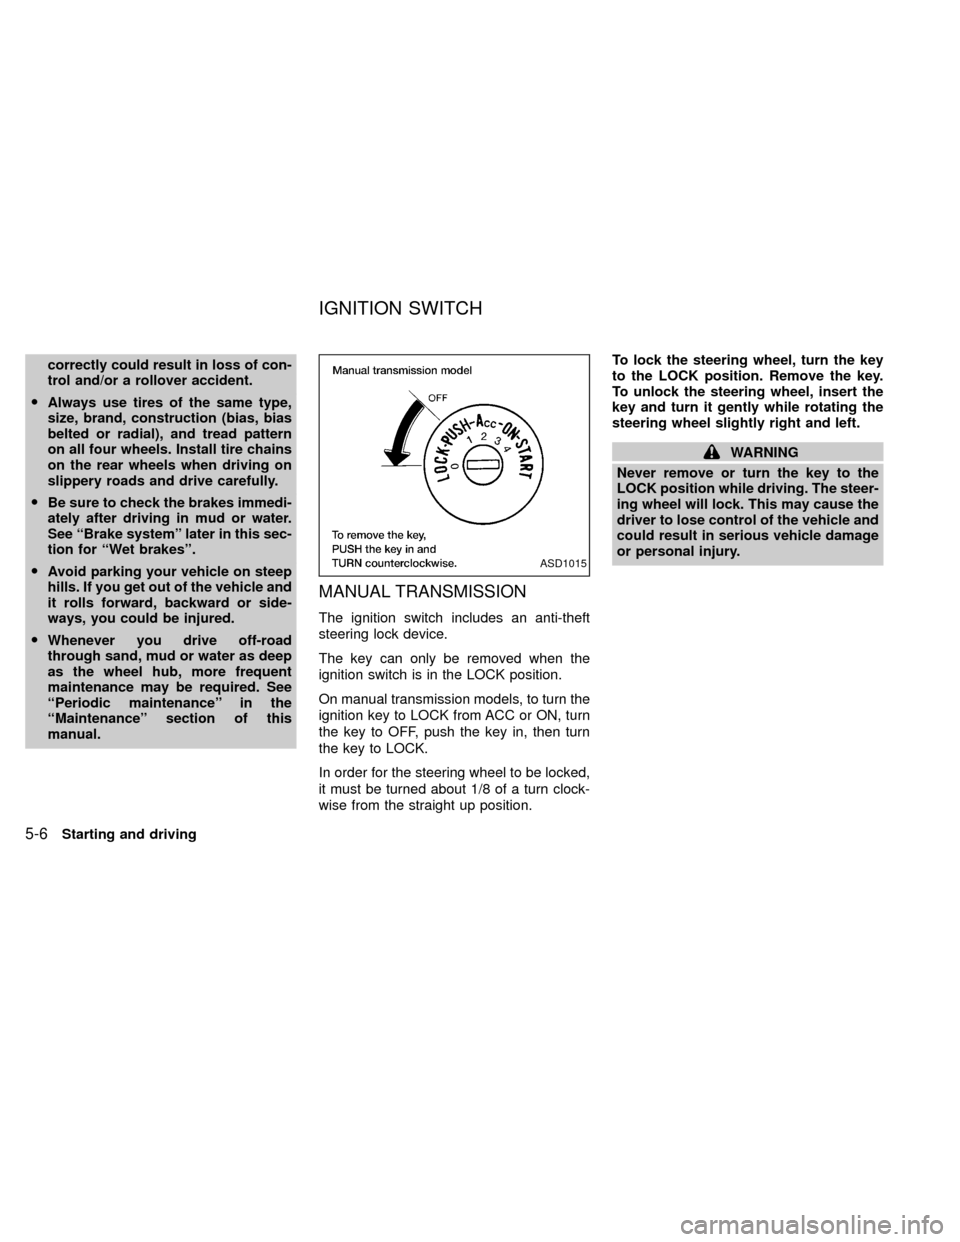
MANUAL TRANSMISSION
The ignition switch includes an anti-theft
steering lock device.
The key can only be removed when the
ignition switch is in the LOCK position.
On manual transmission models, to turn the
ignition key to LOCK from ACC or ON, turn
the key to OFF, push the key in, then turn
the key to LOCK.
In order for the steering wheel to be locked,
it must be turned about 1/8 of a turn clock-
wise from the straight up position.To lock the steering wheel, turn the key
to the LOCK position. Remove the key.
To unlock the steering wheel, insert the
key and turn it gently while rotating the
steering wheel slightly right and left.
WARNING
Never remove or turn the key to the
LOCK position while driving. The steer-
ing wheel will lock. This may cause the
driver to lose control of the vehicle and
could result in serious vehicle damage
or personal injury.
ASD1015
IGNITION SWITCH
5-6Starting and driving
ZX
Page 132 of 263
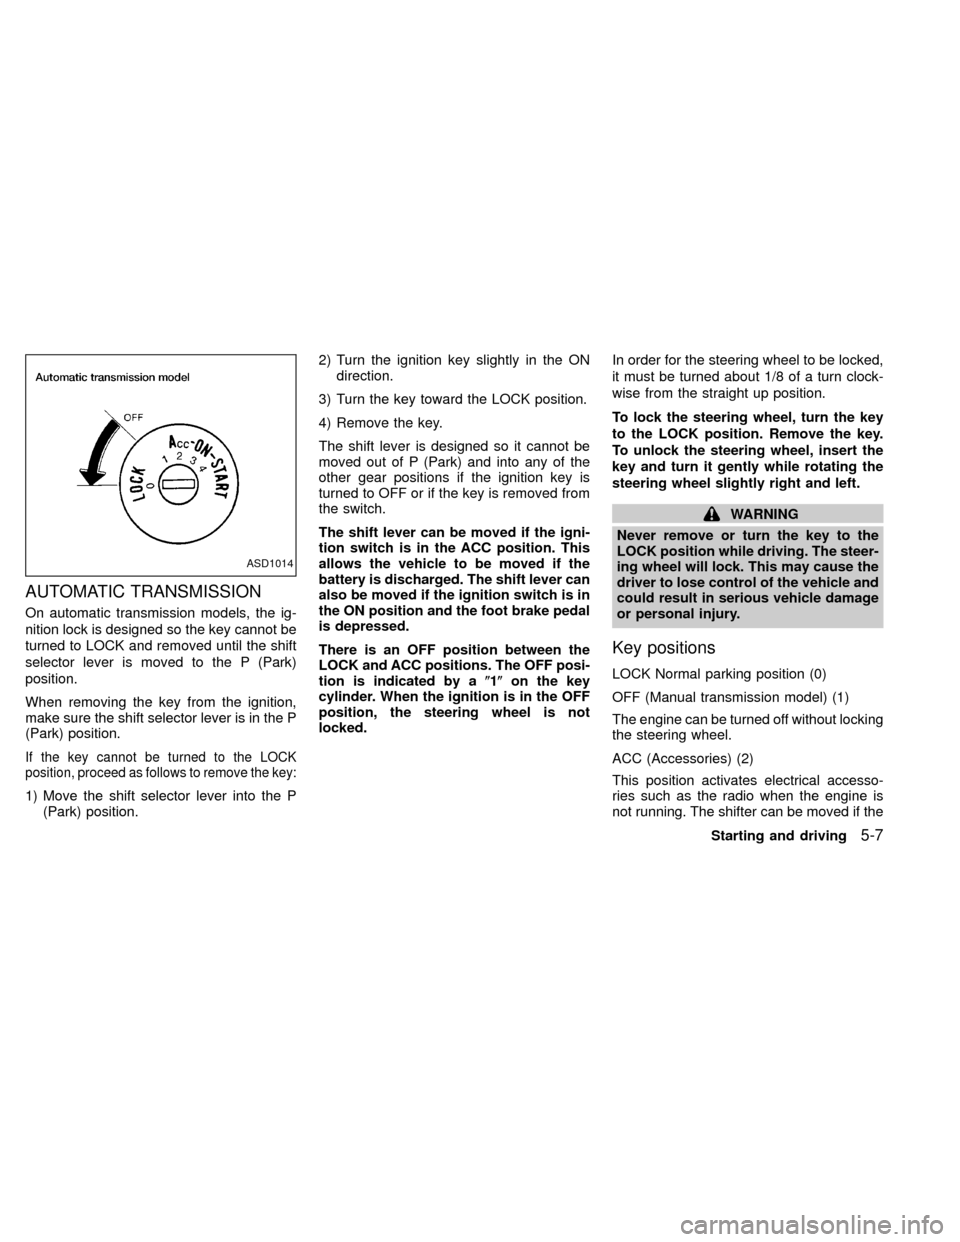
AUTOMATIC TRANSMISSION
On automatic transmission models, the ig-
nition lock is designed so the key cannot be
turned to LOCK and removed until the shift
selector lever is moved to the P (Park)
position.
When removing the key from the ignition,
make sure the shift selector lever is in the P
(Park) position.
If the key cannot be turned to the LOCK
position, proceed as follows to remove the key:
1) Move the shift selector lever into the P
(Park) position.2) Turn the ignition key slightly in the ON
direction.
3) Turn the key toward the LOCK position.
4) Remove the key.
The shift lever is designed so it cannot be
moved out of P (Park) and into any of the
other gear positions if the ignition key is
turned to OFF or if the key is removed from
the switch.
The shift lever can be moved if the igni-
tion switch is in the ACC position. This
allows the vehicle to be moved if the
battery is discharged. The shift lever can
also be moved if the ignition switch is in
the ON position and the foot brake pedal
is depressed.
There is an OFF position between the
LOCK and ACC positions. The OFF posi-
tion is indicated by a(1(on the key
cylinder. When the ignition is in the OFF
position, the steering wheel is not
locked.In order for the steering wheel to be locked,
it must be turned about 1/8 of a turn clock-
wise from the straight up position.
To lock the steering wheel, turn the key
to the LOCK position. Remove the key.
To unlock the steering wheel, insert the
key and turn it gently while rotating the
steering wheel slightly right and left.
WARNING
Never remove or turn the key to the
LOCK position while driving. The steer-
ing wheel will lock. This may cause the
driver to lose control of the vehicle and
could result in serious vehicle damage
or personal injury.
Key positions
LOCK Normal parking position (0)
OFF (Manual transmission model) (1)
The engine can be turned off without locking
the steering wheel.
ACC (Accessories) (2)
This position activates electrical accesso-
ries such as the radio when the engine is
not running. The shifter can be moved if the
ASD1014
Starting and driving5-7
ZX
Page 157 of 263
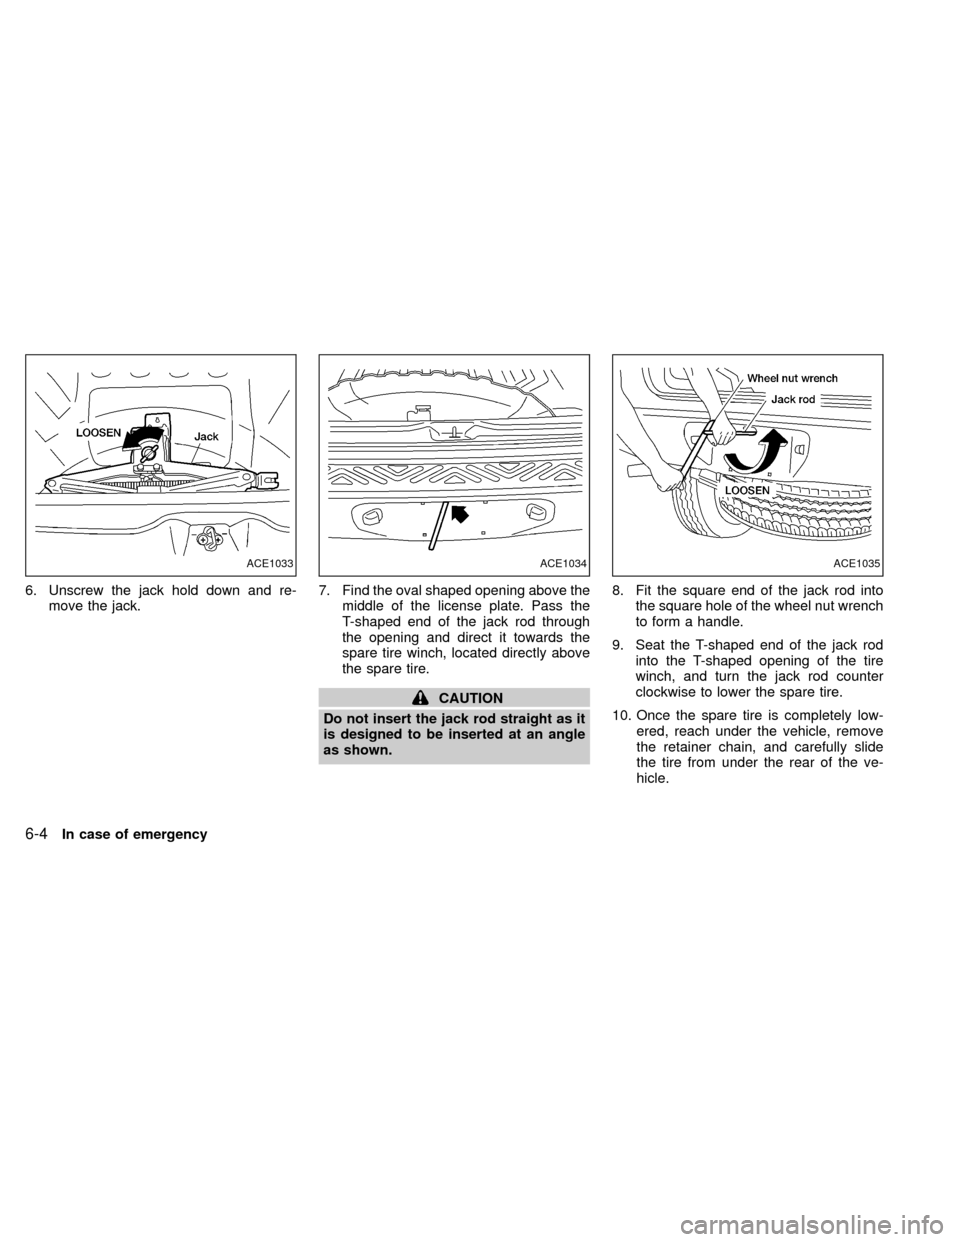
6. Unscrew the jack hold down and re-
move the jack.7. Find the oval shaped opening above the
middle of the license plate. Pass the
T-shaped end of the jack rod through
the opening and direct it towards the
spare tire winch, located directly above
the spare tire.
CAUTION
Do not insert the jack rod straight as it
is designed to be inserted at an angle
as shown.8. Fit the square end of the jack rod into
the square hole of the wheel nut wrench
to form a handle.
9. Seat the T-shaped end of the jack rod
into the T-shaped opening of the tire
winch, and turn the jack rod counter
clockwise to lower the spare tire.
10. Once the spare tire is completely low-
ered, reach under the vehicle, remove
the retainer chain, and carefully slide
the tire from under the rear of the ve-
hicle.
ACE1033ACE1034ACE1035
6-4In case of emergency
ZX