2000 NISSAN SENTRA oil level
[x] Cancel search: oil levelPage 50 of 240
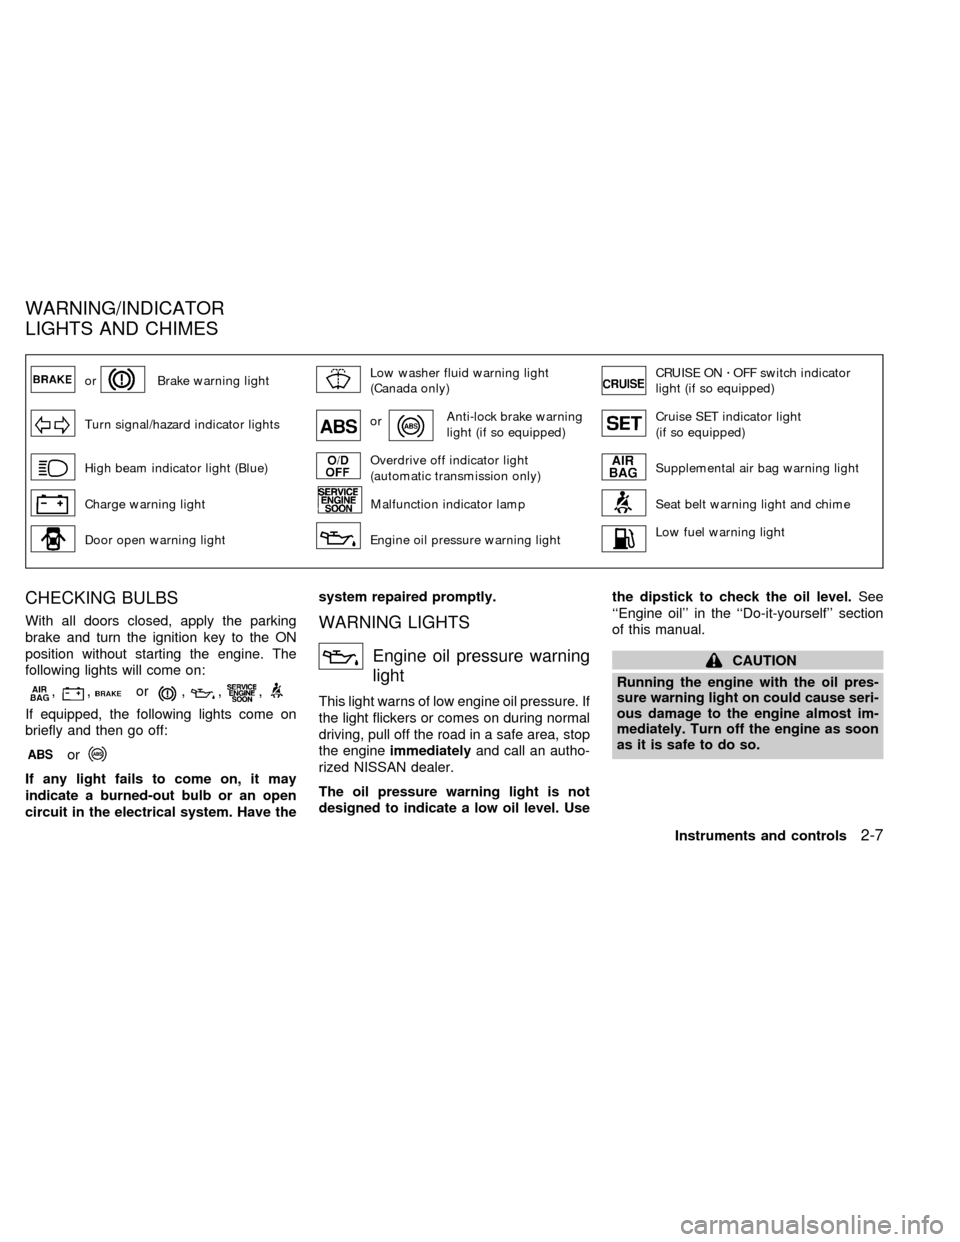
orBrake warning lightLow washer fluid warning light
(Canada only)CRUISE ONzOFF switch indicator
light (if so equipped)
Turn signal/hazard indicator lightsorAnti-lock brake warning
light (if so equipped)Cruise SET indicator light
(if so equipped)
High beam indicator light (Blue)Overdrive off indicator light
(automatic transmission only)Supplemental air bag warning light
Charge warning lightMalfunction indicator lampSeat belt warning light and chime
Door open warning lightEngine oil pressure warning lightLow fuel warning light
CHECKING BULBS
With all doors closed, apply the parking
brake and turn the ignition key to the ON
position without starting the engine. The
following lights will come on:
,,or,,,
If equipped, the following lights come on
briefly and then go off:
or
If any light fails to come on, it may
indicate a burned-out bulb or an open
circuit in the electrical system. Have thesystem repaired promptly.
WARNING LIGHTS
Engine oil pressure warning
light
This light warns of low engine oil pressure. If
the light flickers or comes on during normal
driving, pull off the road in a safe area, stop
the engineimmediatelyand call an autho-
rized NISSAN dealer.
The oil pressure warning light is not
designed to indicate a low oil level. Usethe dipstick to check the oil level.See
``Engine oil'' in the ``Do-it-yourself'' section
of this manual.
CAUTION
Running the engine with the oil pres-
sure warning light on could cause seri-
ous damage to the engine almost im-
mediately. Turn off the engine as soon
as it is safe to do so.
WARNING/INDICATOR
LIGHTS AND CHIMES
Instruments and controls2-7
ZX
Page 157 of 240

8 Do-it-yourself
Maintenance precautions .......................................8-2
Engine compartment check locations -
QG engine .............................................................8-4
Engine compartment check locations -
SR engine ..............................................................8-5
Engine cooling system ...........................................8-6
Checking engine coolant level ...............................8-6
Changing engine coolant .......................................8-8
Engine oil ...............................................................8-9
Checking engine oil level .......................................8-9
Changing engine oil .............................................8-10
Changing engine oil filter .....................................8-12
Automatic transmission fluid ................................8-13
Temperature conditions for checking ...................8-14
Power steering fluid..............................................8-15
Brake fluid ............................................................8-15
Clutch fluid............................................................8-16
Window washer fluid ............................................8-16
Battery ..................................................................8-17
Jump starting ........................................................8-18
Drive belts ............................................................8-19
Spark plug ............................................................8-20Replacing spark plugs ..........................................8-20
Air cleaner ............................................................8-21
Windshield wiper blades ......................................8-22
Cleaning ...............................................................8-22
Replacing .............................................................8-22
Parking brake and brake pedal ............................8-23
Checking park brake ............................................8-23
Checking brake pedal ..........................................8-23
Brake booster .......................................................8-24
Clutch pedal .........................................................8-25
Checking clutch pedal ..........................................8-25
Fuses ....................................................................8-25
Engine compartment ............................................8-25
Passenger compartment ......................................8-27
Multi-remote controller battery replacement ........8-28
Lights ....................................................................8-29
Headlights ............................................................8-29
Fog lights (if so equipped) ...................................8-32
Exterior and interior lights ....................................8-33
Wheels and tires ..................................................8-36
Tire pressure ........................................................8-36
Types of tires........................................................8-37
ZX
Page 159 of 240
When performing any inspection or mainte-
nance work on your vehicle, always take
care to prevent serious accidental injury to
yourself or damage to the vehicle. The
following are general precautions which
should be closely observed.
WARNING
cPark the vehicle on a level surface,
apply the parking brake securely and
block the wheels to prevent the ve-
hicle from moving. For manual trans-
mission models, move the shift lever
to N (Neutral). For automatic trans-
mission models, move the shift se-
lector lever to P (Park).
cBe sure the ignition key is in the OFF
or LOCK position when performing
any parts replacement or repairs.
cYour vehicle is equipped with an
automatic engine cooling fan. It may
come on at any time without warn-
ing, even if the ignition key is in the
OFF position and the engine is not
running. To avoid injury, always dis-
connect the negative battery cable
before working near the fan.cIf you must work with the engine
running, keep your hands, clothing,
hair and tools away from moving
fans, belts and any other moving
parts.
cIt is advisable to secure or remove
any loose clothing and remove any
jewelry, such as rings, watches, etc.,
before working on your vehicle.
cAlways wear eye protection when-
ever you work on your vehicle.
cIf you must run the engine in an
enclosed space such as a garage, be
sure there is proper ventilation for
exhaust gases to escape.
cNever get under the vehicle while it
is supported only by a jack. If it is
necessary to work under the vehicle,
support it with safety stands.
cKeep smoking materials, flame and
sparks away from the fuel tank and
battery.cOn gasoline engine models with the
multiport fuel injection (MFI) system,
the fuel filter or fuel lines should be
serviced by an authorized NISSAN
dealer because the fuel lines are
under high pressure even when the
engine is off.
CAUTION
cDo not work under the hood while
the engine is hot. Turn the engine off
and wait until it cools down.
cNever connect or disconnect the bat-
tery or any transistorized compo-
nent while the ignition switch is in
the ON position.
cNever leave the engine or automatic
transmission related component
harnesses disconnected while the
ignition switch is in the ON position.
c
Avoid contact with used engine oil.
Improperly disposed engine oil
and/or other vehicle fluids can dam-
age the environment. Always con-
form to local regulations for disposal
of vehicle fluid.
MAINTENANCE
PRECAUTIONS
8-2Do-it-yourself
ZX
Page 166 of 240

4. Close the drain plugs on the radiator and
the engine block securely.
5. See the ``Technical and consumer infor-
mation'' section for cooling system ca-
pacity. Fill the radiator slowly with the
proper mixture of coolant and water. Fill
the reservoir tank up to the MAX level.
6. Open and close the air release plug(s) to
release air. Then fill the radiator again
and install the radiator cap.
7.
Start the engine, and warm it up until it
reaches normal operating temperature.
Then race the engine two or three times
under no load. Watch the engine coolant
temperature gauge for signs of overheating.
8. Stop the engine. After it completely
cools down, refill the radiator up to the
filler opening. Fill the reservoir tank up to
the MAX level.
9. Open and close the air release plug(s)
to release air. Then fill the radiator again
and install the radiator cap.
10. Check the drain plugs on the radiator
and the engine block for any sign of
leakage. Also check the air release plug
for any sign of leakage.CHECKING ENGINE OIL LEVEL
1. Park the vehicle on a level surface and
apply the parking brake.
2. Start the engine and let it idle until it
reaches operating temperature.
ADI0615DI1249MWDI0014
ENGINE OIL
Do-it-yourself8-9
ZX
Page 167 of 240
3. Turn off the engine.Wait a few minutes
for the oil to drain back into the oil
pan.
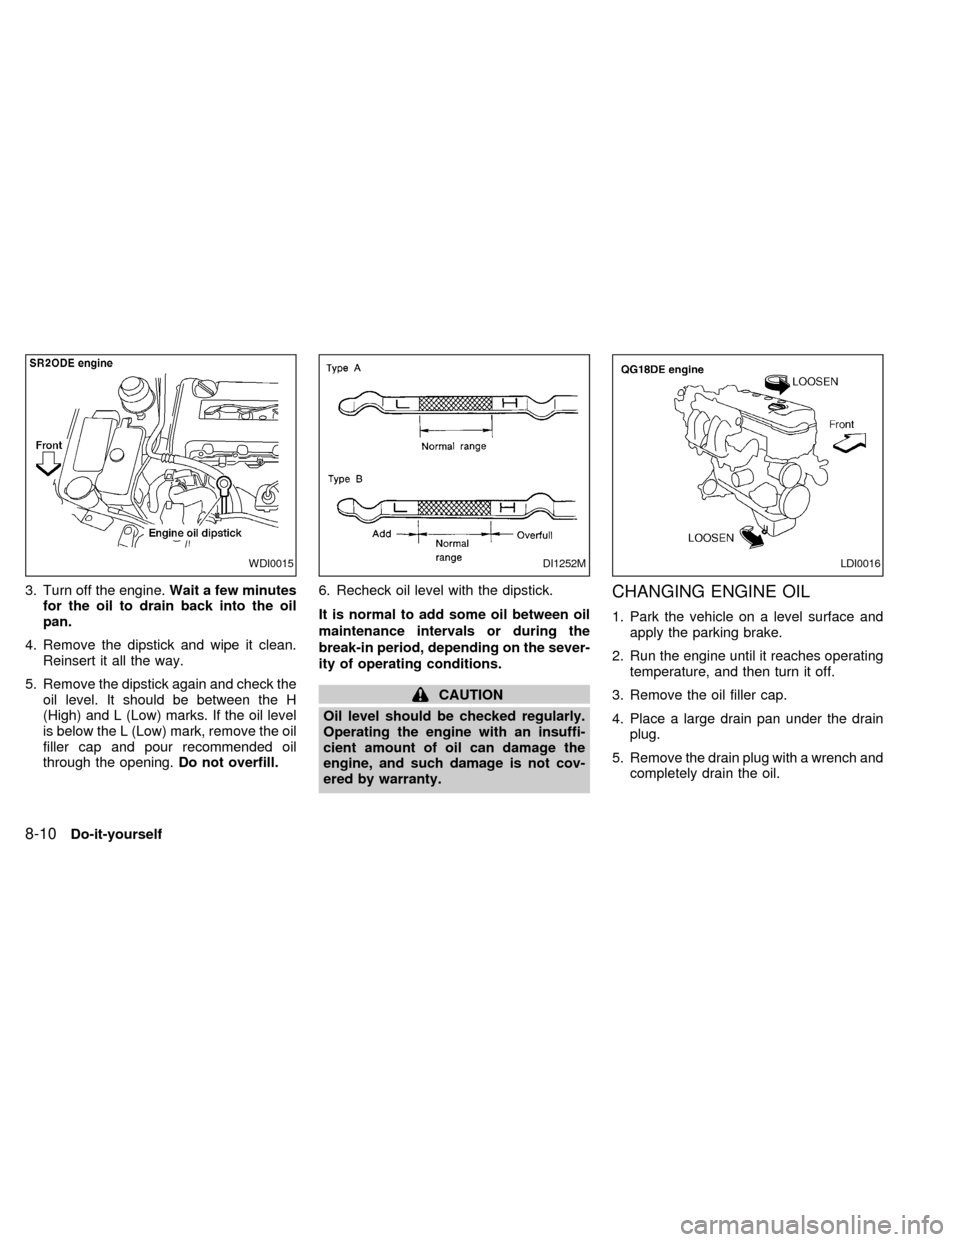
4. Remove the dipstick and wipe it clean.
Reinsert it all the way.
5. Remove the dipstick again and check the
oil level. It should be between the H
(High) and L (Low) marks. If the oil level
is below the L (Low) mark, remove the oil
filler cap and pour recommended oil
through the opening.Do not overfill.6. Recheck oil level with the dipstick.
It is normal to add some oil between oil
maintenance intervals or during the
break-in period, depending on the sever-
ity of operating conditions.
CAUTION
Oil level should be checked regularly.
Operating the engine with an insuffi-
cient amount of oil can damage the
engine, and such damage is not cov-
ered by warranty.
CHANGING ENGINE OIL
1. Park the vehicle on a level surface and
apply the parking brake.
2. Run the engine until it reaches operating
temperature, and then turn it off.
3. Remove the oil filler cap.
4. Place a large drain pan under the drain
plug.
5. Remove the drain plug with a wrench and
completely drain the oil.
WDI0015DI1252MLDI0016
8-10Do-it-yourself
ZX
Page 168 of 240
If the oil filter is to be changed, remove
and replace it at this time. See ``Chang-
ing engine oil filter'' later in this section.
CAUTION
Be careful not to burn yourself. The
engine oil may be hot.
Waste oil must be disposed of properly.
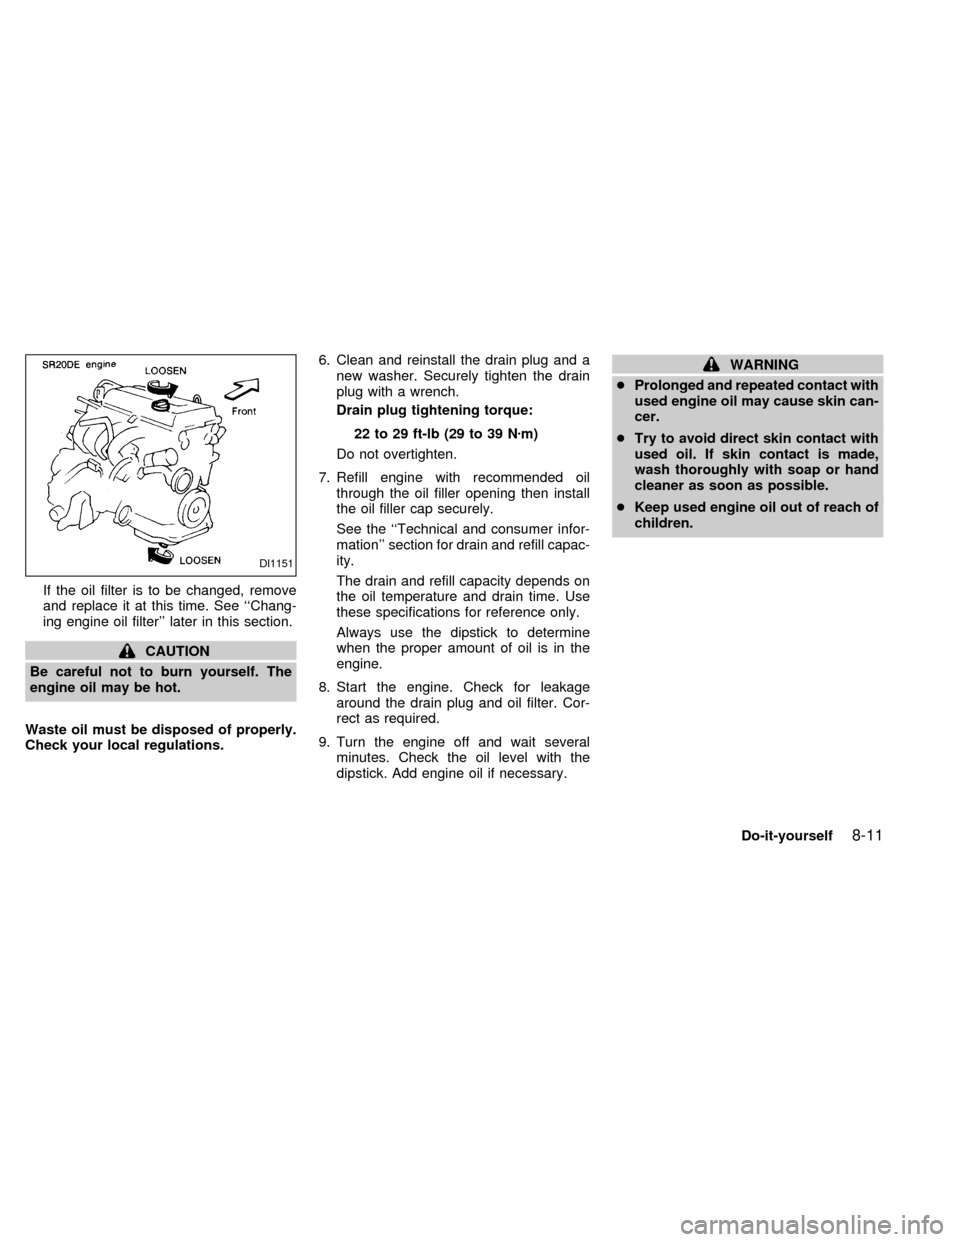
Check your local regulations.6. Clean and reinstall the drain plug and a
new washer. Securely tighten the drain
plug with a wrench.
Drain plug tightening torque:
22 to 29 ft-lb (29 to 39 Nzm)
Do not overtighten.
7. Refill engine with recommended oil
through the oil filler opening then install
the oil filler cap securely.
See the ``Technical and consumer infor-
mation'' section for drain and refill capac-
ity.
The drain and refill capacity depends on
the oil temperature and drain time. Use
these specifications for reference only.
Always use the dipstick to determine
when the proper amount of oil is in the
engine.
8. Start the engine. Check for leakage
around the drain plug and oil filter. Cor-
rect as required.
9. Turn the engine off and wait several
minutes. Check the oil level with the
dipstick. Add engine oil if necessary.
WARNING
cProlonged and repeated contact with
used engine oil may cause skin can-
cer.
cTry to avoid direct skin contact with
used oil. If skin contact is made,
wash thoroughly with soap or hand
cleaner as soon as possible.
cKeep used engine oil out of reach of
children.
DI1151
Do-it-yourself8-11
ZX
Page 169 of 240
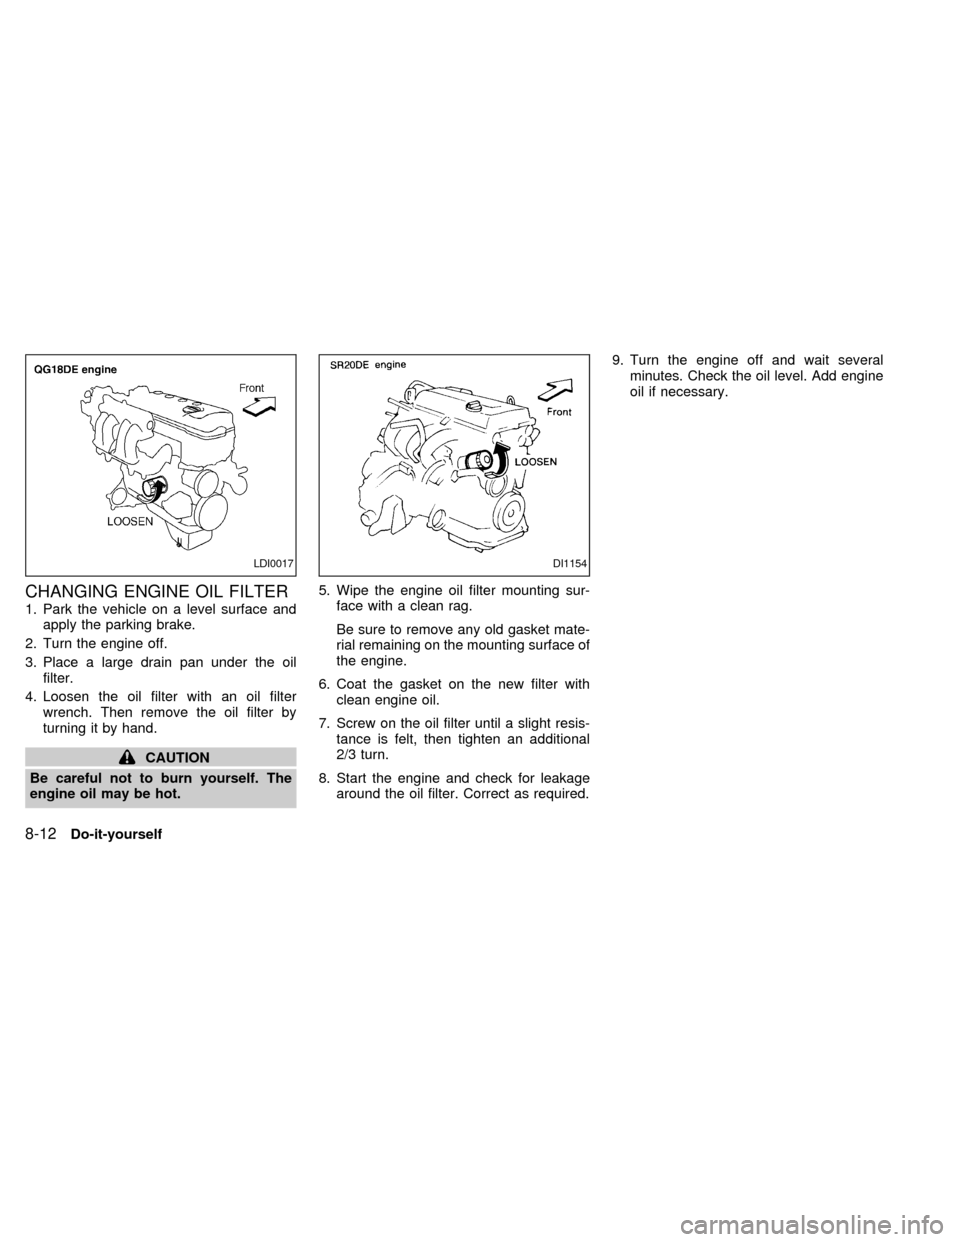
CHANGING ENGINE OIL FILTER
1. Park the vehicle on a level surface and
apply the parking brake.
2. Turn the engine off.
3. Place a large drain pan under the oil
filter.
4. Loosen the oil filter with an oil filter
wrench. Then remove the oil filter by
turning it by hand.
CAUTION
Be careful not to burn yourself. The
engine oil may be hot.5. Wipe the engine oil filter mounting sur-
face with a clean rag.
Be sure to remove any old gasket mate-
rial remaining on the mounting surface of
the engine.
6. Coat the gasket on the new filter with
clean engine oil.
7. Screw on the oil filter until a slight resis-
tance is felt, then tighten an additional
2/3 turn.
8. Start the engine and check for leakage
around the oil filter. Correct as required.9. Turn the engine off and wait several
minutes. Check the oil level. Add engine
oil if necessary.
LDI0017DI1154
8-12Do-it-yourself
ZX
Page 187 of 240

Adjusting the headlight aim
Before performing aiming adjustment, make
sure of the following:
a. Use an aiming wall screen.
b. Keep all of the tires inflated to the correct
pressure.
c. Place the vehicle and screen on level
ground.
d. See that the vehicle is unloaded (except
for full levels of coolant, engine oil and
fuel, and that the spare tire, jack, and
tools are stored). Have the driver or anequivalent weight placed in the driver's
seat.
1. Open the hood. Turn headlamp low
beam on.
2. Adjust the vertical aim by turning the
adjustment screw.
cCover the opposite lamp and ensure the
fog lamps (if so equipped) are turned off.
cAdjust beam pattern until cutoff line is
positioned at the same height off ground
as bulb center (on H-line).
LDI0027
8-30Do-it-yourself
ZX