Page 39 of 240
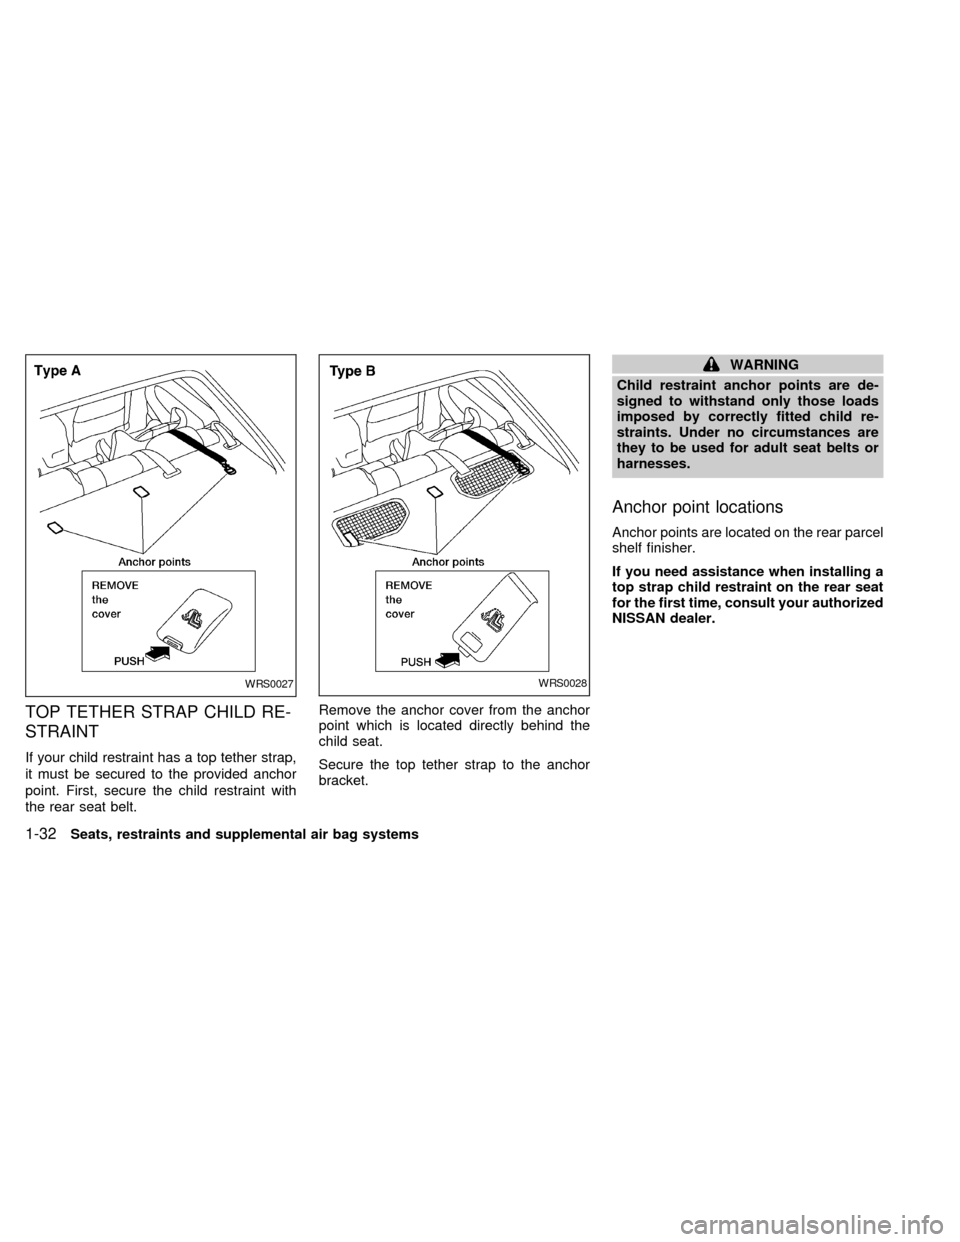
TOP TETHER STRAP CHILD RE-
STRAINT
If your child restraint has a top tether strap,
it must be secured to the provided anchor
point. First, secure the child restraint with
the rear seat belt.Remove the anchor cover from the anchor
point which is located directly behind the
child seat.
Secure the top tether strap to the anchor
bracket.
WARNING
Child restraint anchor points are de-
signed to withstand only those loads
imposed by correctly fitted child re-
straints. Under no circumstances are
they to be used for adult seat belts or
harnesses.
Anchor point locations
Anchor points are located on the rear parcel
shelf finisher.
If you need assistance when installing a
top strap child restraint on the rear seat
for the first time, consult your authorized
NISSAN dealer.
WRS0027WRS0028
1-32Seats, restraints and supplemental air bag systems
ZX
Page 40 of 240
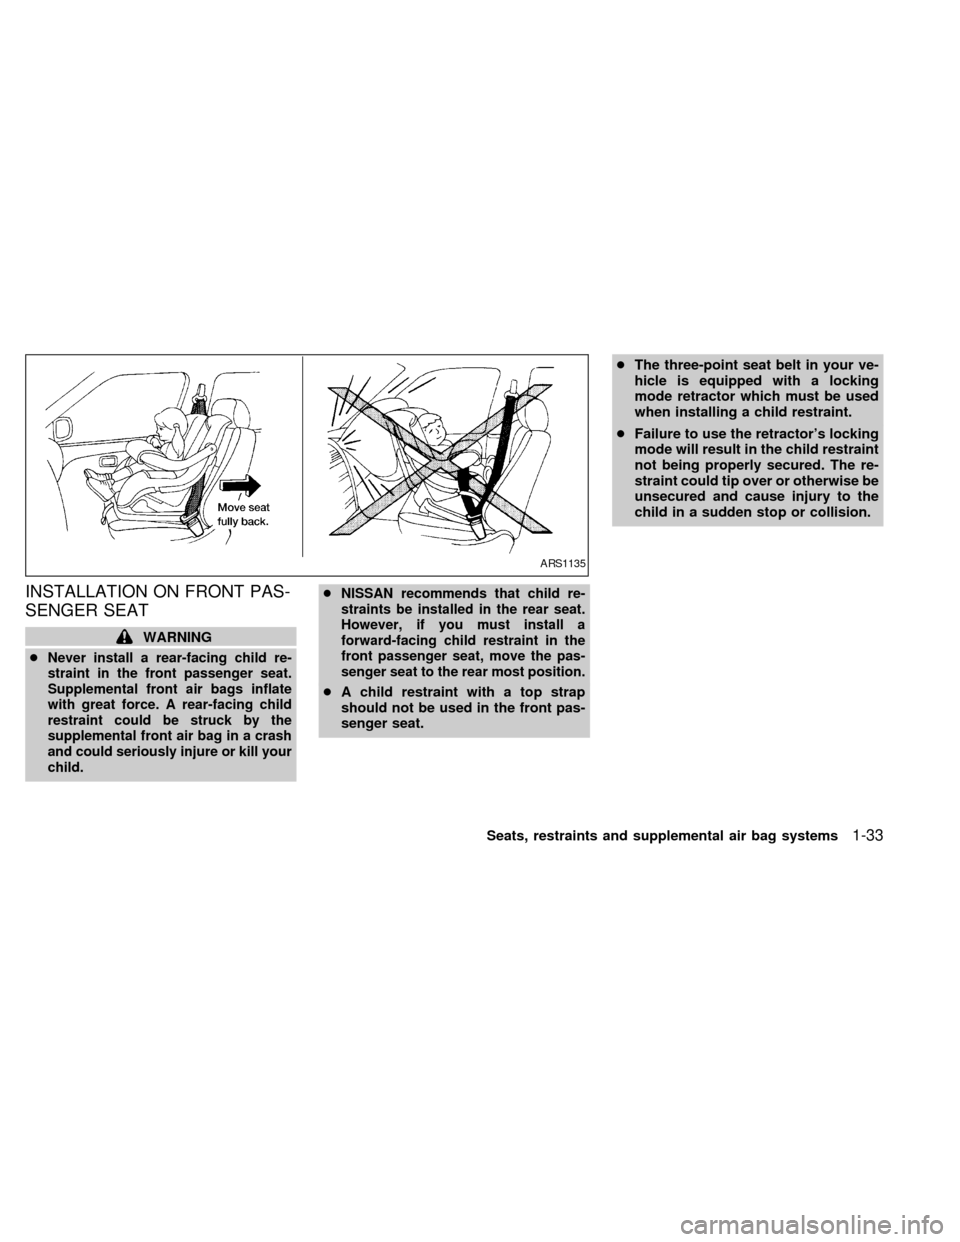
INSTALLATION ON FRONT PAS-
SENGER SEAT
WARNING
c
Never install a rear-facing child re-
straint in the front passenger seat.
Supplemental front air bags inflate
with great force. A rear-facing child
restraint could be struck by the
supplemental front air bag in a crash
and could seriously injure or kill your
child.cNISSAN recommends that child re-
straints be installed in the rear seat.
However, if you must install a
forward-facing child restraint in the
front passenger seat, move the pas-
senger seat to the rear most position.
cA child restraint with a top strap
should not be used in the front pas-
senger seat.cThe three-point seat belt in your ve-
hicle is equipped with a locking
mode retractor which must be used
when installing a child restraint.
cFailure to use the retractor's locking
mode will result in the child restraint
not being properly secured. The re-
straint could tip over or otherwise be
unsecured and cause injury to the
child in a sudden stop or collision.
ARS1135
Seats, restraints and supplemental air bag systems1-33
ZX
Page 41 of 240
If you must install a child restraint in the front
seat, follow these steps:
1. Position the child restraint on the front
passenger seat.It should be placed in
a front facing direction only.Move the
seat to the rearmost position. Always
follow the restraint manufacturer's in-
structions.Child restraints for infants
must be used in the rear facing direc-
tion and therefore must not be used in
the front seat.2. Route the seat belt tongue through the
child restraint and insert it into the buckle
until you hear and feel the latch engage.
Be sure to follow the child restraint manu-
facturer's instructions for belt routing.3. Pull on the shoulder belt until all of the
belt is fully extended. At this time, the
seat belt retractor is in the automatic
locking mode (child restraint mode). It
reverts back to emergency locking mode
when the seat belt is fully retracted.
WRS0019WRS0044WRS0045
1-34Seats, restraints and supplemental air bag systems
ZX
Page 42 of 240
4.Allow the seat belt to retract slightly. Pull
up on the seat belt to remove any slack in
the belt.5. Before placing the child in the child re-
straint, use force to tilt the child restraint
from side to side, and tug it forward to
make sure it is securely held in place.
6.
Check that the retractor is in the automatic
locking mode by trying to pull more seat
belt out of the retractor. If you cannot pull
any more belt webbing out of the retractor,
the seat belt is in the automatic locking
mode.
7. Check to make sure the child restraint is
properly secured prior to each use. If the
lap belt is not locked, repeat steps three
through six.After the child restraint is removed and the
seat belt is fully retracted, the automatic
locking mode (child restraint mode) is can-
celed.
WRS0046WRS0047
Seats, restraints and supplemental air bag systems1-35
ZX
Page 43 of 240
MEMO
1-36Seats, restraints and supplemental air bag systems
ZX
Page 51 of 240
Charge warning light
If the light comes on while the engine is
running, it may indicate a problem with the
charging system. Turn the engine off and
check the generator belt. If the belt is loose,
broken, or missing, or if the light remains on,
see an authorized NISSAN dealer immedi-
ately.
CAUTION
Do not continue driving if the generator
belt is loose, broken or missing.
Door open warning light
This light comes on when any of the doors
are not closed securely while the ignition
key is ON.
Seat belt warning light and
chime
The light and chime remind you to fasten
the seat belts. The light illuminates and the
chime sounds (for about five seconds)
whenever the ignition key is turned to the
ON position, and the light remains illumi-
nated until the driver's seat belt is fastened.Refer to ªSeat beltsº in the ªSeats, restraints
and supplemental air bag systemsº section
for precautions on seat belt usage.
Supplemental air bag
warning light
When the ignition key is in the ON or START
position, the supplemental air bag warning
light illuminates for about 7 seconds and
then turns off. This means the system is
operational.
If any of the following conditions occur, the
supplemental air bag and supplemental
side air bag need servicing and your vehicle
must be taken to an authorized NISSAN
dealer:
cThe supplemental air bag warning light
remains on after approximately 7 sec-
onds.
cThe supplemental air bag warning light
flashes intermittently.
cThe supplemental air bag warning light
does not come on at all.
Unless checked and repaired, the supple-
mental restraint system may not function
properly. For additional details see ``Supple-
mental restraint system'' in the ``Seats, re-straints and supplemental air bag systems''
section of this manual.
WARNING
If the supplemental air bag warning
light is on, it could mean that the
supplemental front air bag or supple-
mental side air bag system (if so
equipped) will not operate in an acci-
dent.
Low washer fluid warning
light (Canada only)
This light comes on when the washer fluid is
at a low level. Add washer fluid as necessary.
See the ``Do-it-yourself'' section of this
manual.
orBrake warning light
This light functions for both the parking
brake and the foot brake systems.
When the ignition key is in the ON position,
the light comes on when the parking brake
is applied, and also warns of a low brake
fluid level. If the light comes on while the
engine is running with the parking brake not
applied, stop the vehicle and perform the
following:
2-8Instruments and controls
ZX
Page 116 of 240
WARNING
c
The exhaust gas and the exhaust sys-
tem are very hot. Keep people, ani-
mals or flammable materials away
from the exhaust system compo-
nents.
cDo not stop or park the vehicle over
flammable materials such as dry
grass, waste paper or rags. They
may ignite and cause a fire.
CAUTION
c
Do not use leaded gasoline. Deposits
from leaded gasoline seriously re-
duce the three-way catalyst's ability
to help reduce exhaust pollutants.
cKeep your engine tuned up. Malfunc-
tions in the ignition, fuel injection, or
electrical systems can cause over-
rich fuel flow into the three-way cata-
lyst, causing it to overheat. Do not
keep driving if the engine misfires,
or if noticeable loss of performance
or other unusual operating condi-
tions are detected. Have the vehicleinspected promptly by an authorized
NISSAN dealer.
cAvoid driving with an extremely low
fuel level. Running out of fuel could
cause the engine to misfire, damag-
ing the three-way catalyst.
cDo not race the engine while warm-
ing it up.
cDo not push or tow your vehicle to
start the engine.
AVOIDING COLLISION AND
ROLLOVER
WARNING
Failure to operate this vehicle in a safe
and prudent manner may result in loss
of control or an accident.
Be alert and drive defensively at all times.
Obey all traffic regulations. Avoid excessive
speed, high speed cornering, or sudden
steering maneuvers, because these driving
practices could cause you to lose control of
your vehicle.As with any vehicle, loss of
control could result in a collision withother vehicles or objects, or cause the
vehicle to rollover, particularly if the loss
of control causes the vehicle to slide
sideways.Be attentive at all times, and
avoid driving when tired. Never drive when
under the influence of alcohol or drugs
(including prescription or over-the-counter
drugs which may cause drowsiness). Al-
ways wear your seat belt as outlined in the
``Seats, restraints and supplemental air bag
systems'' section of this manual, and also
instruct your passengers to do so.
DRINKING ALCOHOL/DRUGS
AND DRIVING
WARNING
Never drive under the influence of alco-
hol or drugs. Alcohol in the bloodstream
reduces coordination, delays reaction
time and impairs judgement. Driving after
drinking alcohol increases the likelihood
of being involved in an accident injuring
yourself and others. Additionally, if you
are injured in an accident, alcohol can
increase the severity of injury.
NISSAN is committed to safe driving. How-
ever, you must choose not to drive under
Starting and driving
5-3
ZX
Page 153 of 240
Occasionally remove loose dust from the
interior trim, plastic parts and seats using a
vacuum cleaner or soft brush. Wipe the
vinyl and leather surfaces with a clean, soft
cloth dampened in mild soap solution, then
wipe clean with a dry soft cloth. Before
using any fabric protector, read the manu-
facturer's recommendations. Some fabric
protectors contain chemicals that may stain
or bleach the seat material. Use a cloth
dampened only with water, to clean the
meter and gauge lens.
CAUTION
cNever use benzine, thinner, or any
similar material.
cNever use fabric protectors unless
recommended by the manufacturer.
cDo not use glass or plastic cleaner
on meter or gauge lens covers. It
may damage the lens cover.
Floor mats
The use of genuine NISSAN floor mats can
extend the life of your vehicle carpet and
make it easier to clean the interior.No
matter what mats are used, be sure theyare fitted for your vehicle and are prop-
erly positioned in the footwell to prevent
interference with pedal operation.Mats
should be maintained with regular cleaning
and replaced if they become excessively
worn.
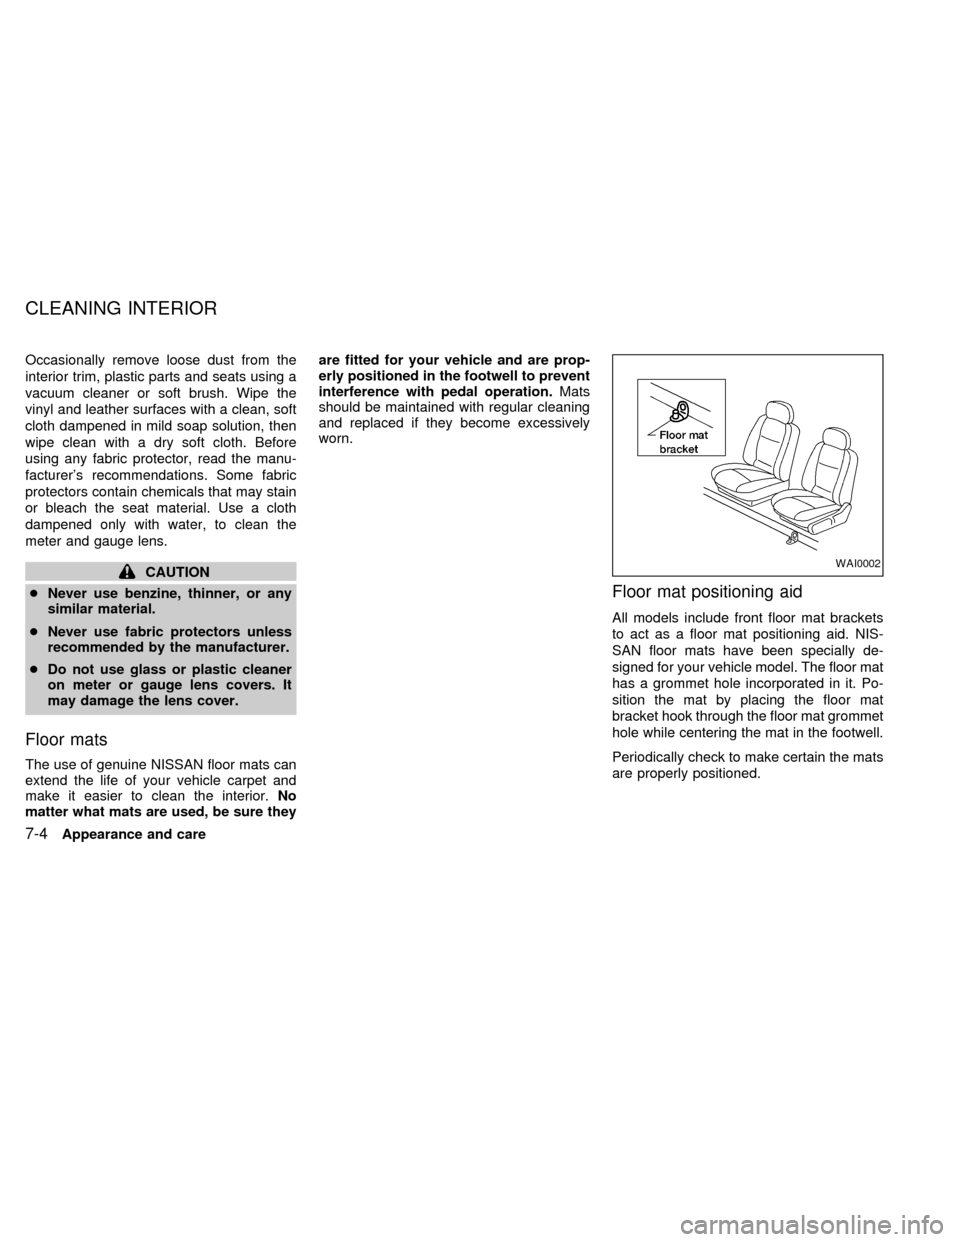
Floor mat positioning aid
All models include front floor mat brackets
to act as a floor mat positioning aid. NIS-
SAN floor mats have been specially de-
signed for your vehicle model. The floor mat
has a grommet hole incorporated in it. Po-
sition the mat by placing the floor mat
bracket hook through the floor mat grommet
hole while centering the mat in the footwell.
Periodically check to make certain the mats
are properly positioned.
WAI0002
CLEANING INTERIOR
7-4Appearance and care
ZX