2000 NISSAN QUEST air filter
[x] Cancel search: air filterPage 144 of 292

WARNING
cThe air conditioner cooling function
operates only when the engine is
running.
cDo not leave children, impaired
adults, or pets alone in your vehicle.
On hot, sunny days, temperatures in
a closed vehicle could quickly be-
come high enough to cause severe
or possibly fatal injuries to people or
animals.
cDo not use the recirculation mode
for long periods as it may cause the
interior air to become stale and the
windows to fog up.
cPositioning of the heater and air con-
ditioner controls should not be done
while driving so full attention may be
given to vehicle operation.
The cabin air filter (if so equipped) requires
periodic maintenance. See the ``Do it your-
self'' section for additional information.
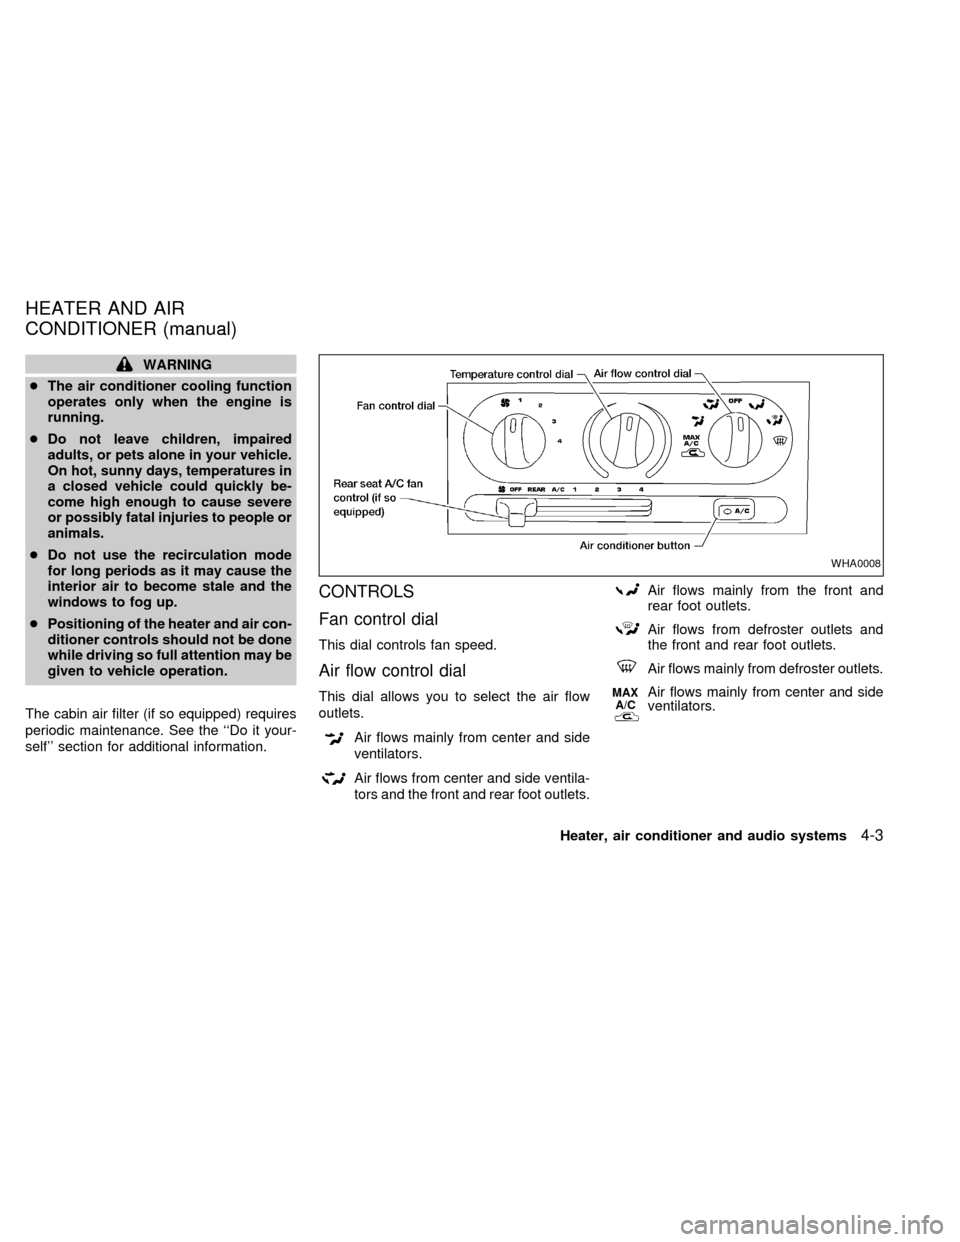
CONTROLS
Fan control dial
This dial controls fan speed.
Air flow control dial
This dial allows you to select the air flow
outlets.
Air flows mainly from center and side
ventilators.
Air flows from center and side ventila-
tors and the front and rear foot outlets.
Air flows mainly from the front and
rear foot outlets.
Air flows from defroster outlets and
the front and rear foot outlets.
Air flows mainly from defroster outlets.
MAX
A/CAir flows mainly from center and side
ventilators.
WHA0008
HEATER AND AIR
CONDITIONER (manual)
Heater, air conditioner and audio systems4-3
ZX
Page 152 of 292

WARNING
cThe air conditioner cooling function
operates only when the engine is
running.
cDo not leave children, impaired
adults, or pets alone in your vehicle.
On hot, sunny days, temperatures in
a closed vehicle could quickly be-
come high enough to cause severe
or possibly fatal injuries to people or
animals.
cDo not use the recirculation mode
for long periods as it may cause theinterior air to become stale and the
windows to fog up.
cPositioning of the heater and air con-
ditioner controls should not be done
while driving so full attention may be
given to vehicle operation.
The cabin air filter (if so equipped) requires
periodic maintenance. See the ``Do it your-
self'' section for additional information.
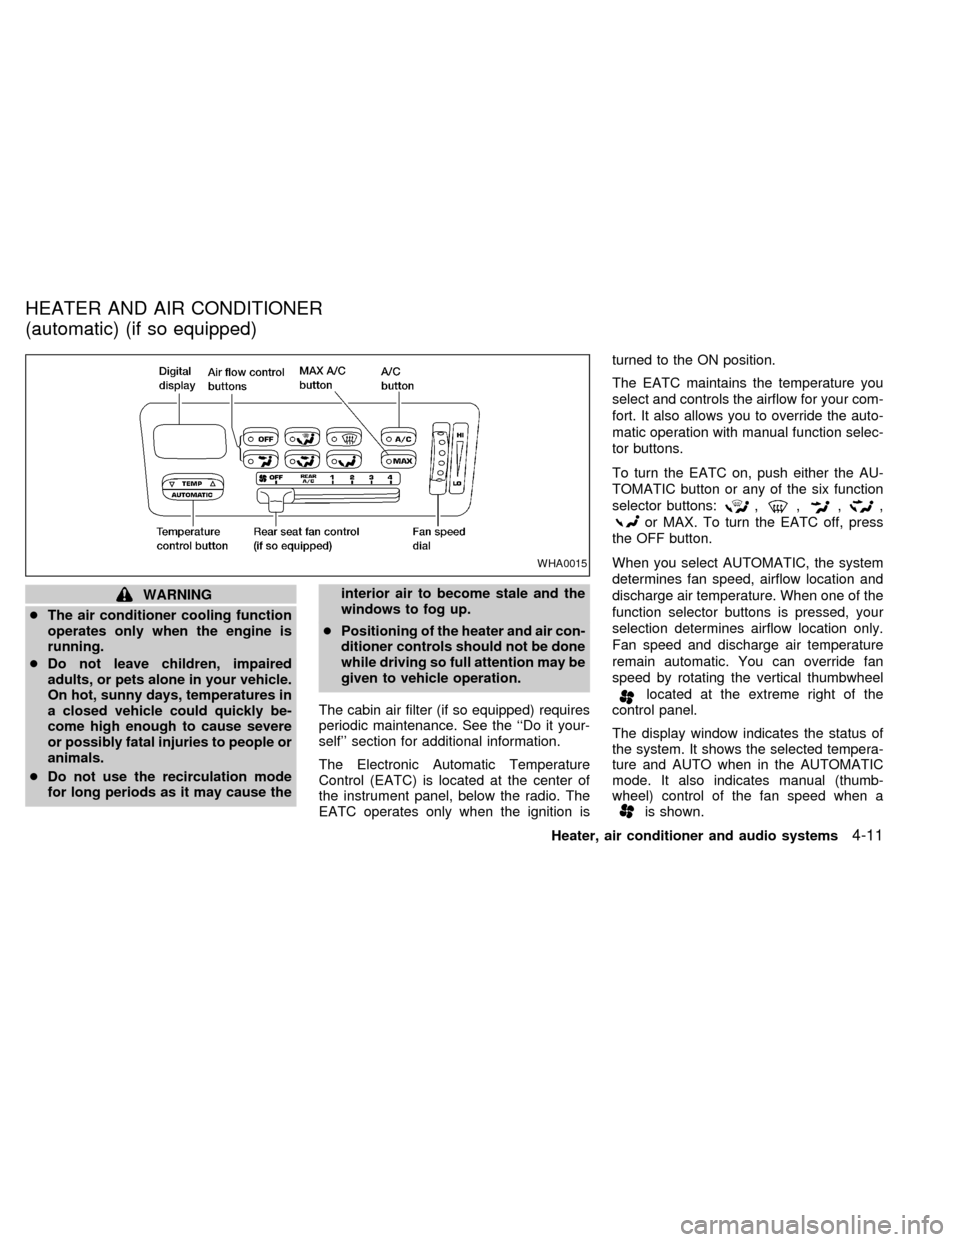
The Electronic Automatic Temperature
Control (EATC) is located at the center of
the instrument panel, below the radio. The
EATC operates only when the ignition isturned to the ON position.
The EATC maintains the temperature you
select and controls the airflow for your com-
fort. It also allows you to override the auto-
matic operation with manual function selec-
tor buttons.
To turn the EATC on, push either the AU-
TOMATIC button or any of the six function
selector buttons:
,,,,
or MAX. To turn the EATC off, press
the OFF button.
When you select AUTOMATIC, the system
determines fan speed, airflow location and
discharge air temperature. When one of the
function selector buttons is pressed, your
selection determines airflow location only.
Fan speed and discharge air temperature
remain automatic. You can override fan
speed by rotating the vertical thumbwheel
located at the extreme right of the
control panel.
The display window indicates the status of
the system. It shows the selected tempera-
ture and AUTO when in the AUTOMATIC
mode. It also indicates manual (thumb-
wheel) control of the fan speed when a
is shown.
WHA0015
HEATER AND AIR CONDITIONER
(automatic) (if so equipped)
Heater, air conditioner and audio systems4-11
ZX
Page 216 of 292

8 Do-it-yourself
Maintenance precautions .......................................8-2
Engine compartment check locations ....................8-3
Engine cooling system ...........................................8-4
Checking engine coolant level ...............................8-4
Changing engine coolant .......................................8-5
Engine oil ...............................................................8-5
Checking engine oil level .......................................8-5
Changing engine oil ...............................................8-6
Changing engine oil filter .......................................8-7
Automatic transmission fluid ..................................8-8
Temperature conditions for checking .....................8-8
Power steering fluid................................................8-9
Brake fluid ..............................................................8-9
Window washer fluid ............................................8-10
Battery ..................................................................8-10
Jump starting ........................................................8-11
Drive belts ............................................................8-12
Spark plugs ..........................................................8-12
Replacing spark plugs ..........................................8-12
Air cleaner ............................................................8-13Cabin air filter .......................................................8-14
Windshield wiper blades ......................................8-17
Cleaning ...............................................................8-17
Replacing .............................................................8-17
Parking brake and brake pedal ............................8-19..........................................8-19
Checking parking brake .......................................8-19
Checking brake pedal ..........................................8-19
Brake booster .......................................................8-20
Fuses ....................................................................8-20
Engine compartment ............................................8-20
Passenger compartment ......................................8-21
Multi-remote controller battery replacement ........8-22
Lights ....................................................................8-23
Headlights ............................................................8-23
Exterior and interior lights ....................................8-24
Wheels and tires ..................................................8-28
Tire pressure ........................................................8-28
Types of tires........................................................8-29
Tire chains ............................................................8-30
Changing tires and wheels...................................8-30
ZX
Page 217 of 292

When performing any inspection or mainte-
nance work on your vehicle, always take
care to prevent serious accidental injury to
yourself or damage to the vehicle. The
following are general precautions which
should be closely observed.
WARNING
cPark the vehicle on a level surface,
apply the parking brake securely and
block the wheels to prevent the ve-
hicle from moving. Move the gear-
shift lever to P (park).
cBe sure the ignition key is in the OFF
or Lock position when performing
any parts replacement or repairs.
cYour vehicle is equipped with an
automatic engine cooling fan. It may
come on at any time without warn-
ing, even if the ignition key is in the
OFF position and the engine is not
running. To avoid injury, always dis-
connect the negative battery cable
before working near the fan.
c
If you must work with the engine run-
ning, keep your hands, clothing, hair
and tools away from moving fans,
belts and any other moving parts.
cIt is advisable to secure or remove
any loose clothing and remove any
jewelry, such as rings, watches, etc.
before working on your vehicle.
cAlways wear eye protection when-
ever you work on your vehicle.
cIf you must run the engine in an
enclosed space such as a garage, be
sure there is proper ventilation for
exhaust gases to escape.
cNever get under the vehicle while it
is supported only by a jack. If it is
necessary to work under the vehicle,
support it with safety stands.
cKeep smoking materials, flame and
sparks away from the fuel tank and
battery.
cOn gasoline engine models with the
multiport fuel injection (MFI) system,
the fuel filter or fuel lines should be
serviced by an authorized NISSAN
dealer because the fuel lines are
under high pressure even when the
engine is off.CAUTION
cDo not work under the hood while
the engine is hot. Turn off the engine
and wait until it cools down.
cNever connect or disconnect the bat-
tery or any transistorized compo-
nent while the ignition switch is in
the ON position.
cAvoid contact with used engine oil.
Improperly disposed motor oil and/
or other vehicle fluids can damage
the environment. Always conform to
local regulations for disposal of ve-
hicle fluid.
This ``Do-it-yourself'' section gives instruc-
tions regarding only those items which are
relatively easy for an owner to perform.
You should be aware that incomplete or
improper servicing may result in operating
difficulties or excessive emissions, and
could affect your warranty coverage.If in
doubt about any servicing, have it done
by an authorized NISSAN dealer.
MAINTENANCE
PRECAUTIONS
8-2Do-it-yourself
ZX
Page 228 of 292

Platinum-tipped spark plugs
It is not necessary to replace platinum-
tipped spark plugs as frequently as conven-
tional type spark plugs because they last
much longer. Follow the maintenance
schedule, but do not reuse the spark plugs
by cleaning or regapping.
cAlways replace spark plugs with rec-
ommended or equivalent ones.
1. Disconnect the spark plug cables from
the spark plugs.
When disconnecting, always hold the boots,
not the cables.2. Remove the spark plugs with a spark
plug socket. The plug socket has a rub-
ber seal that holds the spark plug so it
does not fall when it is pulled out. Make
sure each spark plug is snugly fitted into
the plug socket.
3. Fit the new plugs, one at a time, into the
spark plug socket and install them.Use
only the specified spark plugs.Turn
each plug several full turns by hand, then
tighten with the spark plug socket to the
correct torque. Do not overtighten.
Spark plug tightening torque:
14 to 22 ft-lb (20 to 29 Nzm)
4. Holding the boot, re-connect each high
tension cable to its proper spark plug by
pushing it on until you feel a snap.The filter should not be cleaned and reused.
Replace it according to the maintenance
intervals shown in the ``Maintenance'' sec-
tion of this manual. When replacing the
filter, unclip the four clamps and remove the
filter. Wipe the inside of the air cleaner
housing and the cover with a damp cloth
when replacing filter.
ADI1100ADI0579
AIR CLEANER
Do-it-yourself8-13
ZX
Page 229 of 292

WARNING
cOperating the engine with the air
cleaner removed can cause you or
others to be burned. The air cleaner
not only cleans the air, it stops flame
if the engine backfires. If it isn't there
and the engine backfires, you could
be burned. Do not drive with the air
cleaner removed, and be careful
when working on the engine with the
air cleaner removed.
cNever pour fuel into the throttle body
or attempt to start the engine with
the air cleaner removed. Doing so
could result in serious injury.
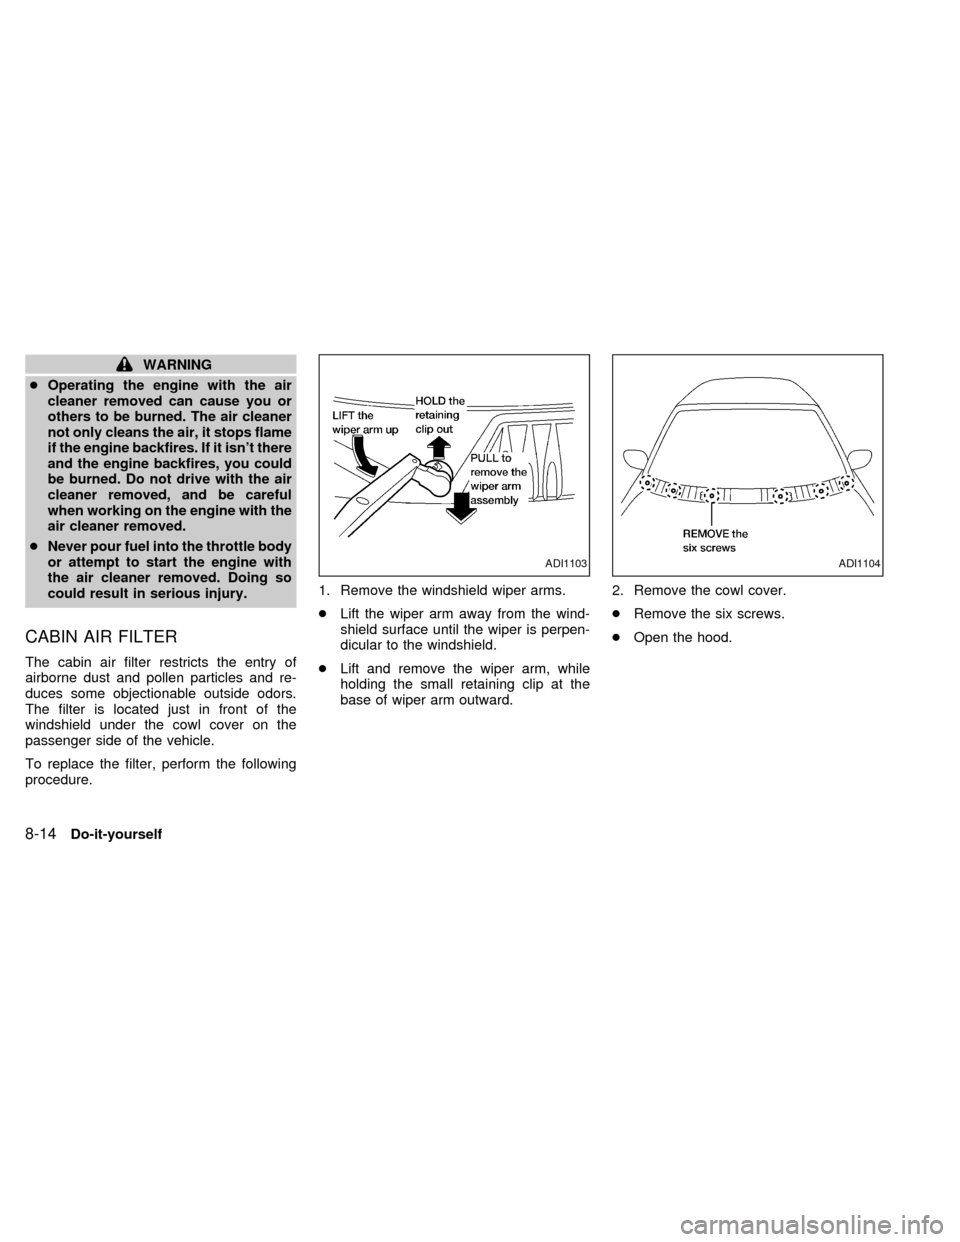
CABIN AIR FILTER
The cabin air filter restricts the entry of
airborne dust and pollen particles and re-
duces some objectionable outside odors.
The filter is located just in front of the
windshield under the cowl cover on the
passenger side of the vehicle.
To replace the filter, perform the following
procedure.1. Remove the windshield wiper arms.
cLift the wiper arm away from the wind-
shield surface until the wiper is perpen-
dicular to the windshield.
cLift and remove the wiper arm, while
holding the small retaining clip at the
base of wiper arm outward.2. Remove the cowl cover.
cRemove the six screws.
cOpen the hood.
ADI1103ADI1104
8-14Do-it-yourself
ZX
Page 230 of 292

cRemove the four plastic screws from the
forward edge of the cowl cover.
cRemove the four plastic screw anchors.cDisconnect the windshield washer hose
at the passenger side rear corner of the
engine compartment.
cPush the windshield washer hose and
the grommet through the sheet metal
hole.
cLift the cowl cover and remove it from
the vehicle.3. Locate the cabin air filter on the passen-
ger side of the vehicle.
cRemove the four screws from the cabin
air filter cover.
cRemove the cabin air filter cover.
ADI1105ADI1106ADI1107
Do-it-yourself8-15
ZX
Page 231 of 292

cRemove the cabin air filter element by
pulling forward on the top surface of the
filter and lifting.4. Install the new cabin air filter element
into the filter retaining frame, ensure that
you insert the three retaining tabs in the
bottom of the filter frame.
5. Install the filter top cover and the four
screws.
6. Feed the windshield washer hose from
the cowl cover through the hole in the
sheet metal.
cEnsure that you fully seat the rubber
grommet into the sheet metal hole.
7. Reconnect the windshield washer hose.8. Position the cowl cover in place.
9. Reinstall the four screw anchors and the
four screws.
10. Close the hood.
11. Install the six screws in the cowl cover.
12. Install the windshield wiper arms.
cPush the wiper arm downward onto the
wiper arm pivot until the small retaining
clip snaps into the locked position.
cLower the wiper arm blade onto the
windshield surface.
ADI1108ADI1109
8-16Do-it-yourself
ZX