2000 NISSAN QUEST heater
[x] Cancel search: heaterPage 173 of 292
CAUTION
cDuring cold weather or rainy days,
the player may malfunction due to
the humidity. If this occurs, remove
the CD and dehumidify or ventilate
the player completely.
cThe player may skip while driving on
rough roads.
cThe CD player sometimes cannot
function when the passenger com-
partment temperature is extremely
high. Decrease the temperature be-
fore use.
cDo not expose the CD to direct sun-
light.
cDo not touch the playing surface of
the disc.
cDo not use 8cm discs. They may
cause player damage even if using
with the optional adapter.
cRecordable compact discs (CD-R)
may not function properly in the CD
player.
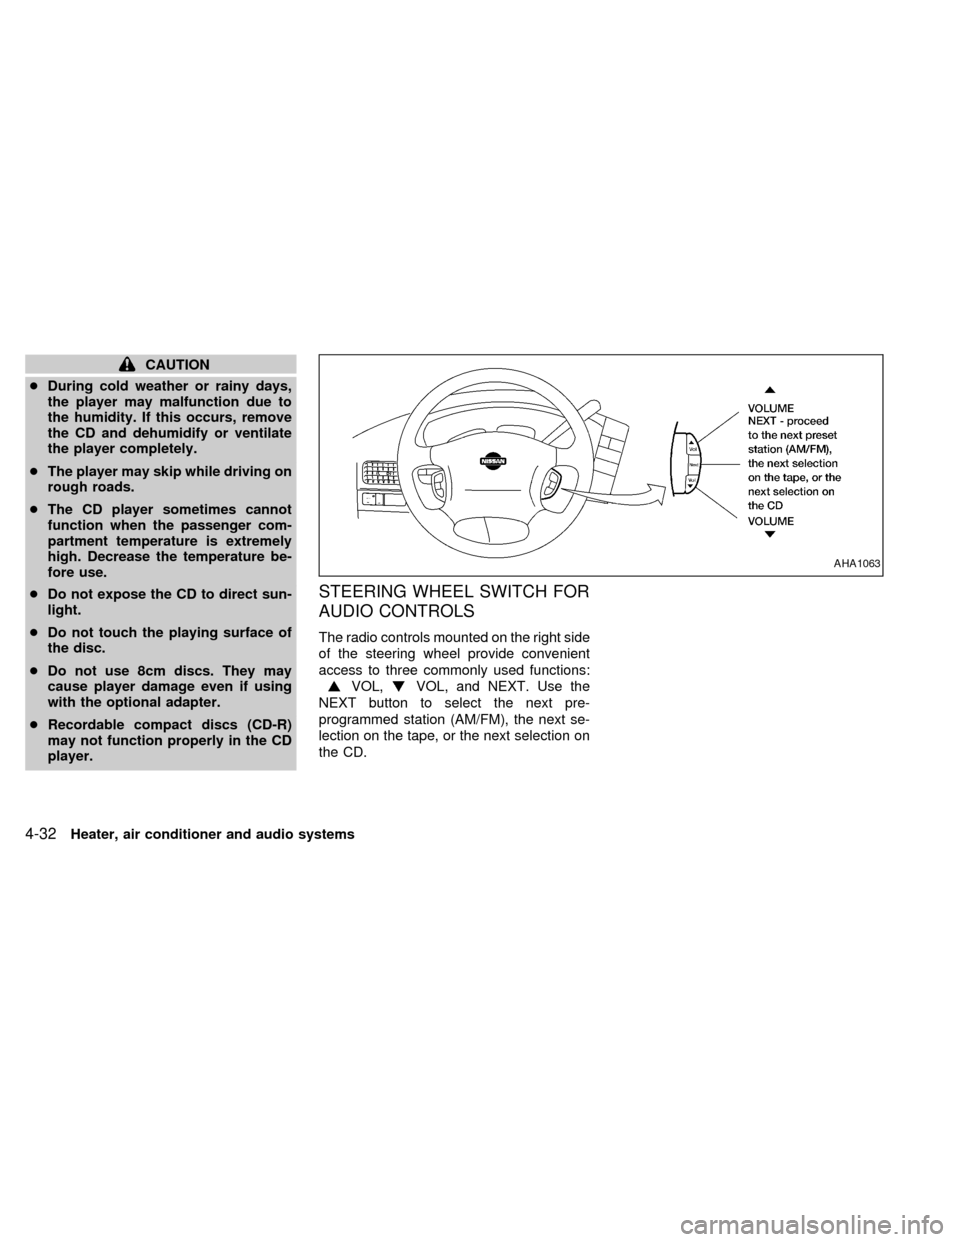
STEERING WHEEL SWITCH FOR
AUDIO CONTROLS
The radio controls mounted on the right side
of the steering wheel provide convenient
access to three commonly used functions:
VOL,VOL, and NEXT. Use the
NEXT button to select the next pre-
programmed station (AM/FM), the next se-
lection on the tape, or the next selection on
the CD.
AHA1063
4-32Heater, air conditioner and audio systems
ZX
Page 174 of 292

REAR AUDIO CONTROLS (if so
equipped)
Radio features controlled by the rear seat
remote control (if so equipped) are listed
below:cVolume: þ/+
cMedia select: AM/FM, tape, CD, or CD
changer.
cSpeakers ON/OFFcMem: proceed to the next preset station
(AM/FM).
cSeek:bc
Push the Memory three and Memory five
buttons on the front radio controls simulta-
neously to turn the rear controls on. Push
them again to turn the rear audio controls off.
The(headphones symbol) illuminates
in the front display when the rear audio
controls are on. Two headphone jacks are
provided so two rear seat passengers may
listen to the audio system privately.
The rear volume controls can only increase
the volume to the level at which the front
radio volume control is set.
Headphones are not included with the ve-
hicle. Most portable radio headphones work
with the rear audio controls.
For vehicles equipped with the premium
FM-AM radio with cassette player, compact
disc player and 6 disc CD player, if the rear
passengers turn off the rear speakers and
are using headphones they may choose to
listen to a different media than the front
passengers. The rear passengers can listen
to the radio while the front passengers can
listen to the same thing, a cassette tape,
AHA1060
Heater, air conditioner and audio systems4-33
ZX
Page 175 of 292

CD, or the CD changer. The radio will go
into DUAL PLAY mode and the rear pas-
sengers can use the rear controls to change
media.
VOLUME button
The VOLUME button allows the rear pas-
sengers to adjust the headphone volume
level.
MEDIA button
The MEDIA button allows the rear passen-
ger to change between AM, FM1, FM2,
TAPE, CD, & CD DJ.
MEM button
In AM, FM1, or FM2 mode the MEM button
allows the rear passenger to successively
access memory preset station 1 through 6.
In CD DJ mode the MEM button allows the
rear passengers to select other compact
discs in the CD changer.
SEEK button
In AM, FM1, or FM2 mode the SEEKandbutton allows the rear pas-
sengers to find the next radio station up or
down the station band frequency.In TAPE mode the SEEK
and
button allows the rear passengers use Au-
tomatic Music Search (AMS) to find the next
or previous song on the cassette.
In CD mode the SEEK
andbutton
allows the rear passengers to find the next
or previous selection on the CD.
In CD DJ mode the SEEK
andbutton allows the rear passengers to find
the next or previous selection on the CD.
For vehicles equipped with the FM-AM radio
with cassette player, when the rear seat
controls are on, push the SPKRS ON-OFF
button to turn all speakers off. Push again to
turn all speakers on.
For vehicles equipped with the premium
FM-AM radio with cassette player, compact
disc player and 6 disc CD player, when the
rear seat controls are on, push the SPKRS
ON-OFF button to turn the rear speakers
off. Push again to turn the rear speakers on.
If the rear audio system was on when the
ignition was turned OFF, the audio system
``remembers'' and the rear system is still on
when the engine is started again. The sys-
tem also ``remembers'' if the speakers were
ON or OFF. Therefore, the speakers mayhave to be turned on again by pressing the
SPKRS ON-OFF button or turning the rear
audio controls off.
4-34Heater, air conditioner and audio systems
ZX
Page 176 of 292
CD CARE AND CLEANING
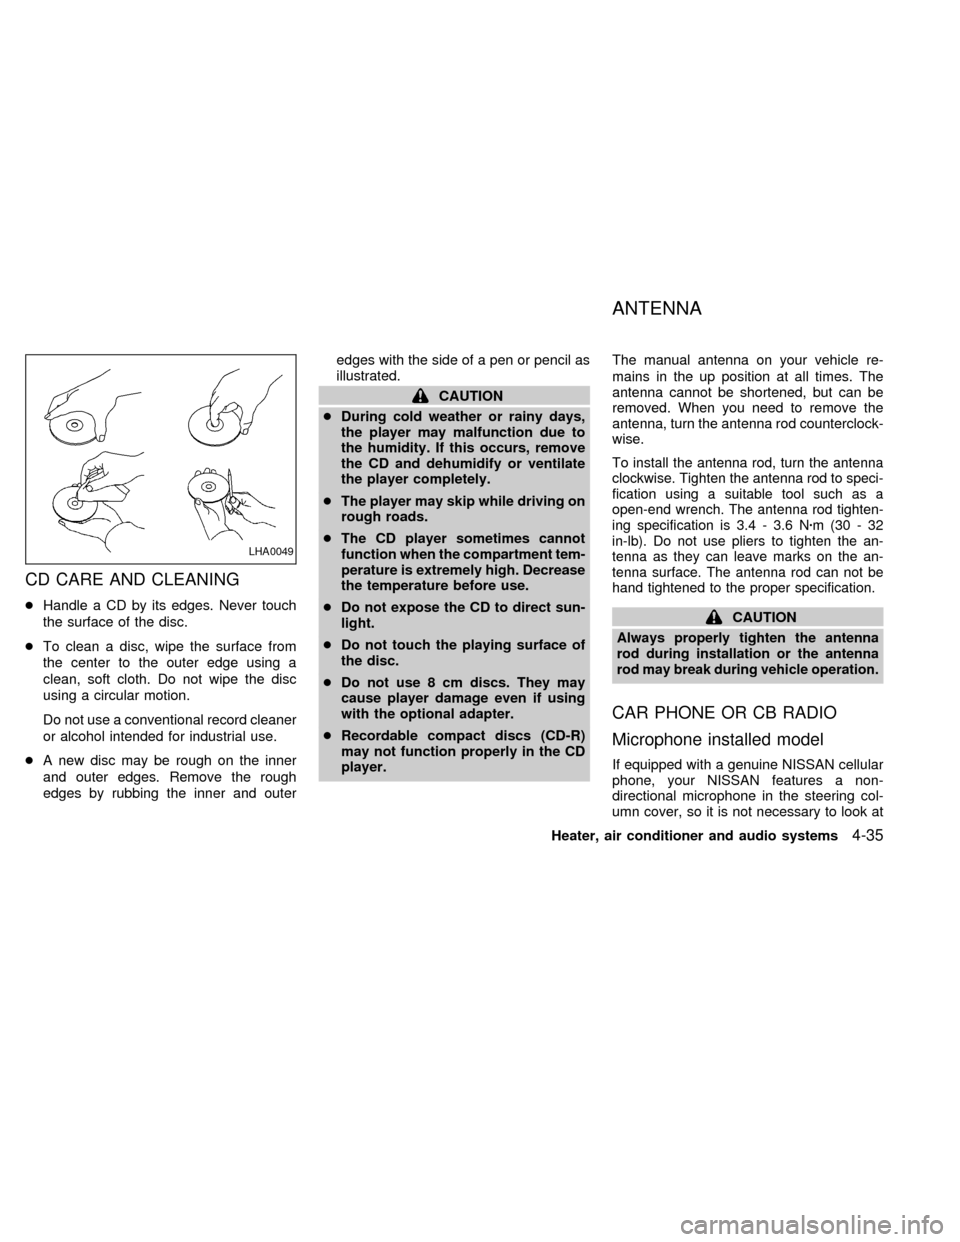
cHandle a CD by its edges. Never touch
the surface of the disc.
cTo clean a disc, wipe the surface from
the center to the outer edge using a
clean, soft cloth. Do not wipe the disc
using a circular motion.
Do not use a conventional record cleaner
or alcohol intended for industrial use.
cA new disc may be rough on the inner
and outer edges. Remove the rough
edges by rubbing the inner and outeredges with the side of a pen or pencil as
illustrated.
CAUTION
cDuring cold weather or rainy days,
the player may malfunction due to
the humidity. If this occurs, remove
the CD and dehumidify or ventilate
the player completely.
cThe player may skip while driving on
rough roads.
cThe CD player sometimes cannot
function when the compartment tem-
perature is extremely high. Decrease
the temperature before use.
cDo not expose the CD to direct sun-
light.
cDo not touch the playing surface of
the disc.
cDo not use 8 cm discs. They may
cause player damage even if using
with the optional adapter.
cRecordable compact discs (CD-R)
may not function properly in the CD
player.The manual antenna on your vehicle re-
mains in the up position at all times. The
antenna cannot be shortened, but can be
removed. When you need to remove the
antenna, turn the antenna rod counterclock-
wise.
To install the antenna rod, turn the antenna
clockwise. Tighten the antenna rod to speci-
fication using a suitable tool such as a
open-end wrench. The antenna rod tighten-
ing specification is 3.4 - 3.6 Nzm(30-32
in-lb). Do not use pliers to tighten the an-
tenna as they can leave marks on the an-
tenna surface. The antenna rod can not be
hand tightened to the proper specification.
CAUTION
Always properly tighten the antenna
rod during installation or the antenna
rod may break during vehicle operation.
CAR PHONE OR CB RADIO
Microphone installed model
If equipped with a genuine NISSAN cellular
phone, your NISSAN features a non-
directional microphone in the steering col-
umn cover, so it is not necessary to look at
LHA0049
ANTENNA
Heater, air conditioner and audio systems4-35
ZX
Page 177 of 292
or speak directly into the microphone when
calling.
To do so could detract from the driving
operation and cause an accident.
See the manual for car phone operation.
Pre-wired and antenna for phone
installed model
Some models are pre-wired to accept the
genuine NISSAN cellular phone.
In addition, the same model has the phone
antenna built into the rear glass window.
When installing a CB ham radio, a car
phone or other transmitters in your NISSAN,
be sure to observe the following cautions,
otherwise the new equipment may ad-
versely affect the MFI (Multiport Fuel Injec-
tion) system and other electronic parts.
WARNING
cA cellular telephone should not be
used while driving so full attention
may be given to vehicle operation.
Some jurisdictions prohibit the use
of cellular telephones while driving.
cIf you must make a call while your
vehicle is in motion, the hands free
cellular phone operational mode (if
so equipped) is highly recom-
mended. Exercise extreme caution
at all times so full attention may be
given to vehicle operation.cIf a conversation in a moving vehicle
requires you to take notes, pull off
the road to a safe location and stop
your vehicle before doing so.
CAUTION
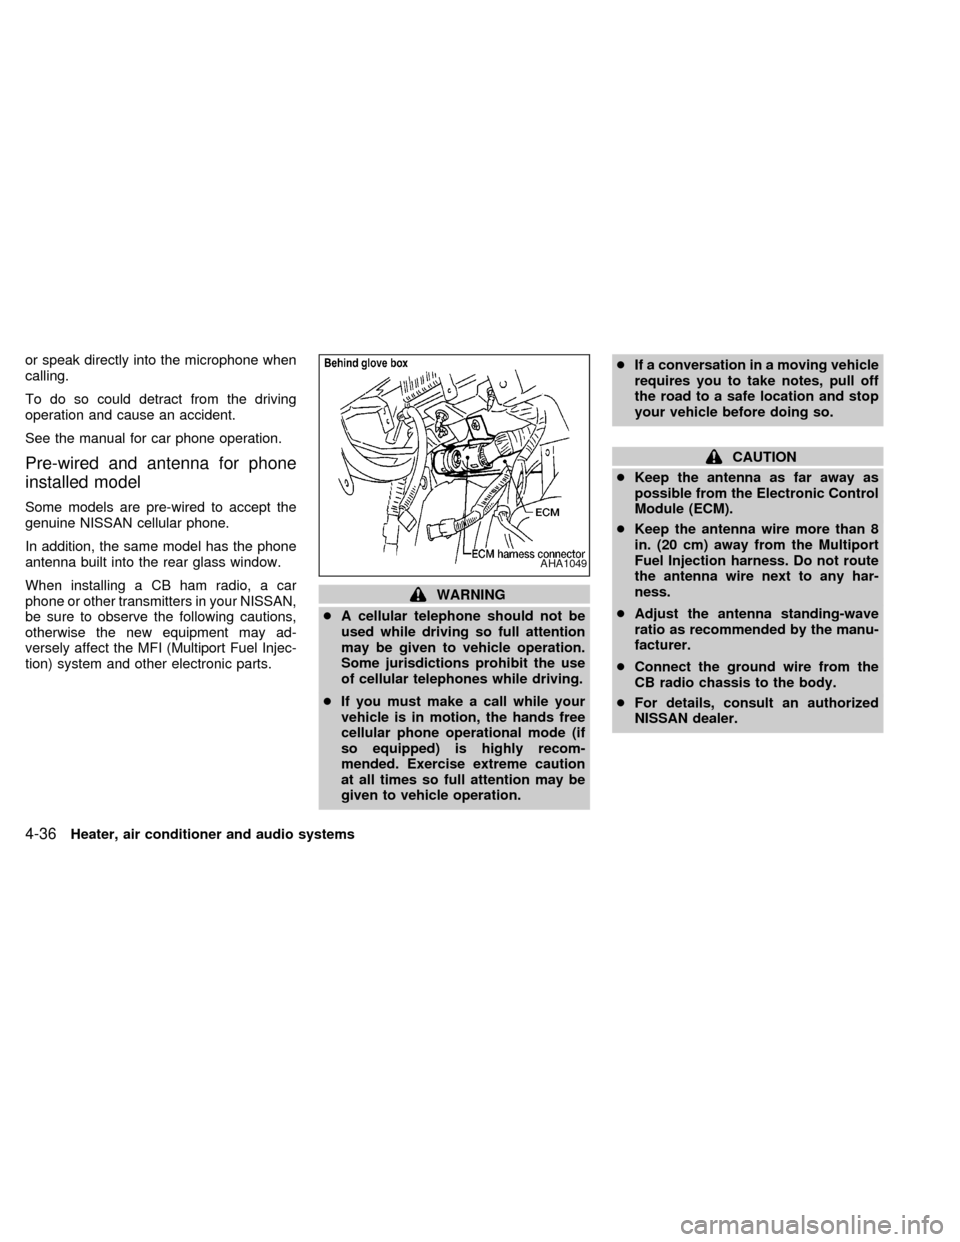
cKeep the antenna as far away as
possible from the Electronic Control
Module (ECM).
cKeep the antenna wire more than 8
in. (20 cm) away from the Multiport
Fuel Injection harness. Do not route
the antenna wire next to any har-
ness.
cAdjust the antenna standing-wave
ratio as recommended by the manu-
facturer.
cConnect the ground wire from the
CB radio chassis to the body.
cFor details, consult an authorized
NISSAN dealer.
AHA1049
4-36Heater, air conditioner and audio systems
ZX
Page 178 of 292

5 Starting and driving
Precautions when starting and driving ...................5-2
Exhaust gas (carbon monoxide) ............................5-2
Three way catalyst .................................................5-2
Avoiding collision and rollover................................5-3
Drinking alcohol/drugs and driving .........................5-3
Ignition switch .........................................................5-4
Key positions ..........................................................5-4
Before starting the engine ......................................5-5
Starting the engine .................................................5-5
Driving the vehicle ..................................................5-6
Parking brake .........................................................5-9
Cruise control .........................................................5-9
Break-in schedule ................................................5-11
Increasing fuel economy ......................................5-12Parking/parking on hills ........................................5-13
Power steering .....................................................5-14
Brake system........................................................5-14
Braking precautions .............................................5-14
Anti-lock brake system (ABS) ..............................5-15
Cold weather driving ............................................5-16
Freeing a frozen door lock ...................................5-16
Anti-freeze ............................................................5-16
Battery ..................................................................5-16
Draining of coolant water .....................................5-16
Tire equipment .....................................................5-16
Special winter equipment .....................................5-17
Driving on snow or ice .........................................5-17
Engine block heater (if so equipped) ...................5-18
ZX
Page 195 of 292
ENGINE BLOCK HEATER (if so
equipped)
An engine block heater to assist extreme
cold temperature starting is available
through an authorized NISSAN dealer.
WARNING
Do not use your heater with an un-
grounded electrical system or two-
pronged (cheater) adapters. You can be
injured by an electrical shock if you use
an ungrounded connection.
5-18Starting and driving
ZX
Page 204 of 292
cWhenever working on or near a bat-
tery, always wear suitable eye pro-
tectors (for example, goggles or in-
dustrial safety spectacles) and
remove rings, metal bands, or any
other jewelry. Do not lean over when
jump starting.
cDo not attempt to jump start a frozen
battery. It could explode and cause
serious injury.
cYour vehicle has an automatic en-
gine cooling fan. It could come on at
any time. Keep hands and other ob-
jects away from it.
Always follow the instructions below.
Failure to do so could result in damage
to the charging system and cause per-
sonal injury.
1. If the booster battery is in another ve-
hicle, position the two vehicles to bring
their batteries close to each other.
Do not allow the two vehicles to touch.
2. Apply the parking brake. Move the gear-
shift lever to the P (Park) position. Switch
off all unnecessary electrical systems
(lights, heater, air conditioner, etc.).3. Remove vent caps on the battery (if so
equipped). Cover the battery with an old
cloth to reduce explosion hazard.
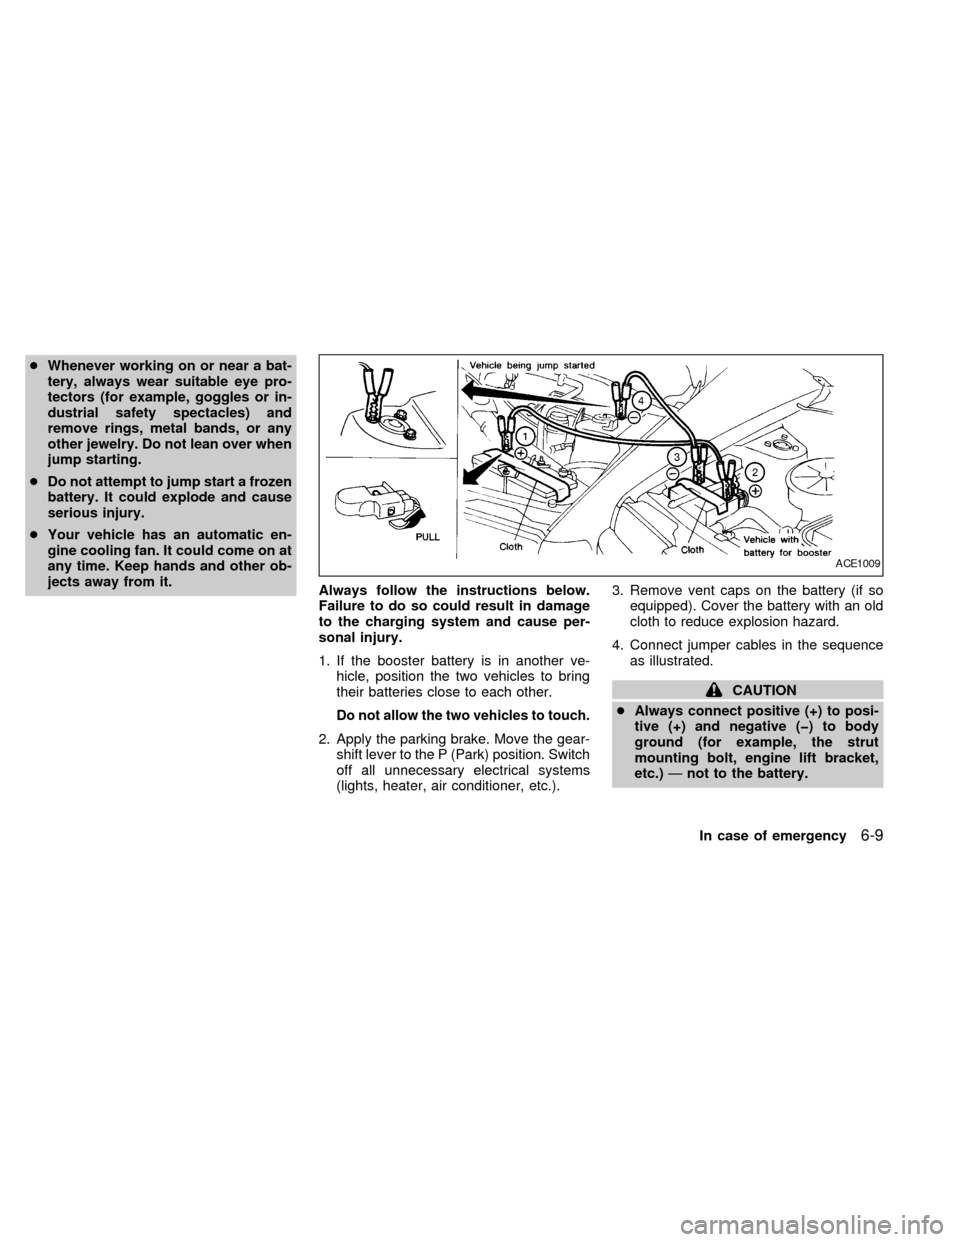
4. Connect jumper cables in the sequence
as illustrated.
CAUTION
cAlways connect positive (+) to posi-
tive (+) and negative (þ) to body
ground (for example, the strut
mounting bolt, engine lift bracket,
etc.)Ðnot to the battery.
ACE1009
In case of emergency6-9
ZX