Page 67 of 292
2. Route the seat belt tongue through the
child restraint and insert it into the buckle
until you hear and feel the latch engage.
Be sure to follow the child restraint manu-
facturer's instructions for belt routing.3. Pull on the shoulder belt until all of the
belt is fully extended. At this time, the
seat belt retractor is in the automatic
locking mode (child restraint mode). It
reverts back to emergency locking mode
when the seat belt is fully retracted.4. Allow the seat belt to retract. Pull up on
the shoulder belt to remove any slack in
the belt.
ARS1177ARS1178ARS1179
1-60Seats, restraints and supplemental air bag systems
ZX
Page 68 of 292

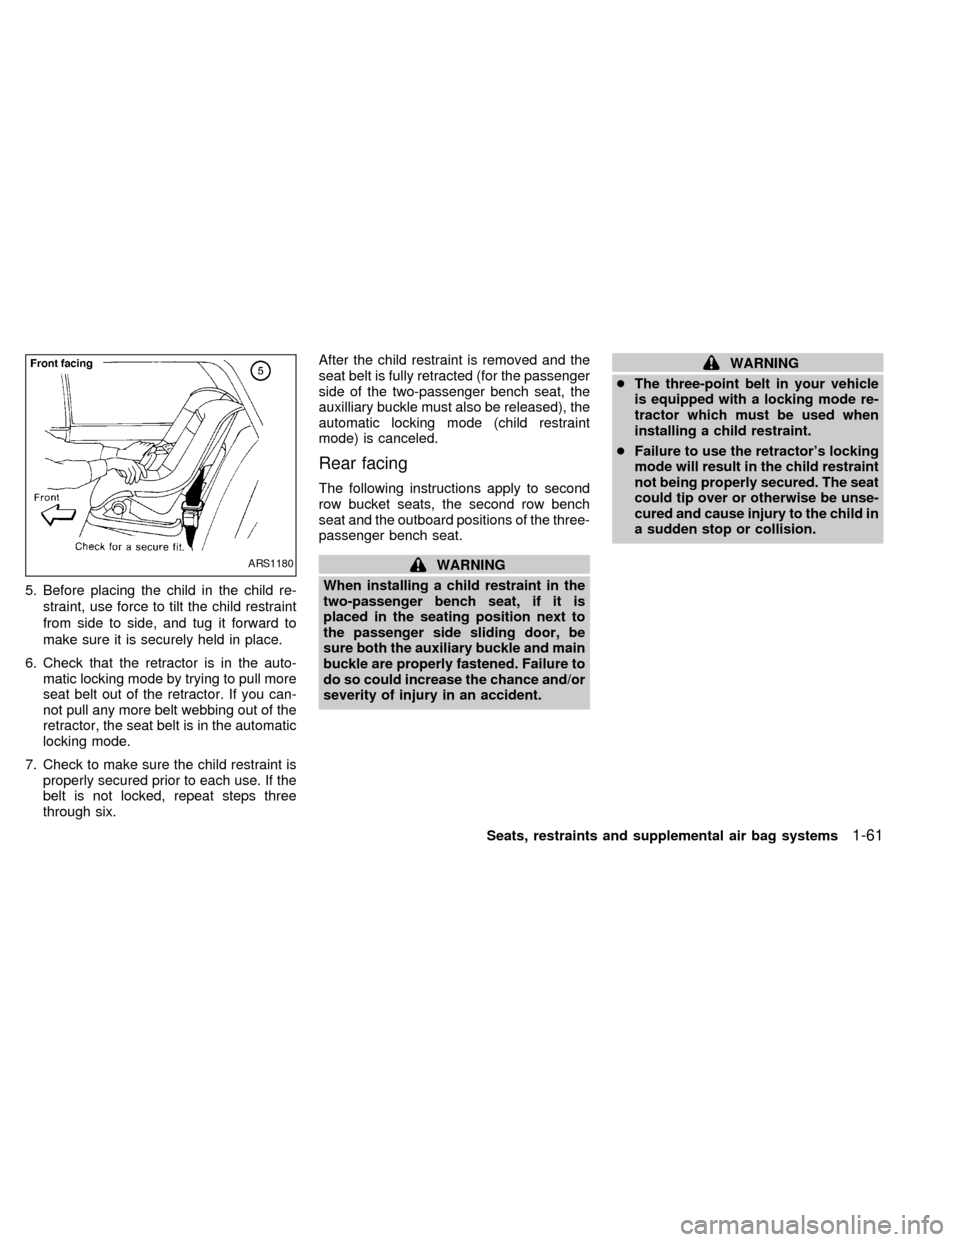
5. Before placing the child in the child re-
straint, use force to tilt the child restraint
from side to side, and tug it forward to
make sure it is securely held in place.
6. Check that the retractor is in the auto-
matic locking mode by trying to pull more
seat belt out of the retractor. If you can-
not pull any more belt webbing out of the
retractor, the seat belt is in the automatic
locking mode.
7. Check to make sure the child restraint is
properly secured prior to each use. If the
belt is not locked, repeat steps three
through six.After the child restraint is removed and the
seat belt is fully retracted (for the passenger
side of the two-passenger bench seat, the
auxilliary buckle must also be released), the
automatic locking mode (child restraint
mode) is canceled.
Rear facing
The following instructions apply to second
row bucket seats, the second row bench
seat and the outboard positions of the three-
passenger bench seat.
WARNING
When installing a child restraint in the
two-passenger bench seat, if it is
placed in the seating position next to
the passenger side sliding door, be
sure both the auxiliary buckle and main
buckle are properly fastened. Failure to
do so could increase the chance and/or
severity of injury in an accident.
WARNING
cThe three-point belt in your vehicle
is equipped with a locking mode re-
tractor which must be used when
installing a child restraint.
cFailure to use the retractor's locking
mode will result in the child restraint
not being properly secured. The seat
could tip over or otherwise be unse-
cured and cause injury to the child in
a sudden stop or collision.
ARS1180
Seats, restraints and supplemental air bag systems1-61
ZX
Page 70 of 292
4. Allow the seat belt to retract. Pull up on
the shoulder belt to remove any slack in
the belt.5. Before placing the child in the child re-
straint, use force to tilt the child restraint
from side to side, and tug it forward to
make sure it is securely held in place.
6. Check that the retractor is in the auto-
matic locking mode by trying to pull more
seat belt out of the retractor. If you can-
not pull any more belt webbing out of the
retractor, the seat belt is in the automatic
locking mode.
7. Check to make sure the child restraint is
properly secured prior to each use. If the
belt is not locked, repeat steps three
through six.After the child restraint is removed and the
seat belt is fully retracted (for the passenger
side of the two-passenger bench seat, the
auxilliary buckle must also be released), the
automatic locking mode (child restraint
mode) is canceled.
ARS1184ARS1185
Seats, restraints and supplemental air bag systems1-63
ZX
Page 73 of 292
4.Allow the seat belt to retract. Pull up on
the belt to remove any slack in the belt.5. Before placing the child in the child re-
straint, use force to tilt the child restraint
from side to side, and tug it forward to
make sure it is securely held in place.
6.
Check that the retractor is in the automatic
locking mode by trying to pull more seat
belt out of the retractor. If you cannot pull
any more belt webbing out of the retractor,
the seat belt is in the automatic locking
mode.
7. Check to make sure the child restraint is
properly secured prior to each use. If the
lap belt is not locked, repeat steps three
through six.
After the child restraint is removed and the
seat belt is fully retracted, the automatic
locking mode (child restraint mode) is can-
celed.
ARS1166ARS1167
1-66Seats, restraints and supplemental air bag systems
ZX
Page 77 of 292

3. Tighten the tether strap to remove any
slack.
4. Before placing the child in the child re-
straint, use force to tilt the child restraint
from side to side, and tug it forward to
make sure it is securely held in place.
5. Check to make sure the child restraint is
properly secured prior to each use. If not
secure, repeat steps two through four.
INSTALLATION ON THREE-
PASSENGER BENCH SEAT IN
SECOND ROW
A child restraint with a top tether strap may
be placed at the passenger side outboard
and center positions on the three-passenger
bench seat when the seat is in the second
row location. Once the child restraint is prop-
erly secured to the seat (see ªInstallation on
second and third row outboard positions,
Front facingº earlier in this section), follow
the directions explained in ``Installation on
three passenger bench seat in third row''
later in this section.
INSTALLATION ON THREE-
PASSENGER BENCH SEAT IN
THIRD ROW
A child restraint with a top tether strap may
be placed at the passenger side outboard
and center positions on the three-
passenger bench seat when the seat is in
the third row location. Once the child re-
straint is properly secured to the seat (see
ªInstallation on second and third row out-
board positions, Front facingº or ªInstallation
on three-passenger bench seat center posi-
tion, Front facingº earlier in this section),follow the directions to attach the tether
strap anchor brackets.
ARS1192
1-70Seats, restraints and supplemental air bag systems
ZX
Page 78 of 292
To attach a tether strap to a third row bench
seat:
1. For the passenger side outboard seating
position, route the tether strap under the
head restraint and between the head
restraint supports.
For the center seating position, route the
tether strap over the seatback.2. Hook the tether strap into the slot in the
anchor bracket that is located on the
lower back of the seat.3. Tighten the tether strap to remove any
slack.
4. Before placing the child in the child re-
straint, use force to tilt the child restraint
from side to side, and tug it forward to
make sure it is securely held in place.
5. Check to make sure the child restraint is
properly secured prior to each use. If it is
not secure, repeat steps two through
four.
WRS0022LRS0023WRS0024
Seats, restraints and supplemental air bag systems1-71
ZX
Page 110 of 292
The front seat convenience net keeps small
packages in the front passenger compart-
ment from moving around while the vehicle
is in motion.
To install the convenience net, attach the
four hooks to the four slots in the base of the
front seats.
To remove the convenience net, detach the
four hooks from four slots in the base of the
front seats.When not in use, the convenience net can
be stored in the passenger side underseat
storage tray (if so equipped). See ``Under-
seat storage tray'' in the ``Seats, restraints
and supplemental air bag systems'' section.
APD1086
FRONT SEAT CONVENIENCE
NET (if so equipped)
Instruments and controls2-23
ZX
Page 213 of 292

Occasionally remove loose dust from the
interior trim, plastic parts and seats using a
vacuum cleaner or soft brush. Wipe the
vinyl and leather surfaces with a clean, soft
cloth dampened in mild soap solution, then
wipe clean with a dry, soft cloth. Before
using any fabric protector, read the manu-
facturer's recommendations. Some fabric
protectors contain chemicals that may stain
or bleach the seat material. Use a cloth
dampened only with water, to clean the
meter and gauge lens.
CAUTION
cNever use benzine, thinner, or any
similar material.
cLeather seats should be regularly
coated with a leather wax like saddle
soap. Never use car wax.
cNever use fabric protectors unless
recommended by the manufacturer.
cDo not use glass or plastic cleaner
on meter or gauge lens covers. It
may damage the lens cover.
FLOOR MATS
The use of genuine NISSAN floor mats can
extend the life of your vehicle carpet and
make it easier to clean the interior.No
matter what mats are used, be sure they
are fitted for your vehicle and are prop-
erly positioned in the footwell to prevent
interference with pedal operation.Mats
should be maintained with regular cleaning
and replaced if they become excessively
worn.
Front floor mat positioning aid
(Driver side only)
This model includes a front floor mat
bracket to act as a floor mat positioning aid.
NISSAN floor mats, specially designed for
your vehicle, incorporate grommets. To in-
stall, simply position the mat using the floor
mat bracket hook through the floor mat
grommet hole while centering the mat in the
footwell.
Periodically check to make certain the mat
is properly positioned.
SEAT BELTS
The seat belts can be cleaned by wiping
them with a sponge dampened in a mildsoap solution. Allow the belts to dry com-
pletely before using them.
WARNING
Do not allow wet seat belts to roll up in
the retractor. NEVER use bleach, dye,
or chemical solvents to clean the seat
belts, since these may severely weaken
the seat belt webbing.
CLEANING INTERIOR
7-4Appearance and care
ZX