2000 NISSAN FRONTIER steering wheel
[x] Cancel search: steering wheelPage 136 of 269
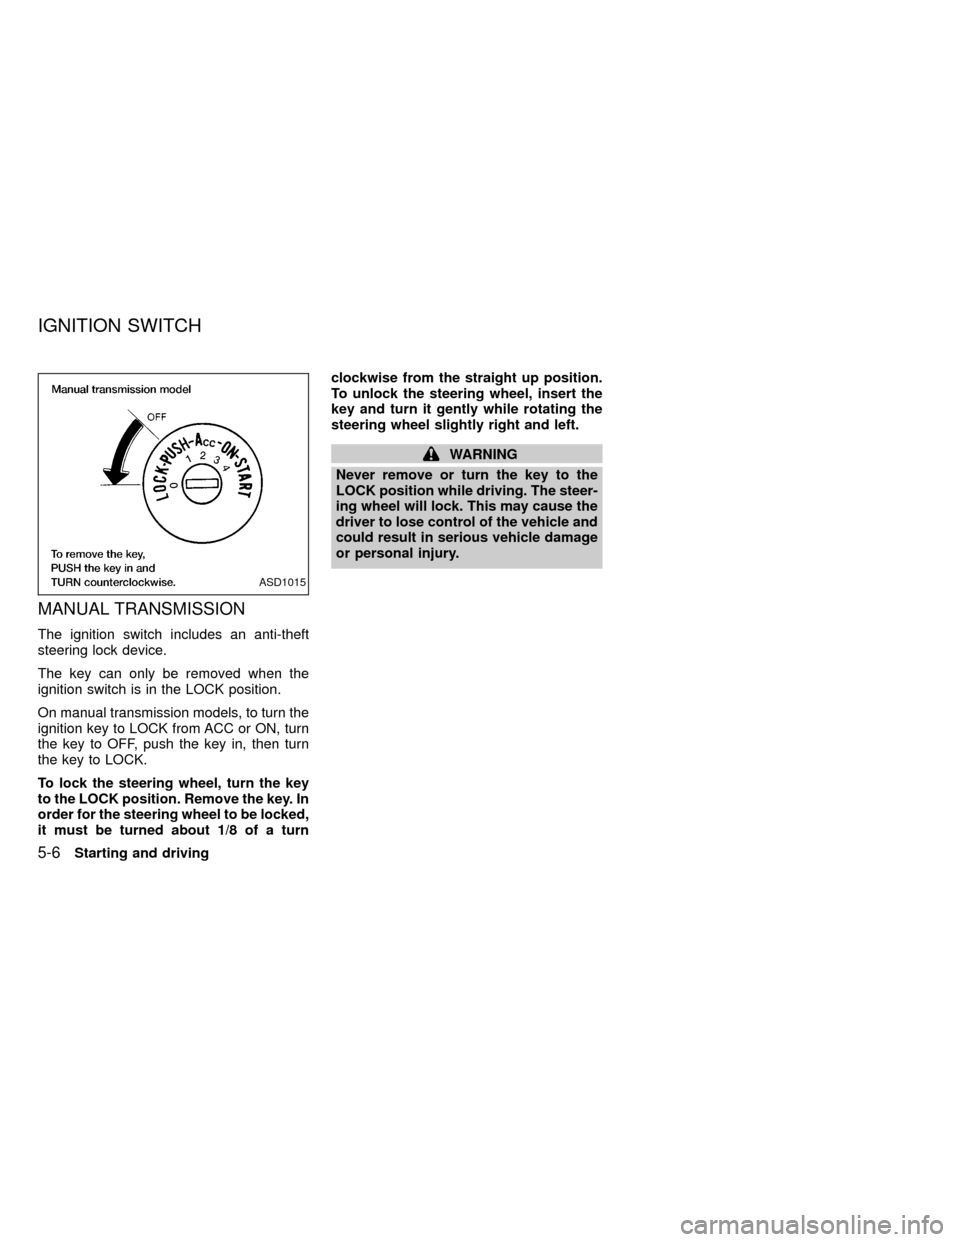
MANUAL TRANSMISSION
The ignition switch includes an anti-theft
steering lock device.
The key can only be removed when the
ignition switch is in the LOCK position.
On manual transmission models, to turn the
ignition key to LOCK from ACC or ON, turn
the key to OFF, push the key in, then turn
the key to LOCK.
To lock the steering wheel, turn the key
to the LOCK position. Remove the key. In
order for the steering wheel to be locked,
it must be turned about 1/8 of a turnclockwise from the straight up position.
To unlock the steering wheel, insert the
key and turn it gently while rotating the
steering wheel slightly right and left.
WARNING
Never remove or turn the key to the
LOCK position while driving. The steer-
ing wheel will lock. This may cause the
driver to lose control of the vehicle and
could result in serious vehicle damage
or personal injury.
ASD1015
IGNITION SWITCH
5-6Starting and driving
ZX
Page 137 of 269
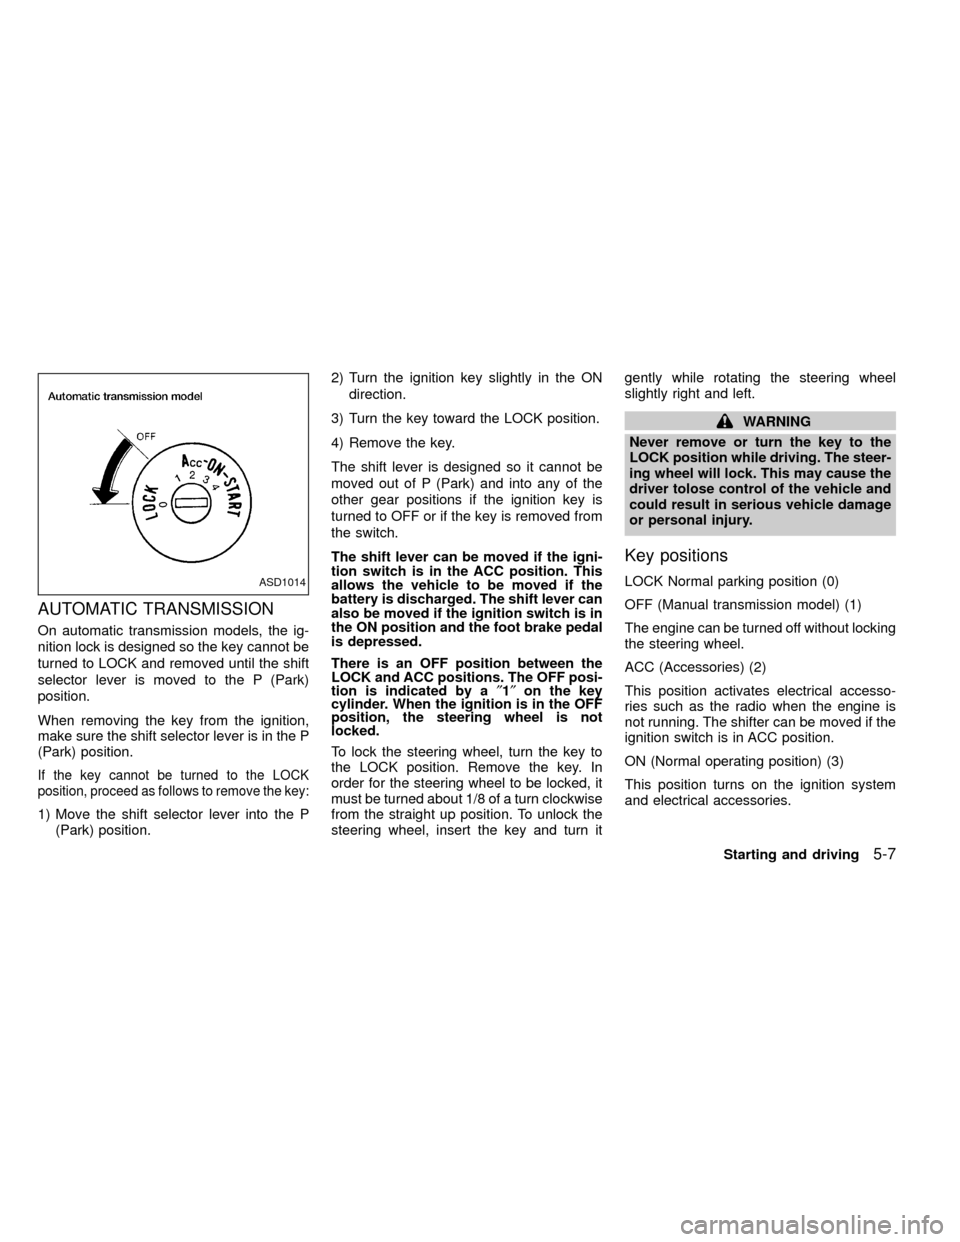
AUTOMATIC TRANSMISSION
On automatic transmission models, the ig-
nition lock is designed so the key cannot be
turned to LOCK and removed until the shift
selector lever is moved to the P (Park)
position.
When removing the key from the ignition,
make sure the shift selector lever is in the P
(Park) position.
If the key cannot be turned to the LOCK
position, proceed as follows to remove the key:
1) Move the shift selector lever into the P
(Park) position.2) Turn the ignition key slightly in the ON
direction.
3) Turn the key toward the LOCK position.
4) Remove the key.
The shift lever is designed so it cannot be
moved out of P (Park) and into any of the
other gear positions if the ignition key is
turned to OFF or if the key is removed from
the switch.
The shift lever can be moved if the igni-
tion switch is in the ACC position. This
allows the vehicle to be moved if the
battery is discharged. The shift lever can
also be moved if the ignition switch is in
the ON position and the foot brake pedal
is depressed.
There is an OFF position between the
LOCK and ACC positions. The OFF posi-
tion is indicated by a²1²on the key
cylinder. When the ignition is in the OFF
position, the steering wheel is not
locked.
To lock the steering wheel, turn the key to
the LOCK position. Remove the key. In
order for the steering wheel to be locked, it
must be turned about 1/8 of a turn clockwise
from the straight up position. To unlock the
steering wheel, insert the key and turn itgently while rotating the steering wheel
slightly right and left.
WARNING
Never remove or turn the key to the
LOCK position while driving. The steer-
ing wheel will lock. This may cause the
driver tolose control of the vehicle and
could result in serious vehicle damage
or personal injury.
Key positions
LOCK Normal parking position (0)
OFF (Manual transmission model) (1)
The engine can be turned off without locking
the steering wheel.
ACC (Accessories) (2)
This position activates electrical accesso-
ries such as the radio when the engine is
not running. The shifter can be moved if the
ignition switch is in ACC position.
ON (Normal operating position) (3)
This position turns on the ignition system
and electrical accessories.ASD1014
Starting and driving5-7
ZX
Page 158 of 269
verse) position. When parking on an up-
hill grade, place the gearshift lever in the
1st position.
Automatic transmission models:
Move the gearshift lever to the P (Park)
position.
3. To help prevent the vehicle from rolling
into the street when parked on an incline,
it is a good practice to turn the wheels as
illustrated.
IHEADED DOWNHILL WITH CURB:À
1
Turn the wheels into the curb and move
the vehicle forward until the curb side
wheel gently touches the curb.
IHEADED UPHILL WITH CURB:Á
2
Turn the wheels away from the curb and
move the vehicle back until the curb side
wheel gently touches the curb.
IHEADED UPHILL OR DOWNHILL, NO
CURB:Â
3
Turn the wheels toward the side of the
road so the vehicle will move away from
the center of the road if it moves.
4. Turn the ignition key to the LOCK posi-
tion and remove the key.The power assisted steering is designed to
use a hydraulic pump, driven by the engine,
to assist steering.
If the engine stops or drive belt breaks, you
will still have control of the vehicle. How-
ever, much greater steering effort is needed,
especially in sharp turns and at low speeds.
WARNING
If the engine is not running or is turned
off while driving, the power assist for
the steering will not work. Steering will
be much harder to operate.The brake system has two separate hydrau-
lic circuits. If one circuit develops a problem,
you will still have braking at two wheels.
Vacuum assisted brakes
The brake booster aids braking by using
engine vacuum. If the engine stops, you can
stop the vehicle by depressing the brake
pedal. However, greater foot pressure on
the brake pedal will be required to stop the
vehicle and stopping distance will be longer.
Wet brakes
When the vehicle is washed or driven
through water, the brakes may get wet. As a
result, your braking distance will be longer
and the vehicle may pull to one side during
braking.
To dry the brakes, drive the vehicle at a safe
speed while lightly pressing the brake pedal
to heat the brakes. Do this until the brakes
return to normal. Avoid driving the vehicle at
high speeds until the brakes function cor-
rectly.
POWER STEERING SYSTEM BRAKE SYSTEM
5-28Starting and driving
ZX
Page 159 of 269
Using the brakes
Avoid resting your foot on the brake pedal
while driving. This will overheat the brakes,
wear out the brake linings and pads faster,
and reduce gas mileage.
To help reduce brake wear, and to prevent
the brakes from overheating, reduce speed
and downshift to a lower gear before going
down a slope or long grade.
WARNING
IWhile driving on a slippery surface,
be careful when braking, accelerat-
ing or downshifting. Abrupt braking
or accelerating could cause the
wheels to skid and result in an acci-
dent.
IIf the engine is not running or is
turned off while driving, the power
assist for the brakes will not work.
Braking will be harder.
Normal Operation
The anti-lock brake system does not oper-
ate at speeds below 3 to 6 MPH (5 to 10
km/h). (The speeds vary according to road
conditions.)
When driving, the anti-lock brake system
controls the wheels so they will not lock
when braking abruptly or when braking on a
slippery road. Thus, difficult steering and
swerving of the vehicle due to locked
wheels is minimized. The system detects
the wheel rotation rate and electronically
controls the pressure applied to each brake.
Slight vibration on the brake pedal accom-
panied by noise usually occurs while the
ABS system is operating. Such vibration
and noise encountered during abrupt brak-
ing is not a problem, but indicates that the
system is functioning.
Self-test feature
The anti-lock brake system consists of elec-
tronic sensors and hydraulic solenoids con-
trolled by a computer. The computer has a
built-in diagnostic feature that tests the sys-
tem each time you start the engine and
move the vehicle at a low speed in forward
or reverse. When the self-test occurs, youmay hear a ``clunk'' noise and/or feel a
pulsation in the brake pedal. This is normal
and is not an indication of any malfunction. If
the computer senses any malfunction, it
switches the anti-lock brake system off and
turns on the ABS brake warning light in the
dashboard. The brake system then operates
normally, but without anti-lock assistance.
If an abnormality occurs in the system, the
anti-lock function will cease but the ordinary
brakes will continue to operate normally. The
ABS brake warning light will then come on.
If the light comes on while you are driving,
contact an authorized NISSAN dealer for
repair.
Using the system (4 wheel ABS)
Depress the brake pedal and hold it down.
WARNING
Do not pump the brake pedal. Doing so
may result in increased stopping dis-
tances.
ANTI-LOCK BRAKE SYSTEM
(ABS)
Starting and driving5-29
ZX
Page 173 of 269
When towing your vehicle, U.S. States, Ca-
nadian provinces and local regulations for
towing must be followed. Incorrect towing
equipment could damage your vehicle. Tow-
ing instructions are available from an autho-
rized NISSAN dealer. Local service operators
are generally familiar with the applicable laws
and procedures for towing. To assure proper
towing and to prevent accidental damage to
your vehicle, NISSAN recommends having a
service operator tow your vehicle. It is advis-
able to have the service operator carefully
read the following precautions:
WARNING
INever ride in a vehicle that is being
towed.
INever get under your vehicle after it
has been lifted by a tow truck.
CAUTION
IWhen towing, make sure that the
transmission, axles, steering system
and powertrain are in working con-
dition. If any unit is damaged, dollies
must be used.IWhen towing with the front wheels
on the ground or with the rear
wheels on the ground (if you do not
use towing dollies): Move the trans-
fer control shift lever into the 2H
position.
IWhen towing with the front wheels
on the ground: Turn the ignition key
to the OFF position and move the
transmission shift lever to the N
(Neutral) position. To move the se-
lector lever to the N (Neutral) posi-
tion on automatic transmission mod-
els, turn the ignition key to the ACC
position. After moving the sleector
lever to the N (Neutral) position, turn
the ignition key to the OFF position
and secure the steering wheel in the
straight ahead position with a rope
or similiar device. Never place the
ignition key in the LOCK position.
This will result in damage to the
steering lock mechanism.
IWhen towing manual transmission
models with rear wheels on the
ground: Always release the parkingbrake and move the transmission
shift lever to the N (Neutral) position.
IFor four-wheel drive models:
Set the free-running hubs to the free
position. See ``
Auto-lock free-
running hubsº or ``Manual-lock
free-running hubsº as appropriate in
the ``Starting and driving'' section.
Move the transfer case shift lever
into the 2H position and the trans-
mission shift lever into the N (Neu-
tral) position.
IAlways attach safety chains before
towing.
TOW TRUCK TOWING
In case of emergency6-11
ZX
Page 175 of 269
CAUTION
If you have to tow your vehicle with four
wheels on the ground or with the front
or rear wheels raised, observe the fol-
lowing restricted towing speeds and
distances:
Automatic transmission model:
ISpeed: Below 30 MPH (48 km/h)
IDistance: Less than 40 miles (64 km)
Manual transmission models:
ISpeed: Below 60 MPH (97 km/h)
IDistance: Less than 500 miles (805
km)
If the speed or distance must necessarily be
greater, remove the front and rear propeller
shafts beforehand to prevent damage to the
transmission.
CAUTION
INever tow your vehicle from the rear
(i.e., backward) with four wheels on
the ground as this may cause seri-
ous and expensive damage to the
transmission.IBe sure to place the transfer control
lever into the 2H position and the
transmission selector lever into the
N (Neutral) position.
VEHICLE RECOVERY (freeing a
stuck vehicle)
ITow chains or cables must be attached
only to the main structural members of
the vehicle.
IPulling devices should be routed so they
do not touch any part of the suspension,
steering, brake or cooling systems.
IAlways pull the cable straight out from
the front or rear of the vehicle. Never pull
the vehicle at an angle.
IPulling devices such as ropes or canvas
straps are not recommended for use in
vehicle towing or recovery.
IStand clear of a stuck vehicle.
WARNING
Do not spin your tires at high speed.
This could cause them to explode and
result in serious injury. Parts of your
vehicle could also overheat and be
damaged.
In case of emergency
6-13
ZX
Page 183 of 269

8 Do-it-yourself
Maintenance precautions .......................................8-2
Engine compartment check locations ....................8-3
Engine cooling system ...........................................8-5
Checking engine coolant level ...............................8-5
Changing engine coolant .......................................8-6
Engine oil ...............................................................8-9
Checking engine oil level .......................................8-9
Changing engine oil .............................................8-10
Changing engine oil filter .....................................8-12
Automatic transmission fluid (ATF) ......................8-13
Temperature conditions for checking ATF ...........8-13
Power steering fluid..............................................8-14
Brake and clutch fluid ...........................................8-15
Window washer fluid ............................................8-15
Battery ..................................................................8-16
Jump starting ........................................................8-17
Drive belts ............................................................8-18Spark plug replacement .......................................8-19
Air cleaner housing filter ......................................8-21
Wiper blades ........................................................8-22
Parking brake check.............................................8-23
Brake pedal ..........................................................8-23
Brake booster .......................................................8-24
Clutch pedal .........................................................8-25
Fuses ....................................................................8-26
Multi-remote controller battery replacement ........8-27
Light bulbs ............................................................8-29
Headlights ............................................................8-29
Bulb replacement .................................................8-30
Front fog light bulb replacement (if so
equipped) .............................................................8-32
Wheels and tires...................................................8-33
Four-wheel drive models ......................................8-36
ZX
Page 223 of 269

sure no wheel nuts are missing, and check for
any loose wheel nuts. Tighten if necessary.
Tire rotation*Tires should be rotated every
7,500 miles (12,000 km).
Wheel alignment and balanceIf the ve-
hicle should pull to either side while driving
on a straight and level road, or if you detect
uneven or abnormal tire wear, there may be
a need for wheel alignment.
If the steering wheel or seat vibrates at
normal highway speeds, wheel balancing
may be needed.
Windshield wiper blades*Check for
cracks or wear if they do not wipe properly.
Doors, hood and tailgateCheck that the
doors, hood and tailgate operate properly.
Also ensure that all latches lock securely.
Lubricate hinges, latches, latch pins, rollers
and links as necessary. Make sure that the
secondary latch keeps the hood from open-
ing when the primary latch is released.
When driving in areas using road salt or
other corrosive materials, check lubrication
frequently.
Lights*Make sure that the headlights, stop
lights, tail lights, turn signal lights, and otherlights are all operating properly and installed
securely. Also check headlight aim.INSIDE THE VEHICLE
The maintenance items listed here should
be checked on a regular basis, such as
when performing periodic maintenance,
cleaning the vehicle, etc.
Additional information on the following
items with an ``*'' is found in the ``Do-it-
yourself'' section of this manual.
Warning lights and chimesMake sure all
warning lights and chimes are operating
properly.
Windshield wiper and washer*Check that
the wipers and washer operate properly and
that the wipers do not streak.
Windshield defrosterCheck that the air
comes out of the defroster outlets properly
and in sufficient quantity when operating the
heater or air conditioner.
Steering wheelCheck for changes in the
steering conditions, such as excessive free-
play, hard steering or strange noises.
SeatsCheck seat position controls such as
seat adjusters, seatback recliner, etc. toensure they operate smoothly and all
latches lock securely in every position.
Check that the head restraints move up and
down smoothly and the locks (if so
equipped) hold securely in all latched posi-
tions.
Seat beltsCheck that all parts of the seat
belt system (e.g., buckles, anchors, adjust-
ers and retractors) operate properly and
smoothly, and are installed securely. Check
the belt webbing for cuts, fraying, wear or
damage.
Accelerator pedalCheck the pedal for
smooth operation and make sure the pedal
does not catch or require uneven effort.
Keep the floor mat away from the pedal.
Clutch pedal*Make sure the pedal oper-
ates smoothly and check that it has the
proper free travel.
BrakesCheck that the brakes do not pull
the vehicle to one side when applied.
Brake pedal and booster*Check the pedal
for smooth operation and make sure it has
the proper distance under it when de-
pressed fully. Check the brake booster func-
tion. Be certain to keep the floor mat away
from the pedal.
Maintenance
9-3
ZX