Page 118 of 273
115 Interior equipment
Te ch n ica l
data Instruments
and controlsOperationDrivingInstrument
cluster displayPractical hints Car care Index LighterSlide cover (arrow) open. Turn key in steering lock to
position 1 or 2.
Push in lighter (1); it will pop out automatically when
hot.
Note:
The lighter socket can be used to accommodate
electrical accessories up to maximum 85 W.
1
P68.20-2170-27
Wa r n i n g !
Never touch the heating element or sides of the
lighter, they are extremely hot, hold at knob only.When leaving the vehicle always remove the key
from the steering lock. Do not leave children
unattended in the vehicle, or with access to an
unlocked vehicle. Unsupervised use of vehicle
equipment may cause serious personal injury.
Page 119 of 273
116 Interior equipment
Te ch n ica l
data Instruments
and controlsOperationDrivingInstrument
cluster displayPractical hints Car care Index
Parcel net in passenger footwell
A small convenience parcel net is located in the
passenger footwell. It is for small and light items, such
as road maps, mail, etc..
Shelf behind roll barsCellular telephone
The vehicle is prepared for the installation of a cellular
telephone. For further information and installation
contact your authorized Mercedes-Benz Center.
Wa r n i n g !
Do not place heavy or fragile objects, or objects
having sharp edges, in the parcel net.In an accident, during hard braking or sudden
maneuvers, they could be thrown around inside
the vehicle, and cause injury to vehicle occupants.Wa r n i n g !
Th e sh elf beh ind the roll bars shou ld not be u sed to
carry objects. This will prevent such objects from
being throw n about and injuring veh icle occ upants
during an accident or sudden maneuver.
Wa r n i n g !
Some ju ri sdi ctions proh ibit th e dri ver from usi ng a
cellular telephone while driving a vehicle. Whether
or not prohibited by law, for safety reasons, the
driver should not use the cellular telephone while
the vehicle is in motion. Stop the vehicle in a safe
location before answering or placing a call.
Page 120 of 273
117 Garage door opener
Te ch n ica l
data Instruments
and controlsOperationDrivingInstrument
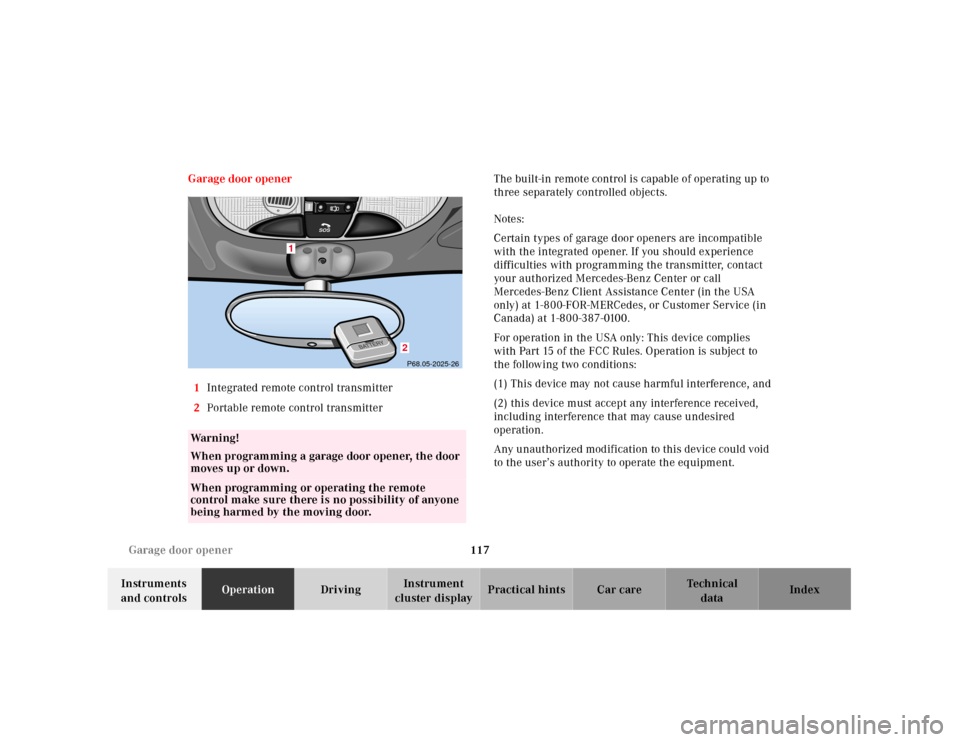
cluster displayPractical hints Car care Index Garage door opener
1Integrated remote control transmitter
2Portable remote control transmitterThe built-in remote control is capable of operating up to
three separately controlled objects.
Notes:
Certain types of garage door openers are incompatible
with the integrated opener. If you should experience
difficulties with programming the transmitter, contact
your authorized Mercedes-Benz Center or call
Mercedes-Benz Client Assistance Center (in the USA
only) at 1-800-FOR-MERCedes, or Customer Service (in
Canada) at 1-800-387-0100.
For operation in the USA only: This device complies
with Part 15 of the FCC Rules. Operation is subject to
the following two conditions:
(1) This device may not cause harmful interference, and
(2) this device must accept any interference received,
including interference that may cause undesired
operation.
Any unauthorized modification to this device could void
to the user’s authority to operate the equipment.
Wa r n i n g !
When programming a garage door opener, the door
moves up or down.When programming or operating the remote
control make sure there is no possibility of anyone
being harmed by the moving door.
1
2P68.05-2025-26
S
O
S
Page 121 of 273
118 Garage door opener
Te ch n ica l
data Instruments
and controlsOperationDrivingInstrument
cluster displayPractical hints Car care Index
Programming or reprogramming the integrated
remote control:
1.Turn key in starter switch to position 1 or 2.
2.Hold the end of the hand-held transmitter of the
d evice you w ish to train approxim ately 2 to 5 inch es
(5 cm to 12 cm) away from the surface of the
integrated remote control located on the inside rear
view mirror, keeping the indicator lamp in view.
3.Using both hands, simultaneously push the hand-
held transmitter button and the desired integrated
remote control button. Do not release the buttons
until completing step 4.
4.The indicator lamp on the integrated remote control
will flash, first slowly and then rapidly. When the
indicator lamp flashes rapidly, both buttons may be
released (the rapid flashing lamp indicates
successful programming of the new frequency
signal). To program the remaining two buttons,
follow steps 1 through 4.Note:
If, after repeated attempts, you do not successfully
program the integrated remote control device to learn
the signal of the hand-held transmitter, the garage door
opener could be equipped with the “rolling code
feature”.
Rolling code programming:
To train a garage door opener (or other rolling code
devices) with the rolling code feature, follow these
instructions after completing the “Programming”
portion of this text. (A second person may make the
following training procedures quicker and easier.)
1.Locate training button on the garage door opener
motor head unit. Exact location and color of the
button may vary by garage door opener brand. If
there is difficulty locating the transmitting button,
reference to garage door opener operator’s manual.
2.Press “training” button on the garage door opener
motor head unit (which activated the “training
light”).
Page 122 of 273
119 Garage door opener
Te ch n ica l
data Instruments
and controlsOperationDrivingInstrument
cluster displayPractical hints Car care Index Note:
Following step 2, there are 30 seconds to initiate
step 3.
3.Firmly press and release the programmed
integrated remote control transmit button. Press
and release same button a second time to complete
the training process. (Some garage door openers
may require you to do this procedure a third time to
complete the training.)
4.Confirm the garage door operation by pressing the
programmed button on the integrated remote
control transmitter.
Canadian programming:
During programming, your hand-held transmitter may
automatically stop transmitting. Continue to press and
hold the integrated remote control transmitter button
(note steps 2 through 4 in the “Programming” portion)
while you press and re-press (“cycle”) your hand-held
transmitter every two seconds until the frequency
signal has been learned. The indicator lamp will f lash
slowly and then rapidly after several seconds upon
successful training.Operation of remote control:
1.Turn key in starter switch to position 1 or 2.
2.Select and press the appropriate button to activate
the remote controlled device. The integrated remote
control transmitter continues to send the signal as
long as the button is pressed – up to 20 seconds.
Erasing the remote control memory:
1.Turn key in starter switch to position 1 or 2.
2.Simultaneously holding down the left and right side
buttons for approximately 20 seconds, or until the
control lamp blinks rapidly, will erase the codes of
all three channels.
Page 123 of 273
120 Retractable hardtop
Te ch n ica l
data Instruments
and controlsOperationDrivingInstrument
cluster displayPractical hints Car care Index
Retractable hardtop
Important!
A minimum clearance height of 5
1/2 ft. (1.65 m) and an
additional 10 in (25 cm) length behind the vehicle is
required to lower or raise the hardtop.
Th e add itional space is requ ired since th e roof moves u p
and the trunk lid back during raising and lowering
operations.
The raising or lowering operations can only be started
with the luggage cover and trunk lid closed.
The raising or lowering procedure is immediately
interrupted by releasing the hardtop switch.
Do not operate the roof while a roof luggage carrier is
installed.To prevent damage to hardtop or luggage / cargo when
lowering the roof:
•load trunk only to the height of the luggage cover,
•do not permit luggage / cargo to raise the closed
luggage cover,
•do not load anything on top of the luggage cover,
•do not place anything on shelf behind roll bars.
Note:
To prevent the hardtop from being lowered
unintentionally while a roof luggage carrier is installed,
keep luggage cover in trunk in the open position.
Wa r n i n g !
Before operating the switch for the retractable
hardtop make sure that no persons due to
inattention are injured by the moving parts
(retractable roof, roof frame, and trunk lid).Hands must never be placed near the roof frame,
upper windshield area, hardtop, shelf behind roll
bars, or trunk lid while the retractable hardtop is
being raised or lowered. Serious personal injury
may occur.
Page 124 of 273
121 Retractable hardtop
Te ch n ica l
data Instruments
and controlsOperationDrivingInstrument
cluster displayPractical hints Car care Index Important!
Do not manually move corner flaps of rear shelf. Doing
so will result in damage to the roof folding mechanism
that is not covered by the Mercedes-Benz Limited
War ra nt y.
Prior to cleaning the rear window, see page 237.Lowering Hardtop
1.Engage parking brake.
2.Turn key in steering lock to position 2.
P65.10-2102-26
1
P77.39-2030-26
Page 125 of 273
122 Retractable hardtop
Te ch n ica l
data Instruments
and controlsOperationDrivingInstrument
cluster displayPractical hints Car care Index
3.Slide hardtop switch back (1) and hold:
•The indicator lamp in the hardtop switch lights
up.
Note:
If indicator lamp blinks slowly, a malfunction
has occurred in the system.
If indicator lamp blinks rapidly, the trunk lid
and / or the luggage cover may be open, and need
to be closed.
•The door windows lower.
•The trunk lid opens rearward.
•The hardtop lowers into its storage
compartment, simultaneously the shelf behind
roll bars opens, and rear quarter windows lower.
•The shelf behind the roll bars closes.
•The trunk lid closes.
•The indicator lamp in the hardtop switch goes
out – the opening procedure is completed.If the hardtop switch is held or is released and slid back
again within approximately 30 seconds, the door
windows will close.
However, the door windows can also be closed / opened
later on. Slide hardtop switch twice forward / backward
and hold.
The rear quarter windows cannot be raised with the
hardtop lowered.
Notes:
For safety reasons, the hardtop cannot be lowered while
driving.
Lowering a wet hardtop can result in water reaching the
vehicle interior. The hardtop should be dry when
lowering it into the storage compartment.
Wa r n i n g !
To prevent possible accidents, drive the vehicle
only with the hardtop either completely closed and
locked, or fully lowered into its storage
compartment.