Page 254 of 297
250 Exterior lamps
Technical
data Instruments
and controlsOperation DrivingInstrument
cluster displayPractical hintsCar care Index
To replace bulbs:
Push the locking button (1) on the rear of the lamp
support inward and swing open lamp support. Push
d ow n t h e b u l b to b e ch a n g e d , t u rn c o u n te rc l oc k w i s e a nd
remove.
Insert new bulb in socket, push in and twist clockwise.
Close lamp support.License plate lamps (5 W/4cp bulb)
Loosen both securing screws (1), remove lamp and take
out bulb.
1
P82.10-0711-26
P82.10-0712-26
1
1
Page 256 of 297
252 Remote control
Technical
data Instruments
and controlsOperation DrivingInstrument
cluster displayPractical hintsCar care Index
Change batteries, inserting new ones with plus (+) side
facing up.
Press battery cover onto housing until locked in place.Important!
Batteries contain materials that can harm the
environment if disposed of improperly. Recycling of
batteries is the preferred method of disposal. For
disposal, please follow manufacturer‘s recommendation
on battery package.
Replacement Battery:
Lithium, type CR 2025 or equivalent.
Synchronizing remote control
The system may have to be resynchronized, if the
transmitter is without voltage for several minutes.
To synchronize system, aim transmitter eye at vehicle
and briefly press transmit buttonŒ or‹ twice.
Within approx. 30 seconds insert key in steering lock
and turn it to position 2.
The remote control should once again be operational.
Page 257 of 297

253 Raising soft top manually
Technical
data Instruments
and controlsOperation DrivingInstrument
cluster displayPractical hintsCar care Index Raising soft top manually
In case of malfunction, the power soft top can also be
raised manually. This procedure should be performed
with great care by 2 persons.
A combination open-end/Allenhead wrench in the
vehicle tool kit is required for this job.
1. Open doors or lower windows.
2. Lower roll bar with roll bar switch. If the roll bar
cannot be lowered, the soft top can be carefully
guided over the roll bar.
3. For safety reasons, remove key from steering lock.
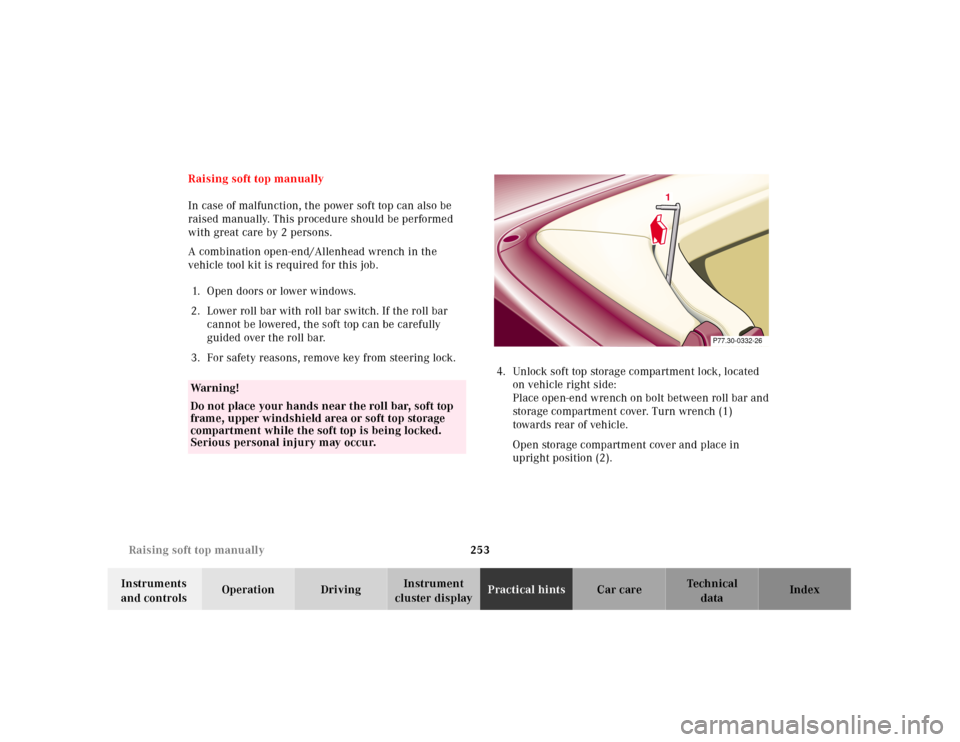
4. Unlock soft top storage compartment lock, located
on vehicle right side:
Place open-end wrench on bolt between roll bar and
storage compartment cover. Turn wrench (1)
towards rear of vehicle.
Open storage compartment cover and place in
upright position (2).
Wa r n i n g !
Do not place your hands near the roll bar, soft top
frame, upper windshield area or soft top storage
compartment while the soft top is being locked.
Serious personal injury may occur.
P77.30-0332-26
1
Page 259 of 297
255 Raising soft top manually
Technical
data Instruments
and controlsOperation DrivingInstrument
cluster displayPractical hintsCar care Index 9. Pivot sun visors to side. Remove left and right
caps (6).10. Using Allen-head wrench, lock left and right of soft
top frame (5) to windshield header - turn wrench in
3 stages towards center of vehicle:
1. Left lock to first notch.
2. Right lock to second notch.
3. Left lock to second notch.
P77.30-0336-26
5
Page 260 of 297
256 Raising soft top manually
Technical
data Instruments
and controlsOperation DrivingInstrument
cluster displayPractical hintsCar care Index
11. Close storage compartment cover (2). - Lock storage
compartment lock on right side: Place open-end
wrench on bolt between roll bar and storage
compartment cover. Turn wrench (1) towards front
of vehicle.
12. Lower soft top bow (4). The rear section of the soft
top cannot be locked during manual operation.
Page 261 of 297
257 Replacing wiper blade insert
Technical
data Instruments
and controlsOperation DrivingInstrument
cluster displayPractical hintsCar care Index Replacing wiper blade insert
Windshield wiper blade
Removal:
Fold wiper a rm forward. Press safety tab down (1), push
wiper blade downward (2) and remove.
Installation:
Press down safety tab of new wiper blade. Insert wiper
b lad e between th e tabs (3) on t he w iper arm . Th en press
safety tab upward until it locks in place. Notes:
Do not open eng ine hood w it h wiper arm fold ed forward.
Do not allow the wiper arm to contact the windshield
glass without a wiper blade inserted. The glass may be
scratched or broken.
Make certain that the wiper blade is properly installed.
An improperly installed wiper blade may cause
windshield damage.
3
2
1
P82.30-0333-26
Page 263 of 297
259 Manual release of fuel filler flap
Technical
data Instruments
and controlsOperation DrivingInstrument
cluster displayPractical hintsCar care Index Manual release of fuel filler flap
The manual release knob is located behind cover (2) in
the right slide trunk panel.
In case the central locking system does not release the
fuel filler flap:
1. Unscrew wing nut (1)
2. Pull panel (2) away from trunk wall.
3. Pull the manual release knob (3) (arrow) while
simultaneously opening the fuel filler f lap.Trunk lamp
1Switching off
2Switching on
Switch off trunk lamp if the trunk is to remain open for
a long period of time. This prevents the vehicle battery
from being discharged.
When the trunk lid is closed, the switch will reset and
turn on the lamp the next time the lid is opened.
Page 268 of 297

264 Cleaning and care of the vehicle
Technical
data Instruments
and controlsOperation DrivingInstrument
cluster displayPractical hintsCar careIndex
Window cleaning
Use a window cleaning solution on all glass surfaces. An
automotive glass cleaner is recommended.
Note:
For safety reasons, switch off wiper and remove key
from steering lock before cleaning the windshield,
otherwise the wiper motor can suddenly turn on and
cause injury.
Light alloy wheels
Mercedes-Benz approved Wheel Care should be used for
regular cleaning of the light alloy wheels.
If possible, clean wheels once a week with
Mercedes-Benz approved Wheel Care, using a soft
bristle brush and a strong spray of water.
Follow instructions on container.
Note:
Use only acid-free cleaning materials. The acid could
lead to corrosion.Instrument cluster
Use a gentle dishwashing detergent or mild detergent
for delicate fabrics as a washing solution. Wipe with a
cloth moistened in lukewarm solution. Do not use
scouring agents.
Steering wheel and gear selector lever
Wipe with a damp cloth and dry thoroughly or clean
with Mercedes-Benz approved Leather Care.
Cup holder
Use a gentle dishwashing detergent or mild detergent
for delicate fabrics as a washing solution. Wipe with a
cloth moistened in lukewarm solution. Do not use
scouring agents.
Note:
For ease of cleaning, the cup holder between the front
seats can be removed by pulling it up when in its closed
position.