2000 MERCEDES-BENZ SL600 lock
[x] Cancel search: lockPage 228 of 297
224 Coolant level
Technical
data Instruments
and controlsOperation DrivingInstrument
cluster displayPractical hintsCar care Index
Adding coolant
If coolant has to be add ed, a 50/50 mix ture of water and
MB anticorrosion/antifreeze should be added.
Model SL 500
The drain plugs for the cooling system are located on
the right side of the engine block and at the bottom of
the radiator.
Model SL 600
The drain plugs for the cooling system are located on
the right and left sides of the engine block and at the
bottom of the radiator.
Anticorrosion/antifreeze, see coolants on page 280.
Wa r n i n g !
In order to avoid possible serious burns or injury:
• Use extreme caution when opening the hood if
there are any signs of steam or coolant leaking
from the cooling system, or if the coolant
temperature gauge indicates that the engine is
overheated.• Do not remove pressure cap on coolant
reservoir if engine temperature is above 194°F
(90°C). Allow engine to cool down before
removing cap. The coolant reservoir contains
hot fluid and is under pressure.• Using a rag, slowly open cap approximately 1/2
turn to relieve excess pressure. If opened
immediately, scalding hot fluid and steam will
be blown out under pressure.• Do not spill antifreeze on hot engine parts.
Antifreeze contains ethylene glycol which may
burn if it comes into contact with hot engine
parts.
Page 234 of 297
230 Tires, Wheels
Technical
data Instruments
and controlsOperation DrivingInstrument
cluster displayPractical hintsCar care Index
Changing wheelsMove vehicle to a level area which is a safe distance
from the roadway.
1. Firmly set parking brake, raise roll bar, and turn on
hazard warning f lasher.
2. Move selector lever to position “P”.
3. While engine is running, depress wheel change
switch for level control. The indicator lamp in the
sw it ch a n d t h e A D S m a l f u n c t i on i n d i c a to r l a mp l ig h t
up.
4. Turn off engine.
5. Prevent vehicle from rolling away by blocking
wheels with wheel chocks (not supplied with
vehicle) or sizable wood block or stone. When
changing a wheel on a hill, place chocks on the
downhill side blocking both wheels of the other
axl e. On a l evel road, pl ace one ch ock in front of a nd
one behind the wheel that is diagonally opposite to
the wheel being changed.
The jack is designed exclusively for jacking up the
veh icle at the jack tu bes bui lt into eith er si de of th e
vehicle. To help avoid personal injury, use the jack
only to lift the vehicle during a wheel change.
Never get beneath the vehicle while it is supported
by th e jack. Keep hands and feet away from the area
under the lifted vehicle. Always firmly set parking
brake and block wheels before raising vehicle with
jack.Do not disengage parking brake whi le th e vehic le is
raised. Be certain that the jack is always vertical
when in use, especially on hills. Always try to use
the jack on level surface. Be sure that the jack arm
is fully inserted in the jack tube. Always lower the
vehicle onto sufficient capacity jackstands before
working under the vehicle.Before working on the vehicle, e.g. when changing
wheels, the roll bar should be raised with the
switch, and the key be removed from the steering
lock, to prevent possible injury.
Page 240 of 297
236 Battery
Technical
data Instruments
and controlsOperation DrivingInstrument
cluster displayPractical hintsCar care Index
Battery
Important!
Battery replacement information:
The maintenance-free battery is located in the trunk
behind the right side cover panel.
The service life of the battery is dependent on its
condition of charge. The battery should always be kept
sufficiently charged, in order to last an optimum length
of time.Therefore, we strongly recom mend that you h ave the
battery charge checked frequently, and corrected if
necessary, especially if you use the vehicle less than
approximately 200 miles (300 km) per month,
mostly for sh ort di stance trips, or if it is not u sed for
long periods of time.
Only charge a battery with a battery charger after the
battery has been disconnected from the vehicle’s
electrical circuit.
Always disconnect the battery negative lead first and
connect last.
When removing and connecting the battery, always
make sure that all electrical consumers are off and the
key is in steering lock position 0. The battery must
always be securely installed when the vehicle is in
operation. During removal and installation always
protect the disconnected battery positive (+) terminal
with the cover attached to the battery.
While the engine is running the battery terminal clamps
must not be loosened or detached, otherwise the
generator and other electronic components will be
damaged.
Important!
Wa r n i n g !
Failure to follow these instructions can result in
severe injury or death.Never lean over batteries w hile connecting, you
might get injured.Battery fluid contains sulfuric acid. Do not allow
this fluid to come in contact with eyes, skin or
cloth ing. In c ase it does, imm edi ately f lu sh af fec ted
area with water and seek medical help.A battery will also produce hydrogen gas, which is
flammable and explosive. Keep flames or sparks
away from battery, avoid improper connection of
jumper cables, smoking etc.
Page 241 of 297

237 Battery
Technical
data Instruments
and controlsOperation DrivingInstrument
cluster displayPractical hintsCar care Index Do not close a door with the windows fully closed while
the power supply is interrupted (battery disconnected or
empty).
Doing so could damage the window frame.
Note:
After reconnecting the battery also set the clock,
resynchronize the express feature of the power
windows, the electronic stability program (ESP) and the
adaptive damping System (ADS).
See page 79 for setting clock, page 41 for power
windows, page 193 for ESP and page 199 for ADS. Battery Recycling
Batteries contain materials that can harm the
environment with improper disposal.
Large 12 Volt storage batteries contain lead.
Recycling of batteries is the preferred method of
disposal.
Many states require sellers of batteries to accept old
batteries for recycling.
Page 245 of 297
241 Towing the vehicle
Technical
data Instruments
and controlsOperation DrivingInstrument
cluster displayPractical hintsCar care Index The vehicle may be towed with all wheels on the ground
and the selector lever in position “N” for distances up to
30 miles (50 km) and at a speed not to exceed 30 mph
(50 km/h). The key must be in steering lock position 2.
To be certain to avoid a possibility of damage to the
transmission, however, we recommend the drive shaft
be disconnected at the rear axle drive f lange for any
towing beyond a short tow to a nearby garage.
Do not tow with sling-type equipment. Towing with
sling-type equipment over bumpy roads will damage
radiator and supports.
The use of wheel lift equipment will damage engine oil
pan.
Important!
When towing the vehicle, please, note the following:
With the automatic central locking activated and the
key in steering lock position 2, the vehicle doors lock if
the left front wheel as well as the right rear wheel are
tu rning a t veh ic le speeds of approx . 9 mph (15 k m/h) or
more.
To prevent the vehicle door locks from locking,
deactivate the automatic central locking.When transporting vehicle on flat bed equipment, the
front end of the vehicle must be loaded first. Additional
ramping may be required for loading to protect bumper
fascia.
Note:
To signal turns while being towed with hazard warning
f lash er in u se, turn key in steering l ock to position 2 a nd
activate combination switch for left or right turn signal
in usual manner – only the selected turn signal will
operate.
Upon canceling the turn signal, the hazard warning
f lasher will operate again.
Wa r n i n g !
With the engine not running, there is no power
assistance for the braking and steering systems. In
this case, it is important to keep in mind that a
considerably higher degree of effort in necessary to
brake and steer the vehicle.
Page 248 of 297
244 Exterior lamps
Technical
data Instruments
and controlsOperation DrivingInstrument
cluster displayPractical hintsCar care Index
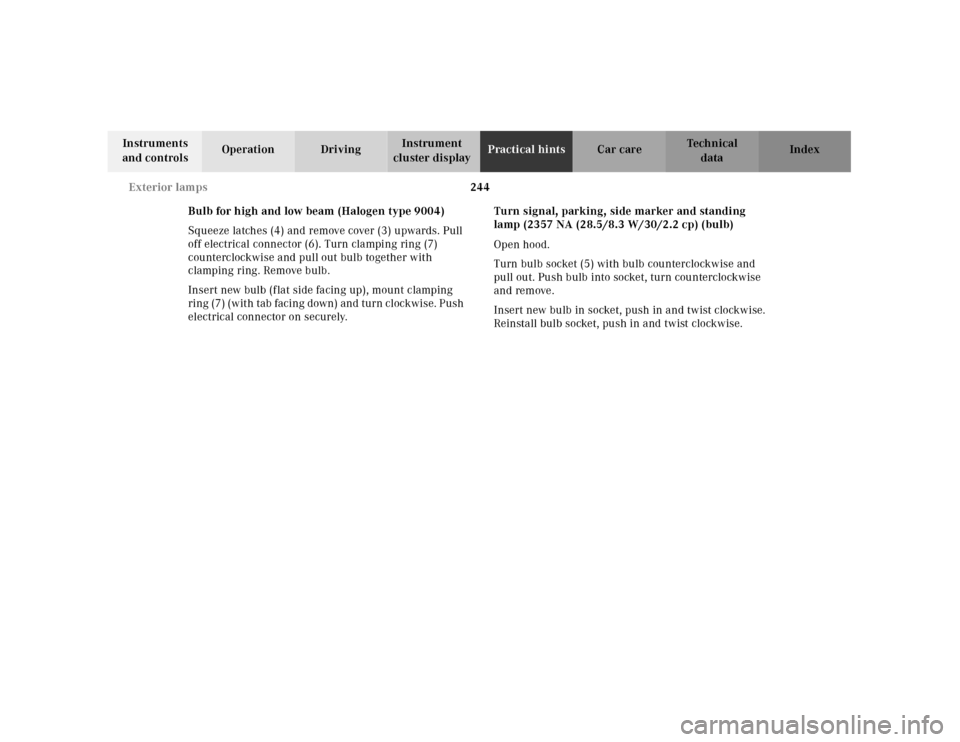
Bulb for high and low beam (Halogen type 9004)
Squeeze latches (4) and remove cover (3) upwards. Pull
off electrical connector (6). Turn clamping ring (7)
counterclockwise and pull out bulb together with
clamping ring. Remove bulb.
Insert new bulb (flat side facing up), mount clamping
ring (7) (w it h tab facing down) and turn cl ockwise. Push
electrical connector on securely.Turn signal, parking, side marker and standing
lamp (2357 NA (28.5/8.3 W/30/2.2 cp) (bulb)
Open hood.
Turn bulb socket (5) with bulb counterclockwise and
pull out. Push bulb into socket, turn counterclockwise
and remove.
Insert new bulb in socket, push in and twist clockwise.
Reinstall bulb socket, push in and twist clockwise.
Page 251 of 297
247 Exterior lamps
Technical
data Instruments
and controlsOperation DrivingInstrument
cluster displayPractical hintsCar care Index Adjusting headlamp aim
Correct headlamp adjustment is extremely important.
To check and readjust a headlamp, follow steps 1
through 7. Please note:
• Adjustments to low beam simultaneously aim the
high beam.
• Vehicle should have a normal trunk load.
• Vertical aim adjustments change horizontal aim.1. Park vehicle on level surface approximately 25 ft.
(7.6 m) from a vertical test screen or wall. The
centerline of the vehicle must be at a 90° angle to
the test screen.
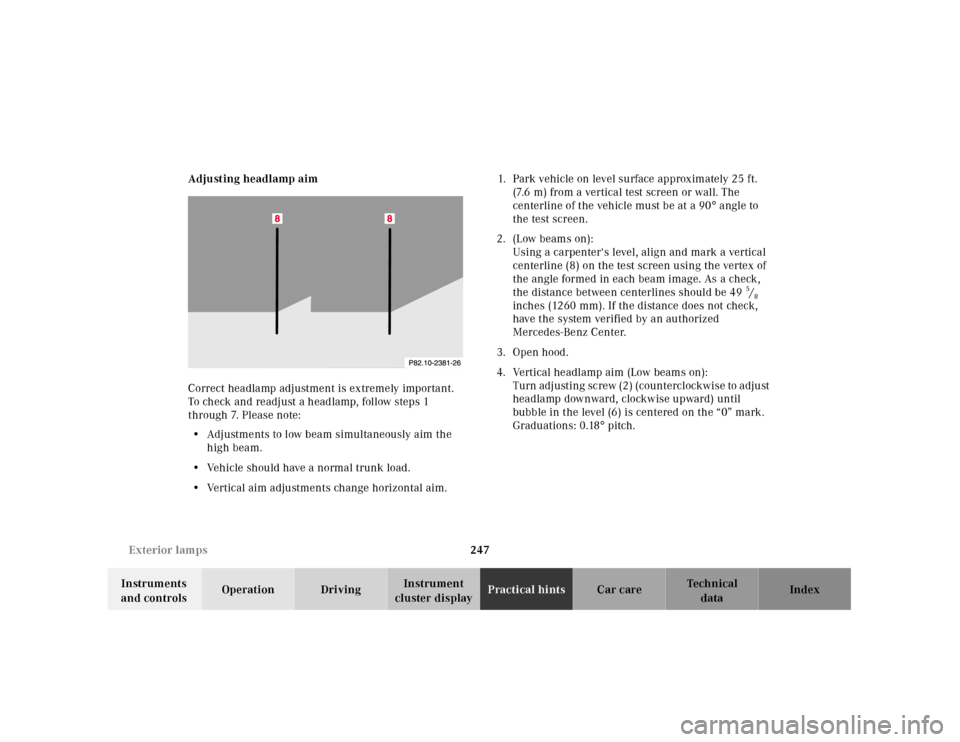
2. (Low beams on):
Using a carpenter‘s level, align and mark a vertical
centerline (8) on the test screen using the vertex of
the angle formed in each beam image. As a check,
the distance between centerlines should be 49
5/8
inches (1260 mm). If the distance does not check,
have the system verified by an authorized
Mercedes-Benz Center.
3. Open hood.
4. Vertical headlamp aim (Low beams on):
T u rn a d j u st i n g sc re w ( 2 ) ( c o u n t e rc l oc k w i s e to a d j u st
headlamp downward, clockwise upward) until
bubble in the level (6) is centered on the “0” mark.
Graduations: 0.18° pitch.
Page 252 of 297
248 Exterior lamps
Technical
data Instruments
and controlsOperation DrivingInstrument
cluster displayPractical hintsCar care Index
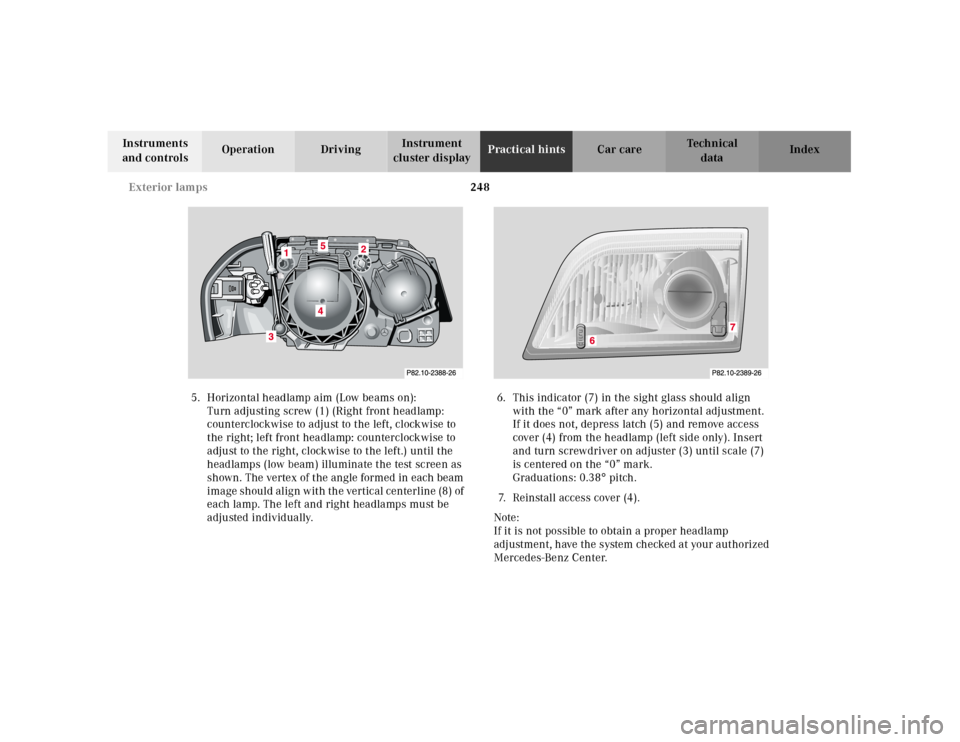
5. Horizontal headlamp aim (Low beams on):
Turn adjusting screw (1) (Right front headlamp:
counterclockwise to adjust to the left, clockwise to
the right; left front headlamp: counterclockwise to
adjust to the right, clockwise to the left.) until the
headlamps (low beam) illuminate the test screen as
shown. The vertex of the angle formed in each beam
image should align with the vertical centerline (8) of
each lamp. The left and right headlamps must be
adjusted individually.6. This indicator (7) in the sight glass should align
with the “0” mark after any horizontal adjustment.
If it does not, depress latch (5) and remove access
cover (4) from the headlamp (left side only). Insert
and turn screwdriver on adjuster (3) until scale (7)
is centered on the “0” mark.
Graduations: 0.38° pitch.
7. Reinstall access cover (4).
Note:
If it is not possible to obtain a proper headlamp
adj ustment, h ave the system ch ecked a t your a ut horized
Mercedes-Benz Center.