Page 259 of 341
256 Fuses
Te ch n ica l
data Instruments
and controlsOperation DrivingInstrument
cluster displayPractical hintsCar care Index
2Auxiliary fuse box below rear seat bench
To gain access, remove rear seat bench.
See page 294.3Auxiliary fuse box to left of exterior lamp switch
To again access, open door, pry off cover and
remove.
Page 270 of 341

267 Tires, Wheels
Te ch n ica l
data Instruments
and controlsOperation DrivingInstrument
cluster displayPractical hintsCar care Index Rotating wheels
Rotation of wheels does not apply to model E 55 AMG
with summer tires.
The wheels can be rotated according to the degree of
tire wear while retaining the same direction of travel.
Rotating, however, should be carried out at as
recommended by the tire manufacturer, before the
characteristic tire wear pattern (shoulder wear on front
wheels and tread center wear on rear wheels) becomes
visible, as otherwise the driving properties deteriorate.
Important!
Unidirectional tires must always be mounted with arrow
on tire sidewall pointing in direction of vehicle forward
movement.Notes:
Thoroughly clean the inner side of the wheels any time
you rotate the wheels or wash the vehicle underside.
The use of retread tires is not recommended. Retread
tires may adversely affect the handling characteristics
and safety of the vehicle.
Dented or bent rims can cause tire pressure loss and
dam age to t he tire bead s. For this reason, ch eck rims for
damage at regular intervals. The rim flanges must be
checked for wear before a tire is mounted. Remove
burrs, if any.
Check and ensure proper tire inflation pressure after
rotating the wheels. For tire inflation pressure see
page 276.
Page 275 of 341
272 Tires, Wheels
Te ch n ica l
data Instruments
and controlsOperation DrivingInstrument
cluster displayPractical hintsCar care Index
4. Using the wrench, loosen but do not yet remove the
wheel bolts.5. Remove the protective cover from the jack support
tube opening by inserting the screwdriver (supplied
in the tool kit) in the opening and prying it out.
The tube openings are located directly behind the
front wheel housings and in front of the rear wheel
housings.
P40.10-2132-26
Page 280 of 341

277 Battery
Te ch n ica l
data Instruments
and controlsOperation DrivingInstrument
cluster displayPractical hintsCar care Index If a tire constantly loses air, it should be inspected for
damage.
The spare tire should be checked periodically for
condition and inflation. Spare tire will age and become
worn over time even if never used, and thus should be
inspected and replaced when necessary.Battery
Important!
Battery replacement information:
The maintenance-free battery is located under the rear
seat cushion. To minimize the chance for acid leakage
which could cause severe burns during a crash or
rollover, a special acid leakage resistant battery was
factory installed. A replacement battery for the vehicle
Wa r n i n g !
Do not overinflate tires. Overinflating tires can
result in sudden deflation (blowout) because they
are more likely to become punctured or damaged
by road debris, potholes etc.. Follow recommended
inflation pressures.Do not overload the tires by exceeding the specified
vehicle capacity weight (as indicated by the label
on the driver’s door latch post). Overloading the
tires can overheat them, possibly causing a
blowout.
Wa r n i n g !
Failure to follow these instructions can result in
severe injury or death.Never lean over batteries while connecting, you
might get injured.Battery fluid contains sulfuric acid. Do not allow
this fluid to come in contact with eyes, skin or
clothing. In case it does, immediately flush affected
area with water and seek medical help if necessary.A battery will also produce hydrogen gas, which is
flammable and explosive. Keep flames or sparks
away from battery, avoid improper connection of
jumper cables, smoking etc..
Page 285 of 341

282 Towing the vehicle
Te ch n ica l
data Instruments
and controlsOperation DrivingInstrument
cluster displayPractical hintsCar care Index
Tow in g t h e ve hic l e
Important!
When towing the vehicle, please, note the following:
With the automatic central locking activated and the
electronic key in steering lock position 2, the vehicle
d oors l ock if th e l ef t front w heel as well as t he righ t rear
wheel are turning at vehicle speeds of approximately
9 mph (15 km / h) or more.
To prevent the vehicle door locks from locking,
deactivate the automatic central locking.
The rear towing eye is located at the right, below the
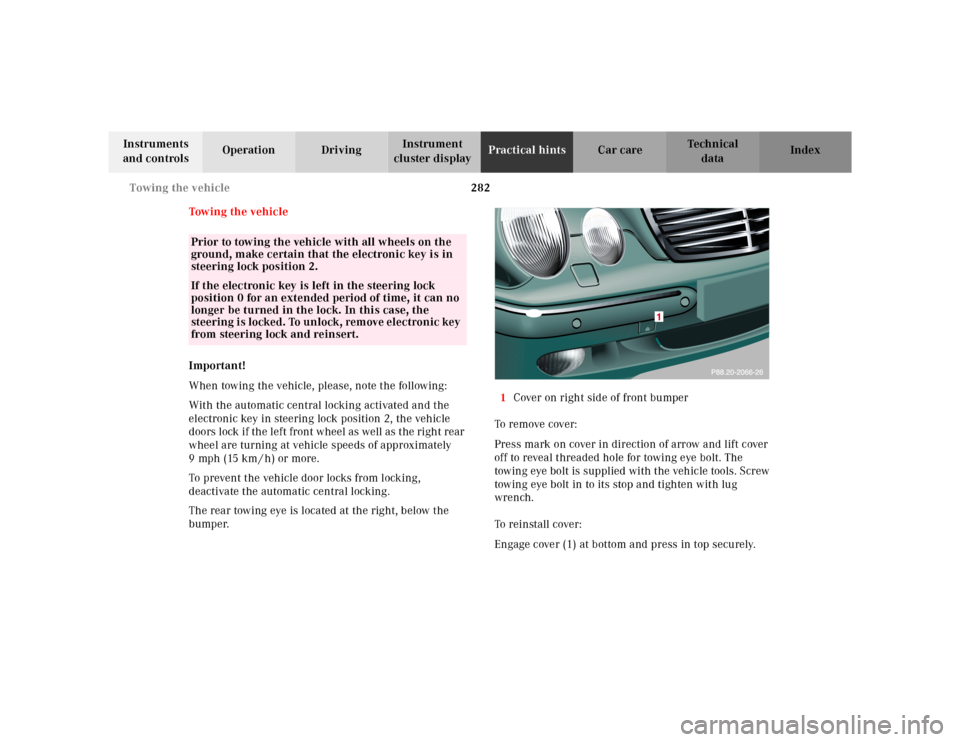
bumper.1Cover on right side of front bumper
To remove cover:
Press mark on cover in direction of arrow and lift cover
off to reveal threaded hole for towing eye bolt. The
towing eye bolt is supplied with the vehicle tools. Screw
towing eye bolt in to its stop and tighten with lug
wrench.
To reinstall cover:
Engage cover (1) at bottom and press in top securely.
Prior to towing the vehicle with all wheels on the
ground, make certain that the electronic key is in
steering lock position 2.If the electronic key is left in the steering lock
position 0 for an extended period of time, it can no
longer be turned in the lock. In this case, the
steering is locked. To unlock, remove electronic key
from steering lock and reinsert.
Page 286 of 341

283 Towing the vehicle
Te ch n ica l
data Instruments
and controlsOperation DrivingInstrument
cluster displayPractical hintsCar care Index We recommend that the vehicle be transported using
flat bed equipment. This method is preferable to other
types of towing.
The vehicle may be towed with all wheels on the ground
and the selector lever in position “N” for distances up to
30 miles (50 km) and at a speed not to exceed 30 mph
(50 km / h). The electronic key must be in steering lock
position 2.
To be certain to avoid a possibility of damage to the
transmission, however, we recommend the drive shaft
be disconnected at the rear axle drive f lange for any
towing beyond a short tow to a nearby garage.
Do not tow with sling-type equipment. Towing with
sling-type equipment over bumpy roads will damage
radiator and supports.
Use wheel lift, dolly, or flat bed equipment, with
electronic key in steering lock turned to position 0.Note:
To signal turns while being towed with hazard warning
flasher in use, turn electronic key in steering lock to
position 2 and activate combination switch for left or
right turn signal in usual manner – only the selected
turn signal will operate.
Upon canceling the turn signal, the hazard warning
flasher will operate again.
Caution!
If the vehicle is towed with the front axle raised, the
engine must be shut off (electronic key in steering lock
position 0 or 1). Otherwise, the ESP will immediately be
engaged and will apply the rear wheel brakes. Switch off
t h e tow - aw ay a lar m a s we l l as t he ES P .
Wa r n i n g !
With the engine not running, there is no power
assistance for the braking and steering systems. In
this case, it is important to keep in mind that a
considerably higher degree of effort is necessary to
brake and steer the vehicle.
Page 292 of 341
289 Exterior lamps
Te ch n ica l
data Instruments
and controlsOperation DrivingInstrument
cluster displayPractical hintsCar care Index Taillamp assemblies
Open trunk lid.
Swing cover aside.
1Turn signal lamp (21 W / 24 cp bulb)
2Stop, tail and parking lamp (21 / 4 W bulb)
3Tail, parking and side marker lamp (5 W / 4 cp bulb)4Driver’s side:
Rear fog lamp (21 W / 32 cp bulb)
5Backup lamp (21 W / 32 cp bulb)
Twist bulb socket counterclockwise and pull out. Push
bulb into socket, turn counterclockwise and remove.
Insert new bulb in socket, push in and twist clockwise.
Reinstall bulb socket.
P82.10-2204-26
1
2
3
Page 297 of 341
294 Rear seat cushion
Te ch n ica l
data Instruments
and controlsOperation DrivingInstrument
cluster displayPractical hintsCar care Index
Rear seat cushionRemoval:
Pull locking tabs up (on left and right side of seat) and
lift seat at the front.
Installation:
Guide seat belt buckles through openings in seat
cushion. Slide rear edge of cushion under the backrest
as far as it will go, and push front of cushion down until
it locks in place.
Caution!
Watch out for sharp edges when removing or installing
the rear seat cushion, and make sure that it is securely
locked in place again, to prevent personal injury.
P91.12-2193-26